


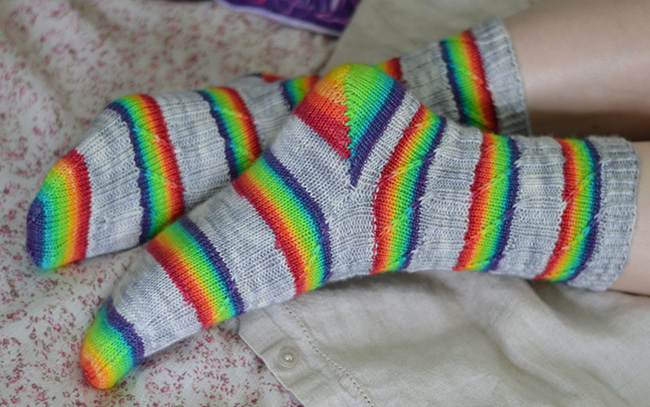
Farrago, a free knitting pattern from Knitty.com. Free knitting pattern for a slipped-stitch sock.
INTRODUCTION
Farrago
 by Becky Wilkins

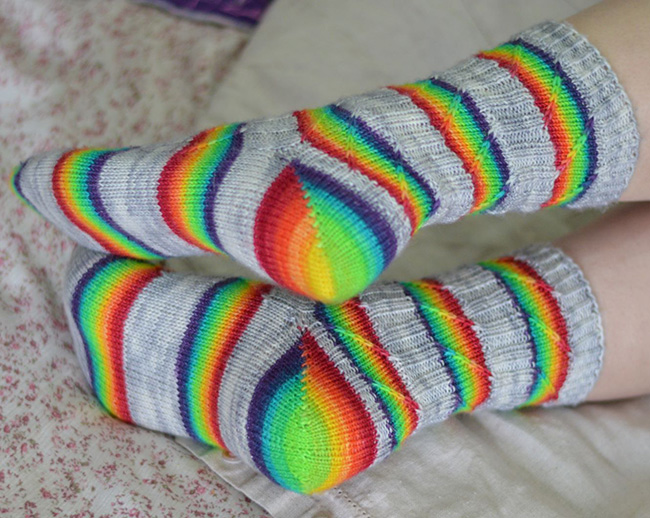
A Farrago is a confused mixture – did you know that? I learn the coolest words when naming patterns.
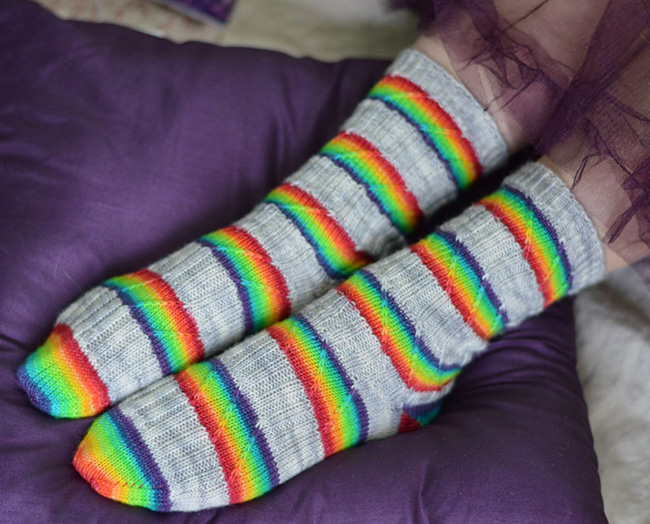
This pattern is inspired by the yarn. I wanted a design that highlighted the rainbows and wouldn't slip down my leg. This led to the combo of slipped stitches creating slanting rainbows while the ribbing does all the work of making the sock cuff functional.
 model + photos: Becky Wilkins


SIZE
Adult S[M, L, XL]
FINISHED MEASUREMENTS
Cuff Circ: 6.25[7, 8, 9] inches/ 16[18, 20.5, 22.5] cm
Note: Socks are intended to be worn with approx. .5-1 inch/1.5-2.5 cm of negative ease
MATERIALS
Yarn
![]() White Birch Fiber Arts [80% superwash merino, 20% nylon; 400yds per 100g skein]; color: Rainbow Warrior
White Birch Fiber Arts [80% superwash merino, 20% nylon; 400yds per 100g skein]; color: Rainbow Warrior
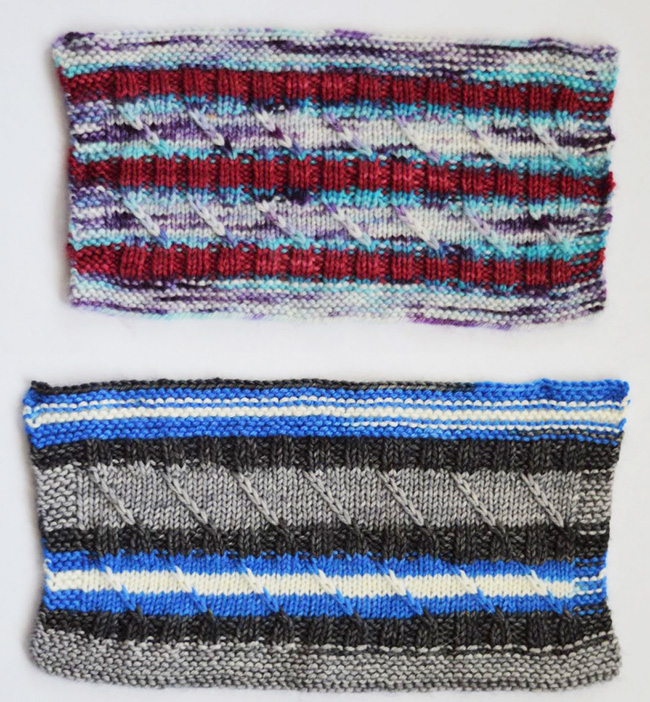
Swatch colorway samples:
Recommended needle size
[always use a needle size that gives you the gauge listed below - every knitter's gauge is unique]
![]() US #1/2.25mm for small circumference in the round: traditional or flexible DPNs, 1 long or 2 short circulars as you prefer
US #1/2.25mm for small circumference in the round: traditional or flexible DPNs, 1 long or 2 short circulars as you prefer
Notions
![]() yarn needle
yarn needle
![]() scrap yarn for holding heel sts
scrap yarn for holding heel sts
![]() cable needle (optional)
cable needle (optional)
![]() stitch markers (optional)
stitch markers (optional)
GAUGE
32 sts/52 rnds = 4 inches/10 cm in stockinette stitch
36 sts/48 rnds = 4 inches/10 cm in ribbing
PATTERN NOTES
[Knitty's list of standard abbreviations and techniques can be found here.]
This pattern works best if you change stitch patterns between sections when the colors change. The slip stitch pattern is more fun when it blends colors while the ribbing is worked in a more solid portion of the colorway. I used the slip stitch pattern for the rainbow where the stripe color changes almost every round. Meanwhile the ribbing is worked in the semi-solid gray.
In the Biscotte Yarn Lighthouse colorway swatch (below, top): I used the dark blue and red segments for the ribbing and the variegated segments for the slip stitch pattern. In this colorway you could easily include the dark blue in the slip stitch pattern, however I wanted enough ribbing to keep the cuff from sagging.
In the String Theory Observer Effect colorway swatch (below, bottom): I knit the ribbing with the dark gray and the slip stitch pattern using the narrow blue and white stripes and the wider gray stripe.
There are many self striping yarns. You'll need to swatch to see what you like best.
For the 64 sts size, I found that approximately one arms' length of yarn was enough for one round. So if I had less than an arms' length of one color segment I could decide if I wanted to change stitch patterns this round or the next one. I also rewound the yarn so I could have the rainbows going in opposite directions on the two socks.
I do provide standard sock directions with counted rounds if you're working this pattern in a non-striping colorway.
Left Leg Slip Stitch PatternRnd 1: [C2L, k6] around.
Rnd 2 (and all even rnds): Knit.
Rnd 3: [K1, C2L, k5] around.
Rnd 5: [K2, C2L, k4] around.
Rnd 7: [K3, C2L, k3] around.
Rnd 9: [K4, C2L, k2] around.
Rnd 11: [K5, C2L, k1] around.
Rnd 13: [K6, C2L] around.
Rnd 15: K1, [K6, C2L] around. Note that on the last repeat, the C2L is worked over the end of the round.
Right Leg Slip Stitch Pattern
Rnd 1: K1, [K6, C2R] around. Note that on the last repeat, the C2R is worked over the end of the round.
Rnd 2 (and all even rnds): Knit.
Rnd 3: [K6, C2R] around.
Rnd 5: [K5, C2R, k1] around.
Rnd 7: [K4, C2R, k2] around.
Rnd 9: [K3, C2R, k3] around.
Rnd 11: [K2, C2R, k4] around.
Rnd 13: [K1, C2R, k5] around.
Rnd 15: [C2R, k6] around.
Left Foot Slip Stitch Pattern
Rnd 1: [C2L, k6] across.
Rnd 2 (and all even rnds): Knit.
Rnd 3: [K1, C2L, k5] across.
Rnd 5: [K2, C2L, k4] across.
Rnd 7: [K3, C2L, k3] across.
Rnd 9: [K4, C2L, k2] across.
Rnd 11: [K5, C2L, k1] across.
Rnd 13: [K6, C2L] across.
Rnd 15: K1, [K6, C2L] across.
Right Foot Slip Stitch Pattern
Rnd 1: [K6, C2R] across.
Rnd 2 (and all even rnds): Knit.
Rnd 3: [K5, C2R, k1] across.
Rnd 5: [K4, C2R, k2] across.
Rnd 7: [K3, C2R, k3] across.
Rnd 9: [K2, C2R, k4] across.
Rnd 11: [K1, C2R, k5] across.
Rnd 13: [C2R, k6]. across
Rnd 15: K1, [K6, C2R] across.
Cable Stitches
I find working the slipped stitches without the cable needle goes much faster, but it does require a little finagling and confidence. I'm providing directions for both techniques.
C2L with cable needle: Sl next st purlwise to cable and hold to front, k next st, sl held st to right needle without working it.
C2L without cable needle: Reach right needle tip behind left and knit the second st on the left needle. Drop two sts off left needle, reach left tip in front of work and pick up unknit st. Place on right needle without working.C2R with cable needle: Sl st to cable needle and hold to back, sl next st purlwise without working it, knit st from CN.
C2R without cable needle: Reach right needle tip in front of left and pick up the second st on the needle. Drop two sts off left needle, reach left tip behind work and pick up unknit st. Knit this st.
Grafting:
Instructions for grafting can be found here and here.
DIRECTIONS
Cuff
Wind yarn so you are starting at the beginning of a solid section of color. For sock cuffs I cast on around two needles at the same time. Slide the extra out once your cast on is complete and the stitches are loose and make for a stretchy cuff. Using the Long-Tail method, CO 56[64, 72, 80] sts. Distribute sts across needles as you prefer and join for working in the round.
Cuff Ribbing: [K1tbl, p1] around.
Work for 10[9, 8, 7] rnds total, or to end of solid color.
Slip Stitch Section
Next round: Work appropriate Leg Slip Stitch Pattern around.
Work in pattern for 19[16, 15, 13] rnds total or to end of rainbow color.
Ribbing Section
Rnd 1: [K2, p2] around.
Work in pattern for 16[14, 12, 11] rnds total or to end of solid color.
Work [Slip Stitch Section followed by Ribbing Section] 1[1, 2, 2] times more, and work Slip Stitch Section once more.
Heel placement
Work 1[7, 1, 3] rnds of ribbing, and work 1 more round ending 1 st before end of rnd (can be adjusted to tweak leg length.)
Next rnd: With scrap yarn k 28[32, 36, 40] sts for heel, slip all sts back to left needle and with working yarn knit these stitches again. P1, [k2, p2] to last 3 sts, k2, p1.
Foot Ribbing Section
Ribbing Rnd: K 28[32, 36, 40] , p1, [k2, p2] to last 3 sts, k2, p1.
Work in pattern for 14[6, 10, 7] rnds total or until end of solid color.
Foot Slip Stitch Section
K 30[32, 38, 40] , work appropriate Foot Slip Stitch Pattern 3[4, 4, 5] times, k 2[0, 2, 0] .
Work in pattern for 19[16, 15, 13] rnds total or until end of rainbow color.
Continue Ribbing Sections and Slip Stitch Sections until piece measures 2.5[3, 3.5, 4] inches/ 6.5[7.5, 8.5, 9.5] cm less than your desired length, from scrap yarn position. For my sample I ended with a ribbed section so the rainbow toe matches the rainbow heel. This is not necessary for fit, only aesthetics.
Toe
Rnd 1, decrease: [K1, k2tog, k to 3 sts before end of half, ssk, k1] twice.
Rnd 2: Knit.
Repeat Rnds 1-2 5[6, 7, 8] times more. 32[36, 40, 44] sts rem.
Work Rnd 1 4[5, 6, 7] times. 16 sts rem.
Break yarn leaving a long tail for grafting – I left about an arm's length as this is relatively easy to pull through in a single motion and leaves no danger of running short. Arrange sts on two needles and using Kitchener stitch, graft the toe closed.
Afterthought Heel
Wind yarn so you are starting with a rainbow section of color.
Carefully remove scrap yarn and place live stitches on needles. You will have 28[32, 36, 40] sts along the leg edge and 27[31, 35, 39] sts along the foot edge. Pick up one more stitch on the foot edge. Place foot sts on holder or spare needle. With RS facing, rejoin yarn at start of leg-side sts.
Decreasing Short Rows
Short row 1 [RS]: K 27[31, 35, 39] , w&t.
Short row 2 [WS]: p 26[30, 34, 38] , w&t.
Short row 3: K to 1 before previously wrapped st, w&t.
Short row 4: P to 1 before previously wrapped st, w&t.
Repeat Short rows 3-4 until 6[8, 8, 10] sts rem unwrapped in the center.
Increasing Short Rows
Short row 1 [RS]: K to wrapped st, pick up wrap and work together with wrapped st, w&t creating a double wrapped stitch.
Short row 2 [WS]: P to wrapped st, pick up wrap and work together with wrapped st. w&t creating a double wrapped st.
Repeat Increasing Short rows 1-2 until 1 wrapped st rems on each side.
Next row [RS]: K up to wrapped st, pick up wrap and work together with wrapped st, turn.
Next row [WS]: P to wrapped st, pick up wrap and work together with wrapped st, turn.
Break yarn leaving a long tail (approximately an arm's length) for grafting.
Arrange sts on two needles and using Kitchener stitch, graft the heel stitches to the foot stitches.
FINISHING
Weave in all ends, use tails from the heel to close up any gaps at the corners. Wash, to block.
ABOUT THE DESIGNER
 Becky Wilkins lives in central Vermont with a house full of kids and animals. When not solving crime she likes to hike, knit, bake, garden, spin, and do yoga. She is well aware that she may be a cliché - but hey, it's fun. One of her favorite things about living in Vermont is that at least once in August it'll be cold enough for a sweater.
Find Becky on Ravelry / Instagram / Twitter as BeckyinVT. Contact her with support questions.
Pattern & images © 2020 Becky Wilkins.