


Lunar Love, a free knitting pattern from Knitty.com.
INTRODUCTION
Lunar Love
 by Stephanie Shiman

I've always loved the look of intarsia projects—but never was it something I was going to do. It goes against everything I know about working with yarn—cut my precious yarn into little pieces, let it hang in tangles on the backside? Horrors!
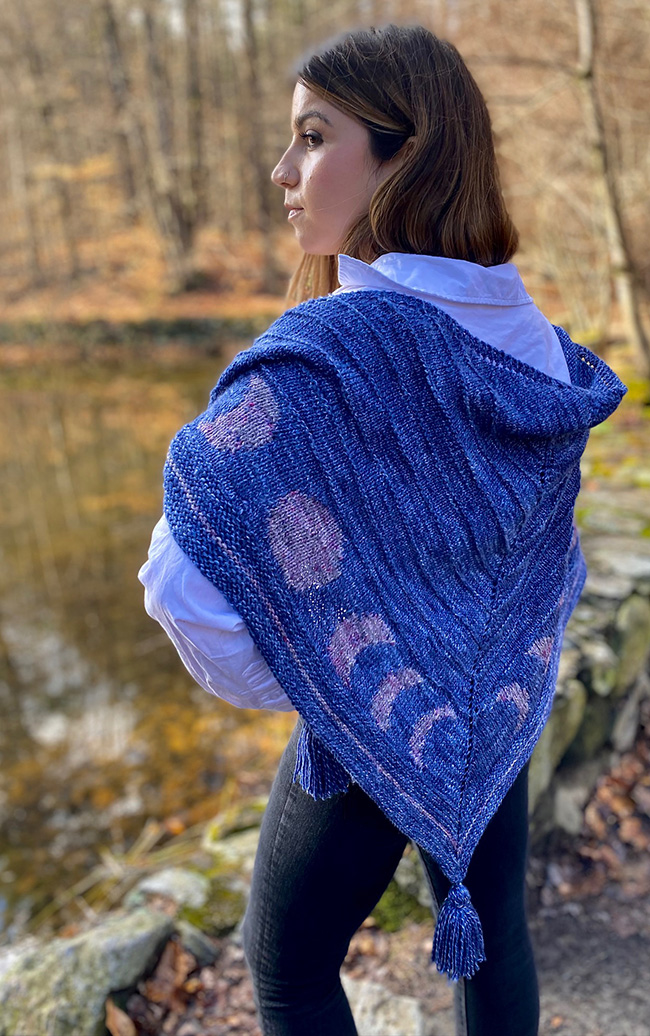
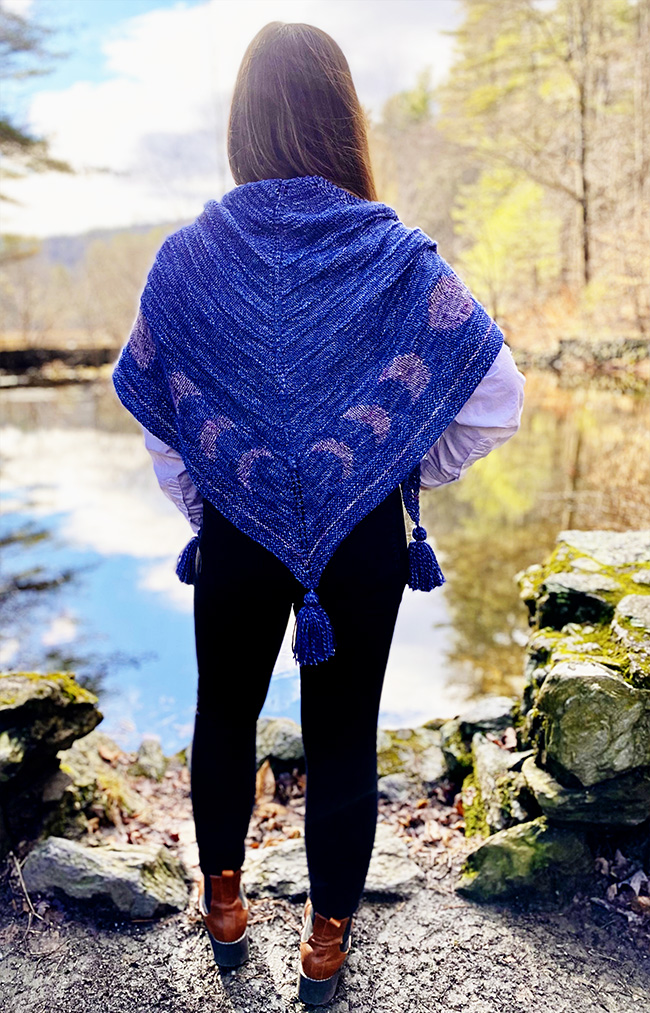
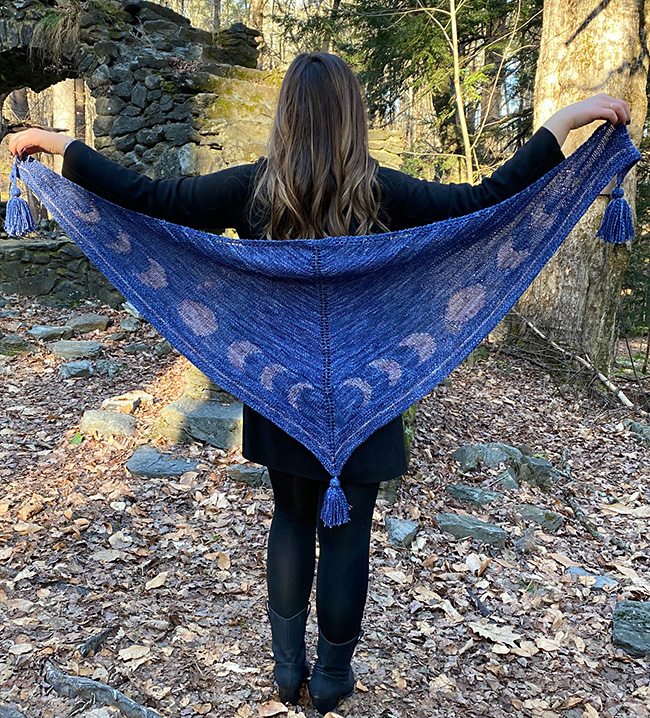
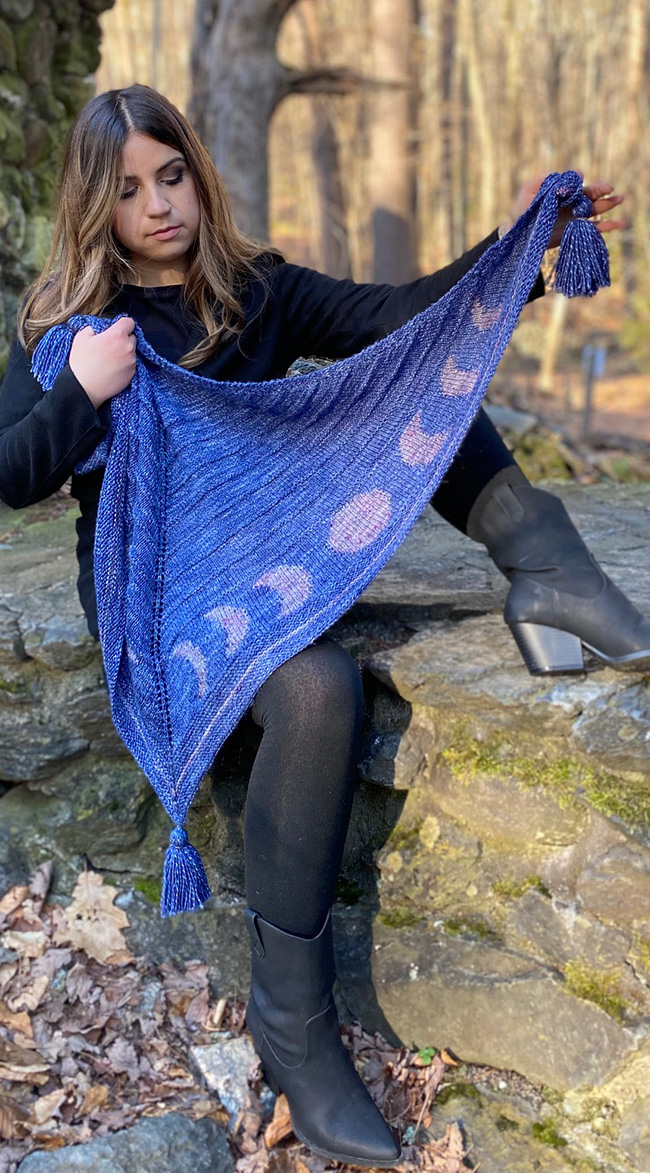
I had been pondering what to knit for the next issue of Knitty when I saw this lovely blue yarn sitting on a table in the studio, practically begging me to knit with it. The shiny wrap of silk against the dark blue reminded me of twinkling stars and I knew it really wanted to be a shawl with colorwork moon phases. It really did, even if that meant intarsia.
First, I called my LYS to see if she had the little plastic bobbin things I had seen for colorwork. She told me nah—you don't want those. Kaffe Fassett's method is just to let it hang—the pieces aren't that long, they don't really tangle. Just comb your fingers through them now and again, it'll be fine.
I had already knit up to the point I wanted to start the colorwork and I *really* wanted a moon phases shawl, so I started my first intarsia adventure.
Here's what I learned: Intarsia is actually really satisfying. The chart is way easier to follow than you'd expect—you only need to note where a stitch is added or subtracted from the moons, and most of that happens in the first few and the last few rows. Make note of the rows that are the same as the one before (10-16). The yarn pieces don't really tangle if you keep them less than a few yards. I mean, they're a mess, for sure, but you just gently pull a strand out of the mess and keep going. When you do pull out a strand—be sure to support the yarn at the knitting so you aren't pulling the previous stitches too tight. Take care to keep things loose at the color changes to avoid puckering, twist yarns around each other when changing colors. And, best of all, when you're finished if you realize you've missed a stitch here or there, just take a sharpie and "adjust" it. Weave in the ends to hide any other blemishes and done. My first intarsia project isn't perfect, but I'm so pleased to have taken the plunge!
 model: Tia Auger
photos: Grace Stamper


SIZE
One
FINISHED MEASUREMENTS
Wingspan: 64 inches/162.5 cm Depth at center point: 26 inches/66 cm
MATERIALS
Yarn
Wonderland Yarns, Silk Twist [72% fine superwash merino, 28% mulberry silk; 250 yds/229m per 3.5 oz/100g skein];
![]() [MC] Stormwind; 3 skeins; Note: If you do the final garter border and (optional) tassels with CC, you only need 2 skeins of MC.
[MC] Stormwind; 3 skeins; Note: If you do the final garter border and (optional) tassels with CC, you only need 2 skeins of MC.
![]() [CC] Moonbeams; 1 skein
[CC] Moonbeams; 1 skein
Yarn Characteristics
![]() The Silk Twist yarn is a soft DK-weight wool that has been wrapped with a strand of silk. The silk randomly catches the light on the tonal background which gives it a bit of a handspun look. I chose a slightly variegated yarn (that wasn't too busy) for the moons to add depth. The CC colorway has specks of a dark blue which ties the two colors together nicely. Contrast is important here, but it doesn't have to be stark. A plied wool or wool-blend yarn with some loft and bounce to it will be the most forgiving and easiest to work with.
The Silk Twist yarn is a soft DK-weight wool that has been wrapped with a strand of silk. The silk randomly catches the light on the tonal background which gives it a bit of a handspun look. I chose a slightly variegated yarn (that wasn't too busy) for the moons to add depth. The CC colorway has specks of a dark blue which ties the two colors together nicely. Contrast is important here, but it doesn't have to be stark. A plied wool or wool-blend yarn with some loft and bounce to it will be the most forgiving and easiest to work with.
Recommended needle size
[always use a needle size that gives you the gauge listed below - every knitter's gauge is unique]
![]() 1 US #6/4mm circular needle, 30 inch/75 cm or longer
1 US #6/4mm circular needle, 30 inch/75 cm or longer
![]() 1 US #7-9/4.5-5.5mm needle, for binding off
1 US #7-9/4.5-5.5mm needle, for binding off
Notions
![]() stitch marker
stitch marker
![]() scissors
scissors
![]() something rigid for wrapping tassels (optional)
something rigid for wrapping tassels (optional)
![]() yarn needle
yarn needle
GAUGE
18 sts/24 rows = 4 inches/10 cm in stockinette stitch
PATTERN NOTES
[Knitty's list of standard abbreviations and techniques can be found here.]
When following the chart, note that most of the action takes place at the top and bottom of the chart, the in-between is pretty simple. While I have charted the full set of phases, you can follow the chart to the center of the full moon and then follow that same row back to the start, as the chart is symmetrical.
Construction method: The shawl is worked top-down, beginning with a garter tab cast-on. The moons are created using intarsia.
Techniques:
There are two ways to work the chart. One method is a hybrid intarsia using individual strands of CC for each moon and floating only 1 strand of MC across the row for working the sections between the moons. Alternately you can use individual strands of CC for each moon and individual strands of MC for the sections between the moons. This second method leaves you with more ends to weave in, but the fabric is much tidier on the back, without any floats, and is the method I'd recommend for the best result.
CHARTS
View and download CHART here
Note: the chart is large and may seem overwhelming. It's not quite as challenging as it might look: it's symmetrical and mirrored in two directions. The colour patterning on rows 13-24 is a mirror of rows 2-12, and stitches 62 onwards are a mirroring of sts 16-61.
DIRECTIONS
Shawl
With MC, CO 3 sts.
Knit 6 rows. At the end of last row, do not turn work but rotate piece 90 degrees clockwise so that the long side of the Garter rectangle is at the top. Pick up and knit 3 sts along this edge (1 st in each of the Garter ridges). Rotate piece another 90 degrees. Pick up and knit 3 sts along the CO edge. 9 sts.
Set-up row [WS]: K3, M1L, p1, pm, p1, pm, p1, M1R, k3. 11 sts.
Row 1 [RS]: K3, yo, k to marker, yo, sm, k1, sm, yo, k to last 3 sts, yo, k3. 4 sts increased.
Row 2 [WS]: K3, p to last 3 sts, k3.
Repeat Rows 1-2 , 18 more times and work Row 1 once more, until you have 91 sts, ending with a RS row.
Purl ridge [WS]: K to m, sm, p1, sm, k to end.
Ridge Section:
Work Rows 1-2 three times, work Row 1 again, then work a Purl Ridge. 16 sts increased.
Repeat Ridge Section 6 more times. 203 sts.
Intarsia Section:
Row 1 [RS]: K3, work Moon chart starting at st 1 to m, sm, k1, sm, work chart starting again at st 1 to last 3 sts, k3.
Row 2 [WS]: K3, work chart to m, sm, p1, sm, work chart again to last 3 sts, k3.
Work as set until chart is complete. 251 sts.
Garter Border:
Row 1 [RS]: K3, yo, k to marker, yo, sm, k1, yo, k to last 3 sts, k3. 4 sts increased.
Row 2: Knit.
Repeat Rows 1-2 four more times.
Leave MC attached, and with CC work Rows 1-2.
With MC work Rows 1-2 five times.
Using larger needle to work the stitches, bind off knitwise.
FINISHING
Weave in ends, using ends to tidy up color changes as needed. Soak or steam, and pin shawl out to smooth the fabric and let dry.
Make 3 tassels, one for each point.
For tassels: I wrapped MC approximately 70 times around a metal knitting needle gauge ruler (measuring about 5 inches/12.5 cm) and tied it off with CC about .75 inch/2 cm down.
ABOUT THE DESIGNER
 Stephanie is the owner of frabjous fibers and Wonderland Yarns. When she's not up to her elbows in dye, she enjoys foolishness with her daughters, junk shops, pottery, and all manner of fiber crafts. She lives in southern Vermont with her daughter and dogs.
Find her on Ravelry.
Pattern & images © 2023 Stephanie Shiman