


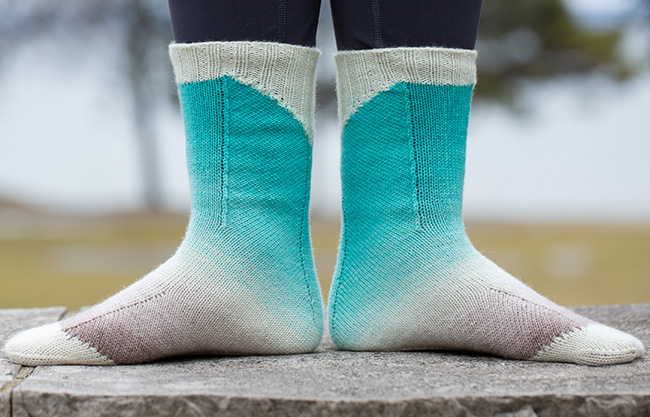
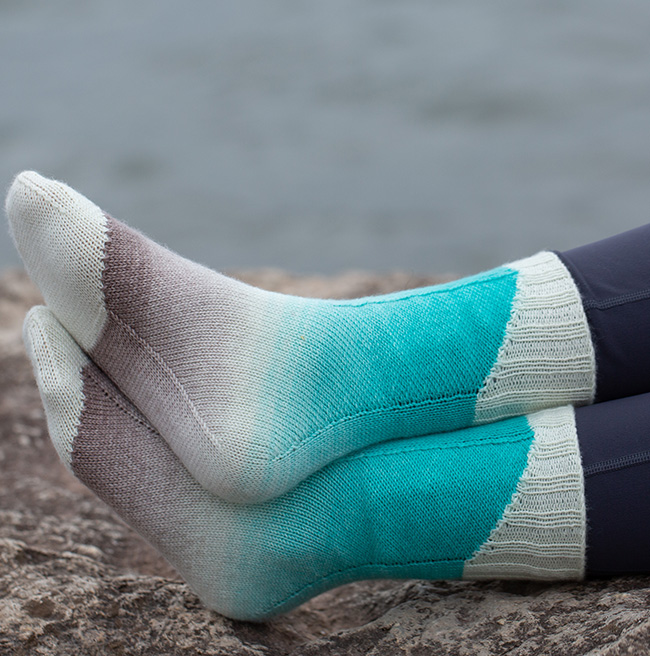
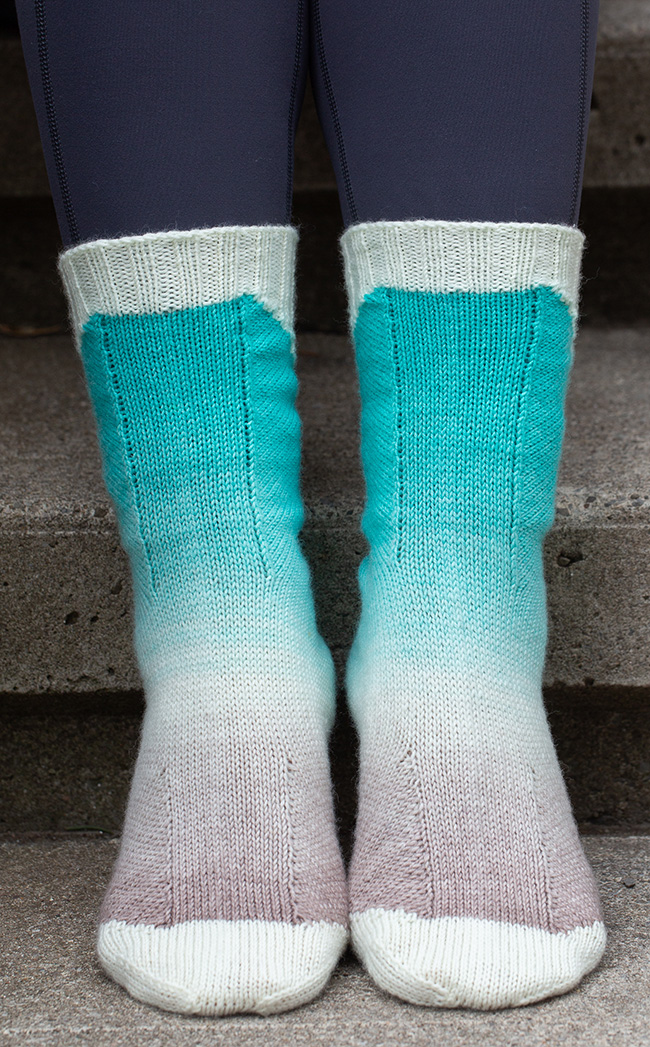
Miter Joint, a free knitting pattern from Knitty.com.
INTRODUCTION
Miter Joint
 by Shuyi Wu

Like many sock knitters, I have a large stash of multicolored yarns that do not play well with elaborate patterns.
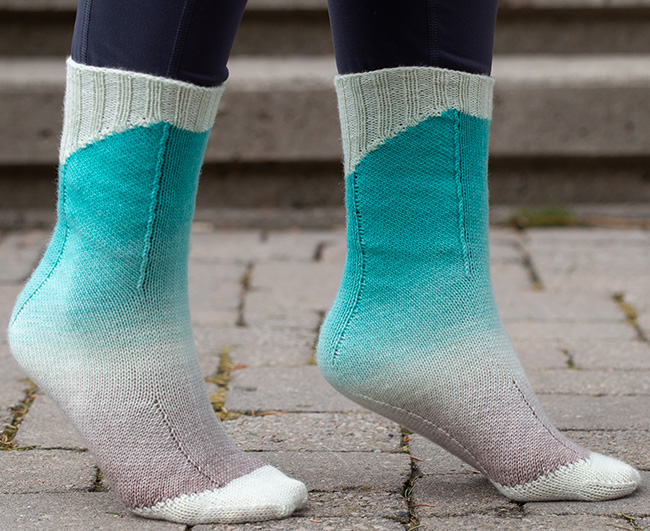
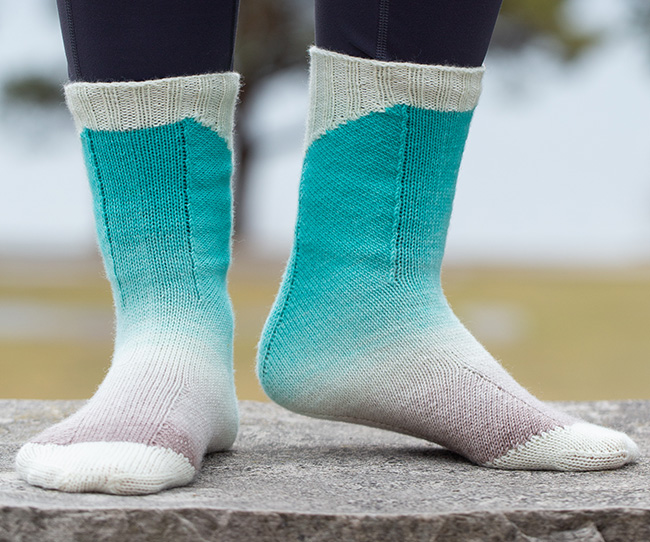
This pattern was specifically designed with gradient and self-striping yarn in mind: it does not interrupt the color sequence at the heel. In fact, this is the easiest heel you will ever knit: all the magic happens at the cuff and toe, and everything in between is smooth sailing.
The concept was inspired by the shape of a woodworker's miter joint, a simple method for joining two pieces to form a corner, commonly used for picture frames. I inserted a 45-degree heel section and a gusset on the instep to make the sock less angular and more foot-shaped. The miter joint is not very strong when made of wood, but don't worry – these socks are highly unlikely to snap in two!
 photos: Shireen Nadir


SIZE
Adult S[M, L, XL]
shown in size M
FINISHED MEASUREMENTS
Foot circumference: 7[8, 9, 10] inches/ 18[20.5, 23, 25.5] cm
Foot & leg length: adjustable
Choose a size approximately 1 inch/2.5 cm smaller than actual foot circumference, measured at the ball of the foot.
MATERIALS
Yarn
The Blue Brick Killarney Sock Twins [80% superwash merino, 20% nylon], available as a set of two 40g (150 yd/137 m) skeins with a coordinating solid 20g (75 yd/69 m) mini-skein
![]() [MC]: Seafoam
[MC]: Seafoam
![]() [CC]: White/Undyed
[CC]: White/Undyed
Yarn Characteristics
![]() Use any fingering-weight sock yarn. For best results, choose a gradient, self-striping, or variegated yarn for MC and a solid yarn for CC. If your CC comes in a 50 g skein, a single skein will be enough, even for the larger sizes. It is also possible to use just one yarn for the entire sock, with the result dependent on the colorway of that skein.
Use any fingering-weight sock yarn. For best results, choose a gradient, self-striping, or variegated yarn for MC and a solid yarn for CC. If your CC comes in a 50 g skein, a single skein will be enough, even for the larger sizes. It is also possible to use just one yarn for the entire sock, with the result dependent on the colorway of that skein.
Recommended needle size
[always use a needle size that gives you the gauge listed below - every knitter's gauge is unique]
![]() US #1.5/2.5 mm needles for small circumference in the round
US #1.5/2.5 mm needles for small circumference in the round
Notions
![]() stitch markers (optional)
stitch markers (optional)
![]() yarn needle
yarn needle
GAUGE
32 sts/43 rounds = 4 inches/10 cm in stockinette stitch.
PATTERN NOTES
[Knitty's list of standard abbreviations and techniques can be found here.]
Short rows:
Wrap and turn: Bring yarn to WS (if not already there); slip next stitch to right needle, bring yarn around this stitch to RS, slip stitch back to left needle, turn.
Working a stitch together with RS-created wraps, on a RS row: Insert tip of right needle knitwise into the wrap, then into the next stitch, and knit them together.
Working a stitch together with WS-created wraps on a WS row: Use tip of right needle to pick up the wrap from the back and place it over left needle, and purl the wrap and stitch together.
Working a stitch together with WS-created wraps on a RS row: Use tip of right needle to pick up the wrap and place it over left needle so that it lies after the stitch; slip stitch knitwise, slip wrap purlwise, insert left needle purlwise through both wrap and stitch, and knit them together.
Working k2tog with a wrapped stitch on a RS row: Insert tip of right needle knitwise into the wrap, then into the next stitch, and knit them together; slip this stitch to left needle and pass next stitch over; slip stitch back to right needle.
Working ssp with a wrapped stitch on a WS row: Use tip of right needle to pick up the wrap from the back and place it over left needle; slip knitwise the wrap and stitch together, slip next stitch knitwise, slip all 3 loops back to left needle purlwise, and purl them together through back loops.
Techniques:
- grafting: photo tutorial; video tutorial
- increases:
The Leg/Foot sections use directional increases that are formed by knitting a YO in the previous round in such a way that the end result resembles a M1L or M1R. This method prevents the increase lines from being too tight.- YO: yarn over, by bringing the yarn over the needle from front to back. On the next round, this will be knitted through the back loop to resemble a M1L.
- YO-b: yarn over backwards, by bringing the yarn over the needle from back to front. On the next round, this will be knitted through the front loop to resemble a M1R.
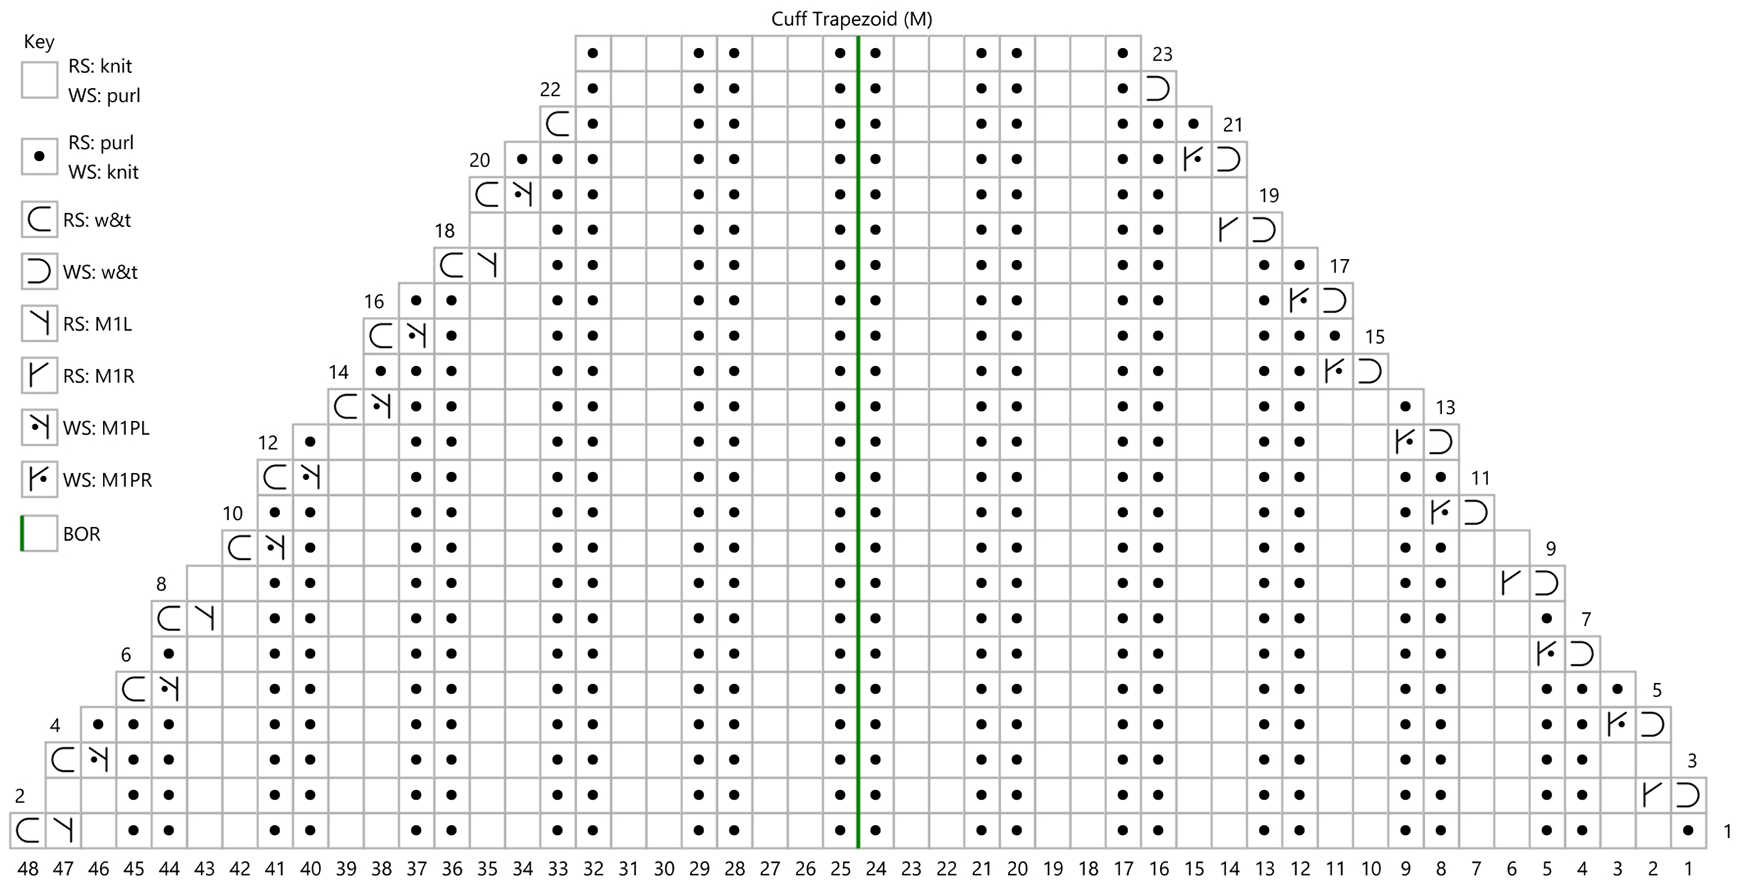
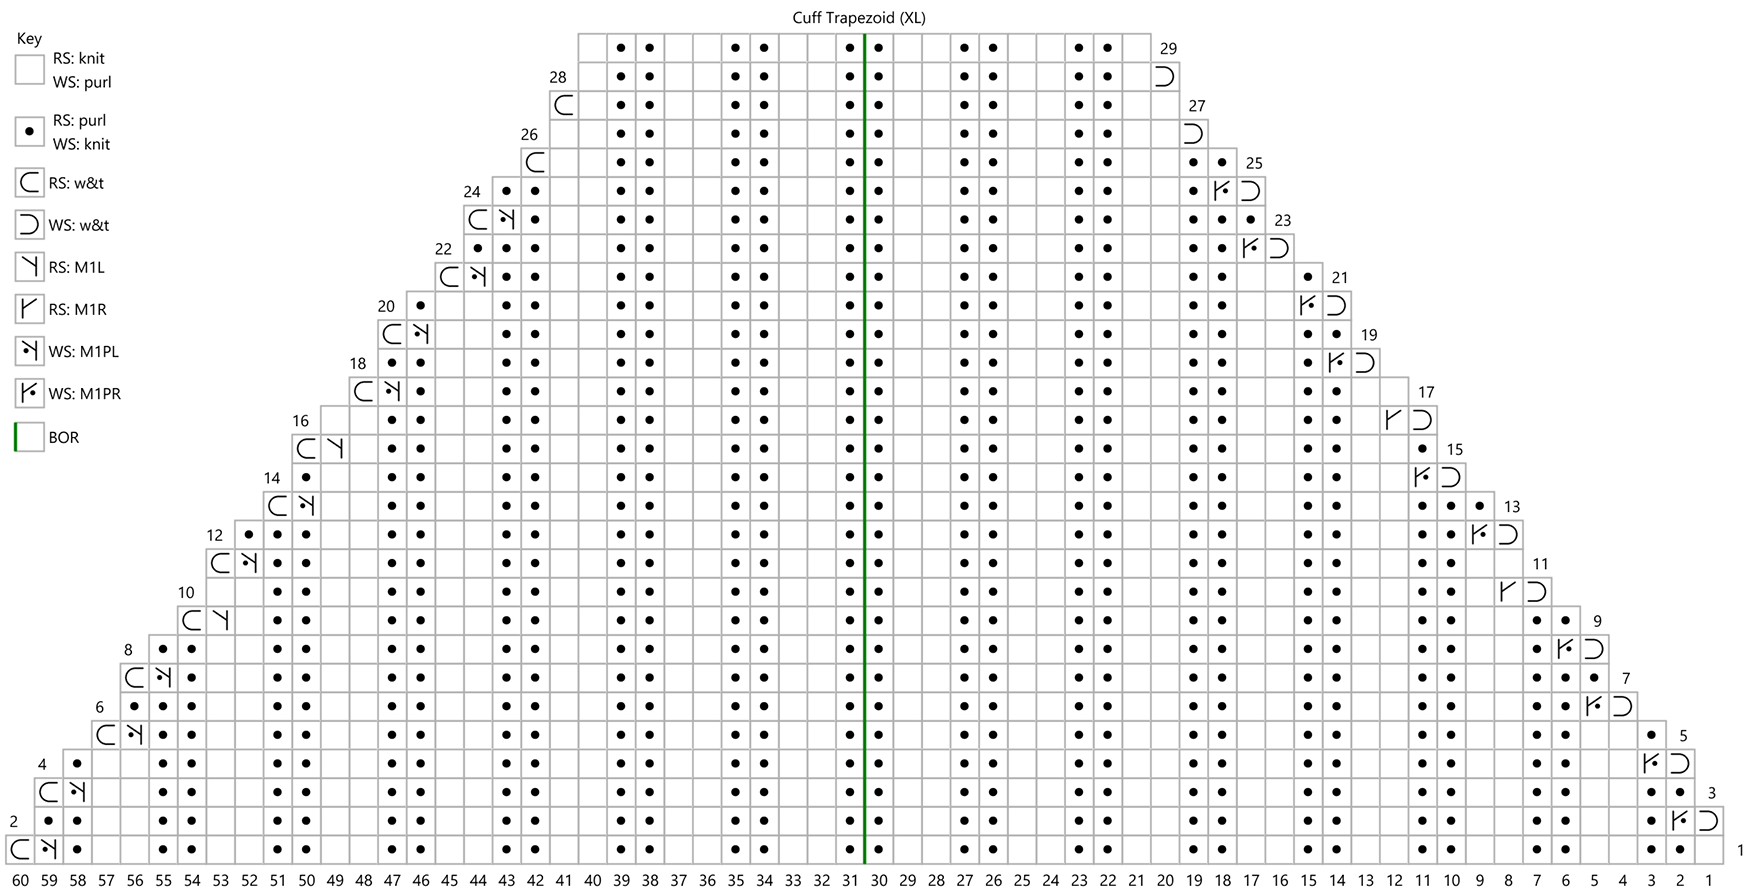
CHARTS
View and download the appropriate size Cuff Trapezoid Chart below:
small | medium | large | extra large
DIRECTIONS
Cuff
Using CC, and a stretchy cast-on method, CO 56[64, 72, 80] sts. Distribute sts across needles as you prefer and join for working in the round. Place a BOR marker if you like (the BOR will be at the center back of leg/sole).
Ribbing rnd: P1, (k2, p2) to last 3 sts, k2, p1.
Work ribbing for 13 rnds total, or until desired length.
Cuff Trapezoid
Setup: Work 21[24, 27, 30] sts in ribbing as est. Place marker B. Work 14[16, 18, 20] sts as est. Place marker A. Stop here; there should be 21[24, 27, 30] sts between marker A and BOR.
Work Cuff Trapezoid chart for your size, working in short rows over the 42[48, 54, 60] sts between markers A and B. The green line in the middle shows the position of BOR. Row 21[23, 25, 29] is a partial row that stops 7[8, 9, 10] sts past the BOR. At this point, you should have 58[68, 78, 84] sts between markers A and B, and 72[84, 96, 104] total sts. Cut CC.
Leg
Join MC.
Setup: Knit to BOR, working any wrapped sts together with their wraps. Remove markers A and B as you come to them.
Rnd 1: K 7[8, 9, 10] , YO, k 21[25, 29, 31] , k2tog, k 12[14, 16, 18] , ssk, k 21[25, 29, 31] , YO-b, k 7[8, 9, 10] .
Rnd 2-3: K 7[8, 9, 10] , YO, ktbl, k 20[24, 28, 30] , k2tog, k 12[14, 16, 18] , ssk, k to last 7[8, 9, 10] sts, YO-b, k to end of rnd.
Rnd 4: K 7[8, 9, 10] , ktbl, k to end of rnd.
Repeat Rnds 1-4 until approx 1.25 inch/3 cm short of desired full leg and heel length. This is the length from the top of the cuff to the ground; measure the sock at the longest point, along the BOR.
Gusset Increases
Rnd 1: K 7[8, 9, 10] , YO, k until 7[8, 9, 10] sts rem, YO-b, k 7[8, 9, 10] . 2 sts increased.
Rnd 2-3: K 7[8, 9, 10] , YO, ktbl, k until 7[8, 9, 10] sts rem, YO-b, k 7[8, 9, 10] . 2 sts increased.
Rnd 4: K7[8, 9, 10], ktbl, k to end of rnd.
Repeat Rnds 1-4 once more, for a total of 2 repeats and 12 sts increased. 84[96, 108, 116] sts.
Note: If you have a larger than usual circumference around the instep/front of the heel, you may work an additional repeat for more room in the heel.
Heel
Knit 12[12, 14, 16] rnds.
Gusset Decreases
Find the halfway point of the rnd and place a removable marker there.
Rnd 1-3: K 6[7, 8, 9] ssk, k to last 8[9, 10, 11] sts, k2tog, k to end. 2 sts decreased.
Rnd 4: K to end.
Repeat Rnds 1-4 once more, for a total of 2 repeats and 12 sts decreased. (If you worked an additional gusset increase repeat, also work an additional gusset decrease repeat to go back down to the same stitch count as before.) 72[84, 96, 104] sts rem.
Foot
Rnd 1: K 6[7, 8, 9] , ssk, k 21[25, 29, 31] , YO-b, k 14[16, 18, 20] , YO, k 21[25, 29, 31] , k2tog, k 6[7, 8, 9] .
Rnd 2-3: K 6[7, 8, 9] , ssk, k 21[25, 29, 31] , YO-b, k 14[16, 18, 20] , YO, ktbl, k to last 8[9, 10, 11] sts, k2tog, k to end of rnd.
Rnd 4: K 43[50, 57, 62] (to YO), ktbl, k to end of rnd.
Repeat Rnds 1-4 until 1.5[1.75, 2, 2.25] inch/ 4[4.5, 5, 5.5] cm short of desired foot length, ending after Rnd 3.
Note: Measure the sock's length by putting it on and measuring from the back of the ankle to the front of the instep, since the instep side determines length, not the sole side.
Toe Trapezoid:
Setup: K 29[34, 39, 42] . Place marker B. K 14[16, 18, 20] . Place marker A. Ktbl, k 21[25, 29, 31] . Stop here; there should be 7[8, 9, 10] sts between marker A and BOR. Cut MC and join CC.
We will now work in short rows over the 58[68, 78, 84] sts between markers A and B.
Size S only:
Setup Row 1: K14, w&t.
Setup Row 2: P14, w&t.
Setup Row 3: K to 1 st past previously wrapped st, w&t.
Setup Row 4: P to 1 st past previously wrapped st, w&t.
Size M only:
Setup Row 1: K16, w&t.
Setup Row 2: P16, w&t.
Size L only:
Setup Row 1: K18, k2tog, w&t.
Setup Row 2: P19, ssp, w&t.
Setup Row 3: K to previously wrapped st, k2tog (with the wrapped st and the next st), w&t.
Setup Row 4: P to previously wrapped st, ssp (with the wrapped st and the next st), w&t.
Size XL only:
Setup Row 1: K20, w&t.
Setup Row 2: P20, w&t.
Setup Row 3: K to 1 st past previously wrapped st, w&t.
Setup Row 4: P to 1 st past previously wrapped st, w&t.
Continue for all sizes:
Row 1: K to 1 st past previously wrapped st, k2tog, w&t.
Row 2: P to 1 st past previously wrapped st, ssp, w&t.
Row 3: K to previously wrapped st, k2tog (with the wrapped st and the next st), w&t.
Row 4: P to previously wrapped st, ssp (with the wrapped st and the next st), w&t.
Repeat Rows 1-4 another 3[4, 4, 5] times.
Final Row: K to marker B. There should be 42[48, 54, 60] sts between markers A and B. 56[64, 72, 80] total sts rem.
Toe
Setup rnd: Knit to BOR, working the wrapped st together with its wrap and removing markers A and B.
Note: the following rnd specifies markers for the toe decrease position; depending on the needles you are using, you can simply rearrange your stitches so that the breaks between the needles act as a virtual marker.
Setup rnd 2: K 14[16, 18, 20] . Place marker A or rearrange sts as required for the start of the instep. K 28[32, 36, 40] . Place marker B or rearrange sts as required for the end of the instep. K 14[16, 18, 20] .
Work the toe as follows, slipping markers as you come to them.
Rnd 1: Knit.
Rnd 2: K to 3 sts before start of instep, k2tog, k2, ssk. K to 3 sts before end of instep, k2tog, k2, ssk. K to BOR. 4 sts decreased.
Repeat Rnds 1-2 5[6, 7, 8] more times, until 32[36, 40, 44] sts rem, then work Rnd 2 only 2[3, 3, 3] more times. 24[24, 28, 32] sts rem.
K 6[6, 7, 8] . Place the next 12[12, 14, 16] instep sts on one needle and the rem 12[12, 14, 16] sole sts on another needle. Cut yarn and graft toe closed.
FINISHING
Weave in all ends. Block the socks: soak in a basin of lukewarm water for 15 minutes, squeeze out excess water, and let dry flat.
ABOUT THE DESIGNER
 Shuyi taught herself to knit for the sole purpose of knitting socks (pun intended), and has been knitting and designing socks ever since. She loves bright colors, bold patterns, and unusual techniques. She lives outside of Toronto, Canada, and works as a computer engineer.
Find her on Ravelry and Instagram.
Pattern & images © 2023 Shuyi Wu