Think Big, a free knitting pattern from Knitty.com.
INTRODUCTION
Think Big
 by Andrea Pfuhl
![]()
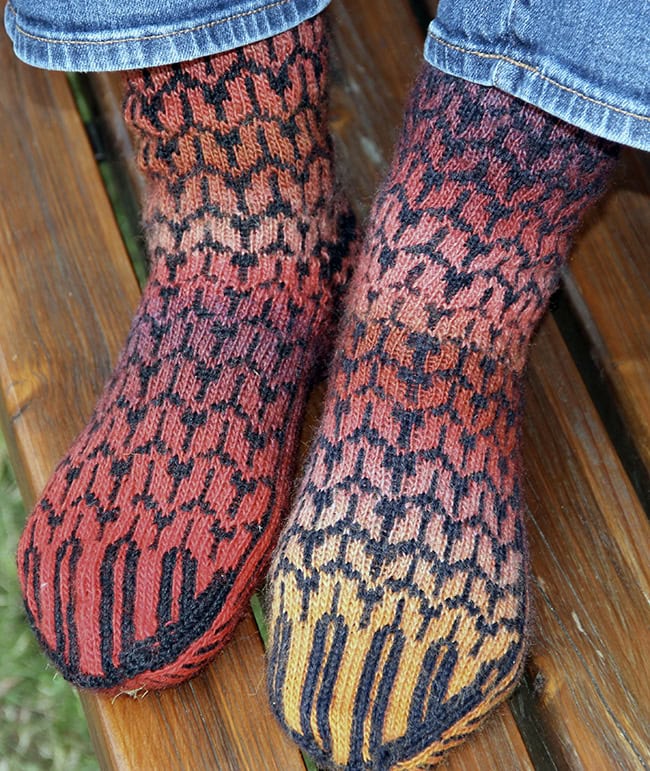
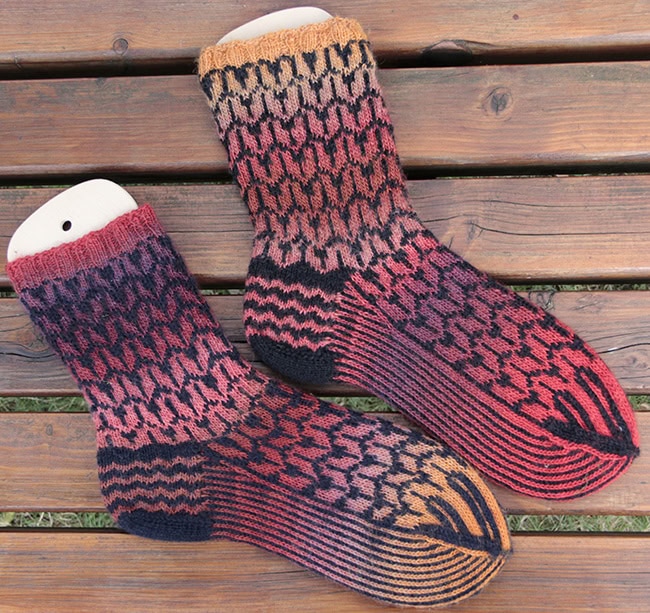
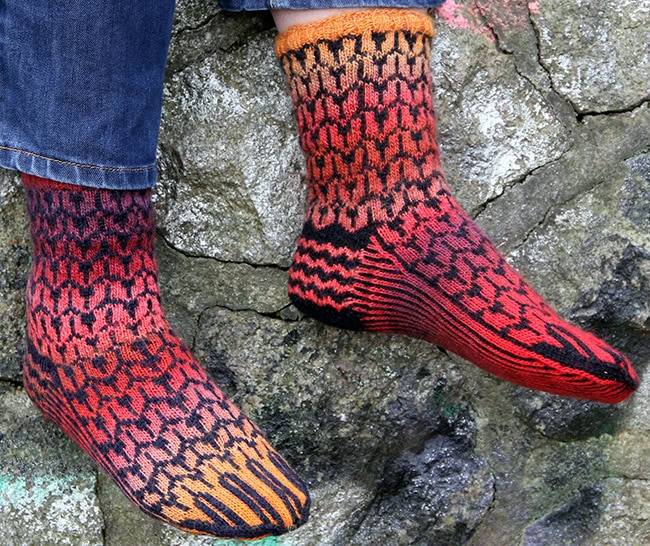
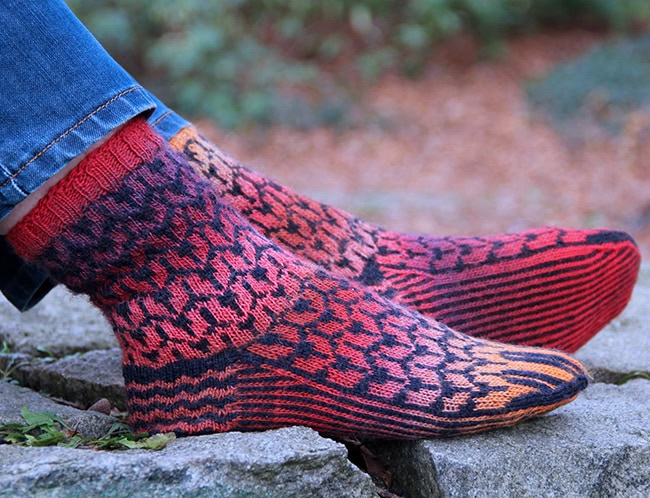
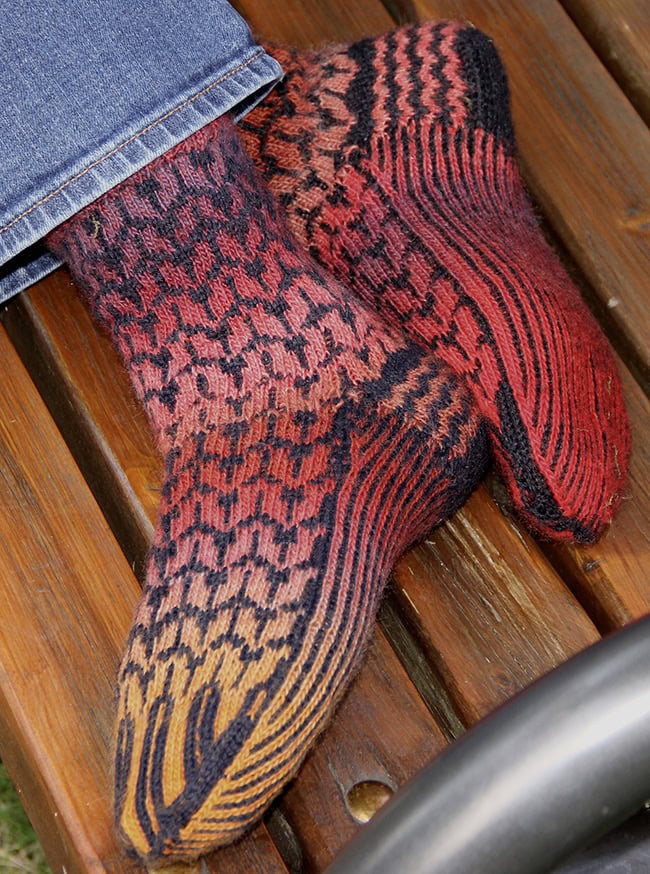
There are many chunky yarns to knit cozy items that keep you warm. But none of them are suitable for knitting socks that will fit in your regular shoes or fall boots. So I thought– why not mimic these cosy-looking feet warmers with their giant stitches in fair isle technique? Here they are.
 photos: Jürgen Pfuhl
SIZE
XS[S, M, L]
Note: XS is child-sized; remainder are adult sizes.
FINISHED MEASUREMENTS
Foot Circumference: 7.5[8.25, 9, 10] inches/ 19[21, 23, 25] cm
Leg Length: 5[6, 6, 6.5] inches/ 13[15, 15, 17] cm or adjustable to preference
Foot Length: adjustable to preference
Note: These socks are designed to be worn with zero ease. Please choose a size closest to your actual foot measurement.
MATERIALS
Yarn
![]() MC: Filcolana Arwetta [80% superwash merino wool, 20% Polyamide; 230 yd/210 m per 50 g skein]; Blue Nights, color #195; 1 skein
MC: Filcolana Arwetta [80% superwash merino wool, 20% Polyamide; 230 yd/210 m per 50 g skein]; Blue Nights, color #195; 1 skein
![]() CC: Schoppel Zauberball [75% superwash wool, 25% Polyamide (biodegradable); 459 yd/420 m per 100 g skein]; Partyhimmel, color #2512; 1 skein
CC: Schoppel Zauberball [75% superwash wool, 25% Polyamide (biodegradable); 459 yd/420 m per 100 g skein]; Partyhimmel, color #2512; 1 skein
Yarn Characteristics
![]() These socks use traditional sock yarns in a wool and polyamide (nylon) blend. The CC is a yarn in a gradient colorway. Any matching weight/composition sock yarn in a gradient colorway will provide similar results.
These socks use traditional sock yarns in a wool and polyamide (nylon) blend. The CC is a yarn in a gradient colorway. Any matching weight/composition sock yarn in a gradient colorway will provide similar results.
Recommended needle size
[always use a needle size that gives you the gauge listed below - every knitter's gauge is unique]
![]() 1 set US #1/2.25 mm needles for small circumference
1 set US #1/2.25 mm needles for small circumference
Notions
![]() stitch markers
stitch markers
![]() yarn needle
yarn needle
GAUGE
38 sts/42 rounds = 4 inches/10 cm in stranded colorwork.
PATTERN NOTES
[Knitty's list of standard abbreviations and techniques can be found here.]
Construction method: The socks are worked cuff down in the round.
To avoid long floats of yarn that your toes might get caught in, weave in the yarn not in use when a color goes unused for 5 sts or more.
CHARTS
DIRECTIONS
Cuff
Using CC, and your preferred stretchy method CO 72[80, 88, 96] sts. Distribute sts across needles as you prefer and join for working in the round. Note or mark start of round.
Knit 2 rounds.
Ribbing round: (P2, k3, p2, k1) around.
Work ribbing as set for approximately 1 inch/ 2.5 cm.
Leg
Join MC
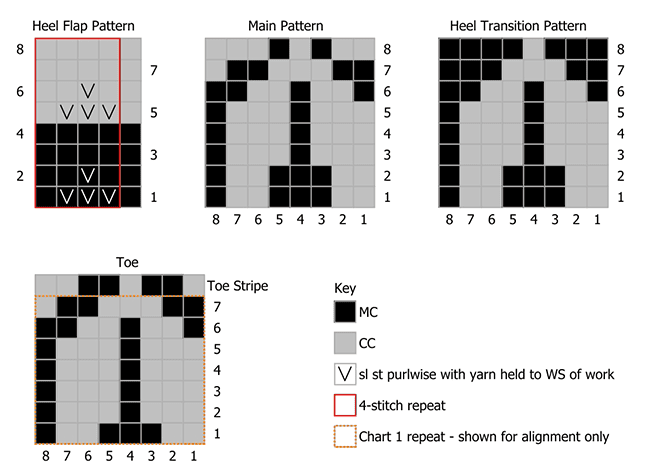
Establishing pattern: Starting with Row 7, work Main Pattern chart, 9[10, 11, 12] times around.
Work until you have completed Row 8 of the Main Pattern chart, and then work Rows 1-8, 5[6, 6, 7] more times, or to desired length, ending with Row 8.
Note: After this, there will be 8 rounds worked in the lower leg to set up the transition to the heel. Make sure you take that into account if adjusting the leg length.
Lower Part of Leg
Right Sock only, next round: Work Heel Transition Pattern over the first 36[40, 44, 48] sts of the round, cont with Main Pattern as set over the last half of the sts.
Left Sock only, next round: Cont with Main Pattern as set as set over the first 36[40, 44, 48] sts of the round; work Heel Transition Pattern over the last half of the sts.
Work as set until you have completed 8 rounds, ending with Row 8 of both charts.
Heel Flap
Right Sock only
The heel is worked on the first 39[39, 47, 47] sts of the round – arrange your sts so they are all on one needle.
Setup Row 1 [RS]: With MC, k1, m1L, k 37[37, 45, 45] , m1L, k1, turn. 41[41, 49, 49] sts.
Setup Row 2 [WS]: With MC, p 41[41, 49, 49] , turn.
Next row [RS]: Work Heel Flap Pattern chart across.
Work as set until you have completed the 8 rows of the chart 2[3, 4, 5] times, then work Rows 1-7 once more.
Last row [WS]: With CC, p1, p2tog, p 35[35, 43, 43] p2tog, p1. 39[39, 47, 47] sts.
Do not break CC.
Left Sock only
The heel is worked on the last 38[38, 46, 46] sts of the round, plus the first sts of the round; 39[39, 47, 47] sts in total. – arrange your sts so they are all on one needle.
Turn so that the WS is facing.
Setup Row 1 [WS]: With MC, p 39[39, 47, 47] , turn.
Setup Row 2 [RS]: With MC, k1, m1L, k 37[37, 45, 45] , m1L, k1, turn. 41[41, 49, 49] sts.
Next row [WS]: Starting with Row 2 of the chart, Work Heel Flap Pattern chart across.
Work as set until you have completed the 8 rows of the chart 2[3, 4, 5] times, then work Rows 1-7 once more.
Last row [WS]: With CC, p1, p2tog, p 35[35, 43, 43] p2tog, p1. 39[39, 47, 47] sts.
Do not break CC.
Both Socks, Turn Heel
Work with MC only.
Setup Row [RS]: Sl1 wyib, k 24[24, 30, 30] , ssk, turn.
Heel Turn Row 1 [WS]: Sl1 wyif, p 11[11, 15, 15] p2tog, turn.
Heel Turn Row 2 [RS]: Sl1 wyib, k 11[11, 15, 15] ssk, turn.
Repeat Heel Turn Rows 1-2 until all heel sts have been worked. 13[13, 17, 17] sts rem.
Gusset
Gusset setup round: Starting and ending with CC, work across the 13[13, 17, 17] sts of heel alternating colors; you will end with CC. Continuing to alternate colors, starting with MC, pick up and knit 14[16, 20, 24] sts along edge of heel flap in pinstripe pattern. Using MC, work M1L between the heel flap and the instep. Work across 33[41, 41, 49] held instep sts in pattern as set – you will be starting with st 8 and ending with st 8 of Main Pattern chart. Using MC, M1L between the heel flap and the instep and starting with CC, pick up and knit 14[16, 20, 24] sts along second edge of heel flap in pinstripe pattern. Work 7[7, 10, 10] sts in Pinstripe pattern as set. This is the new start of round – rearrange sts and mark as you prefer. 76[92, 98, 116] sts.
Gusset Decrease Round 1: Work sole sts in pinstripe pattern until 3 sts remain, with CC work (k2tog, k1); work the instep sts in pattern as set; with CC, work (k1, ssk), work rem sole sts in pinstripe pattern. 2 sts decreased.
Gusset Decrease Round 2: Continue in pattern as set, working first and last 2 sts of sole in CC.
Repeat Gusset Decrease Round 1-2 1[3, 5, 10] more times, until 72[80, 88, 96] sts rem.
Foot
Continue in pattern as set until foot measures approx. 1.75[2, 2.25, 2.5] inches/ 4.5[5, 5.5, 6] cm less than desired foot length, ending with Row 7 of the chart.
Note: If you need to adjust the toe length, you can work more or fewer repeats of the central rows of the Main pattern, rows 3-5, but before transitioning to the toe pattern, always work rows 6-7 of the pattern.
Toe
Setup round: Work to instep in pinstripe pattern as set; work across instep according to Toe Stripe as indicated in the top row of Toe chart, work to end of round in pinstripe pattern as set. From here, follow the stripes as set; Toe chart is only required to show how the patterning lines up.
Round 1, Toe Decrease Round: Work in pinstripe pattern to 3 sts before instep, with CC, work (k2tog, k1); with MC, work (k1, ssk), work in stripe pattern as set to last 3 sts of instep, with MC, work (k2tog, k1); with CC, work (k1, ssk), work to end of round in pinstripe pattern as set. 4 sts decreased.
Round 2: Knit.
Repeat Rounds 1-2 4 more times, until you have 52[60, 68, 76] sts on your needles.
Work Round 1 only 9[11, 13, 15] times, until you have 16 sts left.
Final round: With MC, k to end of instep; stop here.
Divide sts across 2 needles and graft rem sts together.
FINISHING
Weave in all ends.
Soak thoroughly in lukewarm water. Drain and squeeze out the excess water by rolling it up in a towel and let lay flat to dry.
ABOUT THE DESIGNER
 Andrea is a biologist who lives with her husband Jürgen in Northern Germany. Both of them love to travel to Scandinavia and so Jürgen benefits a lot of scandi-inspired pullovers knit by Andrea. She was taught knitting (and even crocheting…) by her beloved and gifted grandmother in the 1970s.
She can be found on Ravelry as Suruvaippa.
Pattern & images © 2024 Andrea Pfuhl


