 IMPORTANT
NOTE: Turn work at the end of each row throughout
pattern, unless instructed otherwise.
IMPORTANT
NOTE: Turn work at the end of each row throughout
pattern, unless instructed otherwise.
SECTION 1
Base Triangles:
Using MC, CO 20 sts.
Row 1 [RS]: K2.
Row 2 [WS]: Sl 1, p1.
Row 3 [RS]: K3.
Row 4 [WS]: Sl 1, p2.
Row 5 [RS]: K4.
Row 6 [WS]: Sl 1, p3.
Row 7 [RS]: K5.
Row 8 [WS]: Sl 1, p4.
Row 9 [RS]: K6.
Row 10 [WS]: Sl 1, p5.
Row 11 [RS]: K7.
Row 12 [WS]: Sl 1, p6.
Row 13 [RS]: K8.
Row 14 [WS]: Sl 1, p7.
Row 15 [RS]: K9.
Row 16 [WS]: Sl 1, p8.
Row 17 [RS]: K12.
Repeat Rows 2-16 once more.
Next Row [RS]: K10. Break yarn.
SECTION 2
Left Edge Triangle:
Row 1 [WS]: Using CC1, pfb, p2tog.
Row 2 [RS]: K3.
Row 3 [WS]: Pfb, p1, p2tog.
Row 4 [RS]: K4.
Row 5 [WS]: Pfb, p2, p2tog.
Row 6 [RS]: K5.
Row 7 [WS]: Pfb, p3, p2tog.
Row 8 [RS]: K6.
Row 9 [WS]: Pfb, p4, p2tog.
Row 10 [RS]: K7.
Row 11 [WS]: Pfb, p5, p2tog.
Row 12 [RS]: K8.
Row 13 [WS]: Pfb, p6, p2tog.
Row 14 [RS]: K9.
Row 15 [WS]: Pfb, p7, p2tog. Do not
turn work. 10 sts on right needle.
Note:
Directions for Center Square and Right Edge
Triangle will instruct you to pick up sts
along the edge of a square. The first time
you work Section 1, you will be picking these
sts up along the edges of the Base Triangles.
Center Square:
Pick up and p 10 sts along edge of square
adjacent to right needle. Slip last picked-up
st to left needle, p2tog.
Next Row [RS]: K10.
Next Row [WS]: P9, p2tog.
Repeat these 2 rows 8 times more. All sts
have been worked; 20 sts on right needle.
Do not turn work at end of last row.
Right Edge Triangle:
Pick up and p 9 sts along edge of square adjacent
to right needle.
Row 1 [RS]: K9.
Row 2 [WS]: P7, p2tog.
Row 3 [RS]: K8.
Row 4 [WS]: P6, p2tog.
Row 5 [RS]: K7.
Row 6 [WS]: P5, p2tog.
Row 7 [RS]: K6.
Row 8 [WS]: P4, p2tog.
Row 9 [RS]: K5.
Row 10 [WS]: P3, p2tog.
Row 11 [RS]: K4.
Row 12 [WS]: P2, p2tog.
Row 13 [RS]: K3.
Row 14 [WS]: P1, p2tog.
Row 15 [RS]: K2.
Row 16 [WS]: P2tog. Break yarn..
SECTION 3
First Square:
With RS facing and using MC, k1, pick up and
k 9 sts along edge of Right Edge Triangle;
k 1 st from left needle, and pass last picked-up
st over this st.
*Next Row [WS]: P10.
Next Row [RS]: K9, ssk.
Repeat these 2 rows 8 times more. 10 sts on
right needle. Do not turn work at end of last
row.*
Second Square:
Pick up and k 10 sts along edge of Center
Square; k 1 st from left needle, and pass
last picked-up st over this st.
Work from * to * as for First Square. Break
yarn.
Repeat Section 2 and Section 3 until work
measures 63 inches, ending with Section 2.
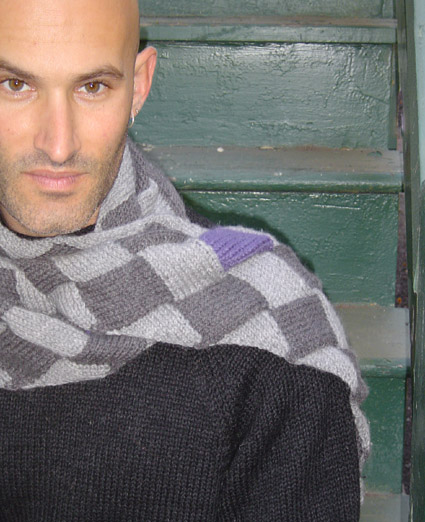
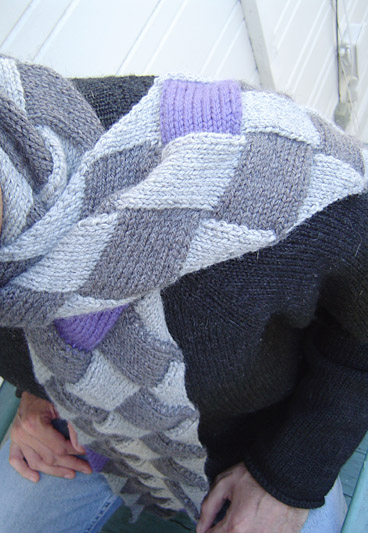
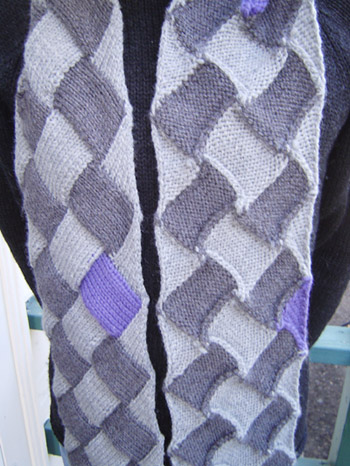
Purple squares and triangles are added randomly.
When you want to knit a purple piece, break
yarn before picking up sts for next square
or triangle. Join CC2 and work square or triangle.
Break CC2 and join appropriate yarn before
picking up sts for next square or triangle.
 SECTION
4
SECTION
4
End Triangle:
With RS facing and using MC, k1, pick up and
k 9 sts along edge of Right Edge Triangle;
k 1 st from left needle, and pass last picked-up
st over this st.
Row 1 [WS]: P10.
Row 2 [RS]: K2tog, k7, ssk.
Row 3 [WS]: P9.
Row 4 [RS]: K2tog, k6, ssk.
Row 5 [WS]: P8.
Row 6 [RS]: K2tog, k5, ssk.
Row 7 [WS]: P7.
Row 8 [RS]: K2tog, k4, ssk.
Row 9 [WS]: P6.
Row 10 [RS]: K2tog, k3, ssk.
Row 11 [WS]: P5.
Row 12 [RS]: K2tog, k2, ssk.
Row 13 [WS]: P4.
Row 14 [RS]: K2tog, k1, ssk.
Row 15 [WS]: P3.
Row 16 [RS]: K2tog, ssk.
Row 17 [WS]: P2.
Row 18 [RS]: Ssk.
Work a second triangle in the same way.
Break yarn and draw through rem st.