Grandma Knitty Home
Knitty: little purls of wisdom
letter from the editorfeatured articlesKnitty's fabulous pattern selectionarchive of back issuestell us what you think of KnittyKnitty's favorite linkshelp knitty keep on keepin' onknitty's virtual sNbjoin the Knitty notifylistknitty's tiny little shopping malltake home something Knitty


Elann

the Knitty FAQ

submission guidelines for designers and writers

the obligatory legal statement

the rabbit

© Knitty 2002-2006. All rights reserved. Unauthorized reproduction prohibited. This means you.


katecreaturesboogie timeknecklacebamboozellenamastebest friend
forecasttempting IIfestivetubeyblanche-neigebristowcheesy puffs
bobbliciouschaosblupomatomusthujamarleyspikedanica
urban rustic glovesreal stocking capmrs beeton
layersstarsky

colourmart cashmere

1. forecast
Pronunciation: -"kast;
fOr-'kast, for-'
Function: verb transitive sense:
1 a : to calculate or predict some future event or condition usually as a result of study and analysis of available pertinent data;
b : to indicate as likely to occur [such events may forecast peace] intransitive senses : to calculate the future


I spend a lot of time thinking about the future. What will happen to me? Will I be happier tomorrow than I am today? More succesful? Will I have children? Be a grandmother? This design was created at a time of personal transition for me: finishing a two-year stay in Europe, and beginning a new job in New Mexico, which seems to be the polar opposite of the place I am leaving. I am saying goodbye to dear friends, and hoping to meet new ones, equally dear, wondering what the future holds, and sitting in awe of Fate and its constant surprises...wishing for the ability to forecast my own destiny.

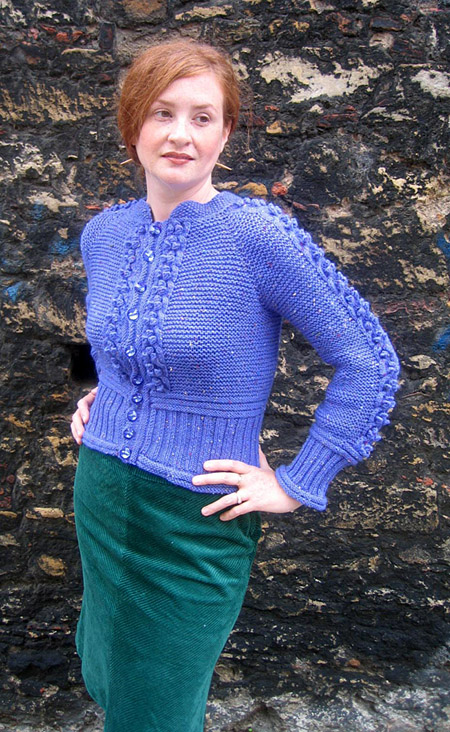
Forecast is a whimsical combination of textures. Braided cables accented with tiny eddies of bobbles travel down each panel over a corrugated garter-stitch background, like swiftly moving streams over ploughed fields. The yarn is my favorite Cascade 220 tweed, in a beautiful bright-dark blue-purple with flecks of red and yellow that reminds me of sunrise. Slightly belled sleeves are cinc hed at the wrist by bordered ribbing, and the same ribbing used at the waist to provide a slimming, shapely silhouette. This design is an example of how to achieve complex-looking shaping using only textural changes.

model: Stefanie Japel photos: Nathan Japel

SIZE
S [M, L, XL, XXL] (shown in size M)
 
FINISHED MEASUREMENTS

Chest: 32.5 [36.5, 39.5, 43.5, 48.5] inches
Length: 18[20, 21, 22, 23] inches


MATERIALS

Cascade 220 Tweed [90% Peruvian Highland Wool, 10% Donegal (Tweed); 220 yd/198 m per 100g skein]; color: 7606; 4[4, 4, 5, 5] skeins

1 US #7/4.5mm circular needle, 32 inch or longer
1 US #5/3.5mm circular needle, 32 inch or longer
Double-point needles in sizes listed above (optional)
10 0.75-inch buttons
Stitch holders
Waste yarn
10 safety pins
Tapestry needle

GAUGE
16 sts/32 rows = 4 inches in garter stitch on US 7/4.5mm needles


PATTERN NOTES

[Knitty's list of standard abbreviations can be found here]

This pattern is knit flat on circular needles from the neckline to the hem. The sleeves are knit flat and seamed later, but could easily be knit in the round. The button bands are picked up and knit from the cardigan front edges.

WC9: Work next row of Cable over next 9 stitches


Make bobble

Slip next 2 sts to cable needle and hold to front of work, k2, k2 from cable needle.

Slip next 2 sts to cable needle and hold to back of work, k2, k2 from cable needle.

This cable chart is from "The New Knitting Stitch Library" by Lesley Stanfield. Lark Books, 1992.

Make bobble: K into front, then back, then front, then back, then front again, of next stitch (4 sts increased), turn work; p5, turn work; pass second, third, fourth and fifth sts over first st, then k this st through back loop.


DIRECTIONS

Collar
Using smaller needle, CO 72[72, 80, 80, 80] sts.

Row 1 [RS]: Sl 1, kfb, [k1, p1] to end.

Row 2 [WS]: Sl 1, kfb, [p1, k1] to last st, p1.

Row 3 [RS]: Sl 1, kfb, [p1, k1] to end.

Row 4 [WS]: Sl 1, kfb, [k1, p] to last st, k1.

Rows 5 & 6: Work as for Rows 1 & 2. 78[78, 86, 86, 86] sts.

Rows 7, 9, 11 [RS]: Sl 1, [k1, p1] to last st, k1.

Rows 8, 10, 12 [WS]: Sl 1, [p1, k1] to last st, p1.

Rows 13 & 14: Sl 1, k to end.

Rows 15 & 16: Sl 1, p to end.

Yoke
Switch to larger needle and proceed as follows:

Row 17 [RS]: Sl 1, WC9, p4[4, 6, 6, 6], place marker, k1, WC9, place marker, k1, WC9, p10[10, 14, 14, 14], WC9, place marker, k1, WC9, place marker, k1, p4[4, 6, 6, 6], WC9, p1.

Row 18 [WS]: Sl 1, p to end.

Row 19 [RS]: Sl 1, WC9, p to marker, m1, slip marker, k1, m1, WC9, m1, slip marker, k1, m1, WC9, p10[10, 14, 14, 14], WC9, m1, slip marker, k1, m1, WC9, m1, slip marker, k1, m1, p to cable, WC9, p1. 86[86, 94, 94, 94] sts.

Row 20 [WS]: Sl 1, p to end.
Row 21 [RS]: Sl 1, WC9, p to marker, m1, slip marker, k1, m1, p to cable, WC9, p to marker, m1, slip marker, k1, m1, p to cable, WC9, p10[10, 14, 14, 14], WC9, p to marker, m1, slip marker, k1, m1, p to cable, WC9, p to marker, m1, slip marker, k1, m1, p to cable, WC9, p1. 8 sts increased.
Repeat these 2 rows 16[20, 21, 25, 30] times more. 222[254, 270, 302, 342] sts.

Divide Sleeves and Body:
Next Row [WS]: Sl 1, p31[35, 38, 42, 47], place next 47[55, 57, 65, 75] sts on st holder or waste yarn for first sleeve, p64[72, 78, 86, 96], place next 47[55, 57, 65, 75] sts on st holder or waste yarn for second sleeve, p32[36, 39, 43, 48]. 128[144, 156, 172, 192] sts on needle.

Lower Body:
Next Row [RS]: Sl 1, [p to cable, WC9] 4 times, p to end.
Next Row [WS]: Sl 1, p to end.
Repeat these 2 rows until work measures 3.5[4.5, 5.5, 6.5, 7.5] inches from underarm.

Lower Border:
Switch to smaller needle and continue as follows, slipping first st of each row:

*Work 3 rows in reverse stockinette st. Work 2 rows in stockinette st.
Repeat from * once more, then work 3 more rows in reverse stockinette st.

P 1 row.

Next Row [RS]: Sl 1, [k2, p2] to last 3 sts, k3.
Next Row [WS]: Sl 1, [p2, k2] to last 3 sts, p3.
Repeat these 2 rows 10 times more.

K 1 row.

**Work 3 rows in reverse stockinette st. Work 2 rows in stockinette st.
Repeat from ** once more, then work 3 more rows in reverse stockinette st.

BO all sts using larger needle.

Sleeves
Replace held sts of one sleeve on larger needle with RS facing, and rejoin yarn.

Note: When working sleeves, do not slip first st of each row.
If desired, sleeves may be worked in the round on double-point needles; if you do this, alternate rows (rows marked "WS") are knit, rather than purled.

Next Row [RS]: P to cable, WC9, p to end.
Next Row [WS]: P all sts.
Repeat these 2 rows until sleeve measures 6.5 inches less than desired length.

Work Lower Border as for Body. On first row of border, decrease 3[3, 1, 1, 3] sts, evenly spaced.

Repeat for second sleeve.

Button Band
Using smaller needles, with RS facing and beg at lower corner of right front edge, pick up and k 3 sts for every 4 rows along edge of lower border, and 1 st for every 2 rows along garter stitch section of body, stopping at base of collar. (When picking up sts along an edge that has been worked with slipped sts, remember that one slipped st on an edge = 2 rows.)

Work 3 rows reverse stockinette st, two rows stockinette st, then three more rows reverse stockinette st. BO all sts using larger needle.

Buttonhole Band
Using smaller needles, with RS facing and beg at upper corner of left front edge at base of collar, pick up and k 1 st for every 2 rows along garter stitch section of body, and 3 sts for every 4 rows along edge of lower border.

Work 3 rows reverse stockinette st.

Using safety pins, mark locations of 10 evenly spaced buttonholes.

Next Row [RS]: [K to location of buttonhole, BO 2 sts] ten times, k to end.
Next Row [WS]: [P to bound off sts, CO 2 sts using backward loop method] ten times, p to end.

Work 3 more rows reverse stockinette st. BO all sts using larger needle.

Editor's note: the designer is currently somewhere over the Atlantic ocean. Schematic will arrive shortly -- and will be placed in this spot when it gets here.
FINISHING

Sew sleeve seams.
Weave in ends and attach buttons.
Block as desired.

ABOUT THE DESIGNER

Stefanie Japel is currently trying to find the time to savor her last few moments living in Europe.

To see more of her designs, visit glampyre.com