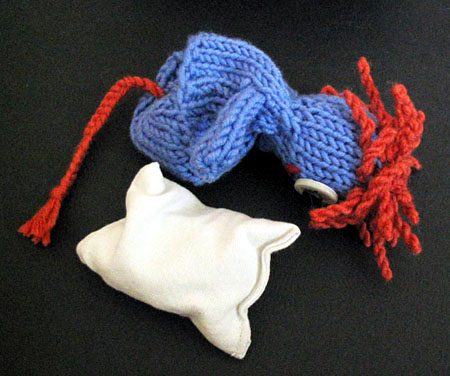
Grandma Knitty Home
Knitty: little purls of wisdom
letter from the editorfeatured articlesKnitty's fabulous pattern selectionarchive of back issuestell us what you think of KnittyKnitty's favorite linkshelp knitty keep on keepin' onknitty's virtual sNbjoin the Knitty notifylistknitty's tiny little shopping malltake home something Knitty


Elann

the Knitty FAQ

submission guidelines for designers and writers

the obligatory legal statement

the rabbit

© Knitty 2002-2006. All rights reserved. Unauthorized reproduction prohibited. This means you.


katecreaturesboogie timeknecklacebamboozellenamastebest friend
forecasttempting IIfestivetubeyblanche-neigebristowcheesy puffs
bobbliciouschaosblupomatomusthujamarleyspikedanica
urban rustic glovesreal stocking capmrs beeton
layersstarsky

These cheerful little creatures hold removable rice and lavender-filled bags that you can heat up in the microwave to keep your hands toasty on chilly days!

Make Uni, Mimi, or Eddie, or recombine their features to create your own unique pocket creature. These little guys knit up quickly and are a great way to use up bits of yarn -- each creature uses about 35 to 45 yards of yarn, depending on appendages.

To use, warm the bag of rice and lavender in the microwave. Until you know how strong your microwave is, heat in 10 second intervals until the bag is warm, not burning (I generally find that 30 seconds total is about right). Then tuck the bag into the creature's pocket and pull the tail through the buttonhole to secure the bag. The bag should retain heat for about 20-30 minutes or so.

Rice bags also make great ice packs -- just keep an extra one in a baggie in your freezer for use on bumps and bruises. If the creature gets dirty, do remove the bag before washing.

model: Annie Dillon and, L to R, Mimi, Uni, Eddie photos: Kate Kuckro

 
FINISHED MEASUREMENTS

Height: about 4 inches[not including horns/hair]


MATERIALS

Note: Less than one ball of each yarn is required. Approximate yardage of each color used for each creature is listed.

Uni
Karabella Aurora 8 [100% merino wool; 98yd/90m per 50g skein];
[MC] #1556 Medium Blue; 35 yd/32m
[CC] #262 Cantaloupe; 5 yd/4.5m

Eddie
[MC] Karabella Aurora 8 [100% merino wool; 98yd/90m per 50g skein]; color: #11 Olive Green; 35 yd/32m
[CC] Lana Grossa Bingo Print [100% merino wool; 89yds/80m per 50g skein]; color: #313 Green/Magenta/Brown Multi; 10 yd/9m

Mimi
Karabella Aurora 8 [100% merino wool; 98yd/90m per 50g skein];
[MC] #1478 Sunflower; 20 yd/18m
[CC] #262 Cantaloupe; 20 yd/18m

For all creatures:
1 set US #6/4mm double-point needles
OR
2 24-inch US #6/4mm circular needles
OR
1 US #6/4mm circular needle, 32-inch or longer
Note: Creatures are worked in the round; use double-point needles, 2 circulars, or magic loop technique, whichever you prefer.

Stitch marker
Stitch holders or waste yarn
Blunt tapestry needle
Scraps of yarn in various colors for embroidered features
Sewing needle
Sewing machine (optional)
Sewing thread
100% cotton muslin (1 4" x 6" piece per creature)
Dried lavender (about 2 tsp. per creature)
Long grain rice (about 4 tsp. per creature)

For Uni:
One 3/4-inch white button
One 5/16-inch black button

For Mimi:
Two 3/8 inch white buttons

GAUGE
20 sts/28 rows = 4 inches in stockinette stitch


PATTERN NOTES

[Knitty's list of standard abbreviations can be found here]

Colors are used as follows:
For Uni: Work body and arms in medium blue yarn, and use cantaloupe yarn for hair and tail.

For Eddie: Work body and arms in olive green yarn, work hair and tail in multicolored yarn.

For Mimi: Work initial ribbing, base, and first four rows of body in cantaloupe yarn; switch to sunflower yarn and continue in alternating 4-row stripes throughout.


I-Cord
Using a circular or double-point needle, CO or pick up required number of sts.
Next Row: Instead of turning work around to work back on the WS, slide all sts to other end of needle, switch needle back to your left hand, bring yarn around back of work, and start knitting the sts again.
Repeat this row to form I-cord. After a few rows, work will begin to form a tube.

1x1 Rib (Worked back and forth over an even number of sts):
Row 1: [K1, p1] to end.
Every row is the same.

Make Bobble
[K into front, then back, then front, then back, then front again] of next st, turn work, sl1, p4, turn work; sl1, k4, slip sts to left needle and pass second, third, fourth, and fifth sts over first st; sl rem st to right needle.

Common Sense
Please microwave only the sachet -- not the entire creature -- and be sure that the cloth that you plan on using for the sachet will not melt when subjected to a minute or two in the microwave!

DIRECTIONS


Pocket Ribbing and Base Circle
CO 16 sts. Work back and forth in 1x1 Rib until work measures 1.25 inches, ending with a RS row.

Next Row [WS]: BO 6 sts, work in patt to end. 10 sts rem.
Next Row [RS]: BO 6 sts, work in patt to end. 4 sts rem.
Next Row [WS]: P1, m1, p to last st, m1, p1. 6 sts
Next Row [RS]: K1, m1, k to last st, m1, k1. 8 sts
Next Row [WS]: P1, m1, p to last st, m1, p1. 10 sts.
Work 4 rows in stockinette st.

Next Row [RS]: K1, k2tog, k to last 3 sts, ssk, k1. 8 sts rem.
Next Row [WS]: P1, p2tog tbl, p to last 3 sts, p2tog, p1. 6 sts rem.
Next Row [RS]: K1, k2tog, ssk, k1. 4 sts rem.

Body
Next Row [WS]: P to end, CO 20 sts at end of row using backward loop method. 24 sts.
Next Row [RS]: K to end. Divide sts evenly between needles, place marker, and join to begin working in the round, being careful not to twist. (RS is facing out.)
Next Round: K5, work 8 sts in 1x1 Rib, k to end.

Work in patt as set for 1 inch.

Form Buttonhole for Tail:
Next Round: K9, yo, k2tog, k to end.
Work 4 rounds in stockinette st.

Form Armholes:
Next Round: K2, yo, k2tog, k10, ssk, yo, k to end.

Shape Neck:
Next Round: [K2, k2tog] around. 18 sts.
K 1 round.
Next Round: [K1, k2tog] around. 12 sts.
K 1 round.
Next Round: K1, [m1, k2] five times, m1, k1. 18 sts.

Head
Choose one of the head types below.

Basic Head (Uni)
K 9 rounds.
Next Round: [K1, k2tog] around. 12 sts.
Next Round: [K2tog] around. 6 sts.
Break yarn, leaving 8-10 inch tail. Thread yarn onto tapestry needle and draw yarn through the rem sts. Pull yarn through to WS and sew a couple of stitches

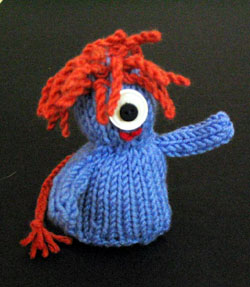
Head with Three Horns (Mimi)

K 11 rounds.
Next Round: K6, place rem sts on st holder or waste yarn.
Work 6 sts on needle in I-Cord for 10 rows, or to desired length. Break yarn and draw through sts.
Slip next 6 sts from holder onto needle, reattach yarn, and work in I-cord for 10 rows. Break yarn and draw through sts.
Work rem 6 sts in the same way.Head with Pointy

Hair, Pop-Out Eyes and Ears (Eddie)
K 7 rounds.
Make bobble eyes:
Next Round: K13, make bobble, k3, make bobble.
K 3 rounds.
Next Round: Slip 5 sts to right needle, place next 3 sts on one stitch holder or waste yarn, place next 6 sts on second stitch holder or waste yarn, place following 3 sts on first stitch holder or waste yarn (with first set of held sts), slip rem st to right needle. 6 sts on needle; 6 sts on each of 2 st holders (or pieces of waste yarn).
*Using CC, work 1 row of I-Cord; work rows that follow in I-Cord as well.
Next Row: [K1, k2tog] twice. 4 sts rem.
Next Row: [K2tog] twice. 2 sts rem.
K2tog. Break yarn and draw through st.*
Place sts from first st holder or piece of waste yarn onto needle. Work from * to *.
Work last set of held sts in the same way.
Pick up 6 sts between first hair point and second hair point; work from * to *.
Pick up 6 sts between second hair point and third hair point; work from * to *.

Make Ears:
In contrast color, cast on 2 sts.
Row 1: K1 f&b, K1. 3 sts.
Row 2: Change to main color, and K all sts f&b. 6 sts.
Row 3: K all sts f&b. 12 sts.
Bind off all sts.
Repeat steps 1 to 5 for second ear.


Attaching the ears:
The ear pattern above makes a semi-circle that can be attached as a cup ear or a standard ear. To make cup ears like Eddie's, sew the first and last st of the BO off row together to create a cup, then sew the ear to the head at the desired location. To make standard ears, place the ear on the head, shape as desired (I usually let the ear curve slightly so that the first and last st of the BO row are slightly in front of the center st of that row), and sew in place.
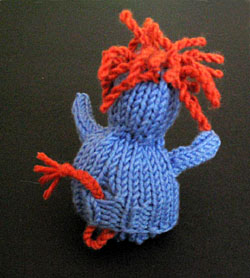
Arms
Pick up and k 6 sts around arm opening (2 sts on each side, 1 above and 1 below).
Work in I-Cord for 10 rows, or to desired length. Break yarn and draw through sts.
Work other arm in the same way.

Tail
Determine tail placement by tucking pocket ribbing into body so that base of creature sits flat. Mark place where buttonhole overlaps pocket ribbing -- this will be the location for the tail. Choose one of the tail types below:

Braided Tail (Uni)

Cut 3 pieces of yarn, each approx. 3 times desired tail length. Thread the yarn pieces onto tapestry needle. At point on the pocket ribbing marked for tail, make a stitch from RS to WS, and back through to RS. The 6 yarn ends should now all be on RS of fabric. Remove needle and adjust yarn pieces so they are the same length. Divide them into 3 bunches of 2, and braid tail. Stop about 1 inch from desired tail length, tie an overhand knot, and trim ends.

I-Cord Tail (Mimi)
On RS of pocket ribbing, pick up 6 sts around point marked for tail. Work in I-Cord for 10 rows, or to desired length. Break yarn and draw through sts.

Curly Tail (Eddie)
CO 30 sts (or approx. 16 sts for each inch of curled tail).
[Kfb] into each st. 60 sts.
BO all sts.
Sew tail to point marked for tail on RS of pocket ribbing. Wrap tail around a knitting needle to curl.
 
FINISHING

Using whip stitch, sew pocket ribbing around edge of round base.

Sew remaining edges of round base to cast on sts that form front of creature's body. Tuck pocket ribbing into body so base of creature sits flat. Use several sts to tack sides of ribbing to sides of body.

Use sewing thread and sharp needle to sew on button eyes, if desired. To make an eye like Uni's, simply sew a smaller dark button on top of a larger white button. Use yarn scraps and a tapestry needle to embroider features.

To make twisty hair, thread tapestry needle with approx. 18 inches CC yarn. Make a couple of sts on WS to secure yarn, then make a small st going from WS to RS and back through to WS. Do not pull tight; instead, catch resulting loop of yarn on one of your fingers, creating a loop approx. 3 inches long. Hold base of loop in place with other hand. Twirl finger holding loop around in one direction until loop is so twisted that it starts to kink and twist back on itself. Slip top of loop from finger onto tip of tapestry needle. Hold loop in place and make a stitch through loop to secure it in place. Tug slightly on twisted yarn to straighten it out. Continue embroidering twisty hair as desired.

Note: You can use this method to make whiskers by using sewing thread rather than yarn to make the twists.

Use yarn scraps to stuff creature's head.

Close neck as follows:
Turn creature inside out and hold with stuffed head facing down. Catching sts on WS, make a series of parallel lines of yarn running in one direction across head opening.

Catch WS along edge of head and work perpendicularly to these lines of yarn, weaving over and under. Continue weaving back and forth, catching WS of knitting at each edge.

Weave in ends.

Rice and Lavender Sachet:
Fold cotton fabric in half (with right sides together) so that it measures 3 inches by 4 inches. Sew longer side and one shorter open side of bag, by hand or with a sewing machine, using a half-inch seam allowance.

Turn bag right side out, and fill with a mixture of approx. 2 tsp. lavender and 4 tsp. long grain rice. Be careful not to overfill bag Æ these bags work best when they are slightly floppy. Fold remaining open edge under and sew shut. Insert bag into pocket on creature, then pull tail through buttonhole to secure pocket.

ABOUT THE DESIGNER

Kate Kuckro lives in San Francisco, where she spends as much time as possible knitting, crafting, and baking.

To read more about her knitting inspirations and experiments, please visit her blog; see more of her knits and patterns here.