When Harry Met Lucy, a free knitting pattern from Knitty.com.
INTRODUCTION
When Harry Met Lucy
 by Paul Haesemeyer
![]()
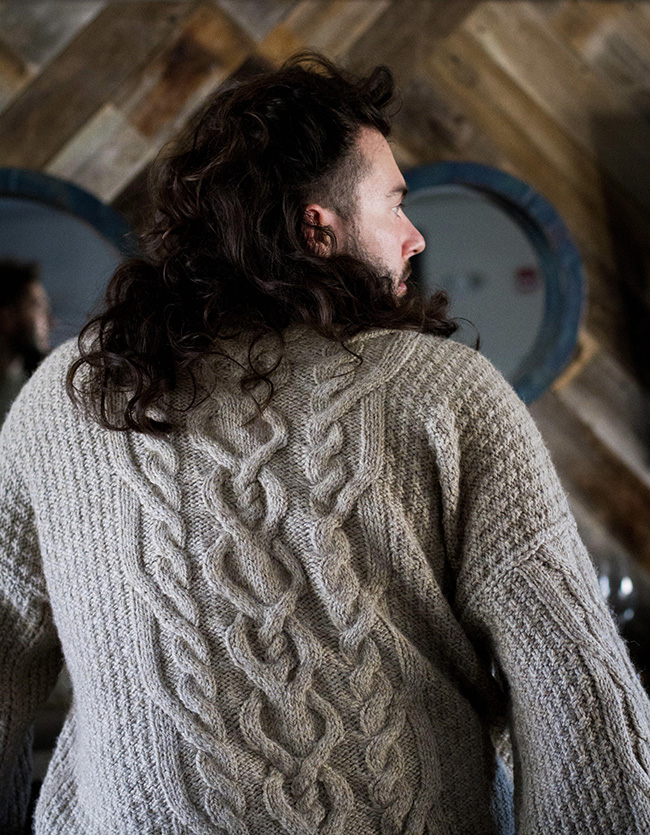
When Harry met Lucy was inspired by two of my favorite rom-coms: When Harry met Sally and While You Were Sleeping. Harry wears an iconic cabled pullover when helping Sally move in. Lucy wears oversized pullovers throughout the movie. I believe she's wearing her deceased father's pullovers to connect with him. And Harry could be related to Lucy somehow. This sweater embraces the iconic 1980s silhouette with modern cables and knits up quickly out of Ultra Alpaca Chunky.
 model: Paul Haesemeyer
 photos: Margaret Cleveland
SIZE
Men's XS[S, M, L, 1X, 2X, 3X, 4X, 5X]
shown in Men's L with 12 inches/ 30.5 cm of ease at chest
FINISHED MEASUREMENTS
Chest: 42[46, 50, 54, 58, 62, 66, 70, 74] inches/ 106.5[117, 127, 137, 147.5, 157.5, 167.5, 178, 188] cm
Length: 24[25, 25, 25, 26, 26, 26, 27, 27] inches/ 61[63.5, 63.5, 63.5, 66, 66, 66, 69, 69] cm
Neck Circumference: 18[20, 21, 22, 23, 24, 25, 26, 27] inches/ 45.5[51, 53.5, 56, 58.5, 61, 63.5, 66, 68.5] cm
Armhole Depth: 9[10, 10, 11, 11, 12, 12, 13, 13] inches/ 23[25.5, 25.5, 28, 28, 30.5, 30.5, 33, 33] cm
Sleeve Length: 19.75[19.75, 20.25, 20.25, 20.75, 20.75, 21.25, 21.25, 21.75] inches / 50[50, 51.5, 51.5, 52.5, 52.5, 54, 54, 55] cm
MATERIALS
Yarn
![]() Berroco Ultra Alpaca Chunky [50% Super Fine Alpaca, 50% Peruvian Wool; 131 yds/ 120m per 3.5 oz/ 100g skein]; color: Barley; 8[10, 11, 13, 13, 15, 16, 17, 18] skeins.
Berroco Ultra Alpaca Chunky [50% Super Fine Alpaca, 50% Peruvian Wool; 131 yds/ 120m per 3.5 oz/ 100g skein]; color: Barley; 8[10, 11, 13, 13, 15, 16, 17, 18] skeins.
Yarn Characteristics
![]() The sample shown uses a bulky-weight 2-ply wool/alpaca blend. For a garment that's slightly less warm, choose a 100% wool yarn, or even a wool/synthetic blend.
The sample shown uses a bulky-weight 2-ply wool/alpaca blend. For a garment that's slightly less warm, choose a 100% wool yarn, or even a wool/synthetic blend.
Recommended needle size
[always use a needle size that gives you the gauge listed below - every knitter's gauge is unique]
![]() 1 set US #10/ 6mm needles for working flat
1 set US #10/ 6mm needles for working flat
![]() 1 set US #8/ 5 mm needles for working flat
1 set US #8/ 5 mm needles for working flat
![]() 1 set US #8/ 5 mm double pointed needles OR 16 inch/40 cm circular needle – for the collar
1 set US #8/ 5 mm double pointed needles OR 16 inch/40 cm circular needle – for the collar
Notions
![]() tapestry needle
tapestry needle
![]() cable needle
cable needle
![]() locking stitch markers
locking stitch markers
GAUGE
16 sts/ 22 rows = 4 inches/ 10 cm in stockinette stitch
20 sts/ 34 rows = 4 inches/ 10 cm wide and 6 inches/ 15 cm tall for Center Cable Motif
14 sts/ 34 rows = 3 inches/ 7.5 cm wide and 6 inches/ 15 cm tall for Framing Cables.
10 inches/ 25.5 cm wide and 6 inches/ 15 cm tall for Total Cable Panel.
PATTERN NOTES
[Knitty's list of standard abbreviations and techniques can be found here.]
Construction method: Back, fronts, and sleeves are worked flat from the bottom up. Hem and Cuff Ribbing is picked-up and knit after pieces are complete. After seaming, the collar is picked up and knit, folded, and sewn into place.
1/1 LPC: Place next st on cable needle, hold to front, p1, k1 from cable needle.
3/3 LC: Slip 3 stitches onto cable needle, hold cable needle at front of work, k3, then k3 from cable needle.
3/3 LPC: Slip 3 stitches onto cable needle, hold cable needle at front of work, p3, then k3 from cable needle.
3/3 RC: Slip 3 stitches onto cable needle, hold cable at back of work, k3, then k3 from cable needle.
3/3 RPC: Slip 3 stitches onto cable needle, hold cable at back of work, k3, then p3 from cable needle.
3/1 LC: Slip 3 stitches onto cable needle, hold cable needle at front of work, k1, then k3 from cable needle.
3/1 LPC: Slip 3 stitches onto cable needle, hold cable needle at front of work, p1, then k3 from cable needle.
3/1 RC: Slip 1 stitch onto cable needle, hold cable needle at back of work, k3, then k1 from cable needle.
3/1 RPC: Slip 1 stitch onto cable needle, hold cable needle at back of work, k3, then p1 from cable needle.
PATTERN STITCHES
Tubular bind off: You can find instructions and a tutorial here.
Sloped Bind-off
When working the shoulder bind-offs, you can get a smoother edge by using the sloped bind-off method, as follows:
On the row before you bind off, work in pattern to last st, and slip the last st purlwise. At the start of the following row, don't work the first 2 sts, but rather slip both of them purlwise to right needle, and pass the first over the second, as per a standard bind off. Continue as normal to end of row, slipping the final stitch as required if the following row begins with a bind off.
CHARTS
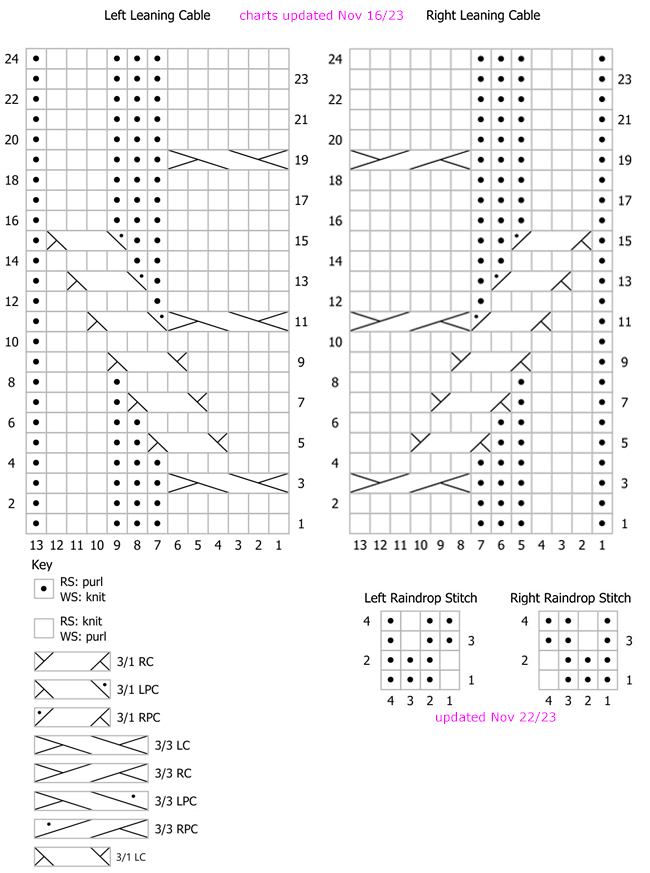
Right Raindrop Stitch (multiple of 4)
Work from Chart or written instructions as you prefer.
Row 1 [RS]: (P3, k1) to end of section.
Row 2 [WS]: (P1, k3) to end of section.
Row 3 [RS]: (P1, k1, p2) to end of section.
Row 4 [WS]: (K2, p1, k1) to end of section.
Left Raindrop Stitch (multiple of 4)
Row 1 [RS]: (K1, p3) to end of section.
Row 2 [WS]: (K3, p1) to end of section.
Row 3 [RS]: (P2, k1, p1) to end of section.
Row 4 [WS]: (K1, p1, k2) to end of section
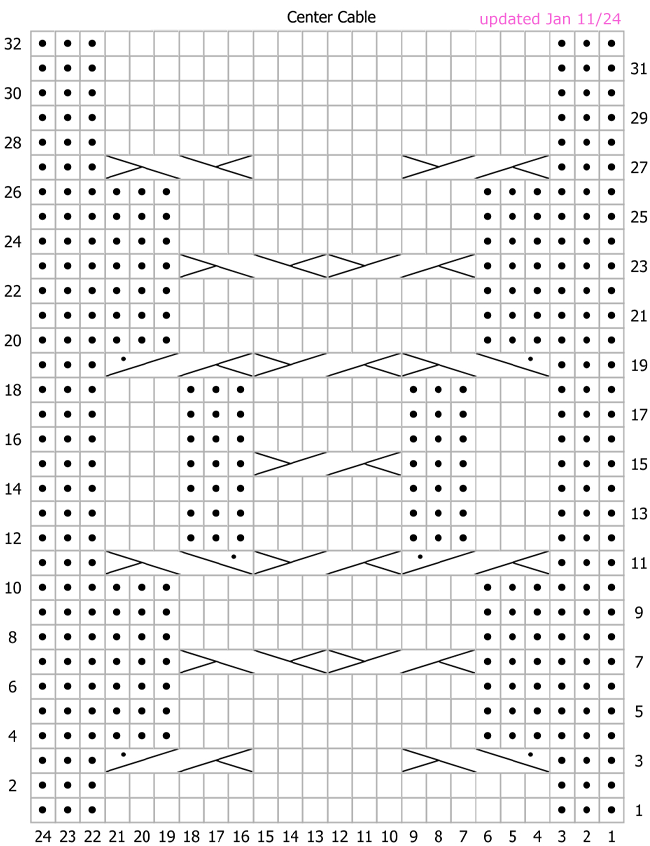
Center Cable (worked over 24 sts)
Row 1 [RS]: P3, k18, p3.
Row 2 [WS]: K3, p18, k3.
Row 3 [RS]: P3, 3/3 LPC, k6, 3/3 RPC, p3.
Row 4 [WS]: K6, p12, k6.
Row 5 [RS]: P6, k12, p6.
Row 6 [WS]: K6, p12, k6.
Row 7 [RS]: P6, 3/3 RC, 3/3 LC, p6.
Row 8 [WS]: K6, p12, k6.
Row 9 [RS]: P6, k12, p6.
Row 10 [WS]: K6, p12, k6.
Row 11 [RS]: P3, 3/3 RPC, 3/3 RC, 3/3 LPC, p3.
Row 12 [WS]: K3, p3, k3, p6, k3, p3, k3.
Row 13 [RS]: P3, k3, p3, k6, p3, k3, p3.
Row 14 [WS]: K3, p3, k3, p6, k3, p3, k3.
Row 15 [RS]: P3, k3, p3, 3/3 RC, p3, k3, p3.
Rows 16-18: Repeat Rows 12-14.
Row 19 [RS]: P3, 3/3 LPC, 3/3 RC, 3/3 RPC, p3.
Row 20 [WS]: K6, p12, k6.
Row 21 [RS]: P6, k12, p6.
Row 22 [WS]: K6, p12, k6.
Row 23 [RS]: P6, 3/3 RC, 3/3 LC, p6.
Row 24 [WS]: K6, p12, k6.
Row 25 [RS]: P6, k12, p6.
Row 26 [WS]: K6, p12, k6.
Row 27 [RS]: P3, 3/3 RC, k6, 3/3 LC, p3.
Row 28 [WS]: K3, p18, k3.
Row 29 [RS]: P3, k18, p3.
Row 30 [WS]: K3, p18, k3.
Row 31 [RS]: P3, k18, p3.
Row 32 [WS]: K3, p18, k3.
| Right Leaning Cable (over 13 stitches) Work from charted or written instructions as you prefer. |
Left Leaning Cable (over 13 stitches) |
DIRECTIONS
Back
With larger needles for working flat, using the long-tail method, CO 86[94, 102, 110, 118, 126, 134, 142, 150] sts.
Row 1: K2, work Right Raindrop Stitch over 16[20, 24, 28, 32, 36, 40, 44, 48] sts, work Right Leaning Cable, work Center Cable, work Left Leaning Cable, work Left Raindrop Stitch over 16[20, 24, 28, 32, 36, 40, 44, 48] sts, k2.
Row 2: P2, work Left Raindrop Stitch over 16[20, 24, 28, 32, 36, 40, 44, 48] sts, work Left Leaning Cable, work Center Cable, work Right Leaning Cable, work Right Raindrop Stitch over 16[20, 24, 28, 32, 36, 40, 44, 48] sts, p2.
Repeat Rows 1-2 for 22[23, 23, 23, 24, 24, 24, 25, 25] inches/ 56[59, 59, 59, 61, 61, 61, 64, 64] cm. BO all sts.
Front
With larger needles, cast on 86[94, 102, 110, 118, 126, 134, 142, 150] sts.
Row 1 [RS]: K2, work Right Raindrop Stitch over 16[20, 24, 28, 32, 36, 40, 44, 48] sts, work Right Leaning Cable, work Center Cable, work Left Leaning Cable, work Left Raindrop Stitch over 16[20, 24, 28, 32, 36, 40, 44, 48] sts, k2.
Row 2 [WS]: P2, work Left Raindrop Stitch over 16[20, 24, 28, 32, 36, 40, 44, 48] sts, work Left Leaning Cable, work Center Cable, work Right Leaning Cable, work Right Raindrop Stitch over 16[20, 24, 28, 32, 36, 40, 44, 48] sts, p2.
Repeat Rows 1-2 for 20.25[20.75, 20.5, 20.5, 21, 21, 21, 21.75, 21.75] inches/ 51[53, 52, 52, 52, 53, 53, 55, 55] cm.

Neck Shaping:
Row 1 [RS]: Work 33[37, 41, 45, 49, 53, 57, 61, 65] sts in pattern, BO center 20 sts, work in pattern to end of row. 66[74, 82, 90, 98, 106, 114, 122, 130] sts.
Continue on the second set of 33[37, 41, 45, 49, 53, 57, 61, 65] sts, for the Right Front Neck only; the first set of 33[37, 41, 45, 49, 53, 57, 61, 65] sts will be held for Left Front Neck.
Row 2 and all WS Rows [WS]: Work across Right Front Neck st in pattern.
Right Front
Row 3 [RS]: BO 4 sts, work in pattern to end of row. 29[33, 37, 41, 45, 49, 53, 57, 61] sts
Row 5: BO 3[3, 3, 3, 3, 4, 4, 4, 4] sts, work in pattern to end of row. 26[30, 34, 38, 42, 45, 49, 53, 57] sts
Row 7: BO 2[2, 2, 3, 3, 3, 3, 3, 3] sts, work in pattern to end of row. 24[28, 32, 35, 39, 42, 46, 50, 54] sts
Row 8: Work across Right Front Neck st in pattern
Size XS only, proceed to Final Rows.
Row 9: BO -[2, 2, 2, 2, 2, 2, 2, 3] sts, work in pattern to end of row. -[26, 30, 33, 37, 40, 44, 48, 51] sts
Row 10: Work across Right Front Neck st in pattern
Size S only, proceed to Final Rows.
Row 11: BO -[-, 1, 1, 1, 1, 2, 2, 2] sts, work in pattern to end of row. -[-, 29, 32, 36, 39, 42, 46, 49] sts.
Row 12: Work across Right Front Neck st in pattern
Sizes M and L only, proceed to Final Rows.
Row 13: BO -[-, -, -, 1, 1, 1, 1, 1] sts, work in pattern to end of row. -[-, -, -, 35, 38, 41, 45, 48] sts.
Row 14: Work across Right Front Neck st in pattern
Sizes XL, 2XL and 3XL only, proceed to Final Rows.
Row 15: BO -[-, -, -, -, -, -, 1, 1] sts, work in pattern to end of row. -[-, -, -, -, -, -, 44, 47] sts.
Row 16: Work across Right Front Neck st in pattern
Final Rows:
24[26, 29, 32, 35, 38, 41, 44, 47] sts rem.
Work two more rows even.
BO all sts on the right side.
Left Front
With WS facing, rejoin yarn to sts held for Left Front.
Row 2 [WS]: Work in pattern across 33[37, 41, 45, 49, 53, 57, 61, 65] sts.
Row 3 and all odd rows [RS]: Work across in pattern.
Row 4: BO 4 sts, work in pattern to end of row. 29[33, 37, 41, 45, 49, 53, 57, 61] sts
Row 6: BO 3[3, 3, 3, 3, 4, 4, 4, 4] sts, work in pattern to end of row. 26[30, 34, 38, 42, 45, 49, 53, 57] sts
Row 8: BO 2[2, 2, 3, 3, 3, 3, 3, 3] sts, work in pattern to end of row. 24[28, 32, 35, 39, 42, 46, 50, 54] sts
Size XS only, proceed to Final Rows.
Row 10 [WS]: BO -[2, 2, 2, 2, 2, 2, 2, 3] sts, work in pattern to end of row. -[26, 30, 33, 37, 40, 44, 48, 51] sts
Size S only, proceed to Final Rows.
Row 12 [WS]: BO -[-, 1, 1, 1, 1, 2, 2, 2] sts, work in pattern to end of row. -[-, 29, 32, 36, 39, 42, 46, 49] sts.
Sizes M and L only, proceed to Final Rows.
Row 14 [WS]: BO -[-, -, -, 1, 1, 1, 1, 1] sts, work in pattern to end of row. -[-, -, -, 35, 38, 41, 45, 48] sts.
Sizes XL, 2XL and 3XL only, proceed to Final Rows.
Row 16 [WS]: BO -[-, -, -, -, -, -, 1, 1] sts, work in pattern to end of row. -[-, -, -, -, -, -, 44, 47] sts.
Final Rows:
24[26, 29, 32, 35, 38, 41, 44, 47] sts rem.
Starting on RS, work 2 rows even. BO all sts on right side.
Body Hems
Work on both Front and Back pieces.
Using smaller needles for working flat, rejoin yarn with RS facing pick up and knit 82[90, 98, 106, 114, 122, 130, 138, 146] sts evenly distributed along the cast-on edge.
Row 1 [WS]: P1, p2tog to last st, p1. 42[46, 50, 54, 58, 62, 66, 70, 74] sts.
Row 2 [RS]: K2, (p2, k2) across.
Row 3: P2, (k2, p2) across.
Repeat Rows 2-3, five more times.
Final Row [RS]: (K1, 1/1 LPC, p1) to last 2 sts, k1, p1.
Using Tubular method, BO.

Sleeves
Using larger needles for working flat, cast on 74[82, 82, 90, 90, 98, 98, 106, 106] sts.
Row 1: K2, work Left Raindrop Stitch over 8[12, 12, 16, 16, 20, 20, 24, 24] sts, p1, k1, work Right Leaning Cable, work Center Cable, work Left Leaning Cable, k1, p1, work Right Raindrop Stitch over 8[12, 12, 16, 16, 20, 20, 24, 24] sts, k2.
Row 2: P2, work Left Raindrop Stitch over 8[12, 12, 16, 16, 20, 20, 24, 24] sts, k1, p1, work Right Leaning Cable, work Center Cable, work Left Leaning Cable, p1, k1, work Right Raindrop Stitch over 8[12, 12, 16, 16, 20, 20, 24, 24] sts, p2.
Row 3: K2, work Left Raindrop Stitch, over 8[12, 12, 16, 16, 20, 20, 24, 24] sts, p1, k1, work Right Leaning Cable, work Center Cable, work Left Leaning Cable, k1, p1, work Right Raindrop Stitch over 8[12, 12, 16, 16, 20, 20, 24, 24] sts, k2.
Row 4: P2, work Right Raindrop Stitch over 8[12, 12, 16, 16, 20, 20, 24, 24] sts, k1, p1, work Right Leaning Cable, work Center Cable, work Left Leaning Cable, p1, k1, work Right Raindrop Stitch over 8[12, 12, 16, 16, 20, 20, 24, 24] sts, k2.
Repeat Rows 1-4 for 17.5[17.5, 18, 18, 18.5, 18.5, 19, 19, 19.5] inches/ 44.5[44.5, 46, 46, 47, 47, 49, 49, 50] cm. BO all sts.
Sleeve Cuff
Using smaller needles for working flat, pick up and knit 74[82, 82, 90, 90, 98, 98, 106, 106] sts from the right side on the cast on edge.
Row 1 [WS]: P1, p2tog to last st, p1. 38[42, 42, 46, 46, 50, 50, 54, 54] sts.
Row 2 [RS]: K2, (p2, k2) across.
Row 3: P2, (k2, p2) across.
Repeat Rows 2-3 five times more.
Next Row: (K1, 1/1 LPC, p1) to last 2 sts, k1, p1.
Using Tubular method, BO.
Finishing
Seam shoulders together using mattress stitch. Place locking stitch markers 9[10, 10, 11, 11, 12, 12, 13, 13] inches/ 23[25.5, 25.5, 28, 28, 30.5, 30.5, 33, 33] cm down from shoulder on side seam, to guide sleeve placement. Position the top of the sleeve between the two locking stitch markers, and seam sleeve to body. Seam side and sleeve seams.
Collar
Using smaller circular needle or DPNs, rejoin yarn at left shoulder seam, and pick up and knit 11[13, 14, 15, 16, 17, 18, 19, 20] sts along the left front slope, 20[20, 20, 20, 20, 20, 20, 20, 20] sts along the front neck, 11[13, 14, 15, 16, 17, 18, 19, 20] sts along the right front slope, and 38[42, 44, 46, 48, 50, 52, 54, 56] sts along the back neck.
80[88, 92, 96, 100, 104, 108, 112, 116] sts total.
Ribbing round: (K2, p2) around. Work ribbing as set for 26 rounds.
Bind off in pattern, using the larger needle to work the stitches to keep the edge relaxed. Cut, yarn, leaving a tail approximately 72 inches/183 cm long. Fold collar in half and stitch to underside, using the tail.

FINISHING
Weave in all ends, soak the sweater with mild soap and cold water, gently squeeze water out of the sweater out with hands, place the sweater flat onto a towel and roll the sweater gently to wring the rest of the water out. Once most of the water has been removed, gently smooth the sweater flat to remove wrinkles and to shape; let dry.
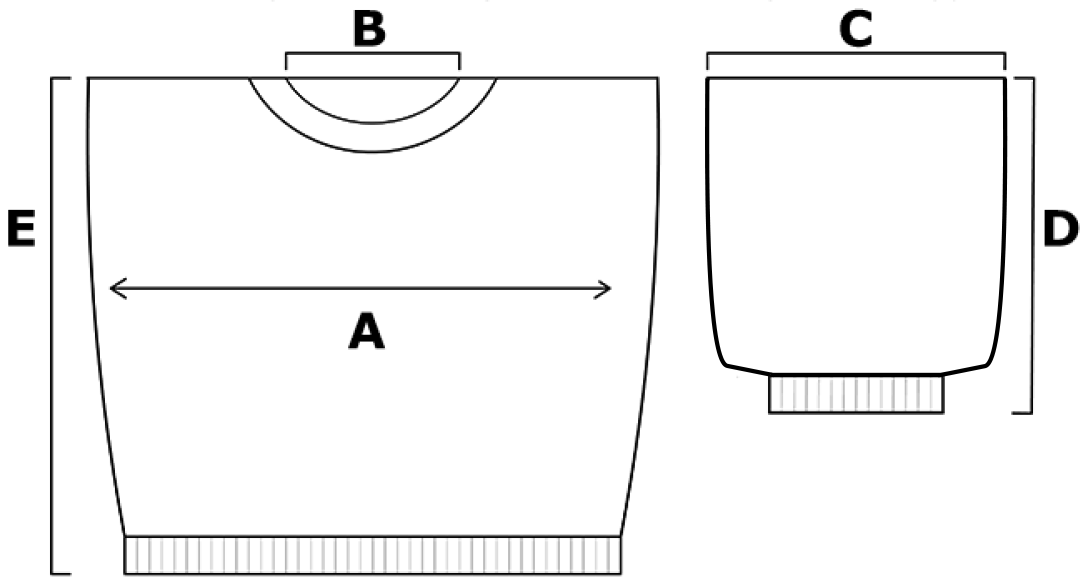
A – chest width: 42[46, 50, 54, 58, 62, 66, 70, 74] inches/ 106.5[117, 127, 137, 147.5, 157.5, 167.5, 178, 188] cm
B – neck width: 9[10, 10.5, 11, 11.5, 12, 12.5, 13, 13.5] inches / 23[25.5, 26.5, 28, 29, 30.5, 32, 33, 34] cm
C – bicep circumference: 18[20, 20, 22, 22, 24, 24, 26, 26] inches/ 45.5[51, 51, 56, 56, 61, 61, 66, 66] cm
D – sleeve length: 19.75[19.75, 20.25, 20.25, 20.75, 20.75, 21.25, 21.25, 21.75] inches / 50[50, 51.5, 51.5, 52.5, 52.5, 54, 54, 55] cm
E – body length: 24[25, 25, 25, 26, 26, 26, 27, 27] inches/ 61[63.5, 63.5, 63.5, 66, 66, 66, 69, 69] cm
ABOUT THE DESIGNER
 Paul Haesemeyer is a multigenerational, up-and-coming knitwear designer who has recently been featured in Radåm Magazine and Vogue Knitting. Ever since learning how to knit as a second-grader, Paul has been stitching ever since. He has worked professionally in costume construction at the Santa Fe Opera and the Alabama Shakespeare Festival.
He will be living in Riga, Latvia, this year as a Fulbright Scholar working on his first knitting book.
Pattern & images © 2023 Paul Haesemeyer


