


Morganna, a free knitting pattern from Knitty.com.
INTRODUCTION
Morganna
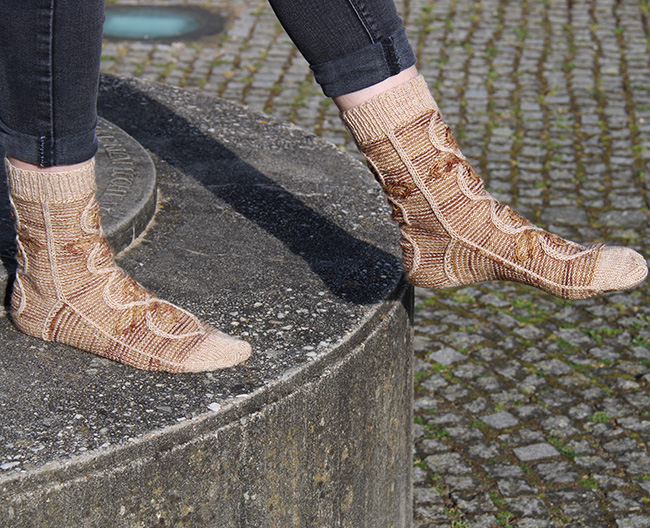 by Linda Janssen-Owens from Atelier Midsummer's Eve

When I was a little girl I loved fairy tales, as I got older I went from reading fairy tales to reading myths and legends. Greek, Roman, Viking, British, it really didn't matter, I read a lot. When I got to my twenties/thirties I started to think more about my heritage. My father's side of the family comes from Wales. So I read more about the Celts, their myths and legends and especially their artwork.
I love Celtic designs and myths, I love (slipped) cables and I love designing and knitting challenging socks. However I do not like colorwork, I prefer using just 1 color at a time. Ask any of my friends and they will tell you. I do, however, love colors.
In this pattern you use 2 contrasting colors to get a pair of complicated looking socks that are really not as difficult to make as they seem on first glance. Through the years I have seen several patterns where you work 1 round in color A and the next in color B, then A again, then B and so on and so on. The advantage being you only use 1 color per round, so it is exactly like working a single color pattern. You do not need to worry about tension between the different colors like you have to do when doing any colorwork and need to carry the yarn over a number of stitches. You only need to consider tension when switching colors. Or to be honest, you cheat. The endresult looks like you have done very complex colorwork but you really haven't. But nobody has to know that.
Combine this technique with drawings from the Book of Kells and the Book of Durow, the Arthurian myths, the use of slipped cables and some lovely contrasting colors and this is how Morganna came to be.
 photos: Linda Janssen-Owens, Atelier Midsummer's Eve


SIZE
Adult S[M, L]
FINISHED MEASUREMENTS
Foot circumference: 7.75[8.5, 9.25] inches/ 19.5[21.5, 23.5] cm
Ankle circumference: 7.75[8.5, 9.25] inches/ 19.5[21.5, 24] cm
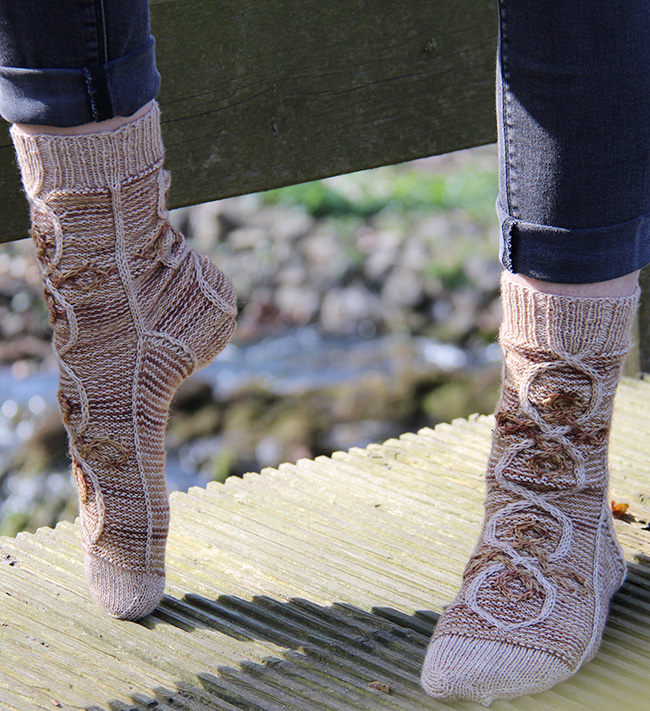
Leg length: 7.25 inches/18 cm as shown, adjustable
Choose a size with approximately .5-1 inch/1.5-2.5 cm negative ease in the foot circumference.
MATERIALS
Yarn
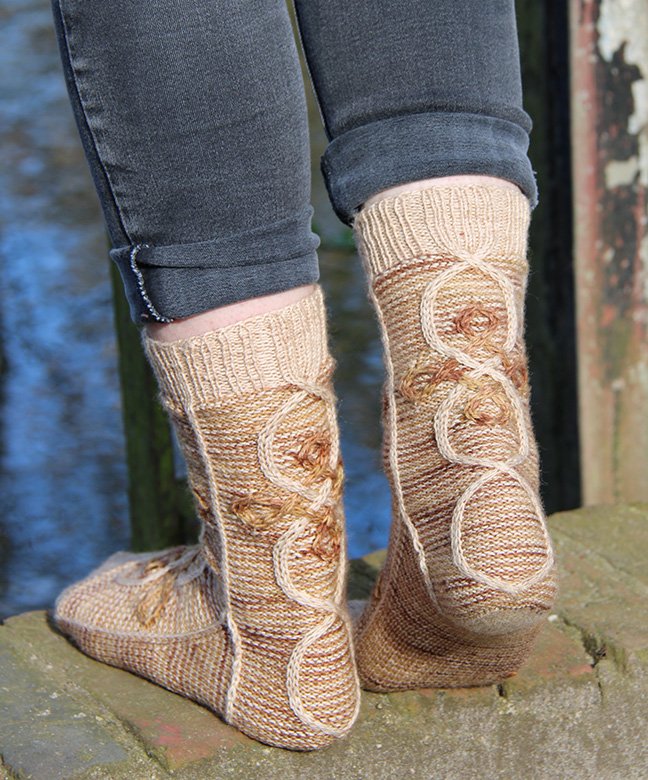
Size S (light brown and darker brown sock, shown below left)
Atelier Het Wolbeest BFL Sock (75% BFL, 25% Nylon, 425 meters / 100 gram)
![]() MC: Rye, 1 skein
MC: Rye, 1 skein
![]() CC: Squirrel Nutkin, 1 skein
CC: Squirrel Nutkin, 1 skein
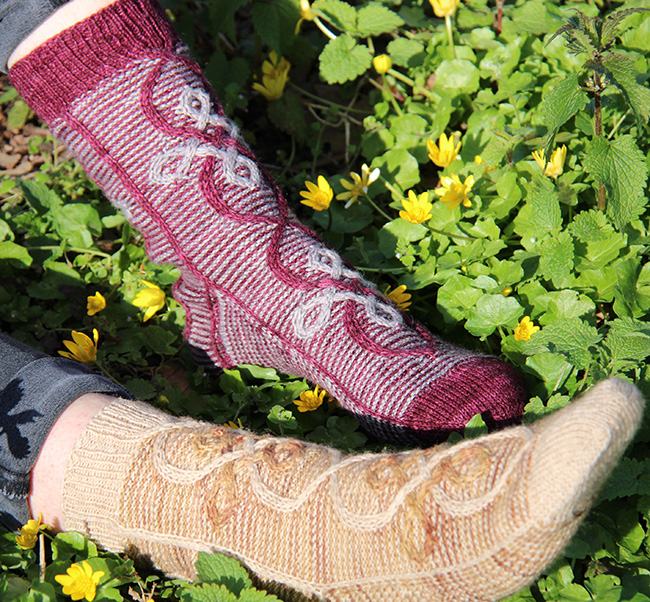
Size M (grey/plum sock, shown below middle)
Atelier Het Wolbeest, Basic Sock 2 (75% wool, 25% Nylon, 420 meters / 100 gram).
![]() MC: Dark Plum, 1 skein
MC: Dark Plum, 1 skein
![]() CC: Mouse Grey, 1 skein
CC: Mouse Grey, 1 skein
Size L (light brownish/dark grey sock, shown below right)
![]() MC: Atelier Het Wolbeest BFL Sock (75% BFL, 25% Nylon, 425 meters / 100 gram)color: Cybermen, 1 skein
MC: Atelier Het Wolbeest BFL Sock (75% BFL, 25% Nylon, 425 meters / 100 gram)color: Cybermen, 1 skein
![]() CC: Atelier Het Wolbeest Yak Sock (70% Superwash Merino 20% Yak 10% Nylon, 400 meters / 100 gram), color: Batts, 1skein
CC: Atelier Het Wolbeest Yak Sock (70% Superwash Merino 20% Yak 10% Nylon, 400 meters / 100 gram), color: Batts, 1skein
Yarn Characteristics
![]() Choose yarns that are smooth and tightly spun, to show the cables best. Use two yarns that have a strong color contrast. You can choose to use 2 (semi-) solids or 1 (semi-) solid and a variegated or self-striping yarn. Good contrast is the most important factor when choosing your yarns.
For my S and L example socks I used a semi-solid (MC for S and CC for L) and a variegated (CC for S and MC for L) yarn and for the M I used 2 semi- solids.
Choose yarns that are smooth and tightly spun, to show the cables best. Use two yarns that have a strong color contrast. You can choose to use 2 (semi-) solids or 1 (semi-) solid and a variegated or self-striping yarn. Good contrast is the most important factor when choosing your yarns.
For my S and L example socks I used a semi-solid (MC for S and CC for L) and a variegated (CC for S and MC for L) yarn and for the M I used 2 semi- solids.
Recommended needle size
[always use a needle size that gives you the gauge listed below - every knitter's gauge is unique]
![]() 1 set US #1/2.25mm needles for small circumference in the round: traditional or flexible DPNs, 1 long circular for magic loop, or 2 shorter circulars
1 set US #1/2.25mm needles for small circumference in the round: traditional or flexible DPNs, 1 long circular for magic loop, or 2 shorter circulars
Notions
![]() 2 cable needles
2 cable needles
![]() stitch markers
stitch markers
![]() yarn needle
yarn needle

GAUGE
32 sts/44 rows = 4 inches/10 cm in stockinette stitch
Panel A is about 3.75 inches/9.75 cm wide and 5.5 inches/14 cm long
PATTERN NOTES
[Knitty's list of standard abbreviations and techniques can be found here.]
Slipping sts: All sts should be slipped purlwise with yarn held to WS of work. When working the MC rows of the heel, do not pull the first and last 3 stitches too tight. You will need some give for the slipped stitches. If you tighten the stitches, the heel flap will be pulled together in a way you do not want to happen.
Increase 1 to 5: [video tutorial] Insert the right needle between the 1st and the 2nd stitch on the left-hand needle (in between, so not into any stitch), wrap the yarn around the needle and pull through as if to knit. Slip the 1st stitch on your left needle purlwise onto your right-hand needle. Now insert your left-hand needle in between the 1st and 2nd stitch on your right-hand needle. Wrap the yarn around your left needle and pull it through. You now have 1 new stitch on your left-hand needle and the original and 1 new stitch on your right-hand needle. Slip the original stitch back onto your left-hand needle purlwise. Insert the right needle between the 1st and the 2nd stitch on the left-hand needle, wrap the yarn around the needle and pull through as if to knit. Slip the 1st stitch on your left needle purlwise onto your right-hand needle. Now insert your left-hand needle in between the 1st and 2nd stitch on your right-hand needle. Wrap the yarn around your left needle and pull it through. You now have 2 new stitches on your left-hand needle and the original and 2 new stitches on your right-hand needle. Slip the 2 new stitches from your left-hand needle to your right-hand needle purlwise. You now have all 4 new stitches (with the original stitch in the middle) on your right-hand needle.
Decrease 5 to 1: [video tutorial] Slip the next 3 stitches on your left-hand needle onto your right-hand needle purlwise. Insert the left-hand needle into the 2nd stitch on your right-hand needle (this is the middle stitch of the 3 you just slipped from your left-handed to your right-handed needle) and pass this stitch over the 1st stitch on your right-hand needle (decrease 1). Slip the 1st stitch from your right-hand needle back onto your left-hand needle purlwise. Insert your right-hand needle into the 2nd stitch on your left-hand needle and pass this stitch over the 1st stitch on your left-hand needle (decrease 2). Slip the 1st stitch of your left-hand needle onto your right-hand needle purlwise again. Insert the left-hand needle into the 2nd stitch on your right-hand needle and pass this stitch over the 1st stitch on your right-hand needle (decrease 3). Slip the 1st stitch from your right-hand needle back onto your left-hand needle purlwise. Insert your right-hand needle into the 2nd stitch on your left-hand needle and pass this stitch over the 1st stitch on your left-hand needle (decrease 4). Purl the remaining stitch (this is what differs from the versions you will find on the internet!). You have now completed your decrease 5 into 1. Remember to purl your last stitch!
M1P: Use the left needle to pick the strand that runs between the last stitch worked, and the next st on the left needle, from back to front; purl this through the front loop.
2/2 RC: Slip next 2 stitches to cable needle and hold at back of work, k2, then k2 from cable needle.
2/2 RPC: Slip next 2 stitches to cable needle and hold at back of work, k2, then p2 from cable needle.
T4R-sl2: On RS of work - Slip next 2 stitches to cable needle and hold at back of work, sl2, then p2 from cable needle. On WS of work - Slip next 2 stitches to cable needle and hold at back of work, k2, then sl2 from cable needle.
2/2 LC: Slip next 2 stitches to cable needle and hold at front of work, k2, then k2 from cable needle.
2/2 LPC: Slip next 2 stitches to cable needle and hold at front of work, p2, then k2 from cable needle.
C4L-sl2: Slip next 2 stitches to cable needle and hold at front of work, k2, then sl2 from cable needle.
C4L-sl2-k2: Slip next 2 stitches to cable needle and hold at front of work, sl2, then k2 from cable needle.
T4L-sl2: On RS of work - Slip next 2 stitches to cable needle and hold at front of work, p2, then sl2 from cable needle. On WS of work - Slip next 2 stitches to cable needle and hold at front of work, sl2, then k2 from cable needle.
2/1/2 RPC: Slip next 3 stitches to cable needle and place at back of work, k2, slip left-most stitch from cable needle to left needle, move cable needle with remaining stitches to front of work, p1 from left needle, then k2 from cable needle.
T5R-sl2-p1-sl2: Slip next 3 stitches to cable needle and place at back of work, sl2, slip left-most stitch from cable needle to left needle, move cable needle with remaining stitches to front of work, p1 from left needle, then sl2 from cable needle.
T5L-sl2-p1-sl2: Slip next 2 stitches to cable needle and place at front of work, slip next stitch to second cable needle and place at back of work, sl2, p1 from back cable needle, then sl2 from front cable needle.
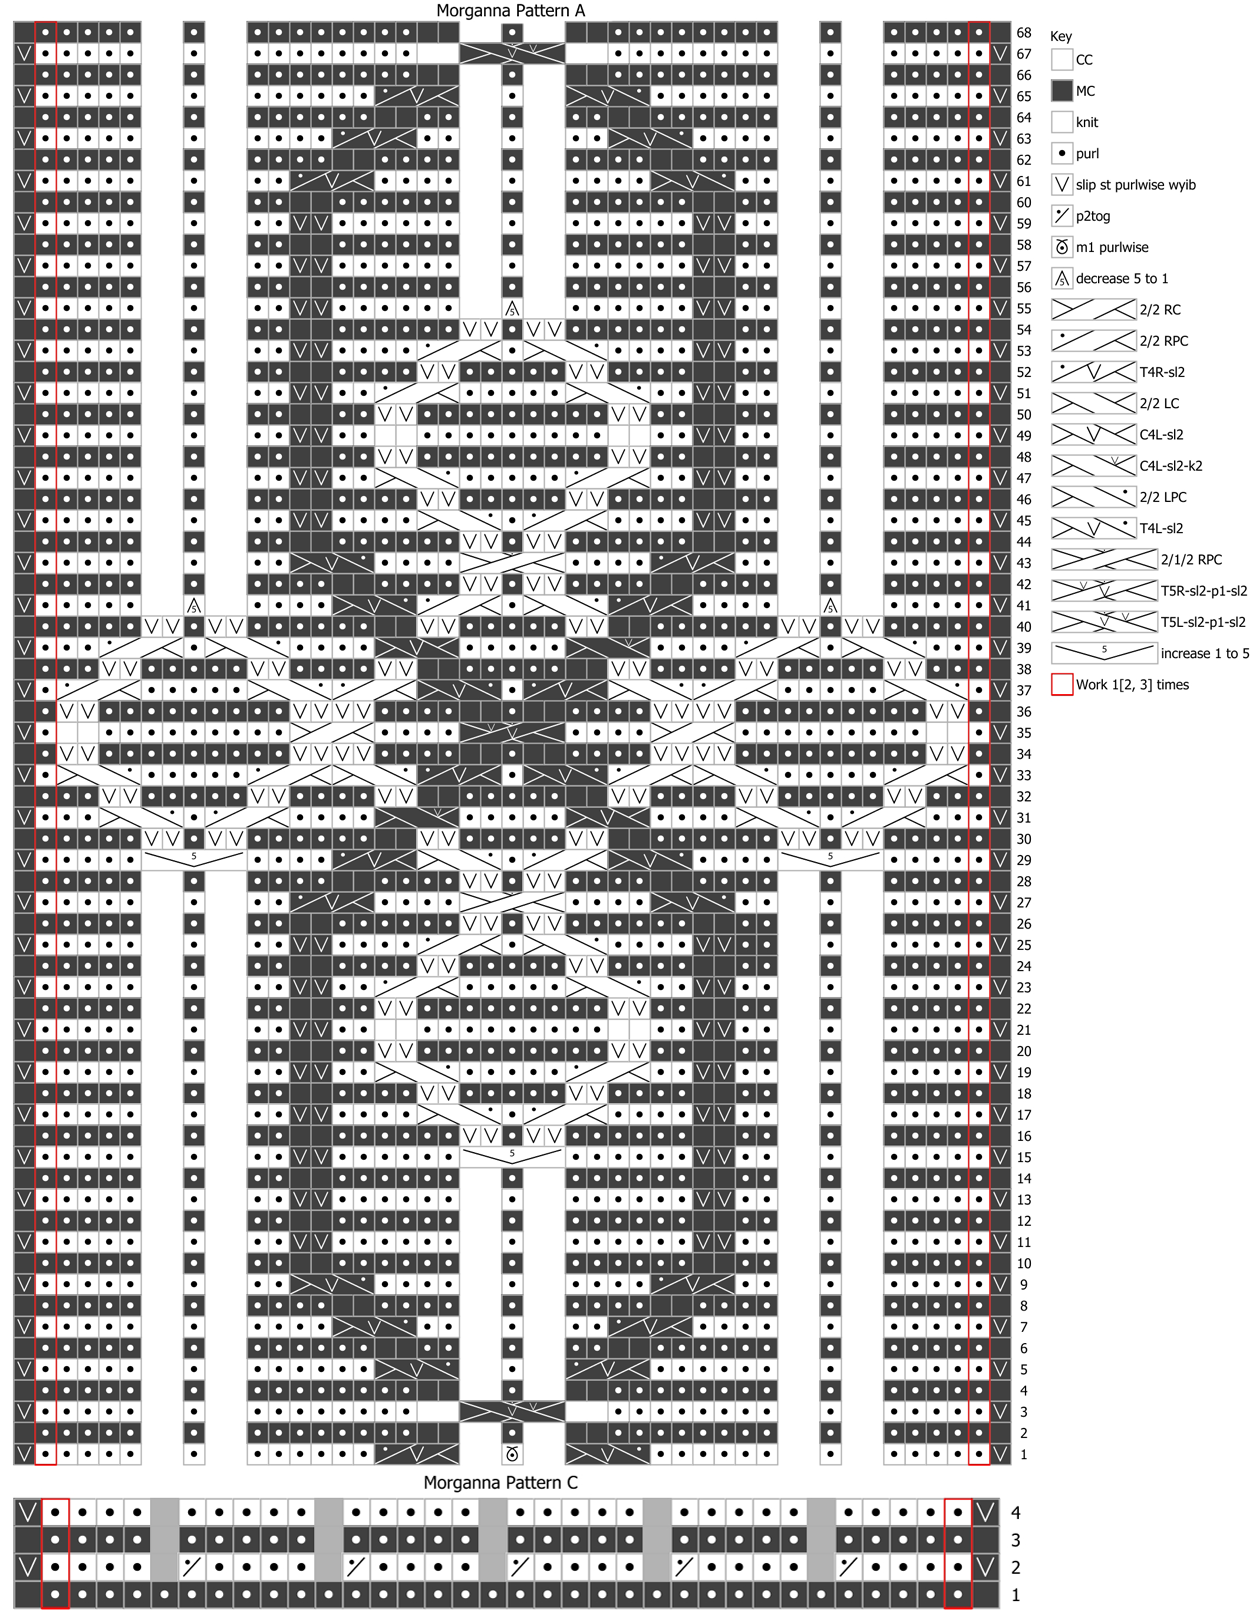
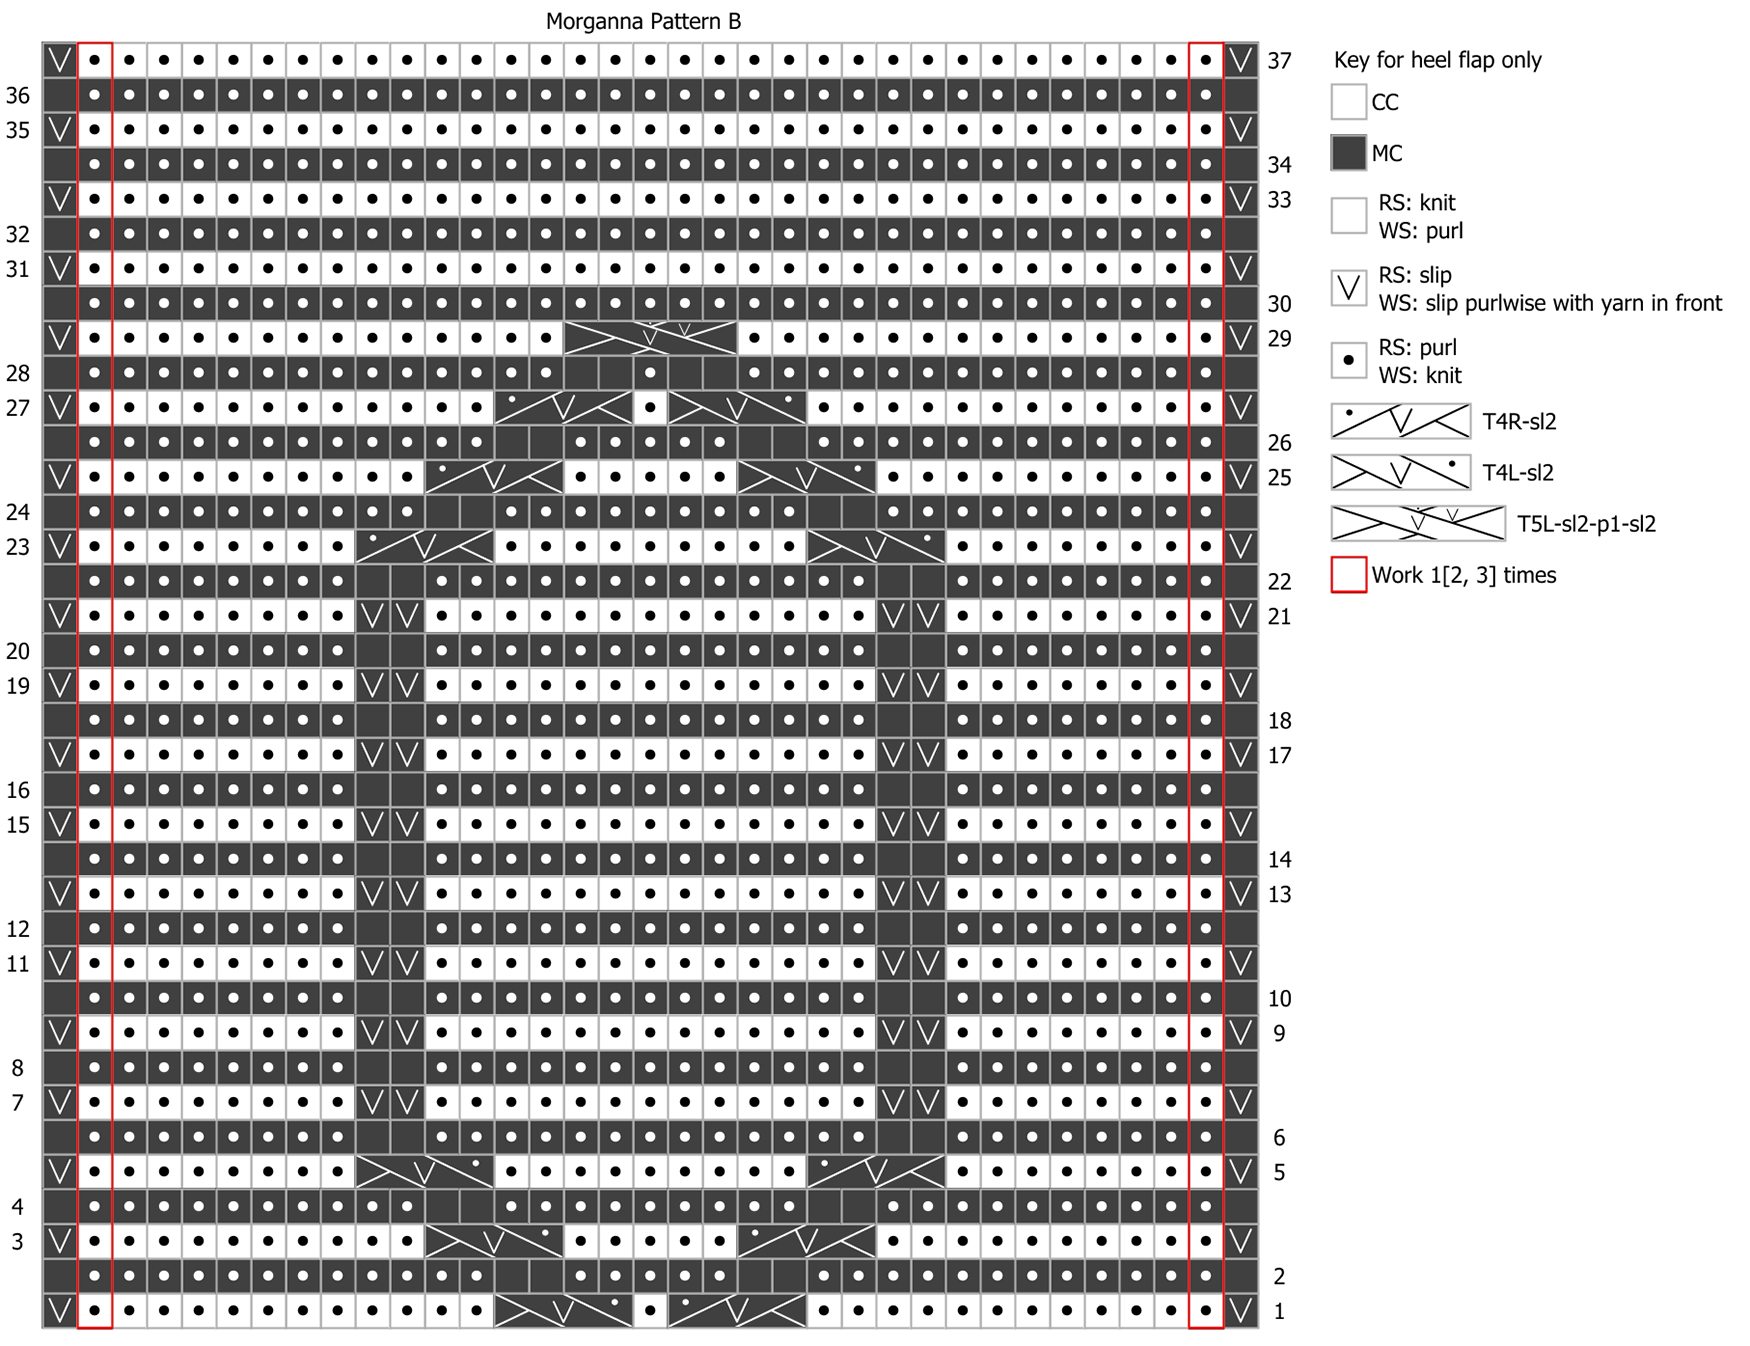
CHARTS
DIRECTIONS
Cuff:
Using MC and your preferred stretchy method, CO 60[64, 68] stitches. Distribute sts across needles as you prefer and join for working in the round. Note or mark start of round. Note: chart repeat is 30[32, 34] sts – divide your sts so that it's easy to keep track.
Sizes S and & L only:
Round 1: ((K1, p1) 4[-, 5] times, k1, p2, k2, p1, k2, p1, k2, p2, k1, (p1, k1) 4[-, 5] times) 2 times.
Size M only:
Round 1: ((K1, p1) 6 times, k2, p1, k2, p1, k2, (p1, k1) 6 times) 2 times.
Work Round 1 a total of 20 times. If you wish to adjust the length of the leg, you can do that here.
Size S only, pattern setup round:
[K1, p1, M1P, k1, p1, k1, M1P, (p1, k1) twice, p2, k2, p1, k2, p1, k2, p2, (k1, p1) twice, M1P, k1, p1, k1, M1P, p1, k1] twice. 68 sts.
Size M only, pattern setup round:
[K1, p1, M1P, (k1, p1) twice, M1P, (k1, p1) 3 times, k2, p1, k2, p1, k2, (p1, k1) three times, M1P, (p1, k1) twice, M1P, p1, k1] twice. 72 sts.
Size L only, pattern setup round:
[K1, p1, M1P, (k1, p1) twice, k1, M1P, (p1, k1) twice, p2, k2, p1, k2, p1, k2, p2, (k1, p1) twice, M1P, (k1, p1) twice, k1, M1P, p1, k1] twice. 76 sts.
Leg:
Join CC.
Leg round: Work Chart A twice around. The stitch count changes throughout the chart. After Rounds 1 and 55, you will have 70[74, 78] sts.
Work as set until you have completed all 68 rows.
Tip: For the smoothest color changes/stripes, just drop the color you have just used at the end of the round and pick up the next color from underneath, without twisting or crossing the yarns.
Heel Flap:
The heel flap is worked over the first 35[37, 39] stitches of the round. It's easiest if you group these stitches together on one needle.
Row 1 [RS]: With CC, work Chart B across 35[37, 39] sts, working repeated sts at the end as indicated. Do not turn, return sts back to start of needle.
Row 2 [RS]: With MC, work Chart B across 35[37, 39] sts, working repeated sts at the end as indicated. Turn.
Row 3 [WS]: With CC, work Chart B across 35[37, 39] sts, working repeated sts at the end as indicated. Do not turn, return sts back to start of needle.
Row 4 [WS]: With MC, work Chart B across 35[37, 39] sts, working repeated sts at the end as indicated.
Continue as set until you have completed 33[33, 37] rows, ending with a CC RS row.
Heel Turn:
Heel turn is worked only in MC; CC is held at the end of the heel flap sts.
Row 1 [RS]: Sl1, k 19[21, 21] , ssk, k1, turn work.
Row 2 [WS]: Sl1, p 6[8, 6] , p2tog, p1, turn work.
Row 3 [RS]: Sl1, k to 1 st before gap, ssk, k1, turn work.
Row 4 [WS]: Sl1, p to 1 st before gap, p2tog, p1, turn work.
Repeat Rows 3-4 until all heel stitches have been worked. 21[23, 23] sts rem.
Last row [RS]: Sl1, k 8[9, 9] , k2tog, k 10[11, 11] . 20[22, 22] sts rem. Both MC and the CC yarn end are hanging on the same side.
Gusset:
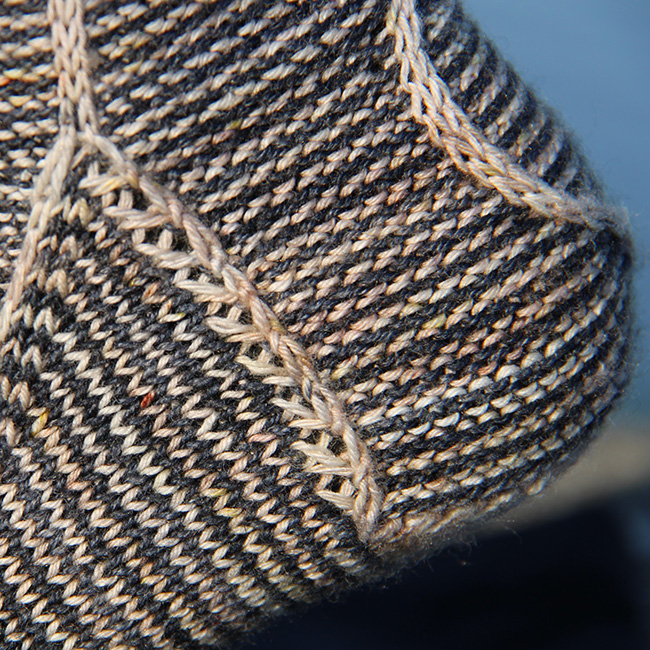
Read before you proceed: To create the vertical CC stripe along the gusset (see picture above), do not pick up under the slipped sts as normal, but rather pick up and knit the gusset sts in the MC column beside the slipped st, from behind, on the WS. This causes the edge to sit slightly differently than you might be used to: the slipped stitches will roll to the front. The picked-up stitches come from the back rather than the front, and there should be no gaps. If you prefer a standard pick-up-knit method, feel free to use that instead.
Gusset round 1, restablish round: Using CC, with RS facing, pick up and knit 17[17, 19] sts along the first side of the heel flap; bring MC along with you, catching the float every 4 sts. Drop MC. With CC, work across 35[37, 39] instep sts as established, as per Chart A, starting with Round 5. As with the first side, pick up and knit 17[17, 19] sts along the second side of the heel flap. Continue and knit across the heel sts, and the first set of picked-up sts.
You will now be positioned at the start of the instep – this is the new start of the round. 89[93, 99] sts - 54[56, 60] sts on the sole.
Gusset round 2: Work across instep in pattern as set; k to end of round.
Gusset round 3: Work across instep in pattern as set; k1, ssk, k to last 3 sts, k2tog, k1. 2 sts decreased.
Repeat Gusset rounds 2-3 11[11, 12] more times, until 65[69, 73] sts rem.
Foot:
Continue in pattern as set, until you have completed Round 67 of Chart A.
Next round: Work Chart C Round 1 across instep; k to end of round.
Next round: Work Chart C Round 2 across instep; k to end of round. 60[64, 68] sts – 30[32, 34] each on sole and instep.
Measure foot. Before you start the toe, the sock foot should measure about 2[2, 2.25] inches/ 5[5, 6] cm short of desired foot length. If you need to lengthen the foot at this point, work Chart C Rounds 3-4, and continue repeating these two rounds until foot reached desired length.
Toe:
Cut CC. Toe is completed in MC.
Decrease round: K1, SSK, knit to 3 sts before end of instep, k2tog, k1; k1, ssk, k to 3 sts before end of round, k2tog, k1. 4 sts decreased.
Knit 3 rounds.
Work the Decrease round followed by 2 even rounds, twice.
Work the Decrease round followed by 1 even round, 3 times.
Work the Decrease round only until 16 sts rem.
Cut yarn, leaving an 8 inch/20 cm tail and graft toe closed.
FINISHING
To block, wash socks. Do not stretch or use blockers. Once dry, weave in all ends.
ABOUT THE DESIGNER
 I live in the Netherlands with my husband and 2 kids. I love to knit and design (mainly socks) and spin as well. You can find me on Ravelry as helix077.
Pattern & images © 2023 Linda Janssen-Owens from Atelier Midsummer's Eve