


This is a Perfect Day, a free knitting pattern from Knitty.com.
INTRODUCTION
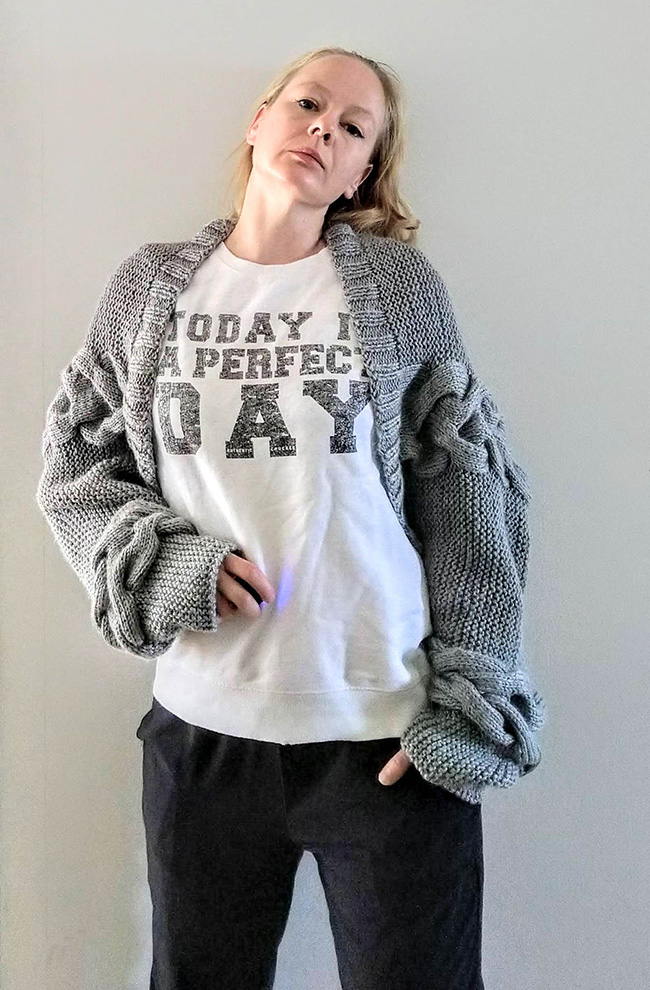
This is a Perfect Day
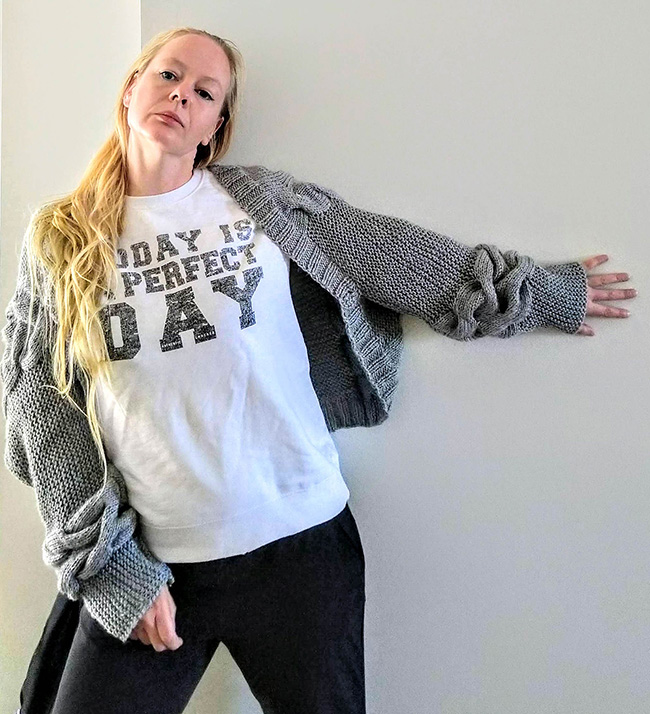 by Artesanitarium Designs

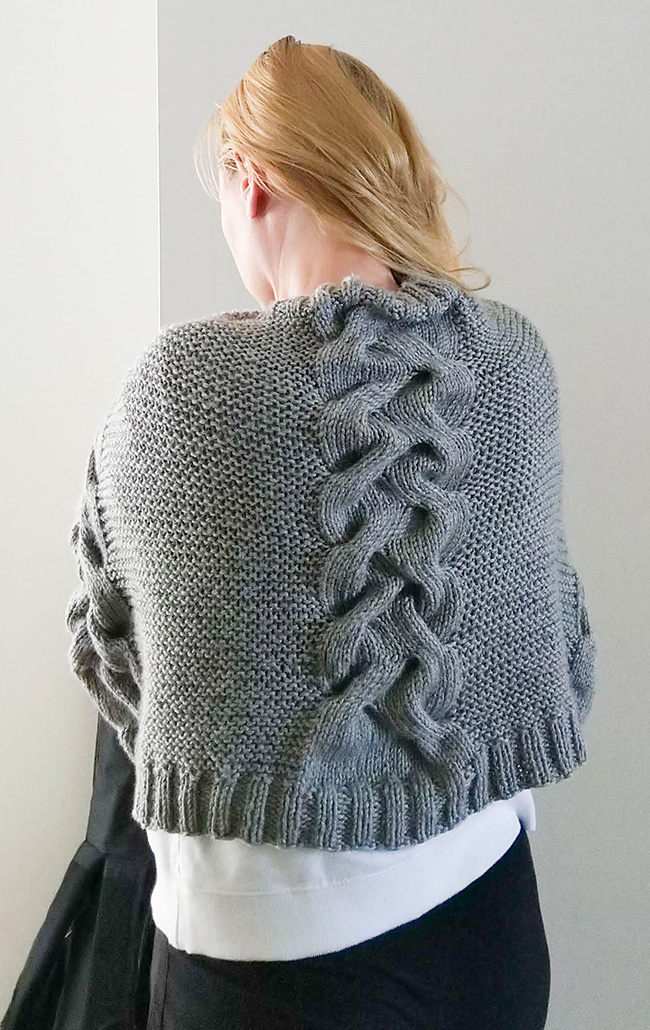
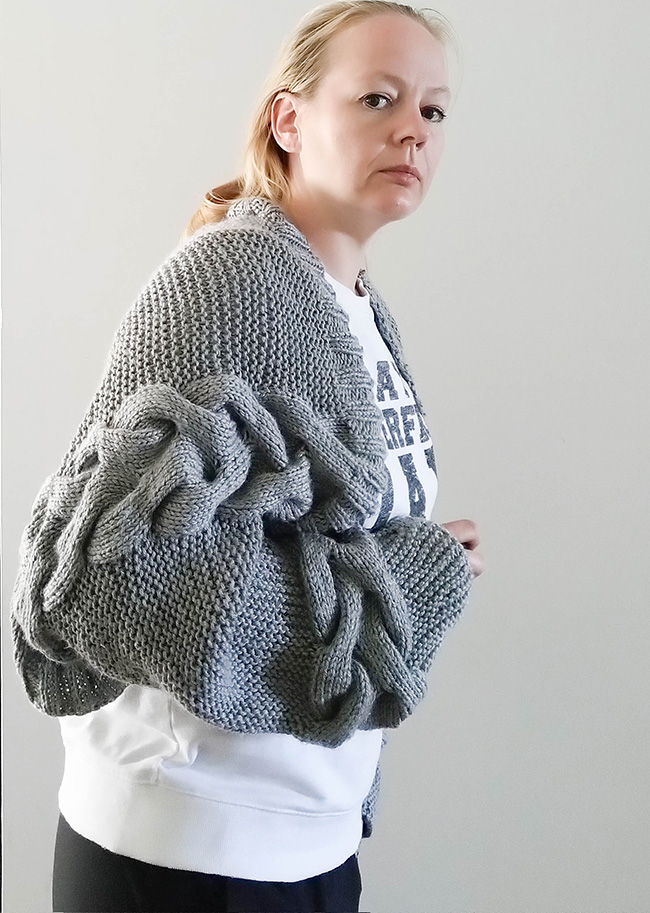
I wanted a relaxed thingy to just throw on on a chilly evening on the balcony, or while knitting in my favorite armchair,or at my laptop, doing busy work. It should be as easy to knit as it is to wear and always, always have cables!
This world of ours is not always a perfect place, not even close! But with this easy and comforting cardigan, you can always make a perfect day, even if just for a second.
 model: Annina
photos: Artesanitarium Designs


SIZE
Women's XS[S, M, L, 1X, 2X, 3X, 4X, 5X]
shown in size M with 8 inches/20 cm of ease at chest
FINISHED MEASUREMENTS
Chest/Bust: 53.5[56.75, 59, 63, 66.25, 69.25, 72.5, 75.5, 78.75] inches/ 136[144, 152, 160, 168, 176, 184, 192, 200] cm
Height: 19.75 inches/50 cm
Sleeve length: 23.5 inches/60 cm
MATERIALS
Yarn
![]() Red Heart; Soft Solids and Heathers [100% Acrylic; 256 yd/ 234 m per 4.97 oz/141 g skein]; color: 00012; 4[4, 4, 4, 5, 5, 5, 6, 6] skeins
Red Heart; Soft Solids and Heathers [100% Acrylic; 256 yd/ 234 m per 4.97 oz/141 g skein]; color: 00012; 4[4, 4, 4, 5, 5, 5, 6, 6] skeins
Yarn Characteristics
![]() The sample shown uses an 100% acrylic yarn which makes the wrap lightweight, easy to clean and affordable. This pattern looks best in solid or semisolid colorway. A wool or wool-blend yarn may hold its shape better over the long term.
The sample shown uses an 100% acrylic yarn which makes the wrap lightweight, easy to clean and affordable. This pattern looks best in solid or semisolid colorway. A wool or wool-blend yarn may hold its shape better over the long term.
Recommended needle size
[always use a needle size that gives you the gauge listed below - every knitter's gauge is unique]
![]() #10.75 US / 7 mm circular needle, or longer
#10.75 US / 7 mm circular needle, or longer
Notions
![]() stitch markers – standard and 2 removable
stitch markers – standard and 2 removable
![]() cable needle
cable needle
![]() yarn needle
yarn needle

GAUGE
10 sts/22 rows = 4 inches/10 cm in Garter stitch
13 sts /19 rows = 4 inches / 10 cm in Stockinette stitch 40-inch/100-cm
24 sts/15 rows in Cable pattern repeat measures 5.5 inches/14 cm wide and 4.25 inches/10.5 cm deep
PATTERN NOTES
[Knitty's list of standard abbreviations and techniques can be found here.]
Construction method: The wrap is knitted as one piece. Work the ribbing on the lower edge of the body first, then the body. The length for sleeves is added by casting on new stitches, and this will create the seam of the sleeve. After the sleeves have reached their full length and width, the same number of stitches that were cast on are bound off. The bind off edge makes the other sleeve seam which is then seamed together with the seam from the sleeve cast on edge made earlier. The edges of the rib sections are seamed together as well.
6/6 LC: Slip next 6 sts to cable needle and hold to front of work; k6, then k6 from cable needle.
6/6 RC: Slip next 6 sts to cable needle and hold to back of work; k6, then k6 from cable needle.
DIRECTIONS
Cast on
Using your preferred stretchy method, CO 136[144, 152, 160, 168, 176, 184, 192, 200] sts.
Hem
Row 1 [RS]: (K2, p2) to end of row.
Row 2 [WS]: (P2, k2) to end of row.
Repeat Rows 1-2 four times more.
Clip removable stitch markers at both ends of the row – these will be used to guide you in finishing.
Using single cast on/backwards loop method, or the knitted-on method, CO 20. Use the same method through-out the following rows. 156[164, 172, 180, 188, 196, 204, 212, 220] sts.
Sleeve increases
In this section, you will work the center of the sleeve in a textured knit/purl pattern, and add stitches by casting on at the end of each row, and you will take the cast-on stitches into the pattern.
Row 1 [RS]: K to end. CO 25 sts. 181[189, 197, 205, 213, 221, 229, 237, 245] sts
Row 2 [WS]: P5, (pm, k 26[28, 30, 32, 34, 36, 38, 40, 42] , pm, p24) 3 times, pm, k 26[28, 30, 32, 34, 36, 38, 40, 42] ], pm, CO 5 sts. 181[189, 197, 205, 213, 221, 229, 237, 245] sts. 5 sts increased.
Row 3: K to end, CO 5 sts. 5 sts increased.
Row 4: (P to marker, k to marker) 4 times, p to end. CO 5 sts. 5 sts increased.
Rows 5-6: Repeat Rows 3-4 once more. 206[214, 222, 230, 238, 246, 254, 262, 270] sts.
Row 7: K to first marker, (k to marker, 6/6 RC, k to marker) 3 times, k to end, CO 5 sts. 211[219, 227, 235, 243, 251, 259, 267, 275] sts.
Row 8: Repeat Row 4.
Row 9-10: Repeat Rows 3-4.
Row 11: Repeat Row 3.
Row 12: K6, pm, (p to marker, k to marker) 4 times, p to last st pm, k1. CO 5. 236[244, 252, 260, 268, 276, 284, 292, 300] sts.
Row 13: As Row 3. 241[249, 257, 265, 273, 281, 289, 297, 305] sts.
Row 14: (K to marker, p to marker) 5 times, k to end, CO 5. 246[254, 262, 270, 278, 286, 294, 302, 310] sts.
Row 15: K to first marker, (k12, 6/6 LC, k to m) 4 times, k to end, CO 5 sts. 251[259, 267, 275, 283, 291, 299, 307, 315] sts.
Row 16: Repeat Row 14. 256[264, 272, 277, 288, 296, 304, 312, 320] sts.
Body
Row 1 [RS]: Sl1, k to end.
Row 2: Sl1, (k to marker, p to marker) 5 times, k to end.
Rows 3-6: Repeat Rows 1-2 two more times.
Row 7: Sl1, k to marker, (6/6 RC, k12 [to first marker], k to next marker) 4 times, k12, 6/6 LC, k to end.
Row 8: As Row 2.
Rows 9-14: Repeat Rows 1-2 three more times.
Row 15: Sl1, k to marker, (k12, 6/6 LC, k to next marker) 4 times, 6/6 RC, k to end.
Row 16: As Row 2.
Repeat Rows 1-16 three more times.
Sleeve Decreases
Note: When you bind off stitches, discard the markers that are no longer needed.
Row 1 [RS]: BO 5 sts, k to end. 5 sts decreased.
Row 2 [WS]: BO 5 sts, (k to marker, p to marker) 5 times, k to end. 5 sts decreased.
Rows 3-6: Repeat Rows 1-2 two more times. 226[234, 242, 250, 258, 266, 274, 282, 290] sts
Row 7: BO 5 sts, k to marker, (k to marker, 6/6 RC, k to marker) 3 times, k to end. 221[229, 237, 245, 253, 261, 269, 277, 285] sts
Row 8: BO 5 sts, (p to marker, k to marker) 4 times, p to end of row. 5 sts decreased.
Row 9: BO 5 sts, k to end. 5 sts decreased.
Rows 10-13: Repeat Rows 8-9 two times more. 191[199, 207, 215, 223, 231, 239, 247, 255] sts
Row 14: BO 5 sts, (p to marker, k to marker) 4 times, p to end of row. 186[194, 202, 210, 218, 226, 234, 242, 250] sts
Row 15: BO 5 sts, (k to marker, k12, 6/6 LC) 3 times, k to end. 181[189, 197, 205, 213, 221, 229, 237, 245] sts.
Row 16: BO 5 sts, (k to marker, p to marker) 3 times, k to end. 176[184, 192, 200, 208, 216, 224, 232, 240] sts.
Collar Rib
Row 1 [WS]: BO 20, p1, k2, (p2, k2) to end of row. 156[164, 172, 180, 188, 196, 204, 212, 220] sts.
Row 2 [RS]: BO 20, p2, (k2, p2) to end of row. 136[144, 152, 160, 168, 176, 184, 192, 200] sts.
Row 3: (P2, k2) to end of row.
Rows 4-10: Repeat Row 3 seven more times.
Bind off in ribbing pattern.
FINISHING
Wash, and lay flat to dry.
Lay the piece flat, and fold the upper half onto the bottom half, right sides facing. Seam the sleeve edges, from the cuff along the cast-on/bound off edges of the sleeve, stopping at the removable markers you placed as a guide for the end.
Weave in loose ends.
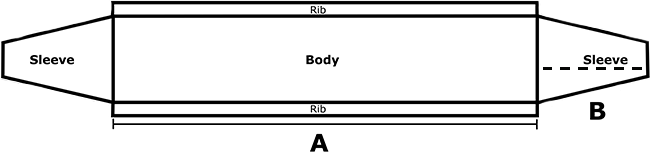
A: 53.5[56.75, 59, 63, 66.25, 69.25, 72.5, 75.5, 78.75] inches/ 136[144, 152, 160, 168, 176, 184, 192, 200] cm
B: 23.5 inches/60 cm
ABOUT THE DESIGNER
 The Artesanitarium is a magical kingdom full of imagination, inspiration and twisted beauty. It is run by Annina the Queen of Cables. She has over 150 designs under her belt, and more are coming. She gets inspired by fantasy, sci-fi, architecture, and mythology. Her designs always have some kind of extra twist in them.
The Artesanitarium is located in the snowy parts of Northern Europe so most of the designs are for what some call "heavier yarn" but in the Artesanitarium, it’s just "yarn". The Queen wants to enable everyone to knit beautiful feminine things, regardless of the thickness of the yarn or needles.
Find her on artesanitarium.com, Ravelry or Instagram.
Pattern & images © 2023 Artesanitarium Designs