


Frozen Porcelain, a free knitting pattern from Knitty.com.
INTRODUCTION
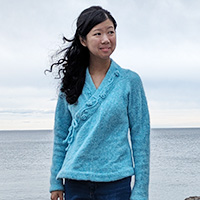
Frozen Porcelain
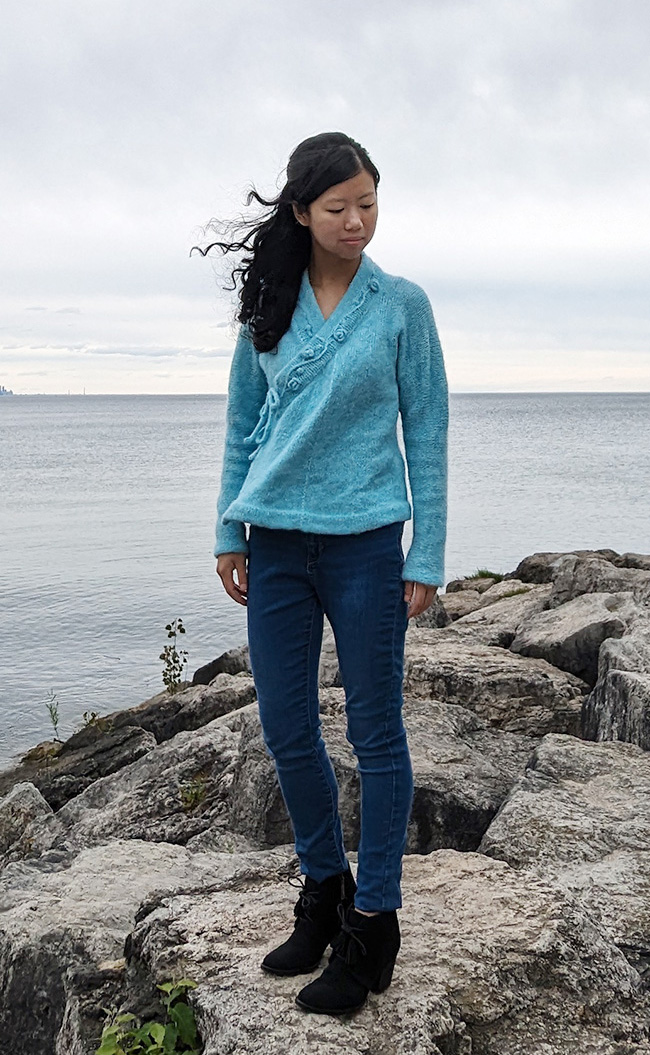
by Jasmine Lin

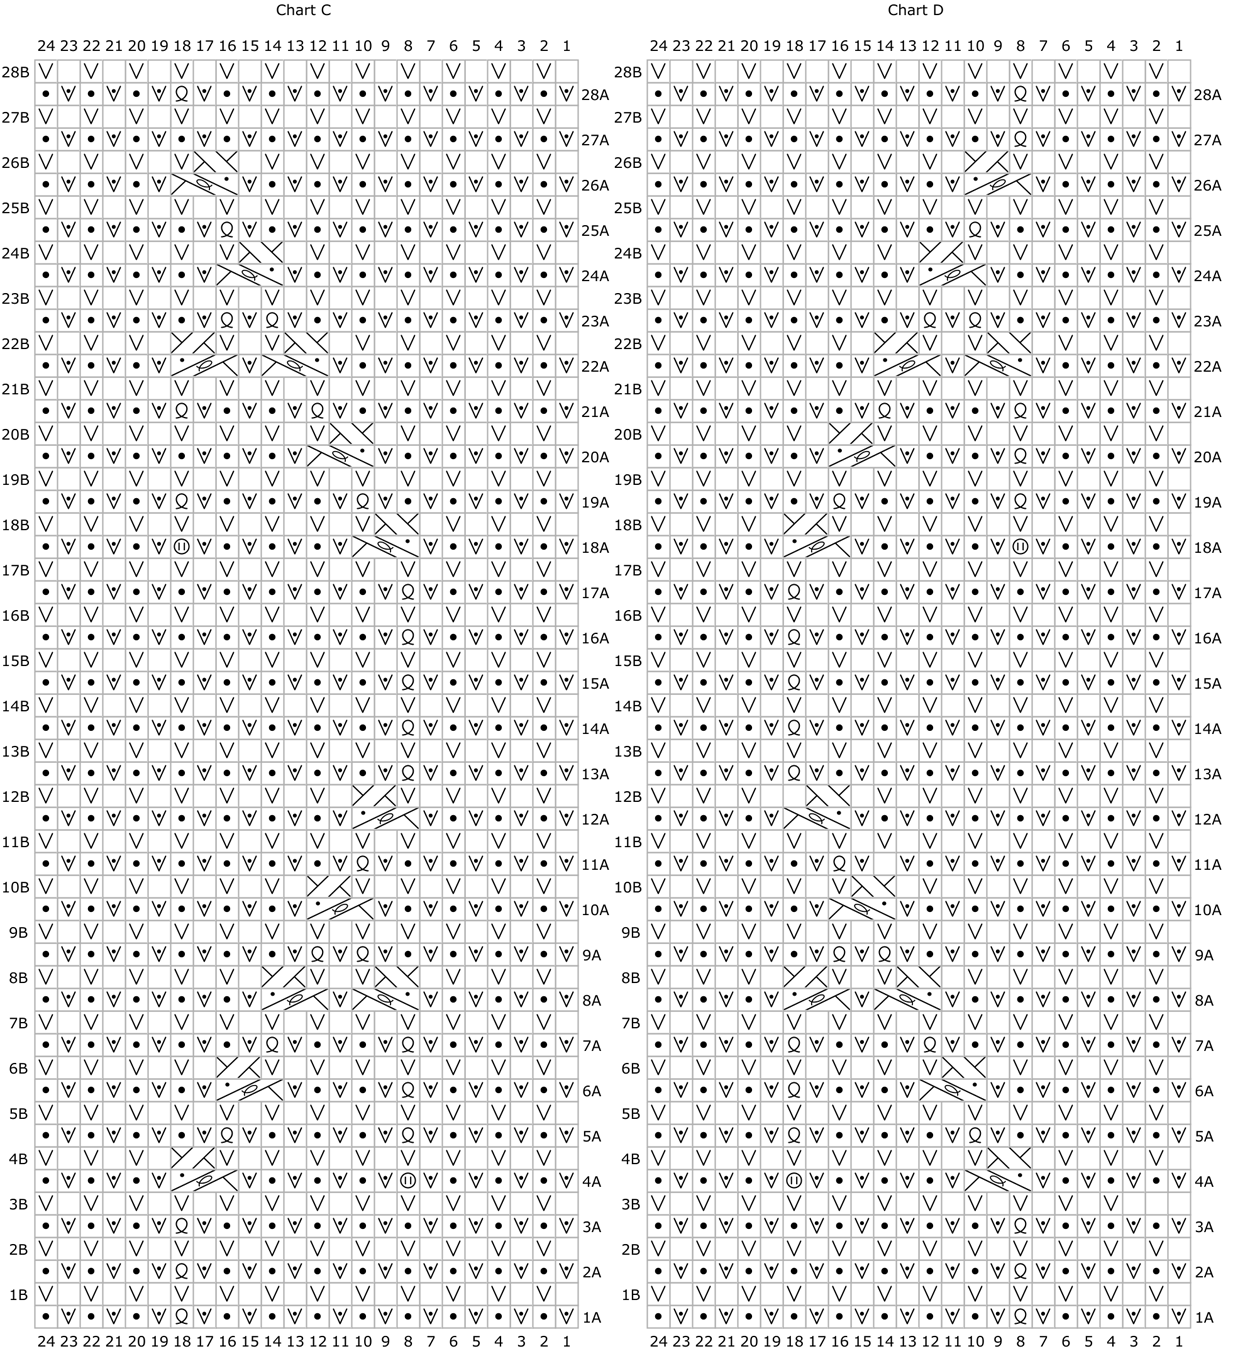
I love looking to history and heritage for inspiration. This pattern is inspired by extant ceramics and hanfu (clothing) from the Ming Dynasty, taking cues from the floral scrolls decorating blue-and-white porcelain and the silhouette of the jiaoling aoqun (cross-collared jacket with skirt).
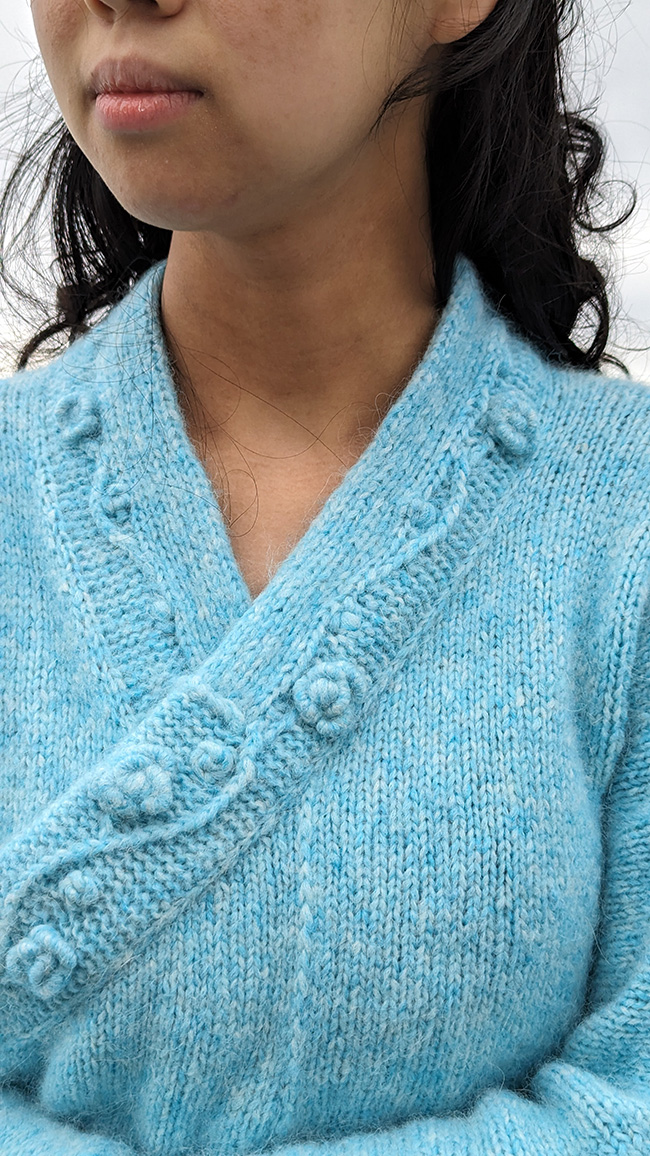
Although hanfu was historically made from woven fabrics seamed together, this sweater boasts a seamless knitted construction. Nonetheless, I've incorporated many features of hanfu in this design — dolman sleeves, curved underarms, continuous grain direction, a curved hem, a left-over-right collar, asymmetric fronts, and an inner collar that doesn't extend all the way to the side seam. There are also bits of inspiration throughout — faux seams where real ones existed historically, a stockinette band that emulates the huling (collar protector), and double-knit fabric to emulate hems. If I were to classify this garment, it would be hanyuansu (clothing with Han elements) inspired by Ming Dynasty jiaoling shan (unlined shirt) with jianxiu (tapered sleeves).
This sweater is constructed top-down, using a variety of techniques: provisional cast-on, double-knitting, cables, crocheted bobbles, 3-needle bind-off, tubular bind-off, and embroidery. Don't let that intimidate you, though — there are huge expanses of stockinette stitch to allow for fairly mindless knitting, and it's worked up quickly in a bulky-weight yarn.
 model + photos: Jasmine Lin


SIZE
Women's XS[S, M, L, 1X, 2X, 3X, 4X, 5X]
shown in size XS with 6 inches/15 cm of ease at chest
FINISHED MEASUREMENTS
Back chest width: 17.25[19.25, 21.25, 23.25, 25.25, 27.25, 29.25, 31.25, 33.25] inches / 44[49, 54, 59, 64, 69, 74.5, 79.5, 84.5] cm
Length: 20.5[21, 21.5, 21.5, 21.75, 22, 22, 22.5, 22.5] inches/ 52[53.5, 54.5, 54.5, 55, 56, 56, 57, 57] cm
MATERIALS
Yarn
![]() Knit Picks Wonderfluff Bulky [70% baby alpaca, 7% merino wool, 23% nylon; 142yd/130m per 1.75 oz/50 g skein]; color: Ripple Heather; 9[10, 10, 11, 11, 12, 13, 13, 14] skeins
Knit Picks Wonderfluff Bulky [70% baby alpaca, 7% merino wool, 23% nylon; 142yd/130m per 1.75 oz/50 g skein]; color: Ripple Heather; 9[10, 10, 11, 11, 12, 13, 13, 14] skeins
Yarn Characteristics
![]() The sample shown uses a bulky-weight tube-blown yarn. It comprises alpaca and merino fibers blown into a knitted nylon tube. The yarn is light and warm, with a heathered appearance.
The sample shown uses a bulky-weight tube-blown yarn. It comprises alpaca and merino fibers blown into a knitted nylon tube. The yarn is light and warm, with a heathered appearance.
Recommended needle size
[always use a needle size that gives you the gauge listed below - every knitter's gauge is unique]
![]() US #8/5mm needles for working flat
US #8/5mm needles for working flat
![]() US H-8/5mm crochet hook (for bobbles)
US H-8/5mm crochet hook (for bobbles)
Notions
![]() cable needle
cable needle
![]() 8 stitch markers
8 stitch markers
![]() 3 stitch holders
3 stitch holders
![]() yarn needle
yarn needle
GAUGE
16 sts/28 rows = 4 inches/10 cm in stockinette stitch
PATTERN NOTES
[Knitty's list of standard abbreviations and techniques can be found here.]
Construction method: This jacket is worked seamlessly from the top down. It starts at the back collar. Then stitches are cast on for the shoulder and picked up from the collar. The back is knit from these stitches, with dolman sleeves being worked at the same time. Stitches are picked up from the shoulders to work the fronts. The underarms are completed with 3-needle bind off. The fronts and back are joined and the rest of the sweater is worked from the underarms. Finally, ties are knitted on.
Difficulty: The Extraspicy classification means that multiple shapings are happening at the same time. The techniques are not any harder than any other pattern; this pattern simply requires careful tracking of each set of instructions as you work. Read ahead and note simultaneous shaping instructions for the size you're working.
A pattern app like knitCompanion could be useful here, and knitty+ will help you pare down the instructions to just those for your size. Special gift: Knit Companion has formatted this pattern into a kCDesigns version, which means that if you use the knitCompanion app, you can load this pattern in directly with all the shaping to be tracked already noted and ready to use, free of charge. Thank you to Sally Holt of knitCompanion for this gift to Knitty readers! To get the kCDesigns version, click here.
If you're new to knitCompanion and using kCDesigns files, this video should help. Questions about knitCompanion? Check this page. Note: Jasmine and Knitty are not able to provide support for knitCompanion.
Techniques:
- provisional cast on
- double knitting [photo/video tutorial]
- Jasmine's video tutorial for this sweater (includes double-knit edges, cables and bobbles, short rows, horizontal braids)
- German short rows
- 3-needle bind off (this pattern uses a modified stretchy version, described in pattern)
- grafting
- bullion stitch rose
- stem stitch rose
If there is double-knitting on the edges of the row, "work in patt to m/end of row" requires you to work all required turns as part of the double-knitting.
RN: Right needle
C2L, WS: C2L[sl1wyif, p1]: Sl1 to cn and hold in front, sl1 wyif from left needle, p1 from cn.
C2L, RS: C2L[k1, sl1wyib]: Sl1 to cn and hold in front, k1 from left needle, sl1 wyib from cn.
C2R, RS: C2R[sl1wyib, k1]: Sl1 to cn and hold in back, sl1 wyib from left needle, k1 from cn.
C2R, WS: C2R[p1, sl1 wyif]: Sl1 to cn and hold in back, p1 from left needle, sl1 wyif from cn.
C3L, WS: C3L[p1tbl, (k1, sl1wyib)]: Sl2 to cn and hold in front, k1tbl from left needle, (k1, sl1 wyib) from cn.
C3L, RS: C3L[(sl1 wyif, p1), k1tbl]: Sl1 to cn and hold in front, (sl1 wyif, p1) from left needle, k1tbl from cn.
C3R, RS: C3R[k1tbl, (p1, sl1 wyif)]: Sl2 to cn and hold in back, k1tbl from left needle, (p1, sl1 wyif) from cn.
C3R, WS: C3R[(sl1wyib, k1), p1tbl]: Sl1 to cn and hold in back, (sl1 wyib, k1) from left needle, k1 from cn.
Gsr (German short row):
On RS (or WS of reverse stockinette): Turn work (so WS is facing you), sl1 wyif, bring yarn to back over the needle, bringing it back to front so you are ready to purl.
On WS (or RS of reverse stockinette): Turn work (so RS is facing you), bring yarn to front, sl1 wyif, bring yarn to back over the needle so you are ready to knit.
Mb (make bobble):
Insert crochet hook into st as if to knit, remove st from needle, [yo and pull through st, yo] 3 times, yo and pull through st, yo and pull through all 7 loops on hook, transfer st on hook to RH.
PU 1 to cn: Insert RH between first 2 sts on left needle, yarn over and pull up stitch (as for cable cast-on). Slip resulting st to cable needle and hold in front.
K1cn-to-cn: K1 from cable needle, slip st just worked from RH back to cable needle and hold in front.
CHARTS
View and download CHARTs here:
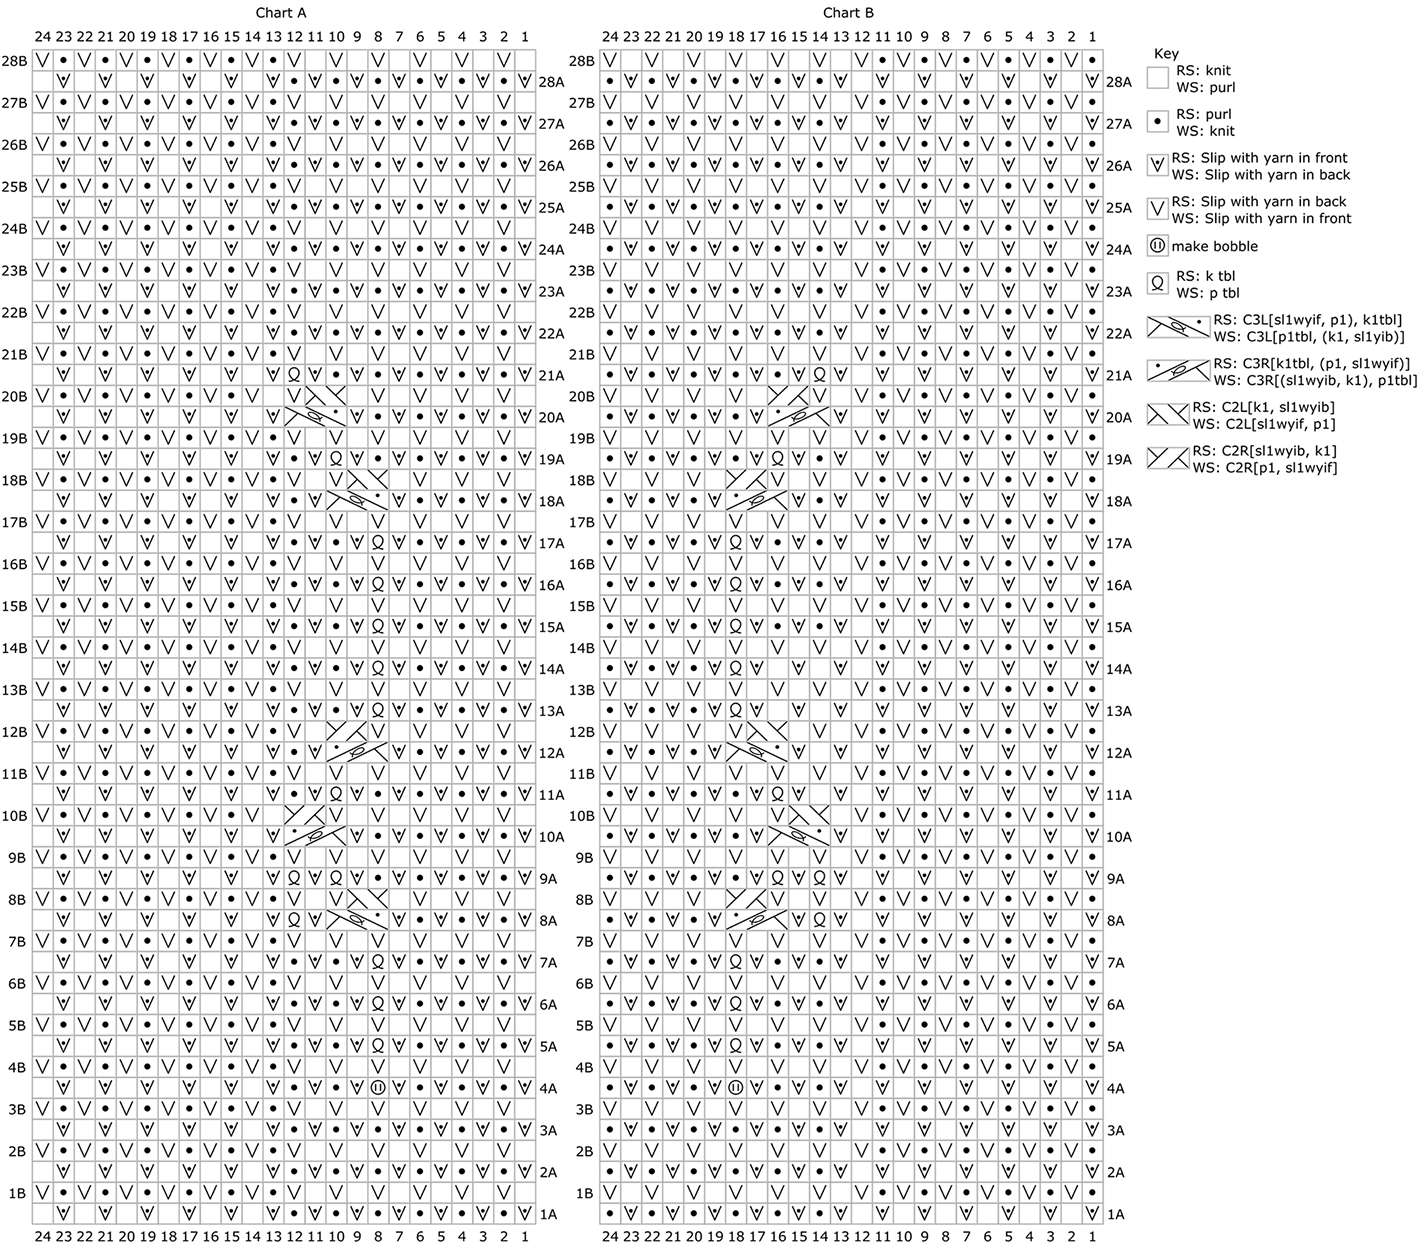
DIRECTIONS
Collar
Cast on 24 sts using provisional cast on and waste yarn. Break waste yarn.
Row 1A [RS]: Work Row 1A of Chart A.
Row 1B [WS]: Work Row 1B of Chart A.
Row 2A: Work next A-side row of Chart A.
Row 2B: Work next B-side row of Chart A.
Repeat Rows 2A-2B 17[18, 18, 20, 20, 21, 21, 23, 23] times more.
Break yarn and transfer sts to Stitch Holder 1.
Unravel provisional cast on from beginning of collar and transfer 24 sts to working needle with RS facing. Join yarn.
Row 1A [RS]: Work Row 1A of Chart B.
Row 1B [WS]: Work Row 1B of Chart B.
Row 2A: Work next A-side row of Chart B.
Row 2B: Work next B-side row of ChartBA.
Repeat Rows 2A-2B 17[18, 18, 20, 20, 21, 21, 23, 23] times more.
Break yarn and transfer sts to Stitch Holder 2.
Back
Cast on 106[109, 113, 116, 116, 119, 121, 124, 124] sts using provisional cast on and waste yarn, break waste yarn, then cast on 106[109, 113, 116, 116, 119, 121, 124, 124] more sts using provisional cast on and waste yarn. Break waste yarn.
Row 1 [RS]: [(Sl1 wyif, k1) 3 times, turn] 2 times, (sl1 wyif, k1) 3 times, k 100[103, 107, 110, 110, 113, 115, 118, 118] . With RS of collar facing, pick up and knit 25[27, 27, 29, 29, 31, 31, 33, 33] sts from purl side edge (approx. 2 sts per 3 rows; see photo for guidance), k 100[103, 107, 110, 110, 113, 115, 118, 118] , [(sl1 wyif, k1) 3 times, turn] 2 times, (sl1 wyif, k1) 3 times. 237[245, 253, 261, 261, 269, 273, 281, 281] sts.
Row 2 [WS]: (Sl1 wyif, k1) 3 times, pm, p 112[116, 120, 124, 124, 128, 130, 134, 134] , pm, p1tbl, p 112[116, 120, 124, 124, 128, 130, 134, 134] , pm, (sl1 wyif, k1) 3 times.
Row 3: [(Sl1wyif, k1) 3 times, turn] 2 times, (sl1 wyif, k1) to marker, sl m, k to 1 st before marker, sl1 wyib, sl m, k to marker, [(sl1 wyif, k1) 3 times, turn] 2 times, (sl1 wyif, k1) to end.
Row 4: (Sl1wyif, k1) to m, sl m, p to m, sl m, p1tbl, p to m, sl m, (sl1 wyif, k1) to end.
Repeat Rows 3-4 8[9, 10, 11, 11, 11, 12, 13, 13] times more, ending after a WS row.
Shape Sleeves:
Row 1 [RS]: Work in patt to last 7[7, 7, 7, 6, 6, 6, 6, 5] sts, gsr.
Row 2 [WS]: Work in patt to last 7[7, 7, 7, 6, 6, 6, 6, 5] sts, gsr.
Sizes XS[S, M, L, -, -, -, -, -] only
Row 3: Work in patt to 4 sts before double st, gsr.
Row 4: Work in patt to 4 sts before double st, gsr.
Repeat Rows 3-4 13[9, 5, 5, -, -, -, -, -] times more.
Sizes -[S, M, L, 1X, 2X, 3X, 4X, -] only
Row 3 [RS]: Work in patt to 3 sts before double st, gsr.
Row 4 [WS]: Work in patt to 3 sts before double st, gsr.
Repeat Rows 3-4 -[4, 9, 9, 12, 6, 6, 1, -] time(s) more.
All Sizes
Row 1 [RS]: Work in patt to 2 sts before double st, gsr.
Row 2 [WS]: Work in patt to 2 sts before double st, gsr.
Repeat Rows 1-2 0[0, 0, 0, 5, 13, 13, 19, 16] times more.
Row 3 [RS]: Work in patt to 1 st before double st, gsr.
Row 4 [WS]: Work in patt to 1 st before double st, gsr.
Repeat Rows 3-4 0[0, 0, 0, 0, 0, 0, 0, 7] times more.
Next row [RS]: Work in patt to double st, gsr.
Next row [WS]: Work in patt to double st, gsr.
Next row [RS]: Work evenly in patt across row, knitting double stitches together as you come across them.
Next row [WS]: Work evenly in patt across row, purling double stitches together as you come across them.
Transfer sts to holder.
Note: You may break yarn here or wait until after finishing the Left Front. (The tail can be used to complete the 3-needle BO under the arms. If you break yarn now, you will have to attach a new end when doing the underarm BO.)
Right Front
Transfer sts on Stitch Holder 1 to working needle with RS facing. Unravel the provisional cast on at the right shoulder and place 106[109, 113, 116, 116, 119, 121, 124, 124] resulting sts on working needle with RS facing. 130[133, 137, 140, 140, 143, 145, 148, 148] sts.
Row 1 [RS]: [(Sl1wyif, k1) 3 times, turn] 2 times, (sl1wyif, k1) 3 times, pm, k 100[103, 107, 110, 110, 113, 115, 118, 118] , pm, work next A-side row of Chart A across sts from stitch holder 1, turn, work next B-side row across 24 sts, turn, work next A-side row to end.
Row 2 [WS]: Work next B-side row of Chart A to m, sl m, purl to m, sl m, (sl1 wyif, k1) 3 times.
Row 3: Work in patt as est to end of row.
Row 4: Work in patt as est to end of row.
Repeat Rows 3-4 6[6, 5, 2, 3, 1, 1, 0, 0] times more.
Begin Collar and Sleeve shaping:
Note: Read ahead; you will be working Collar Shaping and Sleeve Shaping simultaneously. To start, you will only work Collar Shaping. Once 4[6, 10, 18, 16, 20, 22, 26, 26] rows of Collar Shaping have been completed, start working Sleeve Shaping at the same time.
Please note that Collar Shaping will continue beyond the sleeves; after the Sleeve BO, continue working remaining Collar Shaping during the Body section. Work collar increases into St st.
Right Collar Shaping:
Row 1 [RS]: Work in patt to m, sl m, work in patt to 1 st before m, M1R, work in patt to end. 1 st increased at collar.
Rows 2-4: Work even in patt to end of row.
Repeat Rows 1-4 12[13, 13, 14, 14, 15, 15, 16, 16] times more.
Note: On following row, work sts from left needle unless otherwise noted in instructions. Switch from working Chart A to Chart C when instructed, proceeding to the following row number (to maintain pattern).
Row 5 [RS]: Work in patt to m, sl m, work in patt to 1 st before m, M1L, pm, k1, sl m, work 12 sts in Chart A, ***sl1 wyif, PU 1 to cn, k1, k1cn-to-cn, (sl1wyif, k1, k1cn-to-cn) 5 times, turn (keeping 1 st on cn), (sl1 wyif, k1, k1cn-to-cn) 5 times, sl1 wyif, sl st from cn to left needle, k2tog tbl, work 12 sts in Chart A, turn, work next row of Chart C to end. 1 st increased at collar.
Row 6 [WS]: Work in patt to m, sl m, work in patt to m, sl m, p1tbl, work in patt to m, sl m, work in patt to end.
Row 7 [RS]: Work in patt to m, sl m, work in patt to 1 st before m, sl1 wyib, sl m, work in patt to m, sl m, work in patt to end.
Row 8: Repeat Row 6.
Row 9: Work in patt to m, sl m, work in patt to 1 st before m, sl1 wyib, sl m, work in patt to 1 st before m, M1R, sl m, work in patt to end. 1 st increased at collar.
Row 10: Repeat Row 6.
Work 6 rows even in patt.
Next row [RS]: Work in patt to last m, (k2tog) 9 times, [(sl1 wyif, k1) 3 times, turn] 2 times, (sl1 wyif, k1) 3 times.
Next row [WS]: (Sl1 wyif, k1) 3 times, p9, work in patt to end.
Next row: Work in patt to last m, k9, work in patt to end.
Next row: (Sl1 wyif, k1) 3 times, p9, work in patt to end.
Collar Shaping is now complete.
AT THE SAME TIME, when 4[6, 10, 18, 16, 20, 22, 26, 26] rows of Collar Shaping have been worked, work Sleeve shaping as foll:
Row 1 [RS]: Work in patt to end of row.
Row 2 [WS]: Work in patt to last 7[7, 7, 7, 6, 6, 6, 6, 5] sts, gsr.
Sizes XS[S, M, L, -, -, -, -, -] only:
Row 3: Work in patt to end of row.
Row 4: Work in patt to 4 sts before double st, gsr.
Repeat Rows 3-4 13[9, 5, 5, -, -, -, -, -] times more.
Sizes -[S, M, L, 1X, 2x, 3X, 4X, -] only:
Row 3 [RS]: Work in patt to end of row.
Row 4 [WS]: Work in patt to 3 sts before double st, gsr.
Repeat Rows 3-4 -[4, 9, 9, 12, 6, 6, 1, -] time(s) more.
All Sizes:
Row 1 [RS]: Work in patt to end of row.
Row 2 [WS]: Work in patt to 2 sts before double st, gsr.
Repeat Rows 1-2 0[0, 0, 0, 5, 13, 13, 19, 16] times more.
Row 3 [RS]: Work in patt to end of row.
Row 4 [WS]: Work in patt to 1 st before double st, gsr.
Repeat Rows 3-4 0[0, 0, 0, 0, 0, 0, 0, 7] times more.
Next row [RS]: Work in patt to end of row.
Next row [WS]: Work in patt to double st, gsr.
Next row [RS]: Work in patt to end of row.
Next row [WS]: Work in patt to end of row, purling double stitches together as you come across them.
Once this section is complete, move onto Sleeve Bind-Off, continuing to work Collar Shaping.
Sleeve Bind-Off
Place held Back sts on spare circ. Fold work at the shoulder seam (provisional CO) with WS together and Back (LN1) at front and Right Front (LN2) at back. Using yarn from Right Front, work 3-needle bind off as follows:
**(Insert RN knitwise into first 2 sts on LN1 (as if to k2tog), then into first 2 sts on LN2. K4tog) 2 times. Sl 2 sts on RN back to LN1 and k2tbl. 4 sts from each needle decreased to 1 st rem on RN.
Insert RN knitwise into first 2 sts on LN1, then into first 2 sts on LN2, and k4tog. Sl 2 sts on RN back to LN1 and k2tog.
*Insert RN knitwise into st on LN1, then into first st on LN2, and k2tog. Sl 2 sts on RN back to LN1 and k2tbl. Repeat from * 77[77, 77, 77, 73, 73, 71, 71, 67] times more.
In total, 84[84, 84, 84, 80, 80, 78, 78, 74] sts have been bound off each from LN1 and LN2.
Sl remaining st on RN to LN1.***
Transfer rem live sts to holder.

Left Front
Transfer sts on Stitch Holder 2 to working needle. Unravel the provisional cast on at the left shoulder and place sts on working needle. 130[133, 137, 140, 140, 143, 145, 148, 148] sts.
Row 1 [RS]: (Work next A-side row of Chart B across sts from stitch holder 2, turn, work B-side row across 24 sts, turn, work next A-side row across 24 sts, pm, k 100[103, 107, 110, 110, 113, 115, 118, 118] , pm, [(sl1 wyif, k1) 3 times, turn] 2 times, (sl1 wyif, k1) 3 times.
Row 2 [WS]: (Sl1 wyif, k1) 3 times, sl m, p to m, sl m, work B-side row of Chart B to end.
Row 3: Work in patt to end of row.
Row 4: Work in patt to end of row.
Repeat Rows 3-4 6[6, 5, 2, 3, 1, 1, 0, 0] times more.
Begin Collar and Sleeve shaping:
Note: Read ahead; you will be working Collar Shaping and Sleeve Shaping simultaneously. To start, you will only work Collar Shaping. Once 4[6, 10, 18, 16, 20, 22, 26, 26] rows of Collar Shaping have been completed, start working Sleeve Shaping at the same time.
Collar Shaping will continue beyond the sleeves; after the Sleeve BO, continue working remaining Collar Shaping during the Body section.
Left Collar Shaping
NOTE: Stitch counts are not included as there is other shaping worked simultaneously.
SIZE XS ONLY
Row 1 [RS]: Work in patt to m, sl m, k1, M1L, work in patt to end. 1 st increased at collar.
Rows 2-4: Work even in patt to end of row.
ALL SIZES
Row 1 [RS]: Work in patt to m, sl m, k1, M1L, work in patt to end of row. 1 st increased at collar.
Row 2 [WS]: Work even in patt to end of row.
Repeat Rows 1-2 11[13, 13, 14, 14, 15, 15, 16, 16] times more.
Note: On following row, work sts from left needle unless otherwise noted in instructions. Switch from working Chart B to Chart D when instructed, proceeding to the following row number (to maintain pattern).
Row 3 [RS]: Work in Chart B patt for 24 sts, turn, work in Chart B patt for 12 sts, sl1wyif, PU 1 to cn, k1, k1cn-to-cn, (sl1wyif, k1, k1cn-to-cn) 5 times, turn (keeping sl st on CN and bringing it around to the front), (sl1wyif, k1, k1cn-to-cn) 5 times, sl1wyif, sl st from cn to left needle, k2tog tbl, work in patt for 12 sts, sl m, k1, M1L, pm, work in patt to end. 1 st increased at collar.
Row 4 [WS]: Work in patt to second m, sl m, p1tbl, purl to m, sl m, work next row of Chart D to end.
Row 5: (Work next row of Chart D, turn) 2 times, work next row of Chart D, sl m, k1, M1L, k to 1 st before m, sl1 wyib, work in patt to end. 1 st increased at collar.
Row 6: Work in patt to end.
Repeat Rows 1-2 1[0, 1, 0, 1, 0, 0, 0, 0] times more.
Row 7 [RS]: Work in patt to m, sl m, k1, M1L, work in patt to end of row. 1 st increased at collar.
Row 8 [WS]: Work even in patt to 1 st before last m, M1PR, work in patt to end of row. 1 st increased at collar.
Row 9: Work in patt to m, sl m, k1, M1L, work in patt to end of row. 1 st increased at collar.
Row 10: Work even in patt to end of row.
Repeat Rows 7-10 4[5, 6, 9, 6, 9, 7, 7, 7] times more, then repeat Rows 7-8 1[2, 2, 0, 6, 4, 9, 11, 13] times more.
Collar Short Rows
Note: Some of the A-side and B-side rows are worked out of order for this section. If a B-side row contains cables and is being worked before the corresponding A-side, do not work the B-side cables. Instead, resolve the stitch order on the following A-side row.
Row 1 [RS]: Work next A-side row of Chart D, turn, work next B-side row of Chart D for 22 sts, gsr, work next B-side row of Chart D for 22 sts, sl m, k1, M1L, work in patt to end. 1 st increased at collar.
Row 2 [WS]: Work even in patt to 1 st before last m, M1PR, p1, sl m, work next A-side row of Chart D for 19 sts, gsr. 1 st increased at collar.
Row 3: Work next A-side row of Chart D to m, turn, work next B-side row of Chart D to 2 sts before last double stitch, gsr, work next B-side row of Chart D to m, sl m, k1, m1L, work in patt to end. 1 st increased at collar.
Row 4: Work even in patt to 1 st before last m, M1PR, p1, sl m, work next A-side row of Chart D to 2 sts before last double stitch, gsr. 1 st increased at collar.
Repeat Rows 3-4 3 times more.
Next row [RS]: Work next A-side row of Chart D to m, turn, work next B-side row of Chart D to end (working double stitches together in patt), turn, work next A-side row of Chart D to m, sl m, k1, M1L, work in patt to end. 1 st increased at collar.
Next row [WS]: Work even in patt to 1 st before last m, M1PR, p1, sl m, work next B-side row of Chart D to end. 1 st increased at collar.
Next row: K2tog, (k2tog, pass second stitch on RH over first stitch on RH) 11 times, k1, pass second st on RH over first st on RH, work even in patt to end. All 24 original sts of collar have now been BO or decreased.
Next row: Work even in patt to last 3 sts, pm, (pick up and knit 1 st from row below, k1) 3 times. 3 sts increased at collar.
Next row [RS]: [(Sl1wyif, k1) 3 times, turn] 2 times, (sl1wyif, k1) 3 times, sl m, work in patt to end.
Next row [WS]: Work in patt to last m, (sl1wyif, k1) 3 times.
The last 2 rows establish the patt at the left front collar. Collar Shaping is now complete.
AT THE SAME TIME, when 4[6, 10, 18, 16, 20, 22, 26, 26] rows of Collar Shaping have been worked, work Sleeve shaping as foll:
Row 1 [RS]: Work in patt to last 7[7, 7, 7, 6, 6, 6, 6, 5] sts, gsr.
Row 2 [WS]: Work in patt to end of row.
Sizes XS[S, M, L, -, -, -, -, -] only:
Row 3 [RS]: Work in patt to 4 sts before double st, gsr.
Row 4 [WS]: Work in patt to end of row.
Repeat Rows 3-4 13[9, 5, 5, -, -, -, -, -] times more.
Sizes -[S, M, L, 1X, 2X, 3X, 4X, -] only:
Row 3 [RS]: Work in patt to 3 sts before double st, gsr.
Row 4 [WS]: Work in patt to end of row.
Repeat Rows 3-4 -[4, 9, 9, 12, 6, 6, 1, -] times more.
All Sizes:
Row 1 [RS]: Work in patt to 2 sts before double st, gsr.
Row 2 [WS]: Work in patt to end of row.
Repeat Rows 1-2 0[0, 0, 0, 5, 13, 13, 19, 16] times more.
Row 3 [RS]: Work in patt to 1 st before double st, gsr.
Row 4 [WS]: Work in patt to end of row.
Repeat Rows 3-4 0[0, 0, 0, 0, 0, 0, 0, 7] times more.
Next row: Work in patt to double st, gsr.
Next row: Work in patt to end of row.
Next row: Work evenly in patt across row, knitting double stitches together as you come across them.
Next row: Work evenly in patt across row, purling double stitches together as you come across them.
Once this section is complete, move onto Sleeve Bind-Off (Collar Shaping will be incomplete at this point).
Sleeve Bind-Off
Fold work at the shoulder seam (provisional CO) with WS together and Left Front (LN1) at front and Back (LN2) at back. Using yarn from Back, work 3-needle bind off as for Right Front from ** to ***.
Body
NOTE: While working the Body section, continue working remaining Collar Shaping and Patterning on both Fronts.
Once Sleeve Shaping has been completed, orient all live sts on main needle so that from RS, they are ordered: Left Front, remaining st from Left Sleeve BO, Back, remaining st from Right Sleeve BO, Right Front.
Row 1 [RS]: Working in patt, work across Left Front sts to rem st from Left Sleeve BO, M1R, sl1 wyib, place side m, M1L, work across Back sts, M1R, sl1 wyib (rem st from Right Sleeve BO), place side m, M1L, work across Right Front sts.
Row 2 [WS]: (Work in patt to side m, p1tbl) 2 times, work in patt to end.
Row 3: (Patt to 1 st before side m, sl1 wyib, sl m) 2 times, patt to end.
Row 4: (Work in patt to side m, p1tbl) 2 times, work in patt to end.
Repeat Rows 3-4 13 times more.
Collar Shaping is now complete. 197[217, 237, 257, 277, 297, 317, 337, 357] sts: 71[79, 87, 95, 103, 111, 119, 127, 135] sts for Left Front (including side false seam), 72[80, 88, 96, 104, 112, 120, 128, 136] sts for Back (including side false seam), 54[58, 62, 66, 70, 74, 78, 82, 86] sts for Right Front.
A-Line Increases
At this point, you should have (6 sts double knitting), m, (St st for Left Front), (1 st false seam), m, (St st for Left Front), (1 st false seam), m, (St st for Back), (1 st false seam), m, (St st for Back), (1 st false seam), m, (St st for Right Front), (1 st false seam), m, (St st for Right Front), m, (6 sts double knitting). The A-line increases will take place on either side of the false seams.
Increase row [RS]: [(Sl1 wyif, k1) 3 times, turn] 2 times, (sl1 wyif, k1) 3 times, sl m, M1L, (k to 1 st before m, M1R, sl1 wyib, sl m, M1L) 5 times, k to m, M1R, sl m, work in patt to end. 12 sts increased.
Work 13[13, 13, 11, 11, 11, 9, 11, 11] rows even in patt.
Repeat last 14[14, 14, 12, 12, 12, 10, 12, 12] rows two times more, then repeat Increase row once more. 245[265, 285, 305, 325, 345, 365, 385, 405] sts.
Work even in patt until piece measures 10.75[10.75, 10.5, 10.25, 10, 9.75, 9.25, 9.25, 8.75] inches / 27.5[27.5, 26.5, 26, 25.5, 25, 23.5, 23.5, 22] cm from underarm, or 1.5 inches/4 cm shorter than overall desired length.
Hem
Set-up row [WS]: (Sl1 wyif, k1) 3 times, remove m, [(p1, yo) to m, sl m, (p1tbl, yo)] 5 times, (p1, yo) to m, remove m, (sl1wyif, k1) 3 times. 478[518, 558, 598, 638, 678, 718, 758, 798] sts.
Row 1 [RS]: [(Sl1 wyif, k1) to 2 sts before m, sl1 wyif, sl1 wyib] 5 times, (sl1 wyif, k1) to end.
Row 2: (Sl1wyif, k1) to end.
Row 3: (Sl1wyif, k1) to 2 sts before m, sl1 wyif, k1tbl, slm] 5 times, (sl1 wyif, k1) to end.
Row 4: Repeat Row 2.
Repeat Rows 1-4 until hem measures 1.5 inches/4 cm, ending after a WS row.
Separate alternating sts onto separate needles (i.e. sl1 to RN1 and hold in back, sl1 to RN2 and hold in front, cont to end). Break yarn, leaving a tail approx. 3 times the width of the hem. Graft the 2 sets of sts together: insert needle purlwise into front st, insert needle knitwise into back st, *insert yarn needle knitwise into front st and remove from needle, insert yarn needle purlwise into front st, insert yarn needle purlwise into back st and remove from needle, insert yarn needle knitwise into back st; repeat from * until no sts remain.
Weave in ends.
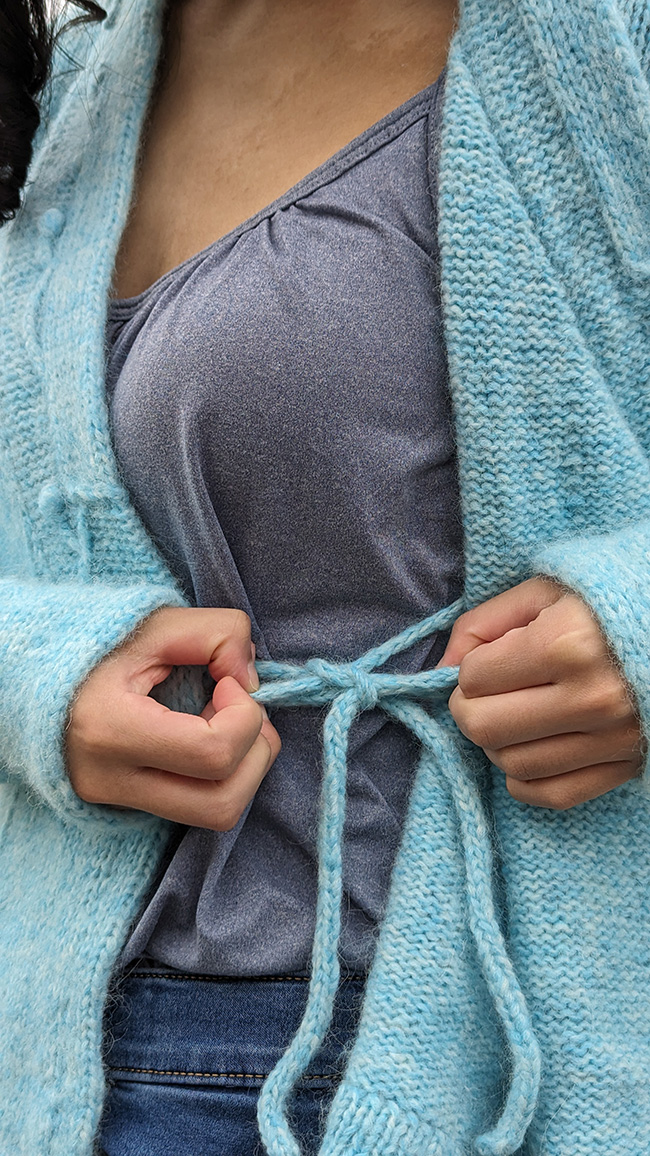
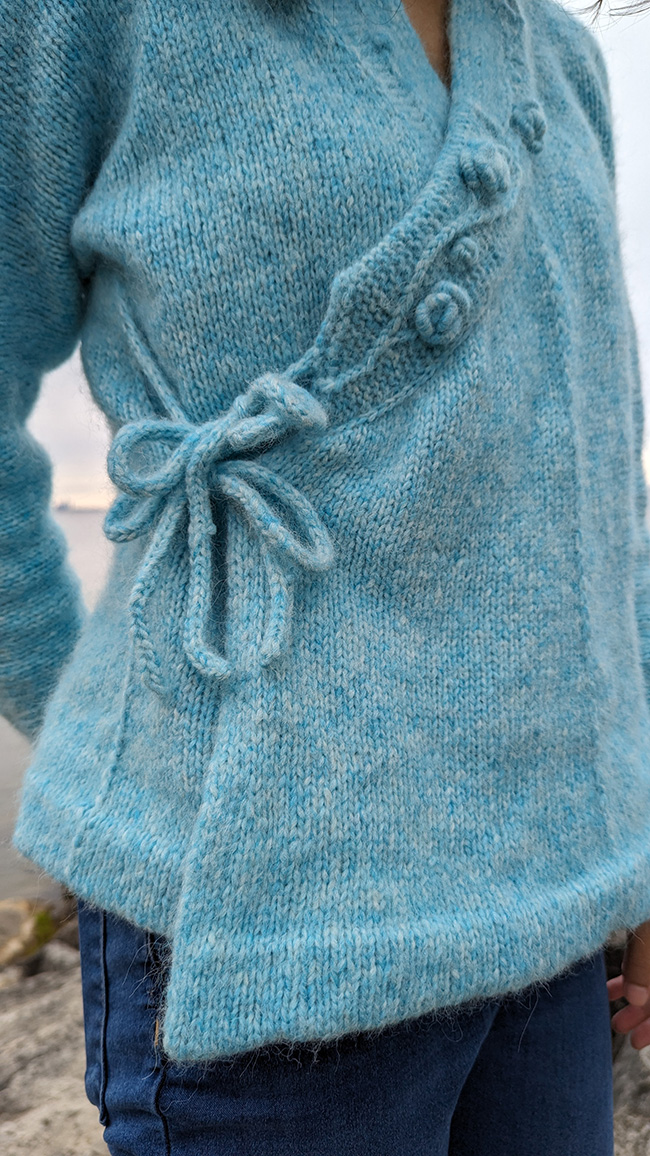
Ties
In total, 6 ties are worked: 4 outer (2 on the left front edge, 2 outside the right side) and 2 inner (1 on the right front edge, 1 inside the left side).
Outer Ties
Work a tie on the Left Front edge in the middle of the Collar stitches, and about 2 inches/2.5 cm down from there. Also work ties on the inside of the right front at the same height.
Pick up and knit 3 sts, orienting work perpendicular to the previous direction of work. Work i-cord as follows:
Row 1 [RS]: K3, slide sts to opposite needle.
Rep Row 1 until tie measures 10 inches/25.5 cm. K3tog and fasten off.
Inner Ties
Work a tie on the Right Front edge at the end of Chart C, and on the inside of the left side at the same height.
Pick up and knit 3 sts, orienting work perpendicular to the previous direction of work. Work i-cord as follows:
Row 1 [RS]: K3, slide sts to opposite needle.
Rep Row 1 until tie measures 12 inches/30.5 cm. K3tog and fasten off.
Embroidery
Cut a piece of yarn approximately double the length of one arm. Thread through the yarn needle, pulling until the two tails are even with each other.
Whenever you run out of yarn during embroidery, thread a new needle following the same directions.
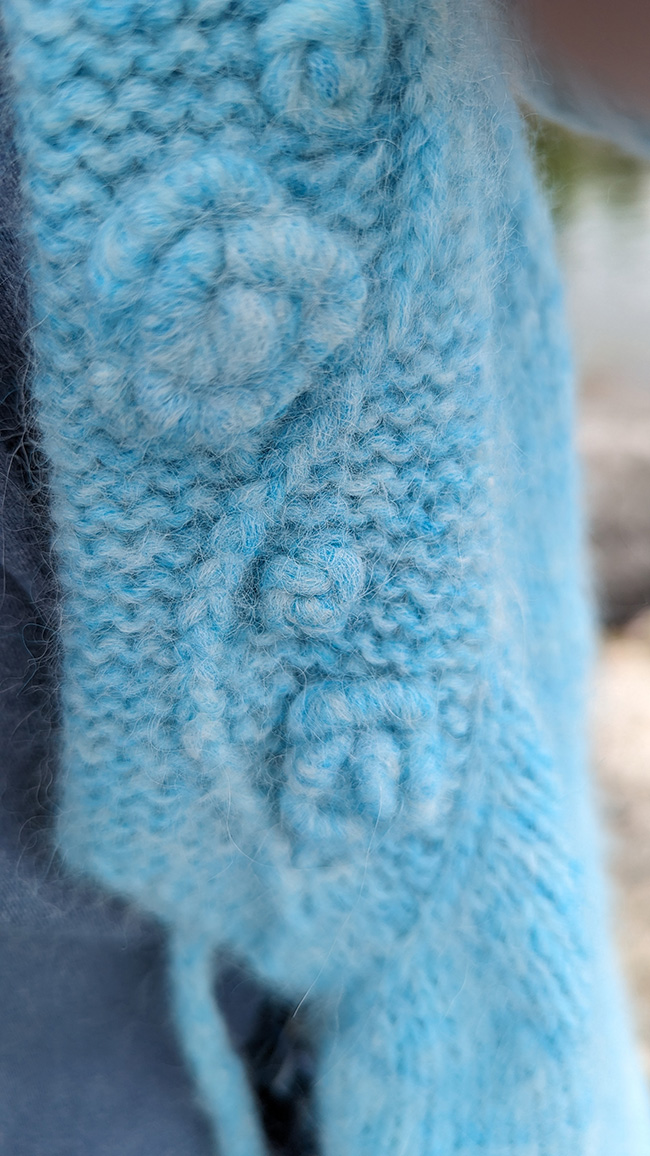
Large Roses
Around each visible bobble, embroider a bullion stitch rose. To make a bullion stitch, wrap the yarn counterclockwise around the yarn needle. Then, pull the needle through. After this, make a backstitch; insert the needle in the fabric to secure the bullion stitch down, then pull it out a little behind the edge of the petal.
The inner round of petals is made of 3 bullion stitches, each with 8 wraps.
For larger roses on the right side, 2-3 extra bullion stitches are added in another round. These ones are made with 11 wraps.
Mini Roses
In the remaining space, embroider stem stitch roses. Create the center using multiple backstitches. Around this center, embroider about 6 stem stitches.
FINISHING
Weave in ends. Block as desired.
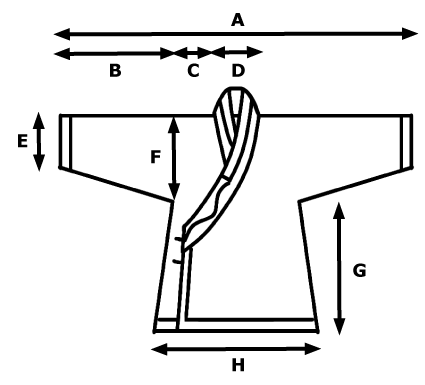
A—Wingspan: 57.75[59.75, 61.75, 63.75, 63.75, 65.75, 66.75, 68.75, 68.75] inches/ 146.5[152, 157, 162, 162, 167, 169.5, 174.5, 174.5] cm
B—Sleeve length: 20[20, 20, 20, 19, 19, 18.5, 18.5, 17.5] inches/ 51[51, 51, 51, 48.5, 48.5, 47, 47, 44.5] cm
C—Shoulder width: 5.75[6.5, 7.5, 8.25, 9.25, 10, 11, 11.75, 12.75] inches/ 14.5[16.5, 19, 21, 23.5, 25.5, 28, 30, 32.5] cm
D—Back neck width: 6.25[6.75, 6.75, 7.25, 7.25, 7.75, 7.75, 8.25, 8.25] inches/ 16[17, 17, 18.5, 18.5, 19.5, 19.5, 21, 21] cm
E—Cuff depth: 3.25[3.5, 3.75, 4, 4, 4, 4.25, 4.5, 4.5] inches/ 8.5[9, 9.5, 10, 10, 10, 11, 11.5, 11.5] cm
F—Upper arm depth: 8.25[8.75, 9.5, 9.75, 10.25, 10.75, 11.25, 11.75, 12.25] inches/ 21[22, 24, 25, 26, 27.5, 28.5, 30, 31] cm
G—Body length: 12.25[12.25, 12, 11.75, 11.5, 11.25, 10.75, 10.75, 10.25] inches/ 31[31, 30.5, 30, 29, 28.5, 27.5, 27.5, 26] cm
H—Back hem width: 22[24, 26, 28, 30, 32, 34, 36, 38] inches/ 56[61, 66, 71, 76, 81.5, 86.5, 91.5, 96.5] cm
ABOUT THE DESIGNER
 Jasmine is a Chinese-Canadian textile artist who is passionate about connection through craft. She loves combining the fiber arts with her other interests — like music, science, and culture — to create innovative designs. When she's not knitting, she's probably spinning yarn or studying new ideas.
Pattern & images © 2024 Jasmine Lin