


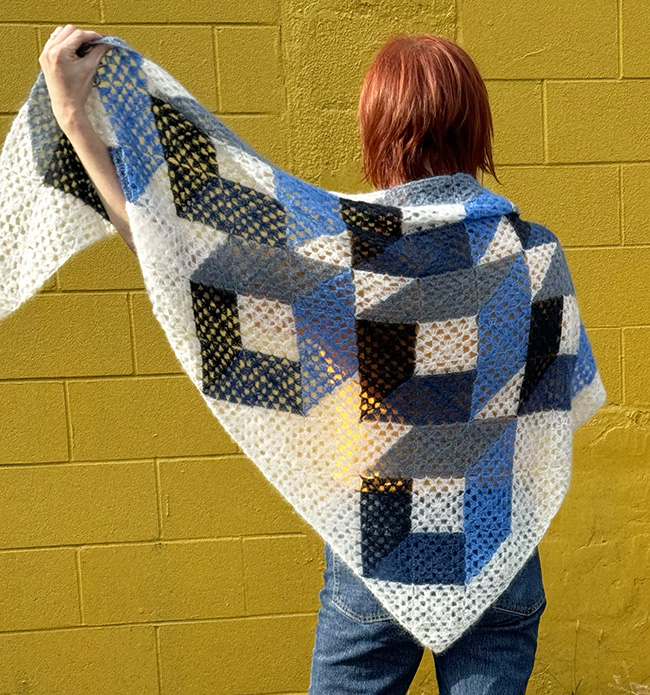
Shadowboxer, a free knitting pattern from Knitty.com.
INTRODUCTION
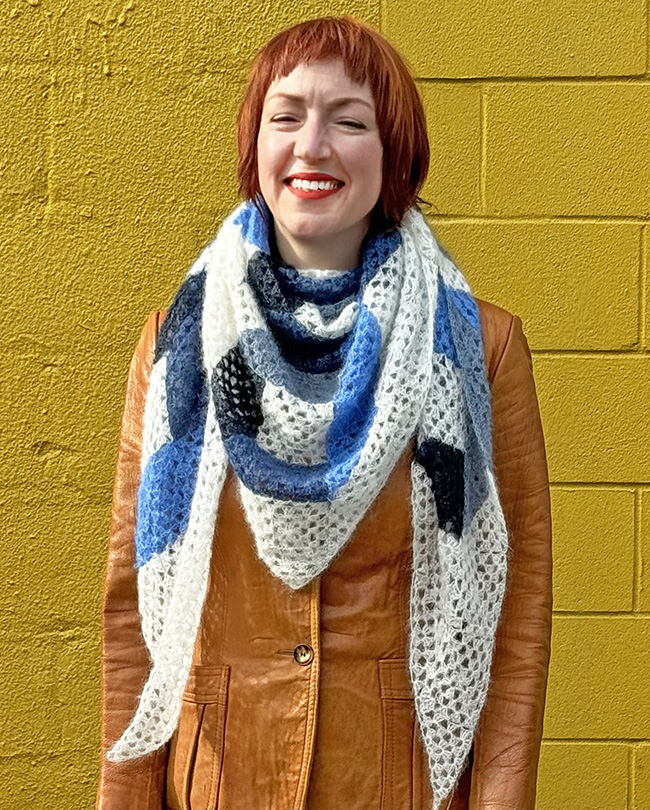
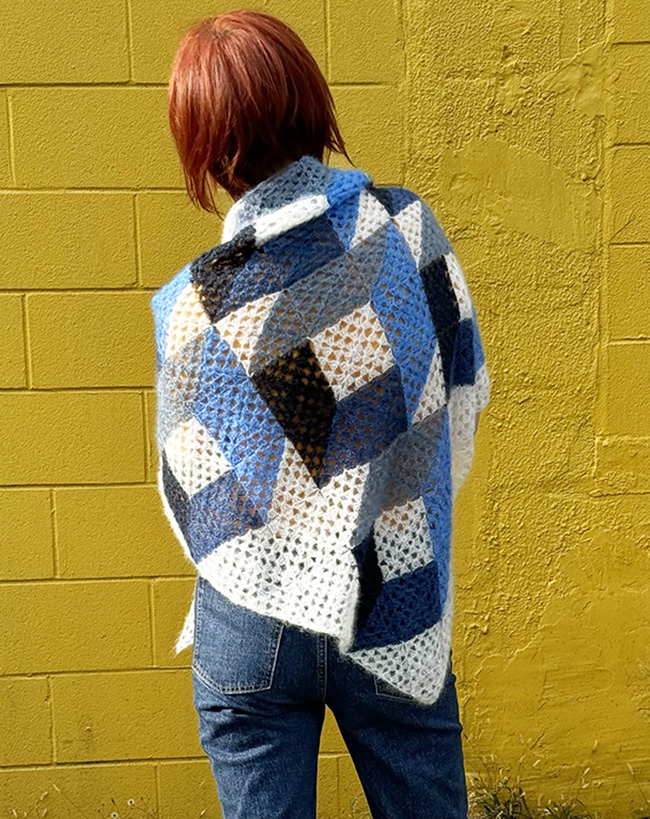
Shadowboxer
by Julia Madill

Most of my favorite designs aren't complex or difficult, but clever and simple. They're the designs that make you go; "Dang! Why didn't I think of that?". The longer I knit and crochet, the more I strive to design patterns this way. What's fun to make? How can I add a twist to an old technique?
If the granny square is crochet 101, then consider this shawl crochet 102. Classic granny squares are combined with half-and-half color squares and a sprinkling of triangles to form a simple, triangular shawl with big graphic impact.
The colorwork here is simple. Each round of the two-color granny square is joined and then turned to work in the opposite direction, allowing you to switch colors without cutting yarn or carrying colors across your work. To create a consistent fabric, the solid-color squares are also worked with joined and turned rounds. The real magic comes from the color placement. Four stepping colors in the same color family create the illusion of three-dimensional boxes against the main shade.
I've chosen to use a silk and mohair yarn for this shawl as I love how it works up into a light-as-air fabric. The haze of kid-mohair compensates for the openness of the granny stitch, while the super-fine yarn weight ensures a crochet fabric that isn't too stiff or dense.
Hate seaming? Join the club! This bad-boy is written to join-as-you-go. Each square (or triangle) is joined to the last as you work, so when you're done: you're done! (Ok, you'll still need to weave in the ends.). The joining instructions are written to work in horizontal rows from left-to-right and the top-down, though once you've learned the technique, the order in which you join is totally flexible.
 model: Julia Madill
photos: JenniferRowsom.com


SIZE
One
FINISHED MEASUREMENTS
With listed yarn, and at gauge given, shawl measures.
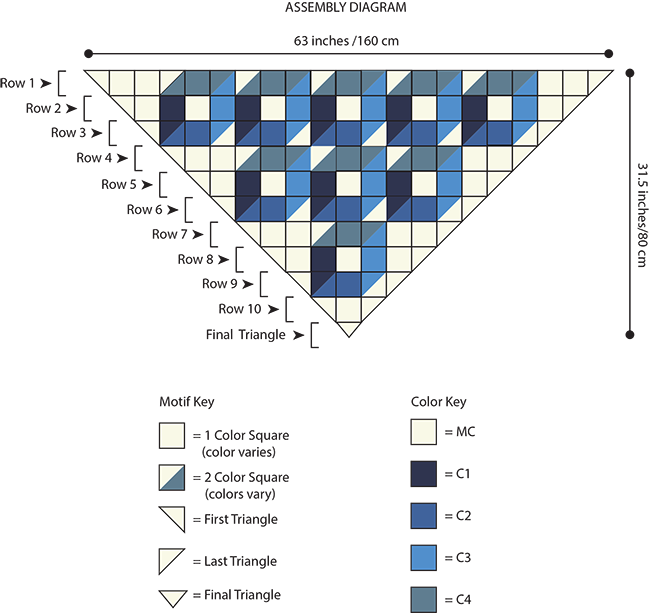
Width at top edge: 63 inches/160 cm
Depth at center point: 31.5 inches/80 cm
See Pattern notes below for details on working with a different yarn.
MATERIALS
Yarn
Knitting For Olive Soft Silk Mohair [70% Mohair, 30% Silk; 246 yd/225 m per .88 oz/25 g skein];
![]() [MC] Cream; 3 balls; approximately 541 yds/495 m
[MC] Cream; 3 balls; approximately 541 yds/495 m
![]() [CC1] Deep Petroleum Blue; 1 ball; approximately 148 yds/135 m
[CC1] Deep Petroleum Blue; 1 ball; approximately 148 yds/135 m
![]() [CC2] Blue Tit; 1 ball; approximately 148 yds/135 m
[CC2] Blue Tit; 1 ball; approximately 148 yds/135 m
![]() [CC3] Poppy Blue; 1 ball; approximately 197 yds/180 m
[CC3] Poppy Blue; 1 ball; approximately 197 yds/180 m
![]() [CC4] Dusty Dove Blue; 1 ball; approximately 197 yds/180 m
[CC4] Dusty Dove Blue; 1 ball; approximately 197 yds/180 m
Yarn Characteristics
![]() The sample shown uses a super-fine mohair silk blend yarn. The yarn is worked at an intentionally loose gauge to allow the brushed yarn to bloom. Choose the same fiber blend or a similar brushed yarn in the same weight.
The sample shown uses a super-fine mohair silk blend yarn. The yarn is worked at an intentionally loose gauge to allow the brushed yarn to bloom. Choose the same fiber blend or a similar brushed yarn in the same weight.
Recommended needle size
[always use a needle size that gives you the gauge listed below - every knitter's gauge is unique]
![]() US G-6/4 mm hook
US G-6/4 mm hook
Notions
![]() removable stitch markers (optional but helpful)
removable stitch markers (optional but helpful)
![]() yarn needle
yarn needle

GAUGE
Single and 2-Color Squares = 3 inches/7.5 cm square
Note: gauge is always taken after blocking.
PATTERN NOTES
[Knitty's list of standard abbreviations and techniques can be found here.]
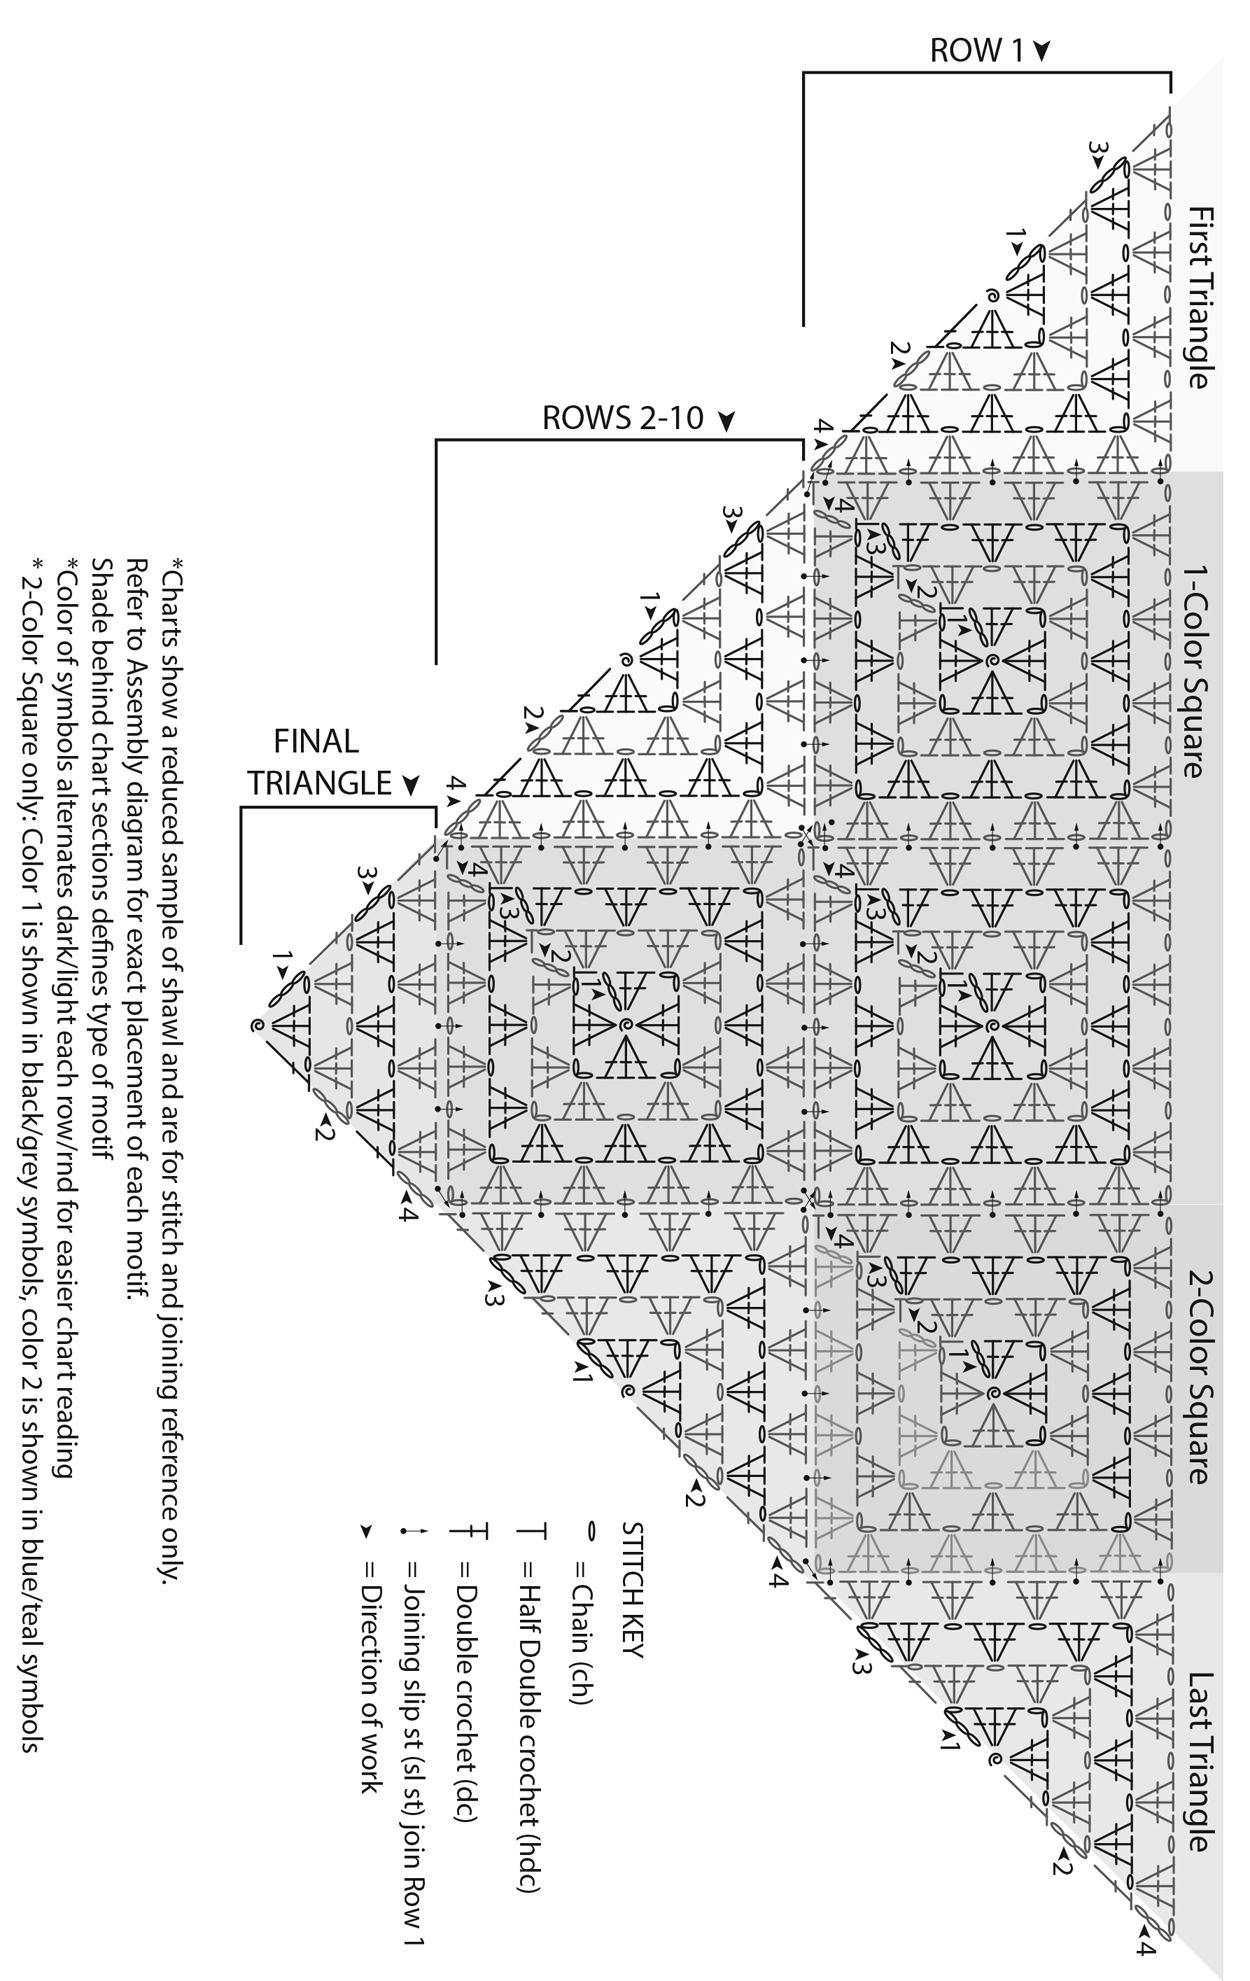
Construction method: This shawl consists of square and triangle motifs. After the first triangle is made, each motif is joined to the last using the join-as-you-go slip stitch technique (as described in instructions). The shawl is worked in rows of motifs from left to right and from the top down.
Using a different yarn: The shawl can be adapted to for other weights of yarn and to create different finished sizes by beginning with row 4 or row 7 of the assembly diagram. Choose a hook size slightly larger than ball band recommendations to maintain fabric drape. Note that yardage requirements will change if you do this.
Single Colour Square
With appropriate color as per assembly diagram, make a magic ring OR ch 4, join with sl st to first ch to form ring.
Rnd 1 [WS]: Ch 3 (counts as 1 dc throughout), 2 dc in ring, [ch 2, 3 dc] 3 times in ring, ch 1, join with hdc in top of beg ch-3 (counts as corner ch-2 sp throughout). Turn.
Rnd 2 [RS]: Ch 3, 2 dc in first corner sp, ch 1, [(3 dc, ch 2, 3 dc, ch 1) in next ch-2 sp] three times, 3 dc in first corner sp, ch 1, join with hdc in top of beg ch-3. Turn.
Rnd 3: Ch 3, 2 dc in first corner sp, [ch 1, 3 dc in next ch-1 sp, ch 1, (3 dc, ch 2, 3 dc) in next ch-2 sp] three times, ch 1, 3 dc in next ch-1 sp, ch 1, 3 dc in first corner sp, ch 1, join with hdc in top of beg ch-3. Turn.
If working Row 1 of shawl (Square is joined to right side edge of prev Motif):
Rnd 4 [RS]: Ch 3, 2 dc in first corner sp, ch 1, [(3 dc in next ch-1 sp, ch 1) twice, (3 dc, ch 2, 3 dc, ch 1) in corner ch-2 sp] twice, [3 dc in next ch-1 sp, ch 1] twice, 3 dc in next corner ch-2 sp, ch 1, sl st in top-right corner ch-2 sp of prev First Triangle, 3 dc in same corner ch-2 sp of current Square, [sl st in next ch-1 sp of prev First Triangle (working down right-side edge), 3 dc in next ch-1 sp of current Square] twice, sl st in next ch-1 sp of prev First Triangle, 3 dc in first corner sp of current Square, sl st in bottom-right corner sp of prev First Triangle, join with hdc in top of beg ch-3 of current Square.
Fasten off.
If working Rows 2-10 of shawl (Square is joined to bottom edge of Motifs of prev Row as well as right-side edge of prev Motif of current row):
Rnd 4 [RS]: Ch 3, 2 dc in first corner sp, ch 1, (3 dc in next ch-1 sp, ch 1) twice, (3 dc, ch 2, 3 dc) in next corner ch-2 sp, ch 1, (3 dc in next ch-1 sp, ch 1) twice, 3 dc in next corner ch-2 sp, ch 1, sl st diagonally to bottom-left corner sp of prev Motif above and to the right of current Square, 3 dc in same corner ch-2 sp of current Square, [sl st in next ch-1 sp of Motif above, 3 dc in next ch-1 sp of current Square] twice, sl st in next ch-1 sp of Motif above, 3 dc in next ch-2 sp of current Square, sl st diagonally to bottom-right corner sp of Motif above and to the left of current Square, 3 dc in same corner ch-2 sp of current Square, [sl st in next ch-1 sp of prev Motif to the left (working down right-side edge), 3 dc in next ch-1 sp of current Square], twice, sl st in next ch-1 sp of prev Motif to the left, 3 dc in first corner sp of current Square, sl st in bottom-right corner sp of prev Motif to the left, join with hdc in top of beg ch-3 of current Square.
Fasten off.
Two Colour Square
Notes: Color 1 refers to the color of the top-left portion of the Square, color 2 refers to the bottom-right portion. Choose appropriate color 1 and color 2 for each two-color square using the assembly diagram.
When changing colors at a corner, the chain two (ch 2) will be worked as chain one (ch 1) in the old color and chain one (ch 1) in the new color. The resulting two chains will be in the old color and the new color will be on the hook to begin your next stitch.
With color 1, make a magic ring OR ch 4, join with sl st to first ch to form ring.
Rnd 1 [WS]: With color 1, ch 3 (counts as 1 dc throughout), [2 dc, ch 2, 3 dc, ch 1] in ring, drop color 1, with color 2, ch 1 (this will join color 2 and complete ch-2 corner in color 1), [3 dc, ch 2, 3 dc, ch 1] in ring, join with hdc in top of beg ch-3 (counts as ch-2 corner sp throughout). Turn.
Rnd 2 [RS]: Cont with color 2, ch 3, 2 dc in first corner sp, ch 1, [3 dc, ch 2, 3 dc] in next ch-2 sp, ch 1, 3 dc in next ch-2 sp, ch 1, drop color 2, with color 1, ch 1, 3 dc in same ch-2 sp, ch 1, [3 dc, ch 2, 3 dc] in next ch-2 sp, ch 1, 3 dc in first corner sp, ch 1, join with hdc in top of beg ch-3.Turn.
Rnd 3 [WS]: Cont with color 1, ch 3, 2 dc in first corner sp, ch 1, 3 dc in next ch-1 sp, ch 1, [3 dc, ch 2, 3 dc] in next ch-2 sp, ch 1, 3 dc in next ch-1 sp, ch 1, 3 dc in next ch-2 sp, ch 1, drop color 1, with color 2, ch 1, 3 dc in same ch-2 sp, ch 1, 3 dc in next ch-1 sp, ch 1, [3 dc, ch 2, 3 dc] in next ch-2 sp, ch 1, 3 dc in next ch-1 sp, ch 1, 3 dc in first corner sp, ch 1, join with hdc in top of beg ch-3. Turn.
If working Row 1 of shawl (Square is joined to right side edge of prev Motif):
Rnd 4 [RS]: Cont with color 2, ch 3, 2 dc in first corner sp, ch 1, [3 dc in next ch-1 sp, ch 1] twice, [3 dc, ch 2, 3 dc] in next ch-2 sp, ch 1, [3 dc in next ch-1 sp, ch 1] twice, 3 dc in next ch-2 sp, ch 1, drop color 2, with color 1, ch 1, 3 dc in same ch-2 sp, ch 1, [3 dc in next ch-1 sp, ch 1] twice, 3 dc in next ch-2 sp, ch 1, sl st in top-right corner ch-2 sp of prev Motif, 3 dc in same corner ch-2 sp of current Square, [sl st in next ch-1 sp of prev Motif (working down right-side edge), 3 dc in next ch-1 sp of current Square] twice, sl st in next ch-1 sp of prev Motif, 3 dc in first corner sp of current Square, sl st in bottom-right corner sp of prev Motif, join with hdc in top of beg ch-3 of current Square.
Fasten off.
If working Rows 2-10 of shawl (Square is joined to bottom edge of Motifs of prev Row as well as right-side edge of prev Motif of current row):
Rnd 4 [RS]: Cont with color 2, ch 3, 2 dc in first corner sp, ch 1, [3 dc in next ch-1 sp, ch 1] twice, [3 dc, ch 2, 3 dc] in next ch-2 sp, ch 1, [3 dc in next ch-1 sp, ch 1] twice, 3 dc in next ch-2 sp, ch 1, drop color 2, with color 1, ch 1, sl st diagonally in bottom-left corner sp of prev Motif above and to the right of current Square, 3 dc in same corner ch-2 sp of current Square, [sl st in next ch-1 sp of Motif above, 3 dc in next ch-1 sp of current Square] twice, sl st in next ch-1 sp of Motif above, 3 dc in next ch-2 sp of current Square, sl st diagonally to bottom-right corner sp of Motif above and to the left of current Square, 3 dc in same corner ch-2 sp of current Square, [sl st in next ch-1 sp of prev Motif to the left (working down right-side edge), 3 dc in next ch-1 sp of current Square], twice, sl st in next ch-1 sp of prev Motif to the left, 3 dc in first corner sp of current Square, sl st in bottom-right corner sp of prev Motif to the left, join with hdc in top of beg ch-3 of current Square.
Fasten off.
Techniques + tips:
- Magic Ring (video tutorial)
- When joining with a slip stitch, insert hook into indicated space from front to back.
- When working a 2-color square, do not cut yarn when changing colors but leave the color not in use at WS of work (to the back on RS rounds, to the front on WS rounds). When picking up the old color from the previous round, bring the new color up to the height of the current round creating a vertical strand. This strand will blend in with the stitch next to it and is hardly noticeable in the finished square.
- Ensure that the right side of the work is facing when joining motifs. It may be useful to place a stitch marker or safety pin on the RS of the work to help keep track (the last row of each motif is the RS).
- The term "Motif" is used to reference Triangles, 1-Color Squares and 2-Color Squares when instructions are interchangeable
CHARTS
View and download CHART here:
Note: This chart represents the key pattern sections. See the Instructions and the Assembly Diagram (above) for details on what squares are worked and where they go in the pattern.
DIRECTIONS
SHAWL ROW ONE
First Triangle
With MC, make a magic ring OR ch 4, join with sl st to first ch to form ring.
Row 1 [WS]: Ch 4 (counts as 1 dc, ch-1 sp throughout), [3 dc, ch 2, 3 dc, ch 1, 1 dc] in ring. Turn.
Row 2 [RS]: Ch 4, 3 dc in first ch-1 sp, ch 1, [3 dc, ch 2, 3 dc] in next ch-2 sp, ch 1, 3 dc in last ch-1 sp, ch 1, 1 dc in 3rd ch of beg ch-4. Turn.
Row 3 [WS]: Ch 4, 3 dc in first ch-1 sp, ch 1, 3 dc in next ch-1 sp, ch 1, [3 dc, ch 2, 3 dc] in next ch-2 sp, ch 1, 3 dc in next ch-1 sp, ch 1, 3 dc in last ch-1 sp, ch 1, 1 dc in 3rd ch of beg ch-4. Turn.
Row 4 [RS]: Ch 4, 3 dc in first ch-1 sp, ch 1, [3 dc in next ch-1 sp, ch 1] twice, [3 dc, ch 2, 3 dc] in next ch-2 sp, ch 1, [3 dc in next ch-1 sp, ch 1] three times, 1 dc in 3rd ch of beg ch-4.
Fasten off.
Squares
Work 19 Squares as shown in Assembly Diagram above, joining as you go.
Last Triangle
Work Rows 1-3 as given for First Triangle.
Row 4 [RS]: Ch 4, 3 dc in first ch-1 sp, ch 1, [3 dc in next ch-1 sp, ch 1] twice, 3 dc in next ch-2 sp, ch 1, sl st to top-right corner sp of prev Motif, 3 dc in same corner ch-2 sp of current Triangle, [sl st in next ch-1 sp of prev Motif (working down right-side edge), 3 dc in next ch-1 sp of current Triangle] three times, sl st to bottom right-hand corner sp of prev Motif, 1 dc in 3rd ch of beg ch-4 of current Triangle.
Fasten off.
SHAWL ROWS 2-10
First Triangle
With MC, make a magic ring OR ch 4, join with sl st to first ch to form ring.
Row 1 [WS]: Ch 4 (counts as 1 dc, ch-1 sp throughout), [3 dc, ch 2, 3 dc, ch 1, 1 dc] in ring. Turn.
Row 2 [RS]: Ch 4, 3 dc in first ch-1 sp, ch 1, [3 dc, ch 2, 3 dc] in next ch-2 sp, ch 1, 3 dc in last ch-1 sp, ch 1, 1 dc in 3rd ch of beg ch-4. Turn.
Row 3 [WS]: Ch 4, 3 dc in first ch-1 sp, ch 1, 3 dc in next ch-1 sp, ch 1, [3 dc, ch 2, 3 dc] in next ch-2 sp, ch 1, 3 dc in next ch-1 sp, ch 1, 3 dc in last ch-1 sp, ch 1, 1 dc in 3rd ch of beg ch-4. Turn.
Row 4 [RS]: Ch 4, 3 dc in first ch-1 sp, ch 1, [3 dc in next ch-1 sp, ch 1] twice, 3 dc in next ch-2 sp, ch 1, sl st diagonally to bottom left-hand corner of prev Motif above and to the right of current Triangle, 3 dc in same corner ch-2 sp of current Triangle, [sl st in next ch-1 sp of Motif directly above, 3 dc in next ch-1 sp of current Triangle] three times, sl st diagonally to bottom corner sp of prev First Triangle above and to the left of current Triangle, 1 dc in 3rd ch of beg ch-4 of current Triangle.
Fasten off.
Squares
Work 1-Color and 2-Color Squares as shown in Assembly Diagram above. You will join as you go. There are 17 squares in Row 2, 15 in Row 3, 13 in Row 4, 11 in Row 5, 9 in Row 6, 7 in Row 7, 5 in Row 8, 3 in Row 9, and 1 in Row 10.
Last Triangle
Work Rows 1-3 as given for First Triangle.
Row 4 [RS]: Ch 4, sl st in bottom corner sp of Last Triangle of prev row, 3 dc in first ch-1 sp of current Triangle, [sl st in next ch-1 sp of Motif above (working across bottom edge), 3 dc in next ch-1 sp of current Triangle] twice, sl st in next ch-1 sp of Motif above, 3 dc in next ch-2 sp of current Triangle, ch 1, sl st diagonally to bottom-right corner sp of prev Motif above and to the left of current Triangle, 3 dc in same corner ch-2 sp of current Triangle, [sl st in next ch-1 sp of prev Square (working down right-side edge), 3 dc in next ch-1 sp of current Triangle] three times, sl st to bottom right-hand corner sp of prev Motif, 1 dc in 3rd ch of beg ch-4 of current Triangle.
Fasten off.
Once you have completed Row 10, make Final Triangle as below.
SHAWL ROW 11
Final Triangle
With MC, make a magic ring OR ch 4, join with sl st to first ch to form ring.
Row 1 [WS]: Ch 4 (counts as 1 dc, ch-1 sp throughout), [3 dc, ch 1, 1 dc] in ring. Turn.
Row 2: Ch 4, 3 dc in first ch-1 sp, ch 1, 3 dc in last ch-1 sp, ch 1, 1 dc in 3rd ch of beg ch-4. Turn.
Row 3: Ch 4, [3 dc, ch 1] in each ch-1 sp to end of row, 1 dc in 3rd ch of beg ch-4. Turn.
Row 4: Ch 3, sl st diagonally to bottom-left corner of Triangle above and to the right of current triangle, 3 dc in next ch-1 sp of current triangle, [sl st in next ch-1 sp of Square above, 3 dc in next ch-1 sp of current triangle] three times, sl st diagonally to bottom-left corner of triangle above and to the left of current triangle, 1 dc in 3rd ch of beg ch-4 of current triangle.
Fasten off.
FINISHING
Weave in all ends. Soak shawl in lukewarm water until yarn is saturated (10-20 minutes). Gently squeeze out water (do not wring) and pin the shawl to open up the fabric and straighten lines of motifs. Allow to dry completely before removing pins.
ABOUT THE DESIGNER
 Julia Madill is a knit and crochet pattern designer, tech editor, and graphic artist. She loves sharing what she has learned in her 10+ years of experience in the yarn industry, providing others with the tools to create in their own style, voice and aesthetic. Her book, Every Way with Granny Crochet is available from David and Charles publishers.
She lives in Toronto with her partner, two daughters, a cat named Pickles and a whole lot of yarn.
Pattern & images © 2024 Julia Madill