


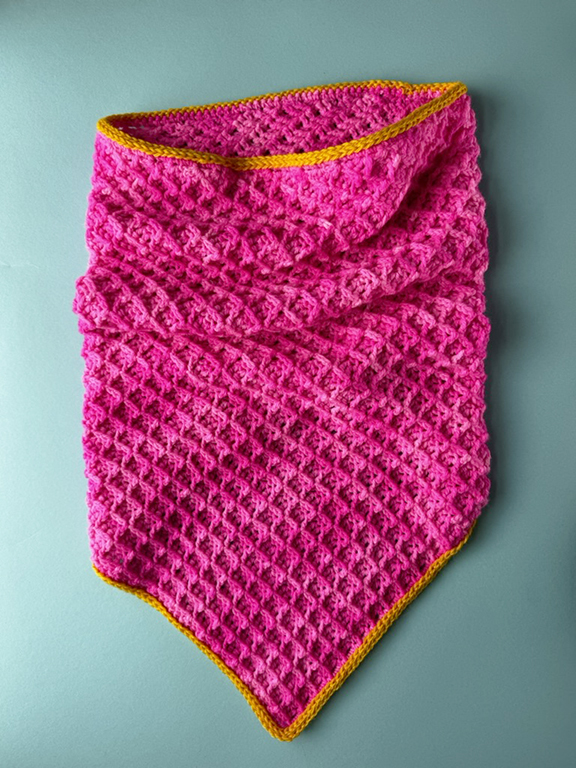
Awfully Waffly, a free knitting pattern from Knitty.com.
INTRODUCTION
Awfully Waffly

by Julia Madill

Deep waffle texture is a breeze to achieve in this pattern by harnessing a crochet secret weapon: the post stitch. If you're new to crochet, you may not know that there's more than one way to work into a stitch. In this case, we're using the front post double crochet (dcfp) stitch, where you work around the stitch of the previous row, not into the top loops. This technique pops your stitch forward, and when used in combination with stitches worked the regular way, you can create fun textures like this waffle pattern!
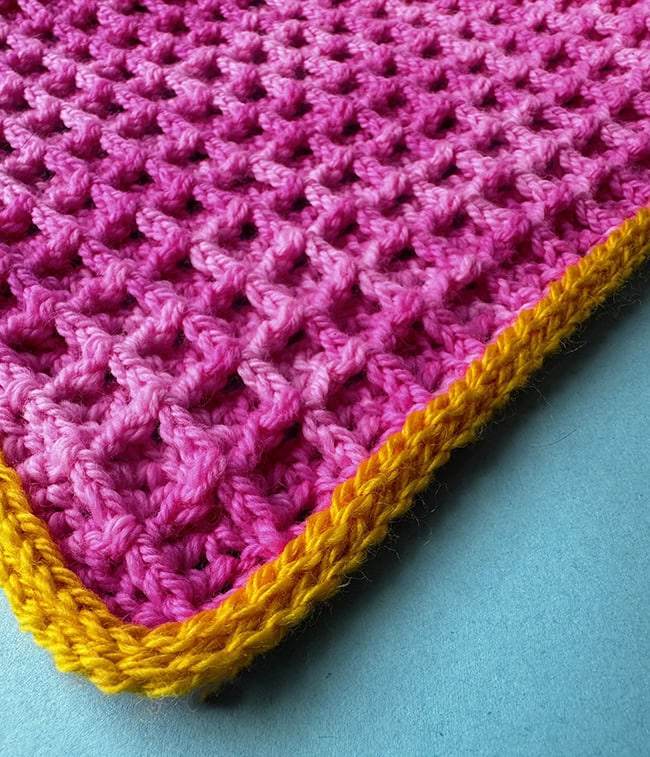
Are post stitches yesterday's news to you? More experienced crocheters may still find something new to try with the contrast trim. While the trim looks suspiciously like a knitted i-cord, the edges of this cowl are worked entirely in crochet! The secret is working into stitches yet another way: in the "third" loop only (tlo).
Shall we get into the weeds? The third loop is located behind and below the top two loops you typically work into BUT this loop is only found on stitches that are made using a yarn-over (yo) prior to inserting your hook into the work. Are you still with me? This means you typically only see "third loop only" (tlo) instructions after a row of half-double crochet (hdc), double crochet (dc) or taller stitches. This pattern cheats the system by using a "yarn over slip stitch" (yoslst), a technique I learned from another designer (shout out Anna-Maria from Crochet Highway!). This unusual stitch has you add a yarn over to a typical slip stitch, creating a third loop for you to work into for your next round. When you work a row or round of stitches into the third loops like this, it pushes the unworked top two loops to the front of the work, creating a decorative horizontal chain. In this pattern, by working slip stitches into the third loops of a round of yarn over slip stitches, the result is two horizontal chains stacked on top of each other. Pretty cool, huh? If I've lost you; don't sweat it. You can easily create a nice trim for your cowl by just working a simple round of single crochet.
I know following a written crochet pattern can be a challenge for even the most experienced crocheter. If the words have you scratching your head, check out the charts! If the charts make your eyes cross, check out the videos! So grab those 2 hanks of precious yarn you picked up without a project in mind (I know you have them) and get thee a-waffle-ing!
 model + photos: Julia Madill


SIZE
One size to fit adult.
FINISHED MEASUREMENTS
At gauge given, piece measures:
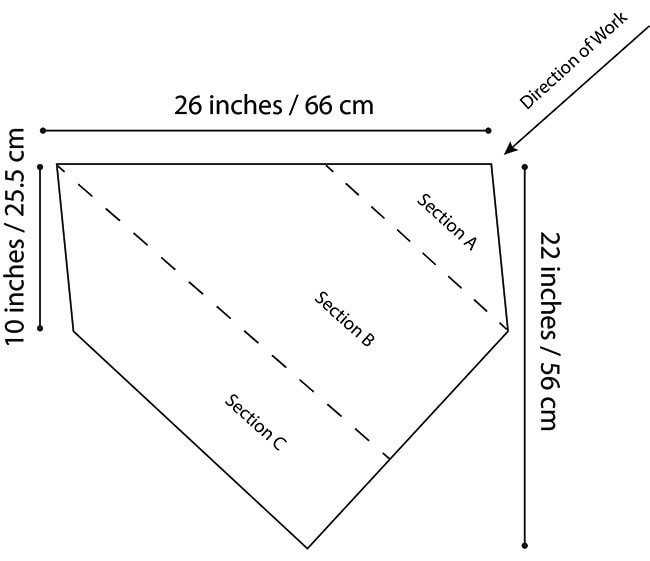
Circumference: 26 inches/66 cm
Front Point Depth: 22 inches/56 cm
Back Neck Depth: 10 inches/25.5 cm
MATERIALS
Yarn
![]() [MC] Lichen and Lace 80/20 Sock [80% Machine washable organic merino 20% Recycled Nylon; 365 yd/334 m per 100 g skein]; Gladiolus; 2 skeins (or approximately 520 yd/475 m)
[MC] Lichen and Lace 80/20 Sock [80% Machine washable organic merino 20% Recycled Nylon; 365 yd/334 m per 100 g skein]; Gladiolus; 2 skeins (or approximately 520 yd/475 m)
![]() [CC] Walcot Yarns Opus [70% Argentinian Merino, 30% Baby Alpaca; 384 yd/350 m per 100 g skein]; Bumblebee: 1 skein –
[CC] Walcot Yarns Opus [70% Argentinian Merino, 30% Baby Alpaca; 384 yd/350 m per 100 g skein]; Bumblebee: 1 skein –
Note: you need 24 yds/22 m; see notes below about making a substitution.
Yarn Characteristics
![]() The sample uses a soft, fingering-weight, three-ply wool for both the main and contrast colors. The MC stitch pattern texture will be most visible with smooth, yarns in solid or semi-solid shades. The CC yarn for the border could be swapped out for something of a different texture or dye effect, provided it is roughly the same yarn weight.
The sample uses a soft, fingering-weight, three-ply wool for both the main and contrast colors. The MC stitch pattern texture will be most visible with smooth, yarns in solid or semi-solid shades. The CC yarn for the border could be swapped out for something of a different texture or dye effect, provided it is roughly the same yarn weight.
You can work the project with a different yarn weight; see Pattern Notes below for guidance.
Recommended hook size
[always use a needle size that gives you the gauge listed below - every knitter's gauge is unique]
![]() US #G-6/4 mm crochet hook
US #G-6/4 mm crochet hook
![]() US #H-7/4.5 mm crochet hook
US #H-7/4.5 mm crochet hook
Notions
![]() removable stitch markers (optional but helpful)
removable stitch markers (optional but helpful)
![]() yarn needle
yarn needle
GAUGE
17 sts and 11 rows = 4 inches/10 cm in waffle stitch pattern.
PATTERN NOTES
[Knitty's list of standard abbreviations and techniques can be found here.]
Construction method: Cowl is worked flat in rows with simple shaping. The work is seamed at the back neck to create a cowl with a pointed bandana hem. Trim is worked directly into the top and bottom edges and worked in the round.
Techniques:
- Beg-dc3tog (Beginning double crochet 3 together): Ch 3, (yo and draw up a loop in next st, yo and draw through 2 loops on hook) twice, yo and draw through all loops on hook. 2 stitches decreased. Counts as one stitch.
- Dc3tog (Double crochet 3 together): (yo and draw up a loop in next st, yo and draw through 2 loops on hook) three times, yo and draw through all loops on hook. 2 stitches decreased. Counts as one stitch.
- Dcfp (Front post double crochet): Yo and draw up a loop around post of next stitch inserting hook from front of work to back and right to left, (yo and draw through 2 loops on hook) twice.
- -tlo: (Third loop only): Work indicated stitch into the third loop only. In this pattern the third loop is located under the top two loops at the back (WS) of the work.
- Yoslst (Yarn over slip stitch): Yo and insert hook into indicated stitch, yo and draw through all loops on hook
A playlist of techniques used in this pattern can be found here.
- Double crochet
- Dc increase at start of row
- Dcfp
- Begdc3tog
- Dc3tog at end of row
- Single crochet into side edges
- Yosls
- Sl st-tlo
- Mattress stitch for crochet: joining side edges
Beginner tips:
If you're having trouble keeping track of or understanding the pattern, it may be helpful to know this: Once the pattern is established, each front post double crochet (dcfp) stitch will be worked around a double crochet (dc) stitch from the previous row. Likewise, each double crochet stitch (dc) will be worked into a front post double crochet (dcfp) from the previous row. The beginning and end of the rows deviate from this pattern to avoid having post stitches at the edge of the work and accommodate shaping, so take care to read those instructions carefully.
It's common for beginner crocheters to unintentionally skip the last stitch of a row. It may be helpful to place a removable stitch marker on the first stitch of each row (often the top of a ch-2 or ch-3) in order to identify where to work the the last stitch when coming back across the next row. Move this first-stitch marker each row.
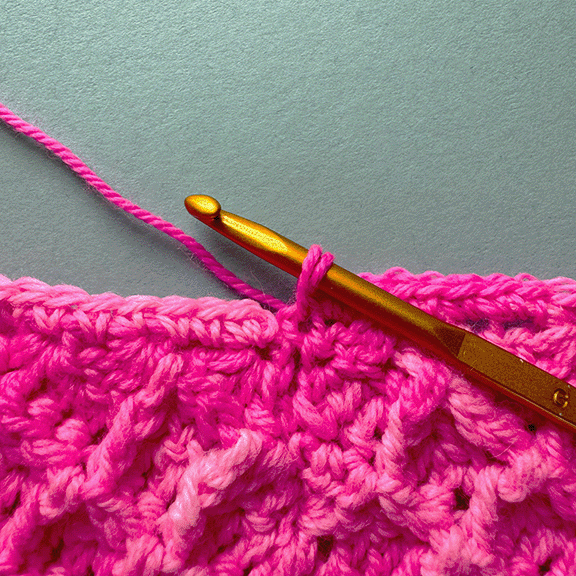
Changing colors: Work the last stitch of the old color until 2 loops remain on the hook, with the new color, yo and draw through these last 2 loops, leaving a tail of approx 6 in/15 cm to weave in later). Cut old color, leaving a similar length tail, and proceed with the new. See animation below.
Optional Simpler Edge (not shown)
If you prefer, you can work a simpler version of the Upper and Lower edges.
Upper and Lower edges:
Work Round 1 as given in the standard instructions. For both, work a different Round 2, as follows:
Round 2: With CC, sc in each sc around. Join with sl st to first sc. Fasten off. Weave in ends.
Adjusting for different yarn weights:
This pattern is easily adapted to work at a different gauge. The guidelines below will allow you to use any yarn for the pattern, though note the final dimensions of the cowl will be different than stated above. Sizing adjustments with this method are limited to the dimensions of the row repeat within each section.
Choose a crochet hook size appropriate for the yarn weight you are substituting. A rough guide to choosing hook sizes can be found here.
- Work Section A, repeating Rows 1-6 as many times as desired (less for thicker yarn, more for thinner yarn). The length of the angled side edges upon completion of section A will be the back neck depth of your finished cowl. Take note of how many repeats have been worked.
- Work Section B, repeating Rows 1-6 as many times as desired, noting final length of increase edge upon completion of section B will be the circumference of your finished cowl.
- Work Section C, repeating Rows 1-6 the same number of times as were worked for Section A.
Fine-tuning sizing:
If you are comfortable reading the fabric and working the stitch pattern without stitch-by-stitch instruction, you can adjust the sizing of the cowl by smaller increments. After working Section A, you will need to continue the waffle stitch pattern on your own, only working the shaping as outlined in Sections B and C. Guidelines as follows:
- Work Section A until angled side edges measure desired length for back neck depth, ending on a WS row. Note number of rows worked.
- Increase along right-side edge only as outlined in Section B (continuing in waffle stitch pattern as established) until total length of increase edge from beginning of Section A measures desired circumference of cowl, ending on a WS row.
- Decrease along right-side edge only as outlined in Section C (continuing in waffle stitch pattern as established) for the same number of rows worked in Section A.
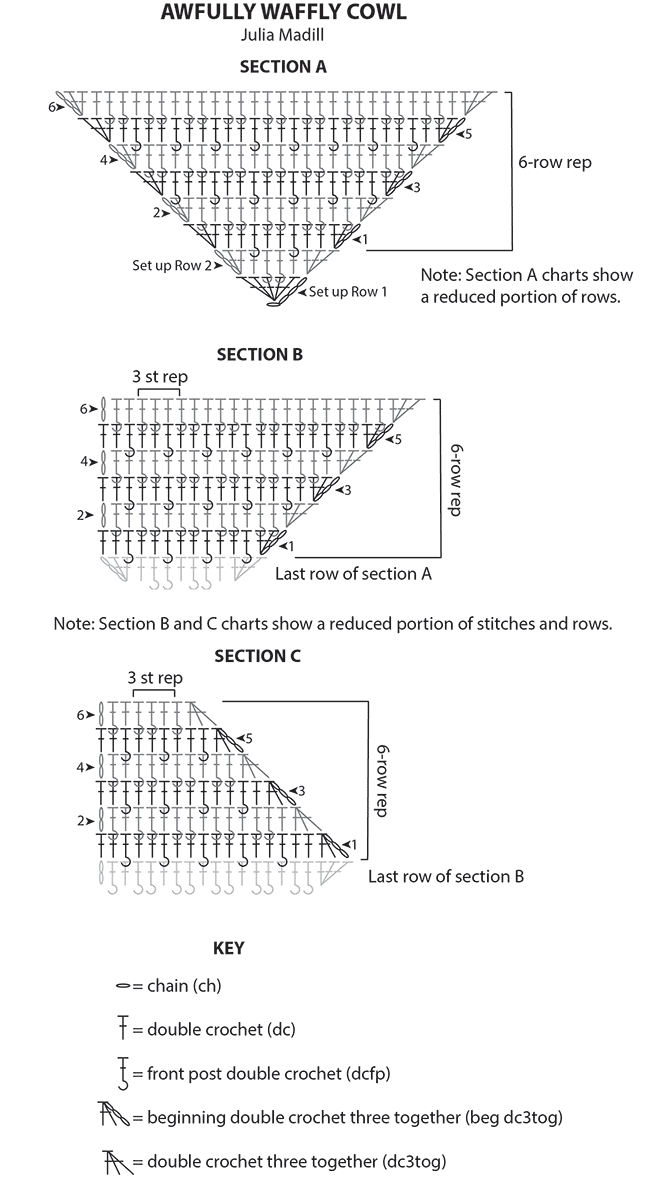
CHARTS
DIRECTIONS

With MC and smaller hook, ch 4.
Section A (Increase at the beginning and end of each row)
Working from chart (above) or written instructions (below) as you prefer, work Rows 1-6 three times. 18 rows total for Section A, NOT including the set-up rows. 82 sts.
Set up Row 1 [RS]: 5 dc in 4th ch from hook (sk'd 3-ch counts as 1 dc). Turn. 6 sts.
Set up Row 2 [WS]: Ch 3, 2 dc in first st (counts as 3 dc throughout), dc in next st, dcfp around each of next 2 sts, dc in next st, 3 dc in top of beg ch-3. Turn. 10 sts.
Row 1: Ch 3, 2 dc in first st, dc in each of next 2 sts, *dcfp around next st, dc in each of next 2 sts; rep from * to last st, 3 dc in top of beg ch-3. Turn. 4 sts inc'd.
Row 2: Ch 3, 2 dc in first st, dcfp around next st, dc in next st, *dcfp around each of next 2 sts, dc in next st; rep from * to last 2 sts, dcfp around next st, 3 dc in top of beg ch-3. Turn. 4 sts inc'd.
Row 3: Ch 3, 2 dc in first st, dcfp, *dc in next each of next 2 sts, dcfp around next st; rep from * to last st, 3 dc in top of beg ch-3. Turn. 4 sts inc'd.
Row 4: Ch 3, 2 dc in first st, dcfp around each of next 2 sts, *dc in next st, dcfp around each of next 2 sts; rep from * to last st, 3 dc in top of beg ch-3. Turn. 4 sts inc'd.
Row 5: Ch 3, 2 dc in first st, dc in next st, dcfp around next st, *dc in next each of next 2 sts, dcfp around next st; rep from * to last 2 sts, dc in next st, 3 dc in top of beg ch-3. Turn. 4 sts inc'd.
Row 6: Ch 3, 2 dc in first st, dc in next st, *dcfp around each of next 2 sts, dc in next st; rep from * to last st, 3 dc in top of beg ch-3. Turn. 4 sts inc'd.
Working from chart or written instructions as you prefer, work Rows 1-6 three times, then Rows 1-2 once more. 122 sts.
Row 1 [RS]: Ch 3, 2 dc in first st (counts as 3 dc throughout), *dcfp around next st, dc in each of next 2 sts; rep from * to end, working last dc in dc in top of beg ch-3. Turn. 2 sts inc'd.
Row 2 [WS]: Ch 2 (counts as dc throughout), dcfp around next st, *dc in next st, dcfp around next 2 sts; rep from * to last st, 3 dc in top of beg ch-3. Turn. 2 sts inc'd.
Row 3: Ch 3, 2 dc in first st, dc in next st, *dcfp around next st, dc in each of next 2 sts; rep from * to end, working last dc in top of beg ch-2. Turn. 2 sts inc'd.
Row 4: Ch 2, dcfp around next st, dc in next st, *dcfp around each of next 2 sts, dc in next st; rep from * to last st, 3 dc in top of beg ch-3. Turn. 2 sts inc'd.
Row 5: Ch 3, 2 dc in first st, dc in each of next 2 sts, *dcfp around next st, dc in each of next 2 sts; rep from * to end, working last dc in top of beg ch-2. Turn. 2 sts inc'd.
Row 6: Ch 2, dcfp around next st, dc in next st, *dcfp around each of next 2 sts, dc in next st; rep from * to last 2 sts, dcfp around next st, 3 dc in top of beg ch-3. Turn. 2 sts inc'd.
Section C (Decrease left side edge only)
Working from chart or written instructions as you prefer, work Rows 1-6 three times, then Rows 1-2 once more. 82 sts. Fasten off, leaving a long tail for seaming.
Row 1 [RS]: Beg-dc3tog, dc in each of next 2 sts, *dcfp around next st, dc in each of next 2 sts; rep from * to end, working last dc in top of beg ch-2. Turn. 2 sts dec'd.
Row 2 [WS]: Ch 2 (counts as dc throughout), dcfp around next st, dc in next st, *dcfp around each of next 2 sts, dc in next st; rep from * to last 3 sts, dc3tog. Turn. 2 sts dec'd.
Row 3: Beg-dc3tog, dc in next st, *dcfp around next st, dc in each of next 2 sts; rep from * to end, working last dc in top of beg ch-2. Turn. 2 sts dec'd.
Row 4: Ch 2, dcfp around next st, *dc in next st, dcfp around each of next 2 sts; rep from * to last 3 sts, dc3tog. 2 sts dec'd.
Row 5: Beg-dc3tog, *dcfp around next st, dc in each of next 2 sts; rep from * to last end, working last dc in top of beg ch-2. Turn. 2 sts dec'd.
Row 6: Ch 2, dcfp around next st, dc in next st, *dcfp around each of next 2 sts, dc in next st; rep from * to last 4 sts, dcfp around next st, dc3tog. Turn. 2 sts dec'd.
FINISHING
Note: The 10 inch/25.5 cm side edges that are to be seamed will be slightly skewed and will not form a perfect 45-degree angle to the top edge of the cowl (see schematic). This is normal and will not affect the look of the finished cowl. If desired, the angles can be blocked to 45 degrees to create a straight back neck seam.
Soak cowl in lukewarm water until yarn is saturated (10-20 minutes). Gently squeeze out water (do not wring) and pin the cowl to straighten and smooth the edges and lines of the stitch pattern. Allow to dry completely before removing pins.
Sew center back seam with RS facing, yarn tail and mattress stitch (see techniques) to form cowl. Weave in all rem ends.
TRIM
Upper Edge
With RS of cowl facing and larger hook , join MC with sl st to the upper edge opening at back seam.
Round 1: Ch 1, sc in same sp as sl st, sc evenly around (approx 2 sts per row, final count is not important as long as work is even), joining CC in last st. Break MC.
Round 2: With CC, yoslst loosely in each sc around. Do not join.
Round 3: Sl st-tlo loosely in each yoslst around. Sl st in first sl st to join.
Fasten off. Weave in ends.
Lower Edge
With RS of cowl facing, larger hook and work held upside down,
Round 1: With MC, ch 1, sc in same sp as sl st, sc evenly to center point, 3 sc in center point, sc evenly to end of round, joining MC to last st.
Rounds 2 and 3: With CC, work as Rounds 2 and 3 of Upper Edge.
Fasten off. Weave in remaining ends.
ABOUT THE DESIGNER
 Julia Madill is a knit and crochet pattern designer, tech editor, and stylist, and Knitty's new Crochet Editor. She loves sharing what she has learned in her 15+ years of experience in the yarn industry, providing others with the tools to create in their own style, voice and aesthetic. Her book, Every Way with Granny Crochet is available from David and Charles publishers. She lives in Toronto with her partner, two daughters, a cat named Pickles and a whole lot of yarn.
Pattern, charts, schematic and images © 2025 Julia Madill