


Megadahlia Lap Rug, a free knitting pattern from Knitty.com.
INTRODUCTION
Megadahlia
 by Franklin Habit

Translated and adapted from "D'oyley in Dahlia Pattern" from Weldon's Practical Knitter (1880s)
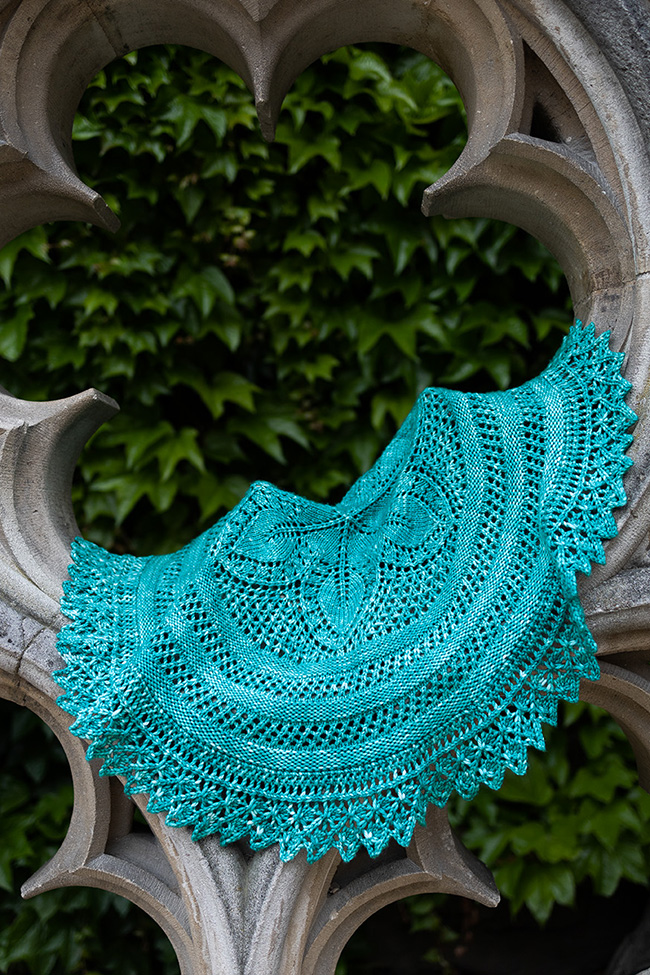
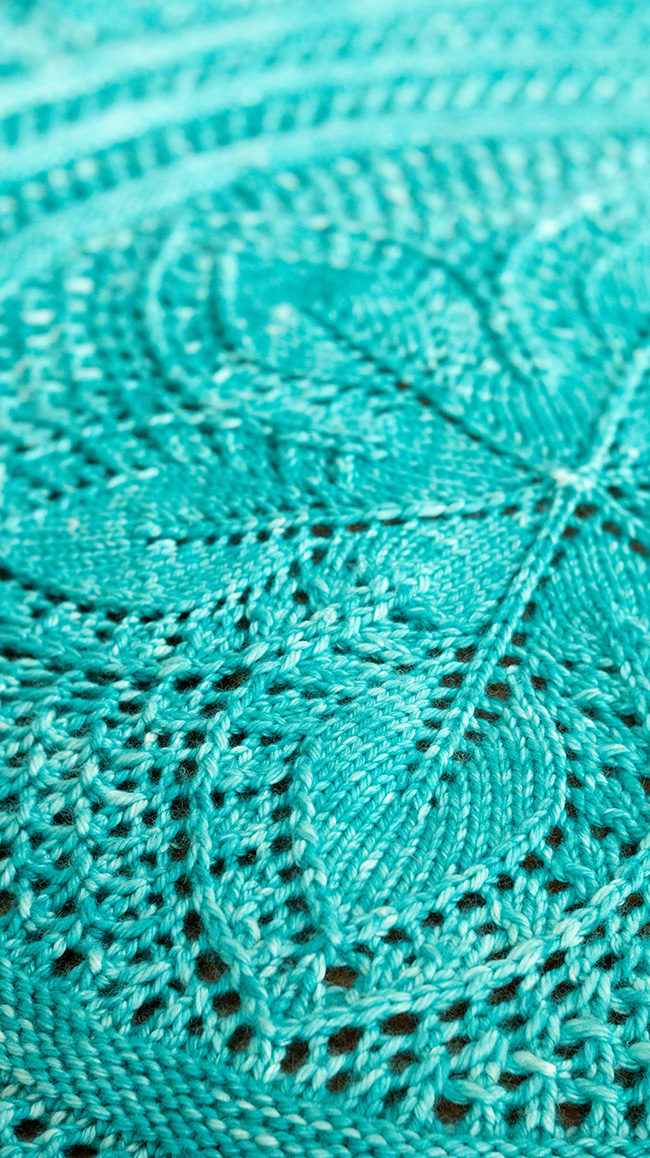
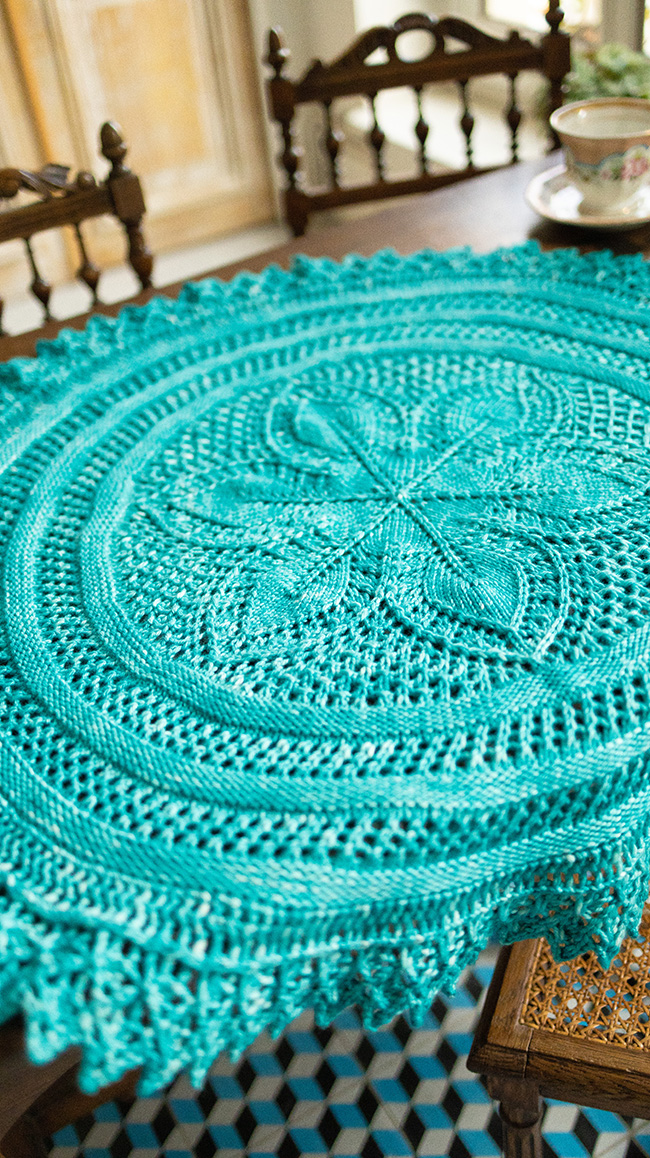
Voilà mon Megadoily.
I am a man with strong opinions about doilies.
I like them. They’re useful. They keep the reading lamp from scratching the end table and the teapot from scorching the tray.
I know, and am often reminded, that it’s possible to live a happy and fulfilling life with scratched end tables and tea brewed in a microwave. But this path is not for me.
So I own, and make frequent use of, doilies. Some are heirlooms, like the one I often use on top of the sewing machine cabinet. It was crocheted by one of my great-grandmothers. Some have been rescued from dusty piles in vintage shops. Others are my own work.
Does this leave me open to criticism? Indeed, to scorn? Yes. In our year of grace 2023, my open espousal of the doily often makes me a figure of fun. You might think, from the ridicule to which I am subjected, that I have taken to wearing a powdered wig and traveling the streets in a sedan chair.
Only one of those things is true.
A recent visitor to my apartment flicked the ravishing specimen of Jazz Age hardanger that sits under my pincushion and said, “Hey, grandma, maybe it’s time to skedaddle into the new century.” And I said, “Stop calling me grandma, Dad.”
The only problem I have with doilies is that I have too many doilies. Even with regular rotation, so that nobody feels left out, there aren’t enough horizontal surfaces in the apartment to accommodate those I already own, forget about those I’d rather like to knit.
And there are so many I’d rather like to knit.
This late nineteenth century darling, from Weldon’s Practical Knitter, has been ringing my chimes for years.
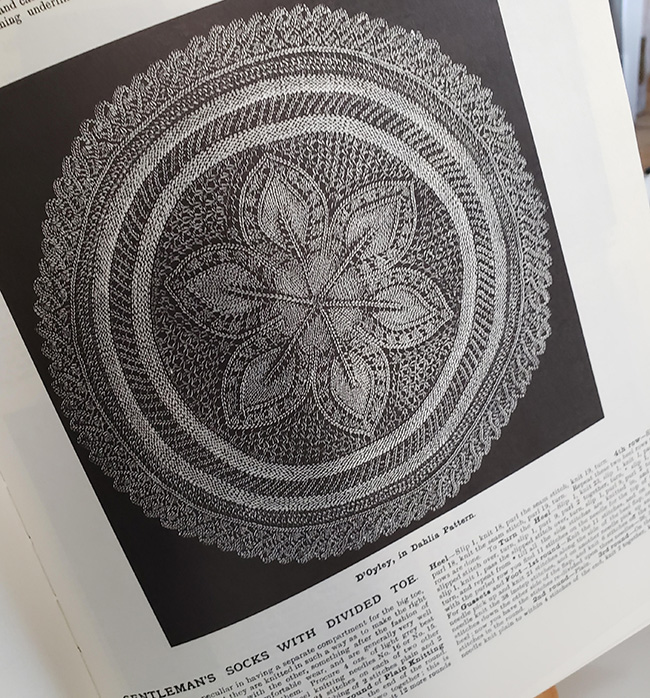
the original Weldon’s Illustration
I love everything about it, including the old-fashioned British spelling of doily as d’oyley. You would think that’s French, and I imagine it once was; but these days in France (I’m living in Paris now) the common term for a doily is “un napperon.”
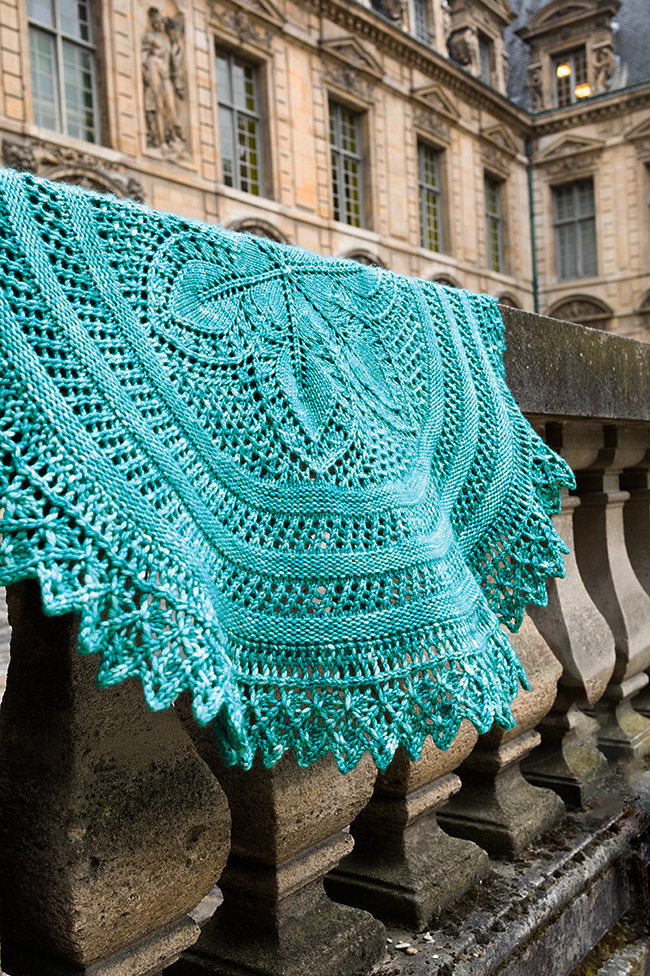
Like many 19th-century doilies, it’s not afraid to try something new, to blaze a trail. The edging (which was originally intended to be sewn on, though I’ve elected to knit mine on) is utterly bananas. I cannot believe, and neither will you, that it does what it does in so few rows.
So, yes. Beautiful doily. Not that it would take up much space, but still – how could I justify knitting it?
Then I got a message from Knitty, asking if I’d like to drop in and do something special for the anniversary. And I said sure. And they said how about something in this big gorgeous bulky yarn. And I said sure. And then I realized that if you knit an itty bitty delicate doily in big gorgeous bulky yarn, it ceases to be a doily and turns into a lap blanket.
So I did that, and here it is. Voilà, as the locals are wont to say.
Because while I may be living with a superabundance of doilies, they do nothing to combat the damp chill of many evenings in Paris. A lovely cuddly lap blanket, though? That’s a fully justifiable necessity.
 photos: Franklin Habit


SIZE
Fits one lap of any size
FINISHED MEASUREMENTS
Diameter: 36 inches/91 cm
MATERIALS
Yarn
![]() Shirsty Cat Designs Just Bulky [100% super wash merino; 137 yd/125m per 3.5 oz/100 g skein]; color: Knitty; 5 skeins
Shirsty Cat Designs Just Bulky [100% super wash merino; 137 yd/125m per 3.5 oz/100 g skein]; color: Knitty; 5 skeins
Yarn Characteristics
![]() The sample shown uses a bulky pure wool yarn with a consistent solid color throughout. Substitute yarns must be of a fiber that holds its shape after a firm blocking, or the blanket will not achieve the specified dimensions.
The sample shown uses a bulky pure wool yarn with a consistent solid color throughout. Substitute yarns must be of a fiber that holds its shape after a firm blocking, or the blanket will not achieve the specified dimensions.
Recommended needle size
[always use a needle size that gives you the gauge listed below - every knitter's gauge is unique]
![]() US #8/5mm needles for working in the round, both small circumference and longer needles.
US #8/5mm needles for working in the round, both small circumference and longer needles.
Note: See Construction Method below, in Pattern Notes.
![]() A single spare DPN or short circular needle in a similar size, for setting up the edging.
A single spare DPN or short circular needle in a similar size, for setting up the edging.
Notes on needles: 19th century patterns typically use needles much smaller than we would for an equivalent yarn. The oddly firm gauge keeps the fabric tidy and the eyelets from being too big – working at a looser gauge makes the fabric a little "sleazy".
Notions
![]() stitch marker
stitch marker
![]() scissors
scissors
![]() tapestry needle
tapestry needle
![]() yard or meter stick
yard or meter stick
![]() blocking pins and mat
blocking pins and mat
GAUGE
16 sts/20 rounds = 4 inches/10cm in stockinette stitch
20 sts/40 rows = 4 inches/10 cm in flat garter stitch
PATTERN NOTES
[Knitty's list of standard abbreviations and techniques can be found here.]
Construction Method: The rug is worked from the center outwards. The needles you use to work the project are your choice. For the start, you will need a small circumference method – DPNs, 2 circulars or a longer circular for magic loop. You can complete the entire project on 2 circular needles (approximately 24 inch/60 cm long), or on a 40 inch/100 cm) circular needle, starting with the magic loop method. If you have a set of interchangeable circular needles, you can also start with your preferred small circumference method, e.g. DPNs, and then change to longer circular needles as the stitch count increases.
The edging is then knitted onto the live stitches of the final round of the center.
On Marking the Start of the Round: When using a small circumference method, two circulars or magic loop, you can't place a stitch marker on the needle. I recommend clipping a removable stitch marker in the fabric at the start of the round, and moving it up as you work. There are places you'll need to move the start of the round by a stitch – slip stitches as required to the end of the round, and move the marker.
Techniques:
Judy's Magic Cast-On
CHARTS
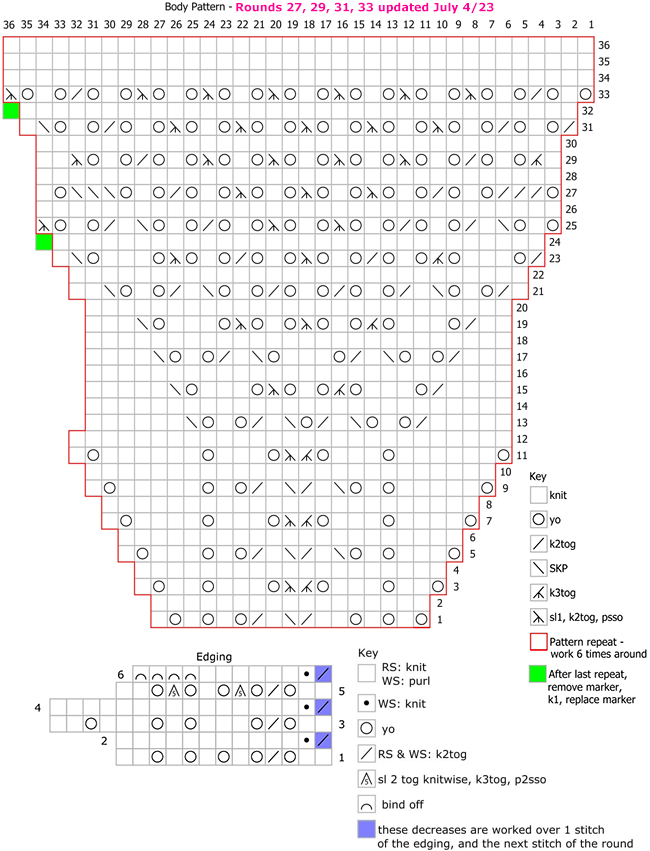
Body Pattern
Rnd 1: ([YO, k1] 2x, yo, k2, k2tog, skp, k1, k2tog, [yo, k1] 3x) around.
Rnd 2 and all following even rnds, unless otherwise noted: Knit.
Rnd 3: (YO, k2, yo, k3, yo, k3tog, sl1-k2tog-psso, yo, k3, yo, k2, yo, k1) around.
Rnd 5: (YO, k3, yo, k1, yo, skp, k1, k2tog, skp, k1, k2tog, yo, k1, yo, k3, yo, k1) around.
Rnd 7: (YO, k4, yo, k3, yo, k3tog, sl1-k2tog-psso, yo, k3, yo, k4, yo, k1) around.
Rnd 9: (YO, k5, yo, k1, yo, skp, k1, k2tog, skp, k1, k2tog, yo, k1, yo, k5, yo, k1) around.
Rnd 11: (YO, k6, yo, k3, yo, k3tog, sl1-k2tog-psso, yo, k3, yo, k6, yo, k1) around.
Rnd 13: (K5, k2tog, yo, k1, yo, skp, k1, k2tog, yo, skp, k1, k2tog, yo, k1, yo, skp, k6) around.
Rnd 15: (K4, k2tog, yo, k3, yo, k3tog, yo, k1, yo, sl1-k2tog-psso, yo, k3, yo, skp, k5) around.
Rnd 17: (K3, k2tog, yo, k1, yo, skp, k1, k2tog, yo, k3, yo, skp, k1, k2tog, yo, k1, yo, skp, k4) around.
Rnd 19: (K2, k2tog, yo, k3, yo, k3tog, yo, k1, yo, sl1-k2tog-psso, yo, k1, yo, sl1-k2tog-psso, yo, k3, yo, skp, k3) around.
Rnd 21: (K1, k2tog, yo, k1, yo, skp, k1, k2tog, yo, k1, yo, k2tog, yo, k1, yo, k2tog, yo, k1, yo, skp, k1, k2tog, yo, k1, yo, skp, k2) around.
Rnd 23: K2tog, yo, k3, yo, k3tog, yo, k1, yo, k2tog, yo, k1, yo, sl1-k2tog-psso, yo, k1, yo, k2tog, yo, k1, yo, sl1-k2tog-psso, yo, k3, yo, ssk, k1.
Rnd 24: Knit around as usual, then knit 1 stitch more. Beg of rnd now moves one st to the left; move marker accordingly.
Rnd 25: (Yo, k1, yo, skp, k1, k2tog, yo, k1, yo, k2tog, yo, k1, yo, sl1-k2tog-psso, yo, k1, yo, sl1-k2tog-psso, yo, k1, yo, k2tog, yo, k1, yo, skp, k1, k2tog, yo, k1, yo, sl1-k2tog-psso) around.
Rnd 27: (Yo, [k2tog] 3 times, yo, k1, yo, k2tog, [yo, k1, yo, sl1-k2tog-psso] 3 times, yo, k1, yo, k2tog, yo, k1, yo, [skp] 3 times, yo, k1) around.
Rnd 29: (K1, k3tog, yo, k1, yo, k2tog, [yo, k1, yo, sl1-k2tog-psso] 4 times, yo, k1, yo, k2tog, yo, k1, yo, sl1-k2tog-psso, k2) around.
Rnd 31: (K2tog, yo, k1, yo, k2tog, [yo, k1, yo, sl1-k2tog-psso] 5 times, yo, k1, yo, k2tog, yo, k1, yo, skp, k1) around. 34 sts per repeat.
Rnd 32: Knit around as usual, then knit 1 stitch more. Beg of rnd now moves one st to the left; move marker accordingly.
Rnd 33: (Yo, k1, yo, k2tog, [yo, k1, yo, sl1-k2tog-psso] 6 times, yo, k1, yo, k2tog, yo, k1, yo, sl1-k2tog-psso) around. 36 sts per repeat.
Rnds 34-36: Knit.
Edging Pattern
Row 1 [RS]: K2, yo, k2tog, (yo, k1) 3x, yo, k2. 13 sts in edging (including st from decrease). Turn work.
Row 2 [WS]: P11, k1, knit last stitch of edging together with adjacent live stitch of shawl center. Turn work.
Row 3: K2, yo, k2tog, (yo, k3, yo, k1) twice, k1. 17 sts in edging (including st from decrease). Turn work.
Row 4: P15, k1, knit last stitch of edging together with adjacent stitch of shawl center. Turn work.
Row 5: K2, yo, k2tog, yo, sl2-k3tog-p2sso, yo, k1, yo, sl2-k3tog-p2sso, yo, k2. 13 sts in edging. Turn work.
Row 6: BO 4, p6, k1, k2tog. 9 sts in edging (including st from decrease). Turn work.
DIRECTIONS
Center
Using Judy's Magic Cast-On method, CO 6 sts. Distribute your stitches across needles as you prefer and join for working in the round, noting or marking the start of round.
Setup:
Rnd 1: Knit.
Rnd 2 and all following even rnds: Knit.Note or mark start of round.
Rnd 3: (Yo, k1) around. 12 sts.
Rnd 5: (Yo, k1) around. 24 sts.
Rnd 7: (Yo, k3, yo, k1) around. 36 sts.
Rnd 9: (Yo, k5, yo, k1) around. 48 sts sts.
Rnd 11: (Yo, k7, yo, k1) around. 60 sts.
Rnd 13: (Yo, k9, yo, k1) around. 72 sts.
Rnd 15: (Yo, k11, yo, k1) around. 84 sts.
Rnd 16: Knit.
Work Body Pattern from chart or written instructions.
Edging Transition
Rnd 1: K6, (M1, k12) 17 times, M1, k6. 234 sts.
Rnds 2-7: Purl. (6 rnds.)
Rnd 8: K19, (M1, k39) 5 times, M1, k20. 240 sts.
Rnd 9: Knit.
Rnd 10: (Yo, k2tog) around.
Rnd 11: Knit.
Repeat Rnds 10-11 2 more times.
Rnd 16: K10, (M1, k20) 11 times, M1, k10. 252 sts.
Rnd 17-21: Purl. (5 rnds.)
Rnd 22 : K7, (M1, k14) 17 times, M1, k7. 270 sts.
Rnd 23: Knit.
Rnd 24: (Yo, k2tog) around
Rnd 25: Knit.
Repeat Rnds 24-25 2 more times.
Rnd 35: Knit.
Break working yarn.
Edging
Cast 9 sts onto a spare DPN or short circular needle of a similar size.
Work Edging from chart or written instructions, working across the newly cast-on sts. Each decrease at the end of the WS rows joins the edging to the main body of the work. You'll be working "backwards" around the main body, heading from the last body stitch worked, around to the start of the around.
Repeat Rows 1-6 of Edging until all live stitches of center have been used up. BO loosely, leaving 12-inch tail. Using whip stitch, sew the bound-off end of the edging to the cast-on end.

FINISHING
Thoroughly soak the rug. Remove from bath and squeeze to remove excess moisture. While still damp, pin out firmly to finished dimensions, taking care to measure diameter frequently to create a proper circle. Allow to dry completely. Remove pins, and weave in ends on WS.
ABOUT THE DESIGNER
 Franklin Habit is an author, teacher, illustrator, and writer whose entire life is tangled up in yarn. As one of the most sought-after teachers and lecturers on the international circuit, he has traveled to teach knitters across the country and around the world; and has been a popular member of the faculties of such festivals as Stitches Events and Vogue Knitting Live.
Among his other, varied experiences in the fiber world are contributions of writing and design to Vogue Knitting, PieceWork, Interweave Knits, and Interweave Crochet; and regular columns and cartoons for Modern Daily Knitting, Knitty.com, PLY Magazine, Lion Brand Yarns, Skacel Collection/Makers' Mercantile. Many of his independently published designs are available via Ravelry and his fabric designs at Spoonflower.
He also authored two very silly books, It Itches: A Stash of Knitting Cartoons (Interweave Press, 2008) and I Dream of Yarn: A Knit and Crochet Coloring Book (Soho Publishing, 2016) and is in the process of preparing At Home with Foxe and Boxe.
Franklin lives in Paris, France, where most of the knitters prefer the ridiculously complicated word maille to the very sensible English noun stitch. But the food is good.
You can come play with him online through his Patreon campaign, and follow him on Twitter or Instagram.
Pattern & images © 2023 Franklin Habit