


Exact Opposite, a free knitting pattern from Knitty.com.
INTRODUCTION
Exact Opposite
 by Shana S. Cohen

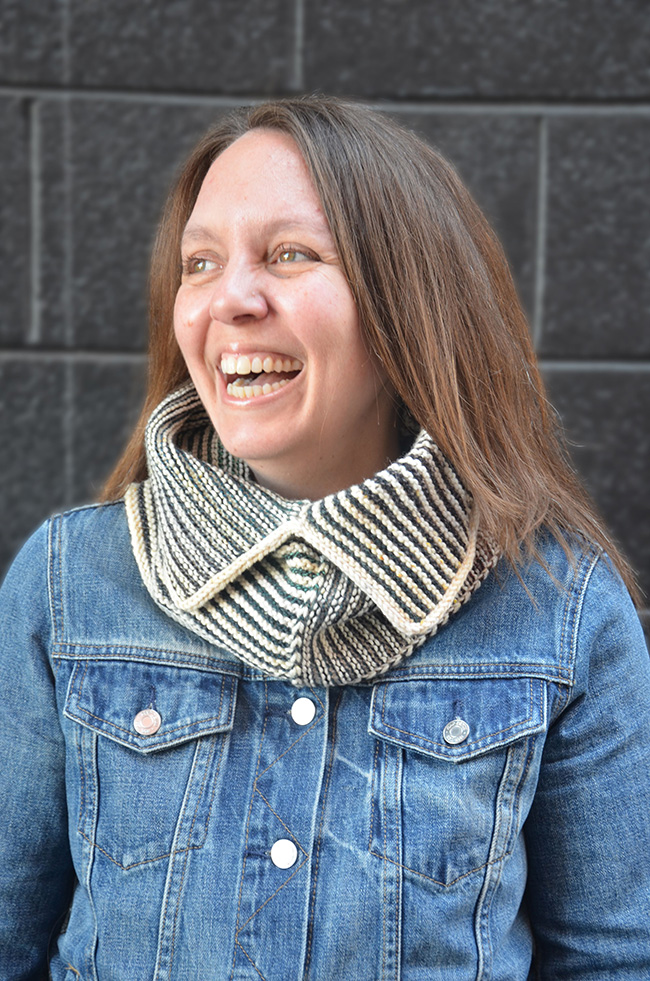
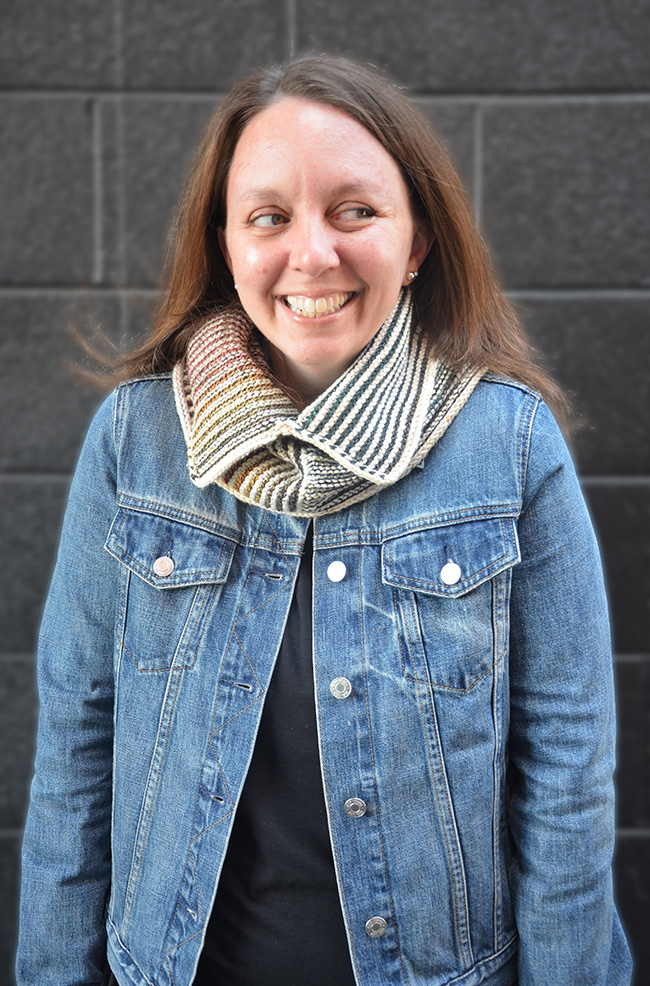
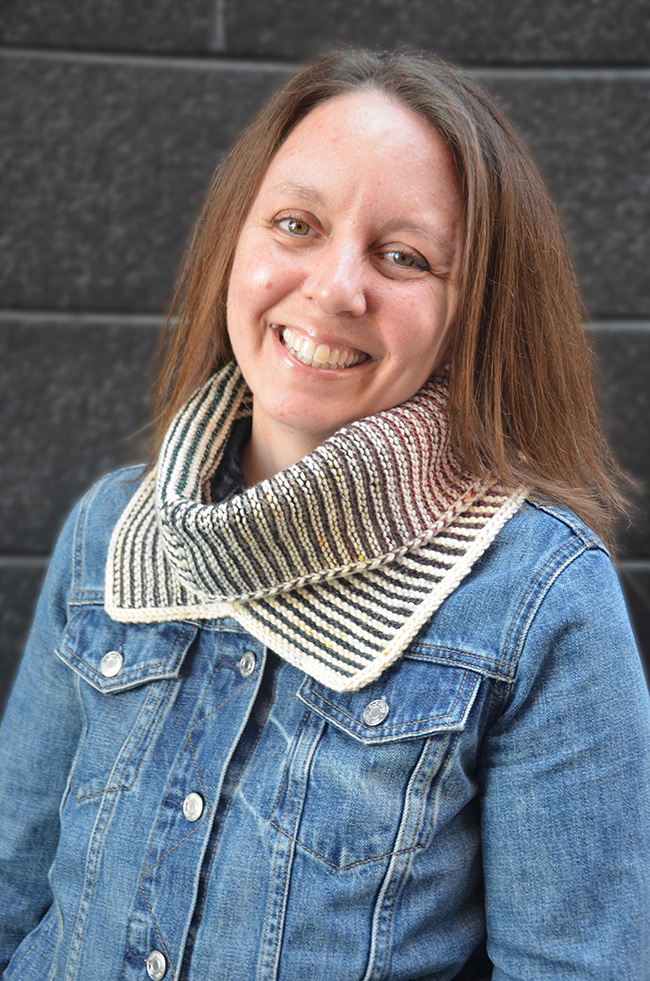
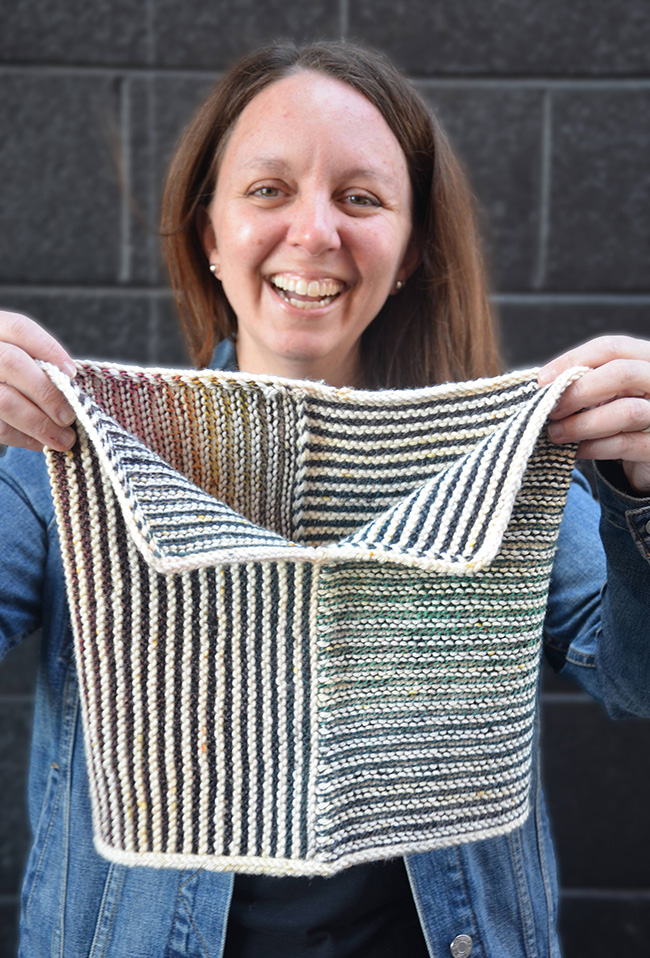
Exact Opposite is a knit cowl that includes all my favorite things! It combines modular reversible garter-stitch stripes finished with a tidy icord edge. The 2 rectangles are exact opposites of each other and come together seamlessly through modular garter stitch joining. The clever shape allows for multiple styling options while showing off 2 special skeins of yarn. Pop the collar or turn and wear the split in front or to the side. The choice is yours!
Sample is shown in a DK weight yarn alternating with a long-color-change sportweight yarn. This design is also suitable for handspun yarn and would also look striking in 2 solid colors.
 model: Shana S. Cohen
photos: Dan Cohen


SIZE
One size (adjustable)
FINISHED MEASUREMENTS
Height: 11.5 inches/30 cm
Circumference: 24.5 inches/62 cm
MATERIALS
Yarn
![]() [MC] Suburban Stitcher Merino DK [100% superwash merino; 250 yd/229 m per 115 g skein]; color: Yarn Lang Syne, 1 skein
[MC] Suburban Stitcher Merino DK [100% superwash merino; 250 yd/229 m per 115 g skein]; color: Yarn Lang Syne, 1 skein
![]() [CC] Spincycle Dyed in the Wool [100% wool, 200 yd/183 m per 50g skein]; color: Eventide, 1 skein
[CC] Spincycle Dyed in the Wool [100% wool, 200 yd/183 m per 50g skein]; color: Eventide, 1 skein
Yarn Characteristics
![]() MC: The sample shown uses a smooth DK weight 100% superwash merino wool with light speckling. Tonal, variegated, or speckled DK weight wool is suggested.
MC: The sample shown uses a smooth DK weight 100% superwash merino wool with light speckling. Tonal, variegated, or speckled DK weight wool is suggested.
![]() CC: The sample shown uses a long color-change sport weight 100% wool yarn with a high twist. Handspun yarn could be used for CC, or fingering weight mini-skeins held double to form a gradient.
CC: The sample shown uses a long color-change sport weight 100% wool yarn with a high twist. Handspun yarn could be used for CC, or fingering weight mini-skeins held double to form a gradient.
Recommended needle size
[always use a needle size that gives you the gauge listed below - every knitter's gauge is unique]
![]() US #5/3.75 mm needles for working flat: straight needles or a circular needle 20-32 inch/50-80 cm long
US #5/3.75 mm needles for working flat: straight needles or a circular needle 20-32 inch/50-80 cm long
Note: circular needles are recommended for this pattern as it makes the construction slightly simpler.
![]() A spare needle of a similar size for using as a stitch holder; recommend a circular needle
A spare needle of a similar size for using as a stitch holder; recommend a circular needle
![]() 1 crochet hook in similar size for provisional cast-on
1 crochet hook in similar size for provisional cast-on
Notions
![]() locking or clip stitch markers to note RS of work
locking or clip stitch markers to note RS of work
![]() ring-style stitch markers (optional)
ring-style stitch markers (optional)
![]() smooth waste yarn in contrast color for provisional cast on
smooth waste yarn in contrast color for provisional cast on
![]() waste yarn, barber cords, or stitch holders for holding live stitches
waste yarn, barber cords, or stitch holders for holding live stitches
![]() yarn needle
yarn needle
GAUGE
20 sts/40 rows = 4 inches/10 cm in garter stitch knit flat.
PATTERN NOTES
[Knitty's list of standard abbreviations and techniques can be found here.]
Construction method:
This cowl is knit flat with a join-as-you-go modular technique and finished with a 2-stitch icord bind off in the round. Each side begins with a provisional cast-on and uses 2-row garter stitch stripes. The second side of the work is joined perpendicularly to first side, leaving equal thirds open on one side, joined completely for the middle third, and open on other side for the final third. The piece is finished with a 2-stitch icord trim on both top and bottom.
Adjusting the size
You can adjust height of cowl by adding a multiple of 3 stitches to the first side cast-on (to be able to divide joining work into equal sections). Adjust width of cowl by changing cast on number for joining side, adding more stitches for a wider cowl or taking away stitches for a narrower cowl.
To make the piece completely reversible, alternate colors on joining side on WS of work. Bring both strands of yarn to WS and alternate working color at the start of each WS row.
When working the Sl 2 wyif, you will be slipping 1 st from working stitches and 1 st from the previously-held sts of the first side.
When working the k2tog and kt2og-tbl, you will be joining 1 working st with 1 previously held st of the first side.
Techniques:
- Provisional cast-on – use the crochet method.
DIRECTIONS
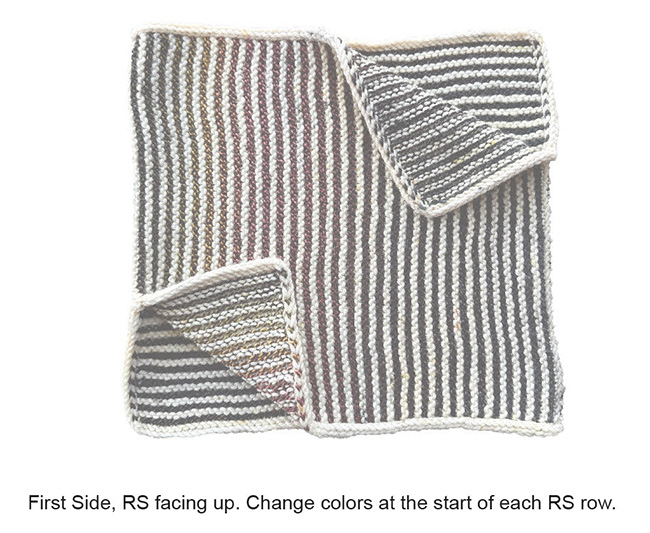
First side:
Using waste yarn and a crochet hook, provisionally cast on 57 stitches.
Join MC.
Set-up Row [RS]: Knit.
Pattern row: K to last st, sl 1 wyif.
Work Pattern row twice with MC. Join CC, leaving MC attached. Work Pattern row twice with CC.
Repeat the above four rows until you have 122 rows total, 61 garter ridges, ending with MC.
Cut MC. Leave CC attached.
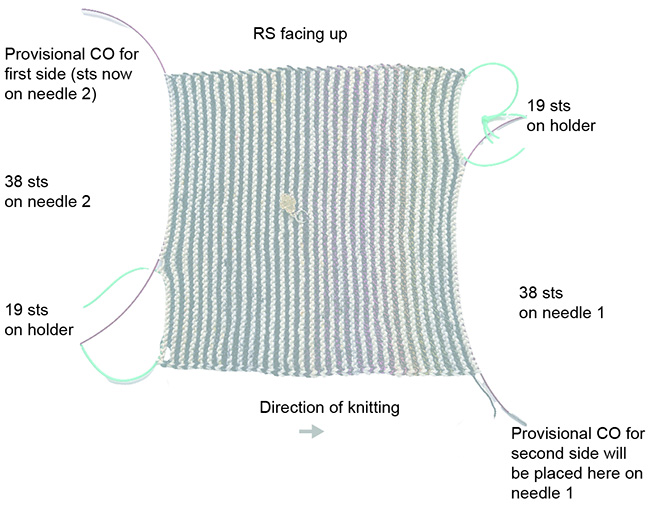
Note: 2 needles are needed for joining the Second Side. Working sts will remain on needle 1, and live stitches from provisional cast on will be placed on needle 2. You will also need two stitch holders – you can use waste yarn, barber cords, stitch holders or spare needles.
With RS facing and the provisional CO st at the top, move the final (the left-most) 19 sts worked to a stitch holder. 38 stitches remain on needle 1; to help you with the working of the second side, you can place a removable stitch marker in the middle of these remaining 38 stitches; you will know that you’ve finished Second Side Part 1 when you reach that marker.
Set-up for Second side:
Carefully remove waste yarn from provisional cast on and place 57 live stitches on the other needle (needle 2). Holding work with RS facing, and provisional CO edge up, place the first 19 sts from provisional cast on to stitch holder. These sts are diagonally opposite from the 19 held sts on the first needle. 38 sts remain on second needle. To help you with the working of the second side, you can place a removable stitch marker in the middle of these remaining 38 sts; you will know that you’ve finished Second Side Part 2 when you reach that marker.
Second Side
You will work the Second Side panel and join it to the first at the same time, in the manner of an attached edging on a shawl. The three parts make up equal thirds of the height of the cowl. The first and third parts have you work joins on only one side, to leave an opening; the second part has you work joins on both sides, to create a closed loop.
Using waste yarn and a crochet hook, provisionally cast on 61 sts onto needle 1, starting at the working CC yarn position. These will be referred to as the Second Side sts.
Part 1
Note: This section has you work joins at the start of each WS row only.
At the end of the first row, you will start the join the Second Side to the First Side stitches. You will be working back and forth on the newly-cast on stitches for the Second Side (the stitches on needle 2), adding in one from the First Side by slipping 1 st at the end of each RS row and knitting it together at the start of each WS row.
Set-up Row [RS]: Using MC, k61, to end of Second Side sts, then with RS of First Side sts facing, sl 1 wyif from needle 1 (this is the first stitch of the First Side).
Row 2 [WS]: Using CC, k2tog, k59 (to last of Second Side sts), sl 1 wyif. 1 st of First Side/Needle 1 decreased.
Row 3: Using CC, k60 (to last of Second Side sts), sl 2 wyif.
Row 4: Using MC, k2tog, k59 (to last of Second Side sts), sl 1 wyif. 1 st from First Side/Needle 1 decreased.
Rows 5-38: Repeat Rows 3-4 another 17 times, alternating MC and CC on each WS row. 38 rows / 19 garter ridges on RS in this section. 19 live sts from First Side remain on needle 1, 38 live sts from First Side remain on needle 2. Do not cut yarn.
Part 2
Note: This section has you work joins at the start and end of each WS row. Hold work with RS facing out to form the cowl tube.
Row 1 [RS]: Using CC, k60 (to last of Second Side sts), sl 2 wyif.
Row 2 [WS]: Using MC, k2tog, k59 (to last of Second Side sts), k2tog-tbl. 2 sts from first side decreased (1 st from each end).
Row 3 [RS]: Using MC, sl 1 wyif, k59 (to last of Second Side sts), sl 2 wyif.
Row 4 [WS]: Using CC, k2tog, k59 (to last of Second Side sts), k2tog-tbl. 2 sts from first side decreased (1 from each end).
Rows 5-38: Repeat Rows 3-4 another 17 times, changing between MC and CC on each WS row. 38 rows / 19 garter ridges on RS in this section. Zero live sts from First Side remain on Needle 1, 19 live sts from First Side remain on Needle 2. Do not cut yarn.
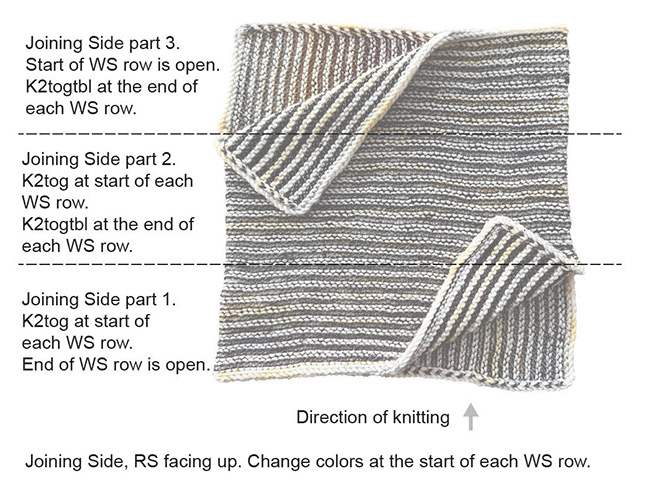
Part 3
Note: This section has you work joins at the end of each WS row only.
Row 1 [RS]: Using MC, sl 1 wyif, k59 (to last of Second Side sts) sl 1 wyif.
Row 2 [WS]: Using CC, k59 (to last of Second Side sts), k2togtbl. 1 st from First Side/Needle 2 decreased.
Rows 3-38: Repeat Rows 1-2 another 18 times, alternating MC and CC on each WS row. 38 rows / 19 garter ridges on RS in this section. All live sts from First Side have been worked, and the top edge of the Second Side is now aligned with the uppermost edge of the First Side. Cut MC and CC.
I-cord Edging (worked the same for each end)
The edging is worked in the round beginning at innermost point of the unattached section of cowl, the “crook” of the opening created when you worked Part 1 of the join. Only one set of needles is required for the i-cord edging.
Return the 19 held sts that are adjacent to this position from First Side to a needle.
Set-up round: Join MC at start of these live stitches. K the 19 previously held sts, pick up and knit 61 sts along side of First Side, k61 live sts from Second Side, pick up and knit 19 sts along side edge of Second Side. 160 sts.
Bind-off as follows: Using the Cable method, CO 2 sts. *K1, k2togtbl, slide 2 st back to left needle;*. repeat from *until 2 sts remain; k2togtbl to BO 2 final stitches.
Cut working yarn, leaving a 12-inch/30-cm tail. Thread yarn on yarn needle to seam bound-off stitches to cable CO stitches, closing up any holes in the work.
Return the other 19 held sts from First Side to a needle.
Return the 61 provisional cast on sts of the Second Side to a needle.
Repeat the process, beginning at the Set-up round.
FINISHING
Weave in all ends. Soak in warm water and wool wash for 20 min. Remove from water and lay flat on a towel. Roll the piece to squeeze out excess water. Lay flat to dry.
ABOUT THE DESIGNER
 Shana is an architect and design educator and knitwear designer based in Colorado with a passion for functional and fun designs with thoughtfully considered details. Her designs often explore the possibilities of garter stitch and reversible construction.
Shana loves celebrating how makers create unique versions of her designs and showcases them in a project gallery on her website.
Pattern & images © 2024 Shana S. Cohen