


Palindrome, a free knitting pattern from Knitty.com.
INTRODUCTION
Palindrome
by Amanda Schwabe

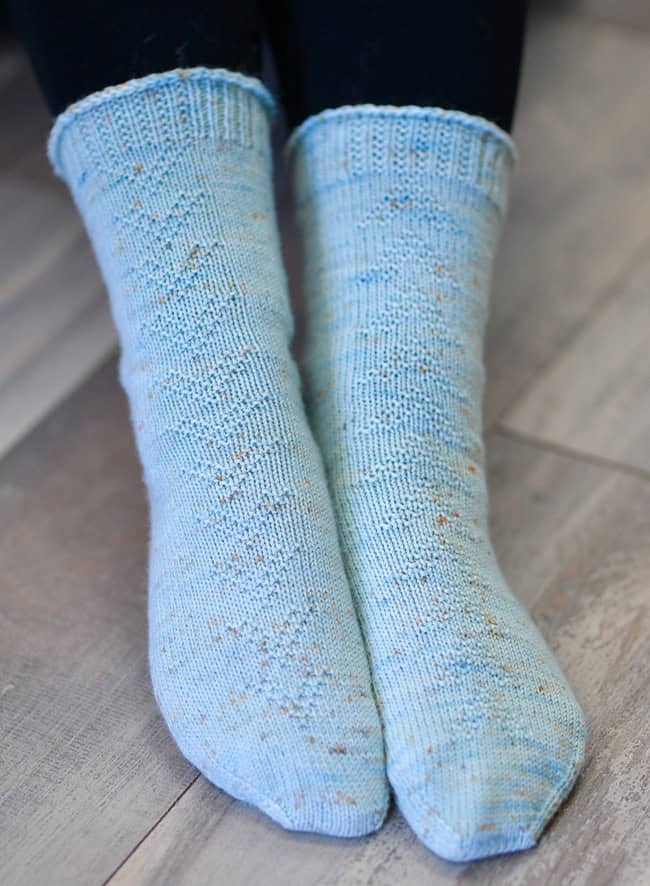
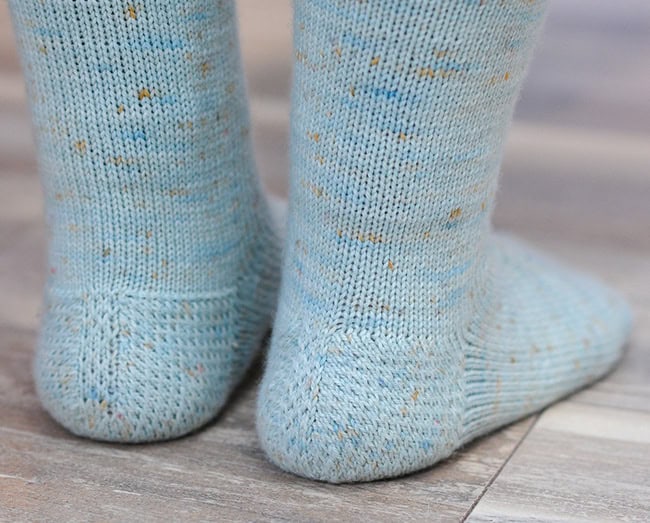
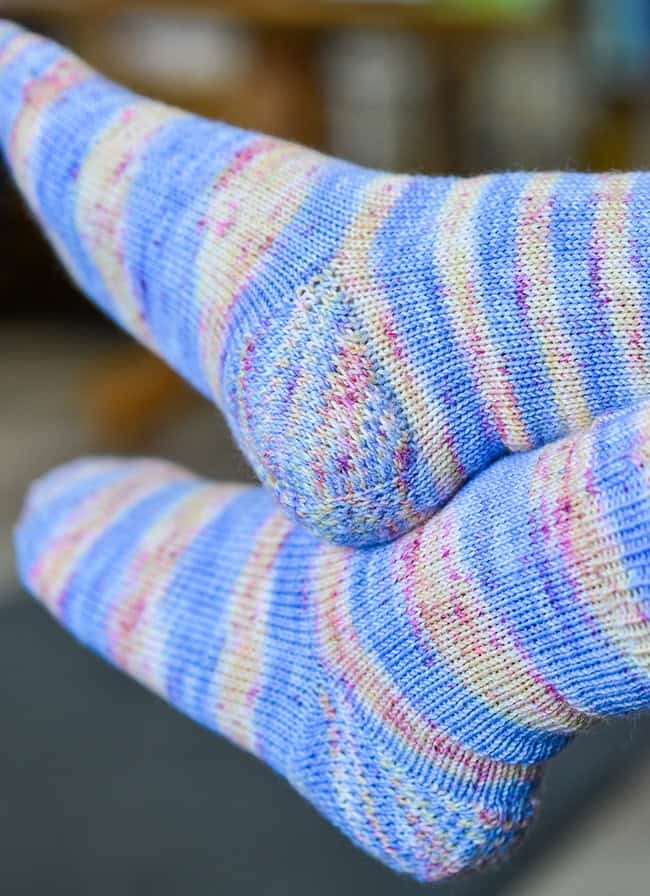
Here's a new heel that works toe-up and top-down. It's a lot like other short-row heels, but there are two significant differences: first, the short row turns are on the outsides of the heel instead of in the middle, so there are no gaps and it makes really cool stripes. Second, there are increases and decreases worked inside it, so it has a roomier fit than a typical short-row heel does. Otherwise, it retains the benefits of a short-row heel construction; namely, that you can ignore any shaping of gussets on the foot or calculations of said gussets in a toe-up construction, so it's less fussy. And it doesn't mess around with the stripe sequences of self-striping yarns on the foot or leg because their circumferences don't change.
Also, I think it's pretty.
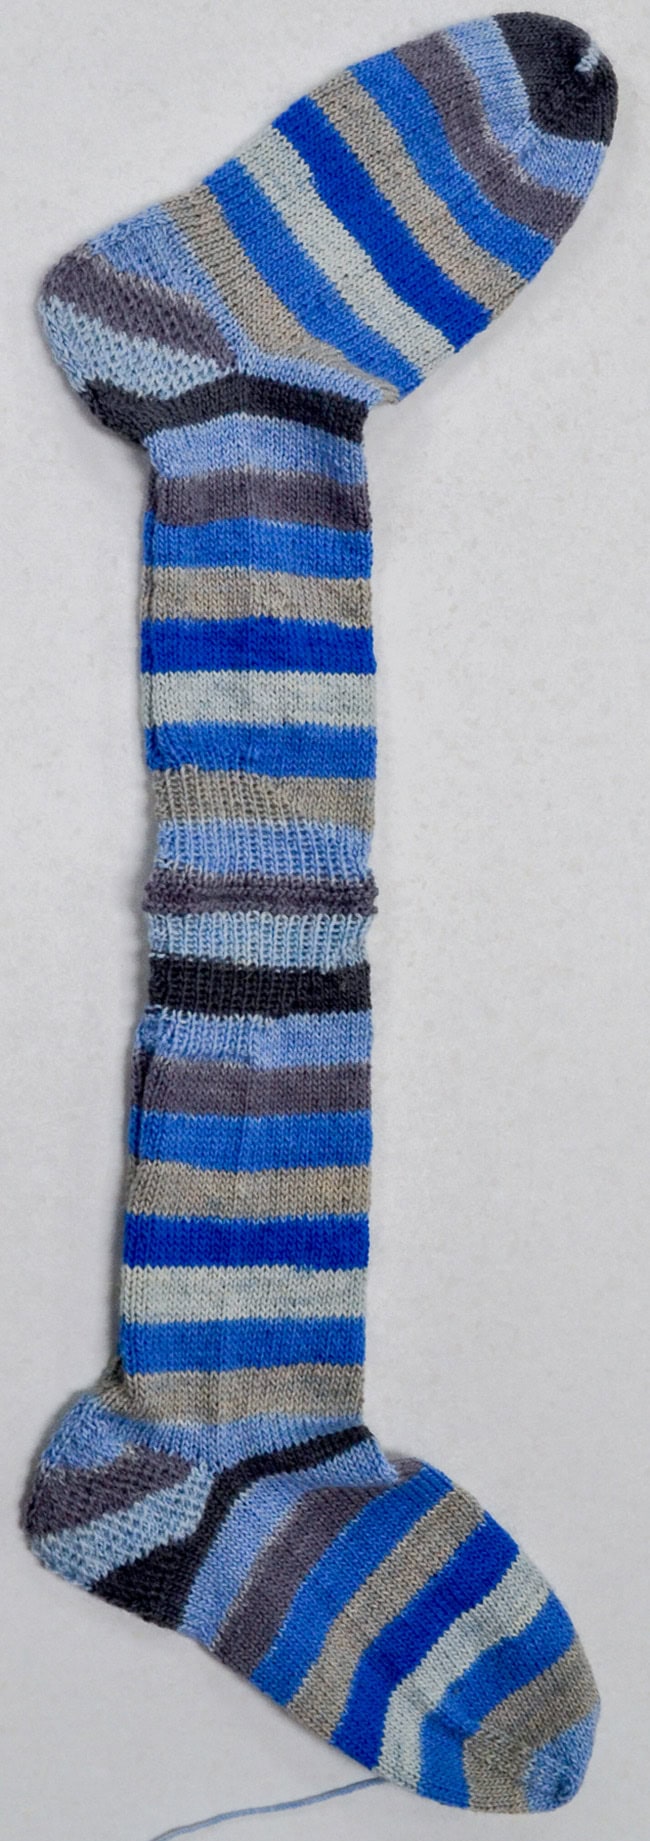
This heel was born because my friend and co-conspirator, Wendy Fraser of Maker Savvy in Kanata, a suburb of Ottawa, asked me to design a pair of socks that could be knit continuously from the first to the second. She wanted a toe-up sock that was followed by a top-down sock, then separated once both were finished. She thought that would be a fun way to teach sock knitting and – bonus! -- prevent her second sock syndrome.
So, I thought of all the heels I knew that could be a good fit for that construction. I started to knit. I randomly chose to start my first test with a garter-stitch short row heel (to keep it ultra simple by avoiding all need for wrapping when turning). She wanted something more exciting.
That's when I started to really experiment. How many ways could I find to swirl some short rows into that little gusset space in new and interesting configurations? I made stacks of heels to try out my ideas, and each iteration that didn't work sparked three new ideas that had some potential. I refined and systematized them. "I think I've really got something here," I thought.
And so, I present to you the first of my aknitica heel variations, in a palindrome of a sock pair of Wendy's desires. I think it might be a new heel, but as Elizabeth Zimmermann famously taught, when an invention is part of an ancient craft enjoyed by many people, chances are that someone else has thought of something similar, unbeknownst to me, so I'll borrow her apt phrase and say I've "unvented" it.
One more thing – let's not fuss with waste yarn or lifelines when we separate these socks. I didn't want to have to go searching for supplies at the halfway point, so to keep knitting, I placed two purl rounds for easy landmarks to pick up and knit later. And why should we stress out about cutting our socks apart? Let's bind them off first, then cut. That way, all the stitches will be secured and finished, and the only thing left to do will be to separate them and sew in the ends.
 photos: Jessica Stockbrugger and Amanda Schwabe


SIZE
Adult XS[S, M, L, XL, XXL]
FINISHED MEASUREMENTS
Ball of Foot Circumference: 7.5[8, 8.5, 9, 9.5, 10] inches/ 19[20.5, 21.5, 23, 24, 25.5] cm
Foot Length: Adjustable to fit
Leg Height: 7.5 inches/19 cm as shown, adjustable to preference
Choose a size with approximately 0.5 inch/1.25 cm negative ease in the ball-of-foot circumference.
MATERIALS
Yarn
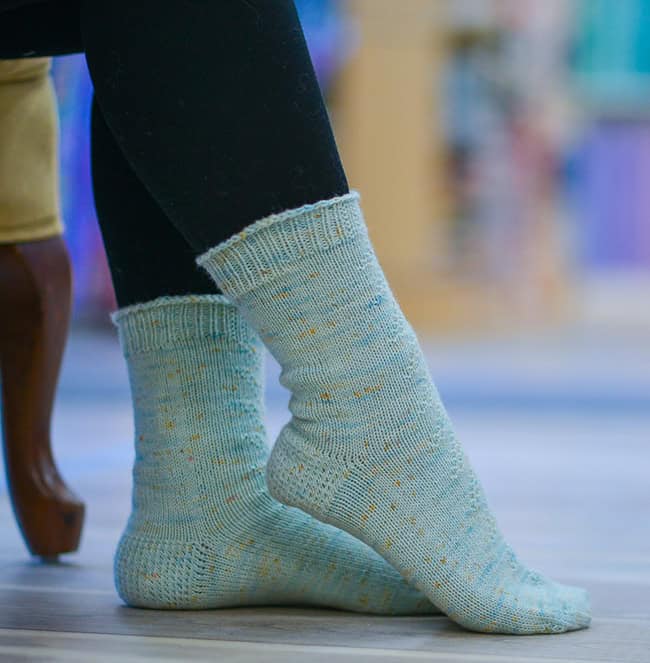
![]() Kat's Riverside Studio Untreated Soft Sock [80% untreated merino, 20% nylon; 420 yd/384 m per 4 oz/115 g skein]; color: Beryl; 1[1, 1, 2, 2, 2] skeins (shown above)
Kat's Riverside Studio Untreated Soft Sock [80% untreated merino, 20% nylon; 420 yd/384 m per 4 oz/115 g skein]; color: Beryl; 1[1, 1, 2, 2, 2] skeins (shown above)
Also shown:
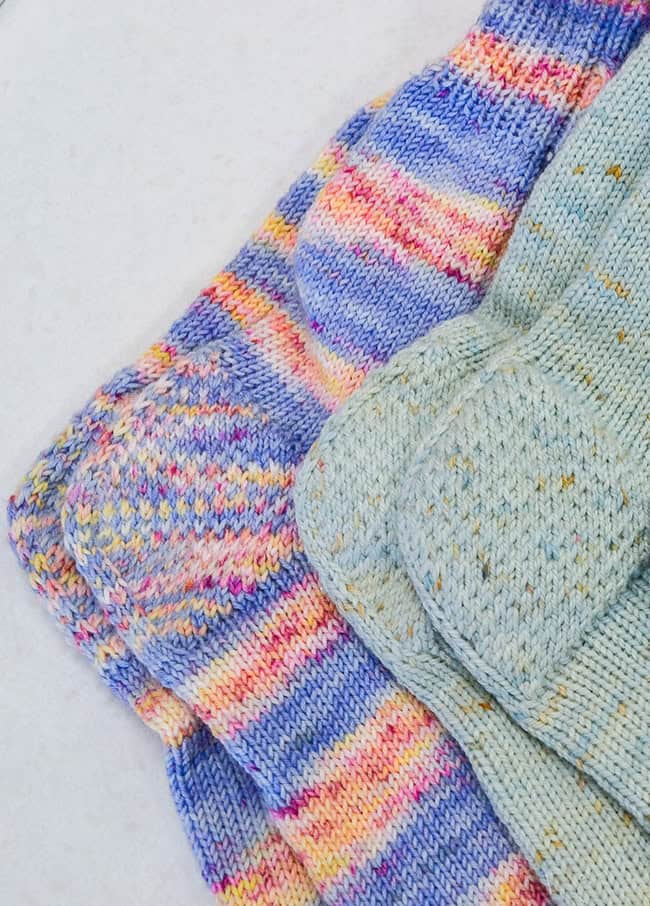
![]() Blue and pink sample: variegated mystery ball (shown below)
Blue and pink sample: variegated mystery ball (shown below)
and
![]() Regia 4-Ply Color [75% wool, 25% nylon; 459 yd/420 m per 3.53 oz/100 g ball]; color: 02737; 1[1, 1, 2, 2, 2] balls (shown in the two-socks-still-attached photo near the bottom)
Regia 4-Ply Color [75% wool, 25% nylon; 459 yd/420 m per 3.53 oz/100 g ball]; color: 02737; 1[1, 1, 2, 2, 2] balls (shown in the two-socks-still-attached photo near the bottom)
Yarn Characteristics
![]() Any fingering-weight, multi-ply sock yarn will do. The heel looks especially distinctive when knit with a self-striping yarn. The yarn shown in the pale aqua sample above is a very soft untreated merino with a round structure and a slight halo. The yarn in the blue and pink sample below is from my stash and has a plump, round structure and good bounce.
Any fingering-weight, multi-ply sock yarn will do. The heel looks especially distinctive when knit with a self-striping yarn. The yarn shown in the pale aqua sample above is a very soft untreated merino with a round structure and a slight halo. The yarn in the blue and pink sample below is from my stash and has a plump, round structure and good bounce.
Recommended needle size
[always use a needle size that gives you the gauge listed below - every knitter's gauge is unique]
![]() US #1/2.25mm needles for small circumference in the round
US #1/2.25mm needles for small circumference in the round
Notions
![]() stitch markers
stitch markers
![]() at least 3 removable stitch markers
at least 3 removable stitch markers
![]() yarn needle
yarn needle
GAUGE
32 sts/48 rounds = 4 inches/10 cm in stockinette stitch.
PATTERN NOTES
[Knitty's list of standard abbreviations and techniques can be found here.]
Construction method: These socks are knit continuously from toe to toe, then bound off, then separated after every stitch has been secured and finished. They feature both toe-up and top-down constructions, one flowing into the next. The heel method uses a combination of short-row and increase/decrease techniques and works well in both a toe-up or top-down construction.
Techniques:
- Judy's Magic Cast On
- DS: With yarn in front, slip next stitch purlwise then tug on yarn to bring both legs of the stitch up onto the needle; take the yarn to the back of the needle and bring it into position for the next stitch. On a RS/knit row, leave the yarn at the back; on a WS/purl row, bring the yarn around to the front again, under the needle.
- Jeny's Surprisingly Stretchy Bind Off
CHARTS
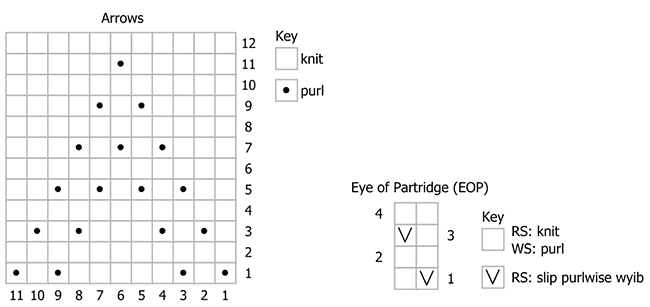
Arrows Pattern
Over 11 sts and 12 rounds: Work from chart or written instructions as you prefer
Round 1: P1, k1, p1, k5, p1, k1, p1.
Round 2 and all even rounds: Knit.
Round 3: [K1, p1] twice, k3, [p1, k1] twice.
Round 5: K2, [p1, k1] four times, k1.
Round 7: K3, [p1, k1] three times, k2.
Round 9: K4, p1, k1, p1, k4.
Round 11: K5, p1, k5.
Round 12: Knit.
Eye of Partridge (EOP) Pattern
Over multiples of 2 sts and 4 rows: Work from chart or written instructions as you prefer
Row 2 [WS]: P.
Row 3: K1, slp1.
Row 4: P.
DIRECTIONS
Toe 1
Using Judy's Magic Cast On, CO 24[24, 24, 24, 28, 28] sts. Distribute sts across needles as you prefer and join for working in the round.
Note: the instructions below refer to the mid-point of the round, and the two halves of the round. You'll find it easiest if you divide the stitches so you can easily identify the midpoint, the end of the first half and the start of the second.
Rnd 1: Knit.
Rnd 2: Knit to midpoint of round. This is the new start of round position
Rnd 3: [K1, RLI, k to 1 st before end of half, LLI, k1] twice. 4 sts increased.
Rnd 4: Knit.
Repeat Rnds 3-4 8[9, 10, 11, 11, 12] more times, until you have 60[64, 68, 72, 76, 80] sts.
Foot 1
Rnd 1: K 10[11, 12, 13, 14, 15] , PM, work Arrows pattern over next 11 sts, PM, k to end of rnd,
Next rnd: K to m, work Arrows pattern over next 11 sts; k to end of rnd.
Work as set until foot is 2[2.25, 2.5, 2.5, 2.75, 2.75] inches / 5[5.5, 6.5, 6.5, 7, 7] cm short of desired finished length.
Take note of how many total and partial reps of Arrows/Chart A are on Foot 1 so you can work the same number on Foot 2. Make a note of where you ended, so you can resume from here on the Leg.
Heel 1
Setup Row [RS]: K to m, work Arrows pattern as set, k to midpoint of rnd and stop. This position will be the start of the heel. Arrange the rem 30[32, 34, 36, 38, 40] sts onto one needle for ease of working.
Note: When working German short rows, when you encounter a DS, you will knit or purl through both legs of the stitch. In the instructions below, KDS indicates to knit a DS, PDS indicates to purl a DS.
Heel Increase Wedge
Short Row 1 [RS]: K 13[14, 15, 16, 17, 18] , LLI, PM, work in Eye of Partridge (EOP) Pattern over 4 sts, PM, RLI, k1. Turn. 32[34, 36, 38, 40, 42] sts on heel.
Short Row 2 [WS]: DS, (p to m) twice, p2. Turn.
Short Row 3: DS, k1, LLI, SM, work EOP, SM, RLI, k1, KDS, k1. Turn. 34[36, 38, 40, 42, 44] sts on heel.
Short Row 4: DS, (p to m) twice, p to DS, PDS, p1. Turn.
Short Row 5: DS, (k1, slp1) to 1 st before M, k1, LLI, SM, work EOP, SM, RLI, (k1, slp1) 1 st before DS, k1, KDS, k1. Turn. 2 sts increased.
Rep Short Rows 4-5 8[9, 10, 11, 12, 13] more times, then work Short Row 4 once more. 2 sts rem unworked on either side of Heel sts. 52[56, 60, 64, 68, 72] sts on heel.
Centre Heel Rows
Short Row 1 [RS]: DS, (work EOP to m) twice, work EOP to DS, KDS, k1. Turn.
Short Row 2 [WS]: DS, (p to m) twice, p to DS, PDS, p1. Turn.
Rep Short Rows 1-2 once more. All Heel sts have been worked.
Short Row 5 [RS]: DS, (work EOP to m) twice, work EOP to 1 st before DS, k1. Turn.
Short Row 6 [WS]: DS, (p to m) twice, p to 1 st before DS, p1. Turn.
Heel Decrease Wedge
Short Row 1 [RS]: DS, (k1, slp1) to 2 sts before m, SSK, SM, work EOP, SM, k2tog, (slp1, k1) to DS. Turn. 2 sts decreased.
Short Row 2 [WS]: DS, (p to m) twice, p to DS. Turn.
Rep Short Rows 1-2 10[11, 12, 13, 14, 15] more times until there are 13[14, 15, 16, 17, 18] DS on left side of Heel sts and 12[13, 14, 15, 16, 17] DS on right side with RS facing. 30[32, 34, 36, 38, 40] Heel sts.
Resolve Heel
Resume working in the rnd. Clip a removeable marker in the stitches of the Arrow pattern on the instep, so you can keep track of the number of repeats worked and make sure your second sock is exactly the same.
Rnd 1 [RS]: DS, k to next DS removing markers as you go, k all DS, k to M, work Arrows Pattern, over next 11 sts, continuing where you left off on the foot, k to next DS, k all DS, k to end of Heel sts.
Leg 1
Next rnd: K to m, work Arrows pattern over next 11 sts, k to end of rnd.
Work as set until Leg is approximately 6 inches/15 cm long or 1.5/4 cm inches short of desired finished length, ending after an Arrows Pattern rnd 12.
Take note of how many total and partial reps of Arrows Pattern were worked on Leg 1 so you can work the same number on Leg 2.
Cuff 1
Rnd 1, sizes XS, M, XL only: (P1, k1) around.
Rnd 1, sizes S, L, XXL only: (K1, p1) around.
Rnd 2: Work in Ribbing as set to m, SM, k to m, SM, work in Ribbing as set to end.
Rep Rnds 1-2 eight more times, or until desired length.
Next rnd: Knit.
Next rnd: Purl. This is the top of Sock 1, and these purl bumps form the landmarks where you will pick up and knit sts during Finishing. Clip a removeable stitch marker to the first purl bump of the rnd.
Transition:
Knit two rnds. This section will be unraveled to separate the socks during Finishing.
Cuff 2
Rnd 1: P to end. This is the top of Sock 2, and the bumps between the stitches will be picked up and knit during Finishing. To help with positioning, clip a removeable stitch marker directly onto the working yarn and slide it tight against the last stitch, keeping it to the RS of the sock as you begin the next rnd.
Rnd 2: K to end.
Rnd 3, sizes XS, M, XL only: (P1, k1) to m, SM, k to m, SM, (k1, p1) to last st, k1.
Rnd 3, sizes S, L, XXL only: (K1, p1) to 1 st before m, k1, SM, k to m, SM, (k1, p1) to end.
Rnd 4, sizes XS, M, XL only: (P1, k1) to end.
Rnd 4, sizes S, L, XXL only: (K1, p1) to end.
Rep Rnds 3-4 eight more times, or until same length as Cuff 1.
Next Rnd: K to end.
Leg 2
Next rnd: K to m, SM, work Arrows Pattern, SM, k to end.
Work as set until Leg 2 measures same length as Leg 1, counting repeats of the Arrow pattern.
Heel 2
Work as for Heel 1.
Foot 2
Work as for Foot 1, following Arrows Pattern from where you left off before Heel 2 and working it the same number of full and partial reps as on Foot 1, ending after a rnd 12.
Toe 2
Rnd 1: K1, SSK, k to 3 sts before midpoint, k2tog, k2, SSK, k to 3 sts before end, k2tog, k1. 4 sts decreased.
Rnd 2: K to end.
Rep Rnds 1-2 8[9, 10, 11, 11, 12] more times, until 24[24, 24, 24, 28, 28] sts rem, ending after a Rnd 1.
Arrange first half of sts onto one needle and second half of sts onto a second needle, if necessary. Graft to close toe.
FINISHING
Starting at the marked stitch, rejoin yarn and pick up and knit the 60[64, 68, 72, 76, 80] purl bumps around the top of Sock 1. Join in the rnd and BO all sts using Jeny's Surprisingly Stretchy Bind Off. Cut yarn, leaving a 6 inch/15 cm tail.
Rotate socks so Sock 2 is positioned with its cuff at the top and its toe hanging down.
Rejoin yarn and pick up and knit the 60[64, 68, 72, 76, 80] purl bumps at the top of Sock 2, beginning with the marked stitch. Join in the rnd and BO all sts as for Sock 1.
Snip 1 st in the Transition area on the side opposite the marked stitches and unravel both strands in either direction until the socks separate.
Wash socks, to block, then weave in ends.
ABOUT THE DESIGNER
 Amanda Schwabe writes innovative patterns that mash up knitting techniques in new ways. She developed reversible slip-stitch cable designs, recorded what might have been the first YouTube video on how to fix mistakes in brioche knitting, developed her own trick for gap-free thumb corners, created a custom-fit yarn-bombed horse art installation for the Canadian War Museum in Ottawa, and is now developing "new" sock heels. She teaches regular knitting classes in Ottawa at Maker Savvy and elsewhere. Amanda is also a fine artist, mother to five teenagers & young adults, and in need of more hours in each day.
Find her all over the place: her website, Ravelry, Instagram, Facebook, YouTube.
Pattern & images © 2025 Amanda Schwabe