


Discovery, a free knitting pattern from Knitty.com.
INTRODUCTION
One-skein Wondrous
by Gladys We

On vacation in the Maritimes last fall, we stopped for lunch in Saint John, New Brunswick. After lunch, I had only ten minutes to run through the Good Fibrations yarn store, and I fell in love with all of their rainbow skeins of hand-dyed yarn. Because souvenirs don't count as stash, I indulged in a gorgeous skein of a colorful and super-soft yarn in their "Drink the Kool Aid" colorway.
This pattern is for everyone who, like me, has bought a wondrous skein of hand-dyed sock yarn, and then picked it up and put it down a hundred times, looking for the perfect pattern which will make the colors pop.
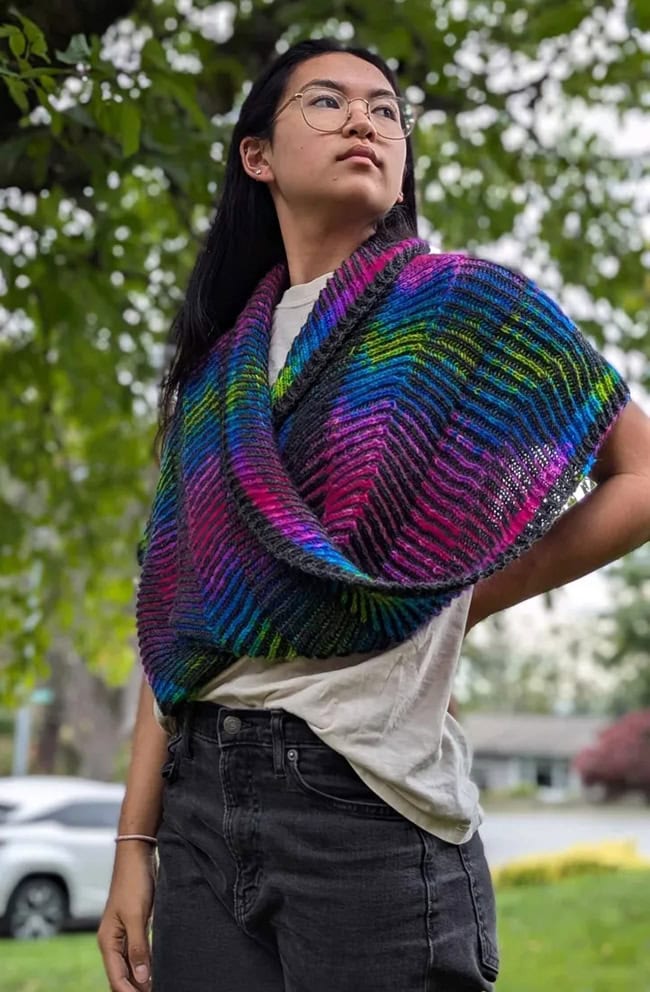
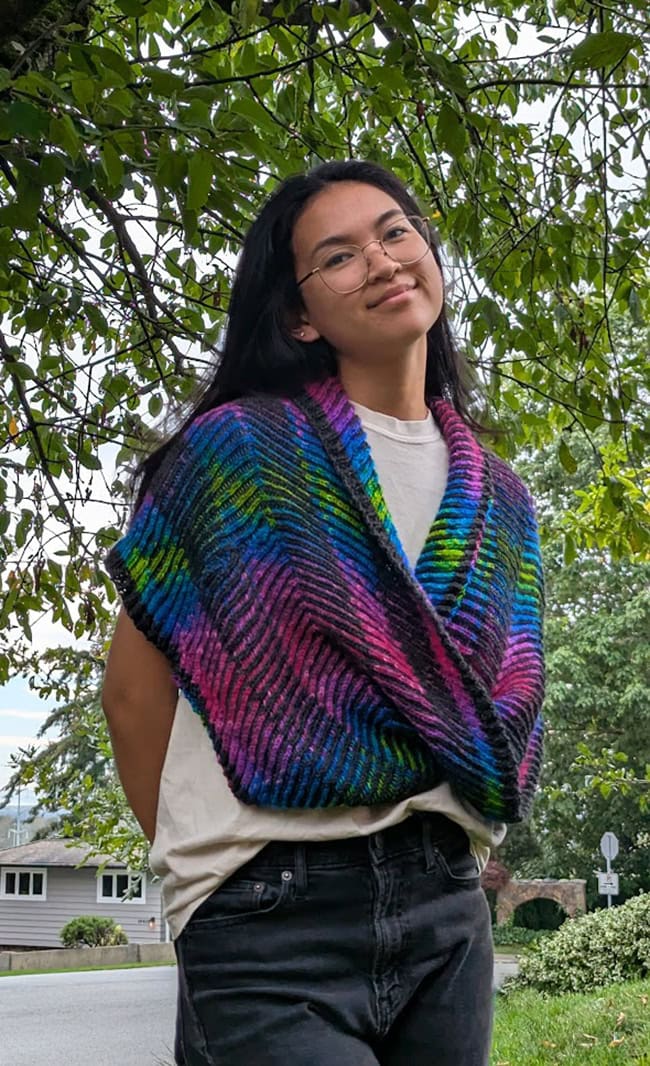
I've also "unvented" a new moebius cast-on that will allow you to directly translate your own colorful skein into almost exactly the correct number of stitches to match the color changes in your skein. If you cast on for two rounds of your skein, you will be able to wear it as a cozy shoulder wrap. Or alternatively, knit it in just one single round of the skein to make a cozy neckwarmer or even a long snood as the season changes to winter.
The brioche stitch makes for a warm and squooshy fabric which is perfect for an extra layer of warmth in the winter, or just a nice wrap for cooler fall or spring evenings. There are many tutorials for the brioche stitch, so I will only use common brioche abbreviations instead of giving instructions for the brioche stitch.
Once you've done your cast-on and added your second solid color, this project becomes a reasonably easy knit with no pattern needed. Your fingers will soon remember how to do the brioche stitches and all you need to pay attention to is how the colors align as you make your stitches.
 model: Julia Kuromi
photos: Andrew Nathan, Gladys We


SIZE
One
Size depends on the circumference of your skein of yarn.
Note: Because hand-dyed yarn skeins come in a range of sizes, the circumference of your skein will determine the circumference of your project. If the circumference of your skein is larger, your project will also be larger. If your skein is smaller in circumference, your project will also be smaller.
FINISHED MEASUREMENTS
Circumference: approximately 48 inches/120 cm
Depth: 16.5 inches / 42 cm
MATERIALS
Hand-dyed yarn
![]() Good Fibrations BSC fingering [70% superwash BFL, 20% silk, 10% cashmere; 400m per 100 g skein]; color: Drink the Kool Aid (color 60); 1 skein.
Good Fibrations BSC fingering [70% superwash BFL, 20% silk, 10% cashmere; 400m per 100 g skein]; color: Drink the Kool Aid (color 60); 1 skein.
Skein circumference: 60 inches/150 cm – see Pattern Notes for information
Dyeing pattern: Dyed across-the-skein.
Secondary solid yarn
![]() Madelinetosh Merino Light [100% superwash merino, 421 yards per 107g skein]; color: Onyx; 1 skein.
Madelinetosh Merino Light [100% superwash merino, 421 yards per 107g skein]; color: Onyx; 1 skein.
Yarn Characteristics
![]() This project is knit with two fingering-weight yarns: one solid and one variegated which is hand-dyed across-the-skein (as compared to "around-the-skein" where the dye doesn't repeat across the folded skein). This photo of a number of different brands of yarns shows some of the range of skein widths and dyes that are "across-the-skein." This is a very common kind of hand-dyeing pattern.
This project is knit with two fingering-weight yarns: one solid and one variegated which is hand-dyed across-the-skein (as compared to "around-the-skein" where the dye doesn't repeat across the folded skein). This photo of a number of different brands of yarns shows some of the range of skein widths and dyes that are "across-the-skein." This is a very common kind of hand-dyeing pattern.
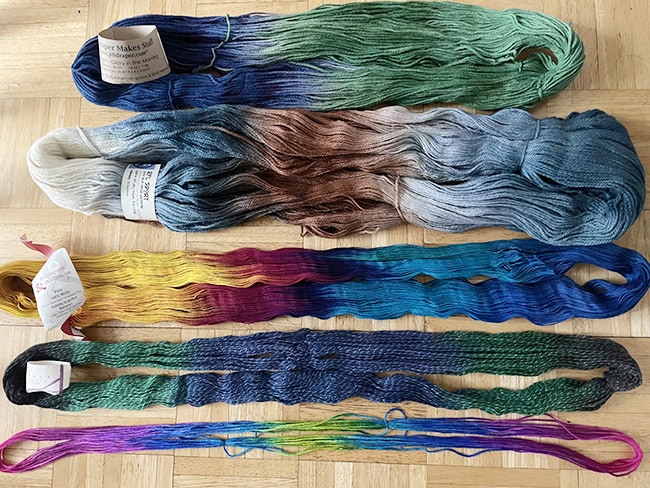
A variety of brightly colored skeins of different lengths
Choose a complementary solid color yarn. Black or dark grey will make the colors of your hand-dyed skein pop. Skein circumference and dyeing pattern does not matter for a solid color.
Tip: A light-colored yarn is also great, but be careful with matching it to a hand-dyed yarn because sometimes there is dye bleed from hand-dyed yarns. If you choose a light-colored yarn for your contrast color, a simple way to test for yarn dye bleed is to cut a small length of yarn from your darker skein, wet it with a little bit of water mixed with your wool-wash, and wrap it around a paper towel. If any dye bleeds onto the paper towel, you may want to pick a different skein, or a darker contrast color. (Most dye will wash out after the first blocking, but it's imperceptible when a darker contrast color picks up the dye.)
Recommended needle size
[always use a needle size that gives you the gauge listed below - every knitter's gauge is unique]
![]() US #7/4.5mm 32-40 inch/80-100 cm circular needle
US #7/4.5mm 32-40 inch/80-100 cm circular needle
![]() US #0/2mm 32-40 inch/80-100 cm circular needle (needed for cast-on only)
US #0/2mm 32-40 inch/80-100 cm circular needle (needed for cast-on only)
Notions
![]() Two stitch markers in two different colors
Two stitch markers in two different colors
![]() Small safety pin to mark a cast-on point (optional)
Small safety pin to mark a cast-on point (optional)
GAUGE
24 sts/28 rows = 4 inches/10 cm in stockinette stitch
16 sts/24 rounds = 4 inches/10 cm in brioche pattern on US #7/4.5mm needles
Color pooling gauge note: If you want your yarn colors to stack vertically, you may find that you need to go down a needle size or knit a bit more tightly on your purl rounds with the variegated skein. Many knitters use slightly more yarn when making their purl stitches as compared to their knit stitches. It's usually not noticeable in knitting projects, but when you are trying to get your yarn to stack vertically, that tiny bit of gauge difference in every stitch does add up after about 10 or 20 stitches.
PATTERN NOTES
[Knitty's list of standard abbreviations and techniques can be found here.]
Construction method:
To make this wrap, you will be guided by your multicolor yarn for the number of your cast-on stitches. You will then knit the two-color brioche pattern and choose how often you may want to change your front and back brioche color. Then you will choose the color of your cast-off round.
Additionally, this pattern comes with a new moebius cast-on so that you can more easily arrive at the best stitch count for the yarn you have selected.
Brioche: This pattern requires you to work the brioche stitch while also carefully watching your colors if you want to stack them into columns. Because of this complication, this should not be your very first brioche knitting project. Instructions for this are provided below, see "Stacking Your Colors".
If you have never done the brioche stitch previously, I would recommend one of these patterns:
- Rodekool, by the brilliant Nancy Marchant
- Uberib, a small and fast two-color project
- Vacillate, a fun way to learn alternating colour stripes in brioche
All of the above patterns include instructions for two-color brioche, so they are a good precursor to this pattern.
Moebius Cast-on:
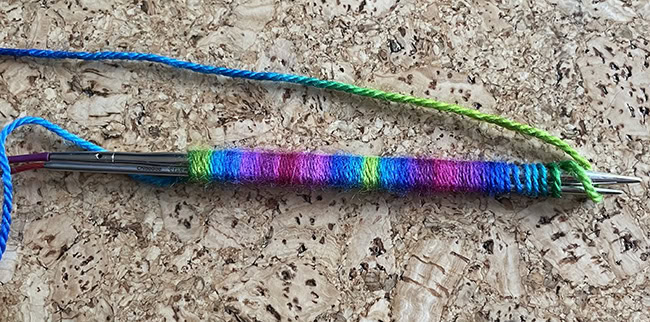
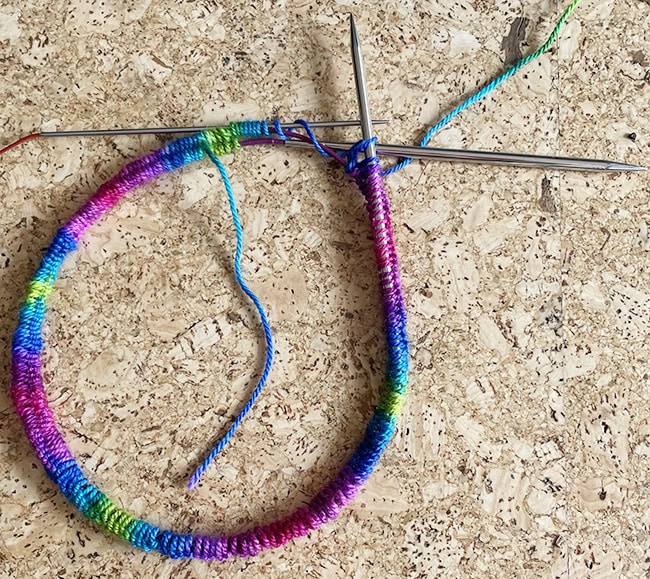
Hold a US #0 needle together with a US #7 needle. Starting at a strong color change in your yarn, make a slip knot and put it on the US #0 needle. Measure out two loops of your skein, to the second repeat of that color change spot.
Put a tiny safety pin into the yarn at the end of that second repeat of the skein colors. You will remove this safety pin after you cast on.
Hold the two needles in your left hand, with the smaller needle on the bottom, and loosely wrap your rainbow yarn counter-clockwise around both needles for those two full loops of your skein. (If it is difficult to move your needles in the wrapped stitches, it is too tight.)
I made a two-part two video for casting on.
Starting the cast-on and Finishing the first half of the cast-on, putting on midpoint stitch marker.

The first few stitches being cast on.
The first loop of the skein being cast on
You will need to slip your wrapped yarn loops backwards onto the cord and off the needle as you go. Eventually, you will have worked across the two full loops of your skein onto your circular needles.
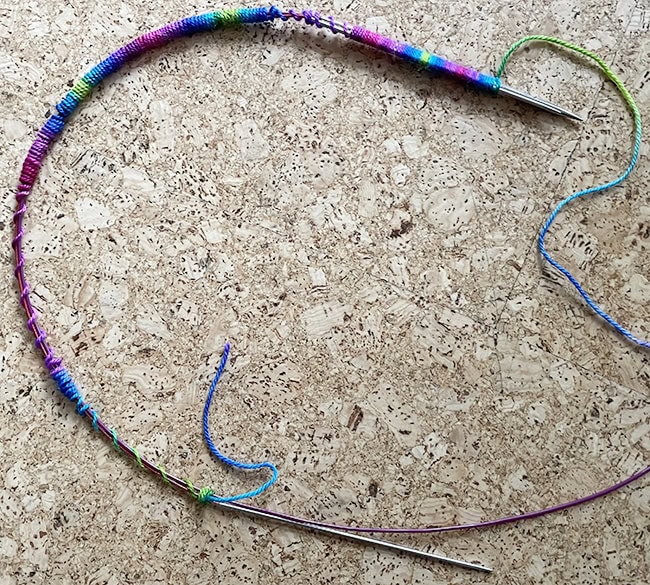
Two loops of the skein as fully cast-on
Now you will begin knitting the first round of your moebius.
On the left side, pull out the larger US #7 needle so that it is hanging off the front of the cast-on loop. You will be knitting your stitches from the US #0 needle.
The stitches in this step might wobble a little bit as you line them up, but trust the process. As long as your color changes line up within a stitch or two, your wrap will have the correct stitch count. (Yarn dyes are liquid, and yarn doesn't always change color at the exact same spot on the skein.) If you're consistently "falling behind", knit just a bit tighter for a few stitches. If you're consistently "knitting ahead," knit a bit more loosely for a few stitches.
At a certain point, you may feel like you're knitting with too many needles flopping around. That also is normal. Adjust the dangling needles as needed to get them out of the way of your work.
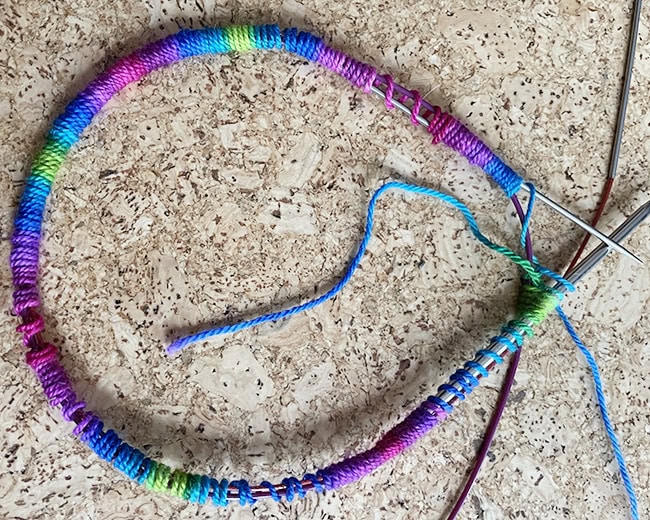
Two loops of the skein cast on and the needles set up to join the moebius.
Your right-hand needle will be your working needle. Slide about 20 of your cast-on stitches to the front of your larger (US #7) right-side needle. This is simply to let you work the first stitches more easily, as the cast-on stitches are next to the stitches you will be working.
Place a stitch marker on your right needle, for the start of the round.
Then take the right-hand needle and working yarn, and begin knitting stitches from the smaller US #0 needle on the left side.
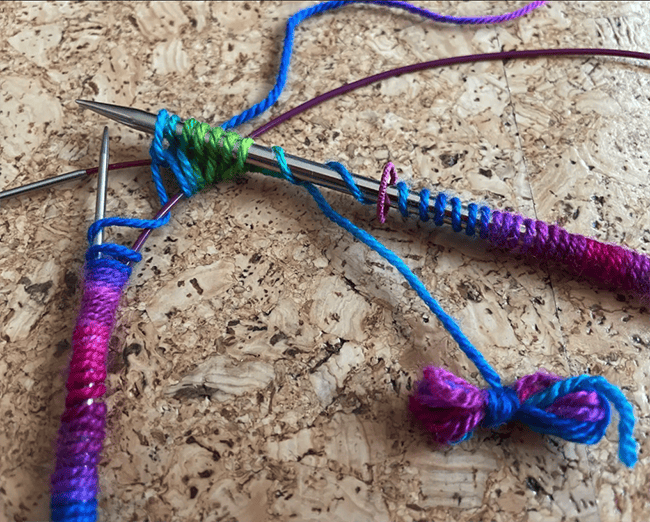
The first few stitches knit off the US #0 needle on the left side.
Almost all of the stitches from the smaller US #0 needle have been knit. Also notice that in the course of working the stitches from the smaller needle, the cable for the larger US #7 needle is now coiled twice — this is once for each side of the moebius.
After you have worked all of the stitches from the smaller US #0 needle, you will have used up two loops of your skein and you will be halfway back to your starting cast-on stitch marker. Place a secondary stitch marker at this halfway mark. If you color code your stitch markers, your first marker could be red, and this one could be green to indicate that you will not switch colors at this marker. The moebius rounds are rather long, so I like having a halfway marker for a small morale boost as I knit.
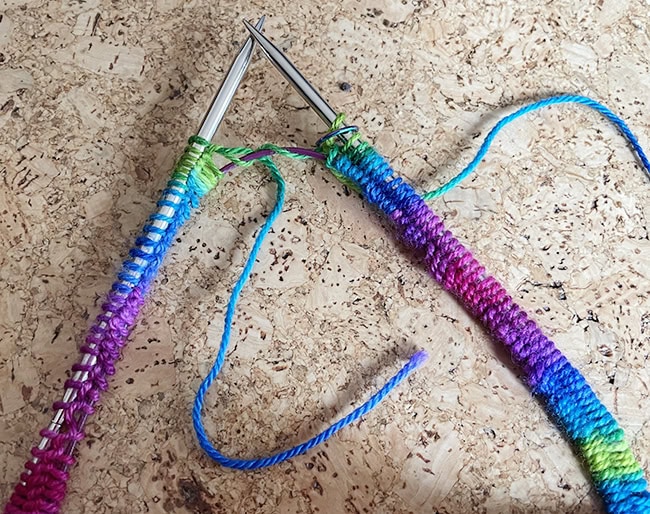
The halfway mark, where all stitches have been worked off the US #0 needle. Notice that at this halfway mark, all the stitches on the left needle are purled and all the stitches on the right needle are knitted.
Continue knitting until you reach your start-of-round stitch marker.
Your cast-on round is now completed and you have cast on a complete moebius loop.
Two-color brioche:
There are many online tutorials for the brioche stitch. I like SweetGeorgia's video on how to knit brioche in the round because she addresses how to add the contrast color and then how to change back to the first color at the end of a round.
Stacking Your Colors:
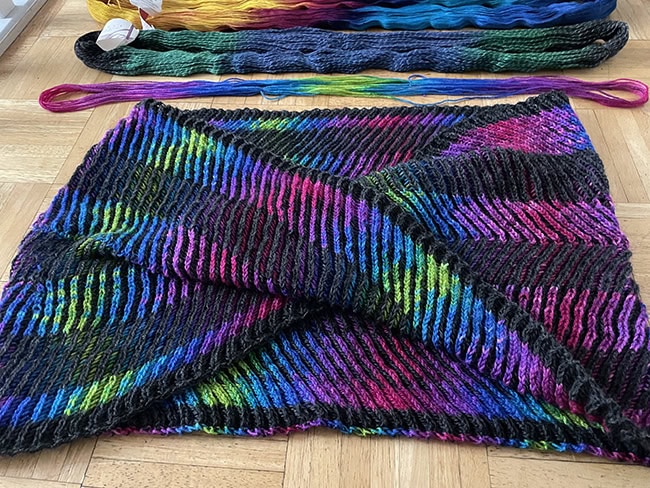
This project is all about "planned pooling" – that is, getting the colors of a variegated yarn to line up, to stack in the round.
You might find that you need to adjust your knitting tension to get the colors to align. This happens for a couple of reasons: the yarn loops on the inside of the skein are slightly shorter than loops on the outside, and dye is fluid so it isn't perfectly aligned from loop to loop of the yarn. You need to be paying a bit of attention to tension so that the colors line up from round to round. Sometimes you need to knit or wrap a bit tighter, other times you want to do it a bit loosely.
The project works equally well if you don't make any adjustments at all – just work at your standard tension. The colors will still pool but rather than stacking vertically, you'll see them spiral around the cowl.
It does take some care and attention, more attention perhaps than you're used to paying to your individual stitches, but it's satisfying to have the stitch color land exactly on top of the color on the previous row. It's like clicking ten thousand jigsaw puzzle pieces in place, and then a bit of magic to see your final project.
The brioche stitch is ideal for this sort of thing, because it gives you a bit more flexibility — your knit/purl and YO stitches can be worked a bit more tightly or loosely as you try to stack your colors.
Binding Off

Two options for your bindoff using the Lace bind off: If you want to bind off in the solid color, you will have a solid edge. If you want to use your colorful skein, your pooling will not match up, but it will be a bright and colorful edging.
DIRECTIONS
Measure out two loops of your skein for the cast-on row, starting at the first strong color change so that you can more easily track your color changes.
Pin a temporary tiny safety pin into color change at the end of your second loop.
Using the Moebius method — see Pattern Notes — cast on until you have used up all of the two loops of yarn, and knit across them as instructed, leaving a tail of about 3 inches/ 8cm join your second color.
Note: The sample had 188 wraps total, resulting in 376 sts in the round.
Setup round, Solid Color: [P1, sl1yo] around to the start-of-round marker.
Note: if, as you approach the start of round marker, you find that you have an odd number of stitches and can't work the pattern, work p2tog instead of p1 in the final repeat.
Two-color Brioche Round 1, Variegated Yarn: [Sl1yo, brk1] around.
Two-color Brioche Round 2, Solid Color: [Brp1, sl1yo] around.
Work Two-color Brioche Rounds 1-2 16 times total.
Reversed two-color Brioche Round 1, Solid Color: [Sl1yo, brk1] around.
Reversed two-color Brioche Round 2, Variegated Yarn: [Brp1, sl1yo] around.
Work Two-color Brioche Rounds 1-2 another 16 times total.
Work Reversed Two-color Brioche Rounds 1-2 another 16 times total.
Switch to the Variegated yarn. You may cut the Solid yarn and weave it back in, or you may choose to carry it up through the next few rounds.
Single-color Brioche Round 1: [Sl1yo, brk1] around.
Single-color Brioche Round 2: [Brp1, sl1yo] around.
Work Single-color Brioche Rounds 1-2 6 times total
Switch to the Solid Color yarn, cutting the Variegated yarn.
Work Single-color Brioche Rounds 1-2 6 times total.
Bind Off
With your solid color, bind off, loosely, using the Lace bind off, as follows:
K1, *k1; return the 2 sts to left needle and work k2tog tbl; repeat from * until all sts have been worked. Cut yarn and pull through final stitch to secure.
See Pattern Notes for options and further information.
FINISHING
Handwash the cowl and lay it flat to dry – do not pin or stretch. Once dry, weave in ends.
ABOUT THE DESIGNER
 Gladys We is unable to resist the siren call of colorful hand-dyed yarns, and has designed several free patterns for flat pooling scarves and stoles. This pattern is the start of her explorations with planned pooling in moebius wraps. Please join us in the Pooled Knits group on Ravelry to share your Discovery Wrap projects and ask questions about stacking your colors!
She can be reached on Ravelry or on Bluesky.
Pattern & images © 2025 Gladys We