


WHAT THE HELL DO I CALL THIS, a free knitting pattern from Knitty.com.
INTRODUCTION
Quiltbox
 by Amy Singer

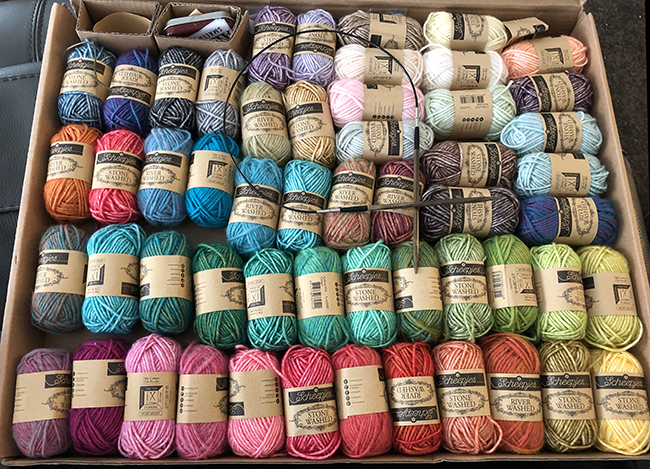
I love colorbox yarn kits: lots of little skeins in rainbow colors. But what do you DO with them? Amigurumi? That can work. But what attracted me to the kit in the first place is all the colors all together, playing off each other. It's like a box of paints in fiber form.
So I decided to make something that would use them all, or as many as I felt like using. I chose the most saturated colors, which is always my preference, sat down and paired them up. Before you knew me, I was a quilter and I loved the half-square triangle block. It's amazing how much more interesting a square is when it's divided in half diagonally colorwise.
As someone formerly allergic to intarsia, I hadn't ever used two colors in the same row like I wanted to do here, but I found Marly Bird's tutorial on how to miter a square in 2 colors and keep the join nice and tight, and that was the help I needed!
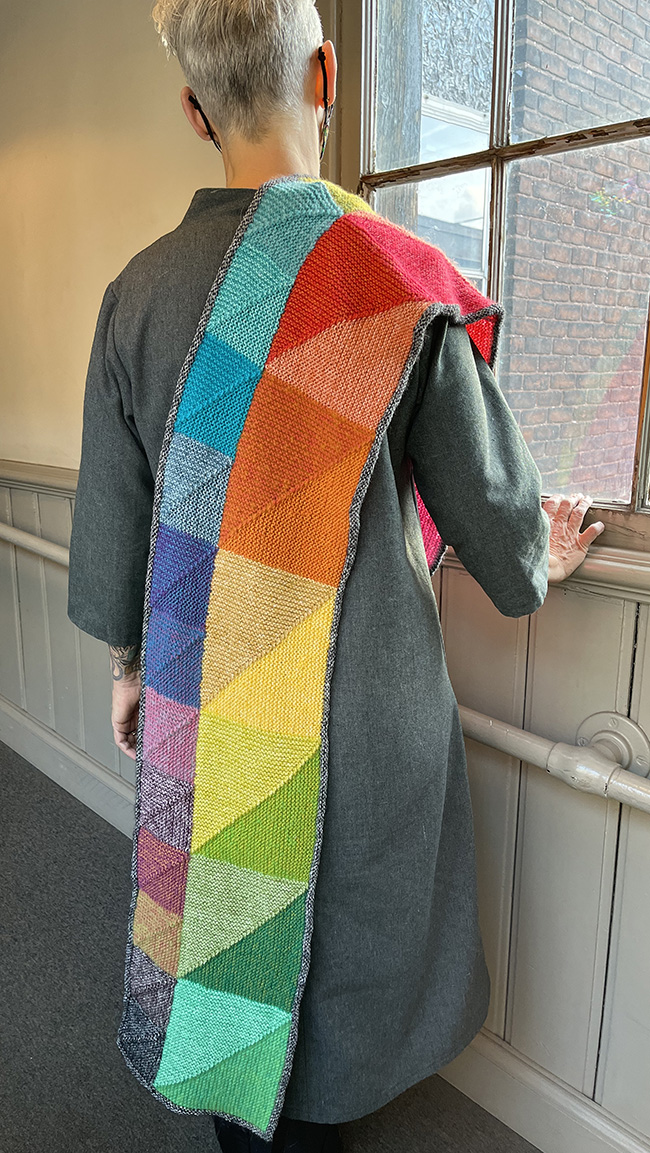
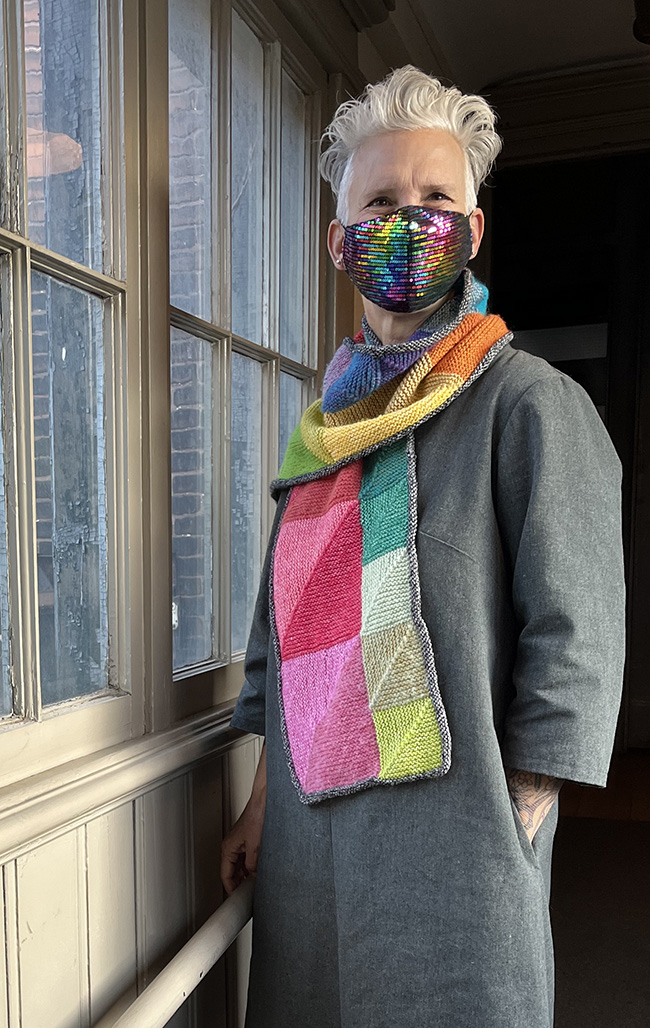
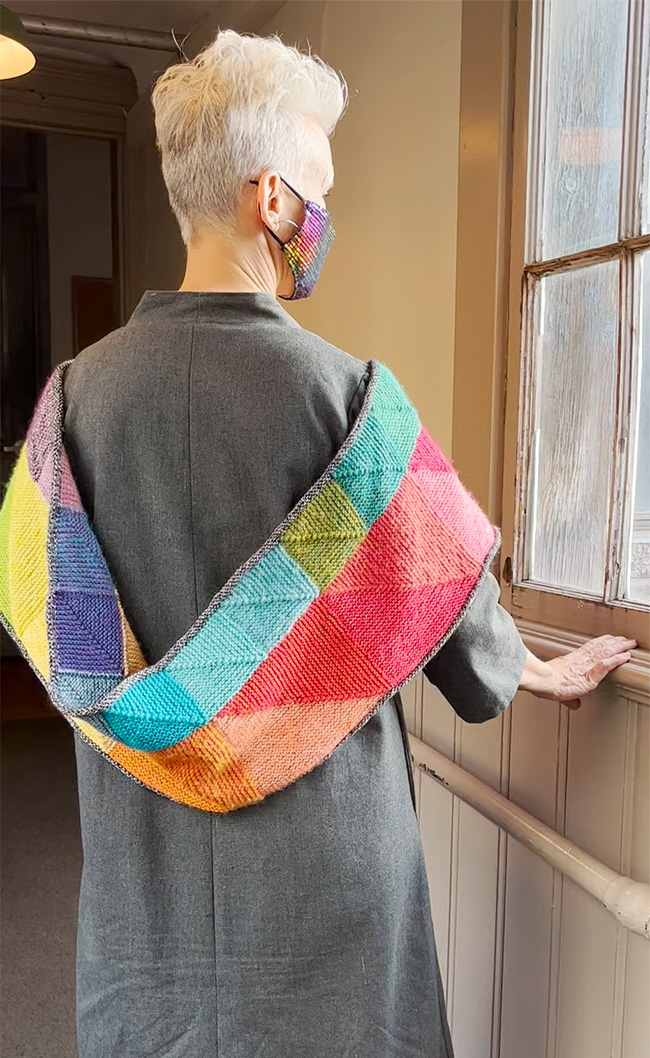
The scarf as knit was made by pairing skeins in the pink to green portion of the rainbow (in this order: pink-red-orange-yellow-green) for the large squares and then choosing skeins in colors on the opposite side of the color wheel of each large square for the solid small squares, choosing the browns and blacks to finish the row. Depending on the colors you choose to pair in the large blocks, and the solid colors you put against those pairs, your scarf can look very different.
 model: Claudia B Manley (the Smize Queen)
photos: Amy Singer


SIZE
One
FINISHED MEASUREMENTS
Width: 9 inches/23 cm
Length: 64 inches/ 162.5 cm
 MATERIALS
Yarn
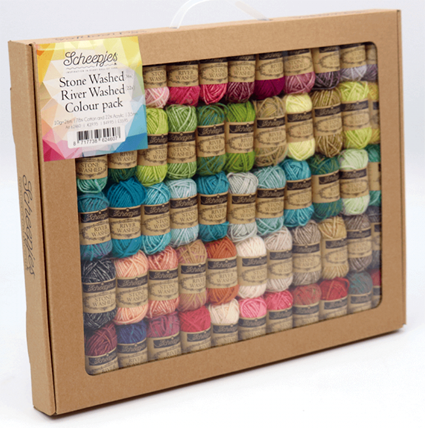
![]() C1, C2, C3: Scheepjes Stone Washed/River Washed Color Pack [78% cotton, 22% acrylic; 27 yd/25m per 0.35 oz/10 g skein]; pack includes 58 miniskeins, each in a different color (shown at right)
C1, C2, C3: Scheepjes Stone Washed/River Washed Color Pack [78% cotton, 22% acrylic; 27 yd/25m per 0.35 oz/10 g skein]; pack includes 58 miniskeins, each in a different color (shown at right)
Note: In total, 36 of the 0.35 oz/10 g skeins were used for the sample scarf, for a total of 972 yards/900 metres. See Pattern Notes for information about alternative yarn options.
![]() MC (for the edging): Scheepjes Stone Washed [78% cotton, 22% acrylic; 142 yd/130m per 1.75 oz/50 g skein]; color: 803 Black Onyx; 1 skein
MC (for the edging): Scheepjes Stone Washed [78% cotton, 22% acrylic; 142 yd/130m per 1.75 oz/50 g skein]; color: 803 Black Onyx; 1 skein
Yarn Characteristics
![]() Stone Washed is a cotton-acrylic blend sport-weight yarn with a smooth plied structure. River Washed has the same base ingredients, but appears as a solid core with a fluffy contrast color on the outside that gives a rich halo to the finished work. They knit to the same gauge. Any plied yarn of a suitable gauge can be used in this project. See Pattern Notes for more information.
Stone Washed is a cotton-acrylic blend sport-weight yarn with a smooth plied structure. River Washed has the same base ingredients, but appears as a solid core with a fluffy contrast color on the outside that gives a rich halo to the finished work. They knit to the same gauge. Any plied yarn of a suitable gauge can be used in this project. See Pattern Notes for more information.
Recommended needle size
[always use a needle size that gives you the gauge listed below - every knitter's gauge is unique]
![]() US#6/4mm needles for working flat
US#6/4mm needles for working flat
![]() US #6/4mm circular needle, at least 40 inches/100 cm long
US #6/4mm circular needle, at least 40 inches/100 cm long
![]() 1 crochet hook of similar size
1 crochet hook of similar size
Notions
![]() removable stitch markers
removable stitch markers
![]() yarn needle (if using non-wool yarn, use one with a sharp point)
yarn needle (if using non-wool yarn, use one with a sharp point)
GAUGE
24 sts/32 rows = 4 inches/10 cm in stockinette stitch
23 sts/20 rows = 4 inches/10 cm in garter stitch
PATTERN NOTES
[Knitty's list of standard abbreviations and techniques can be found here.]
Editor's note: Because we know you'll ask, Claudia bought the mask on Etsy 2 years ago.
Note: In checking for the link to post to Marly's video while coding this page, I noticed Quiltbox looks like the sister to a scarf Rebecca Velasquez designed in 2017. She did hers long before I did, and I hadn't spotted it when I was looking for stitch tutorials on YouTube.
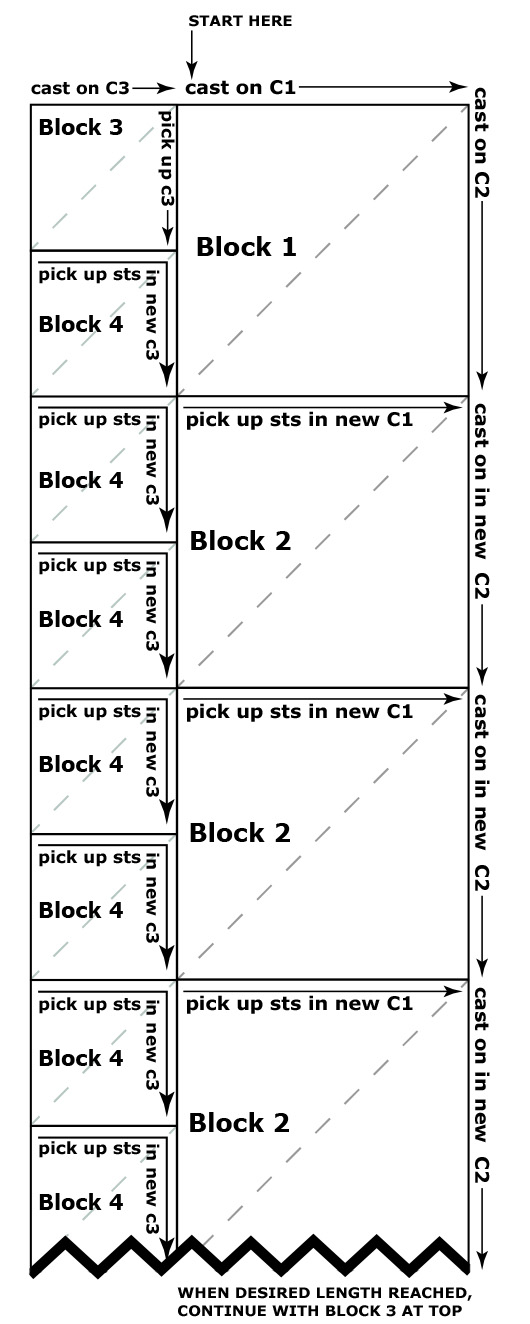
The scarf is made of mitred blocks; there are two sizes, large and small. It is constructed as follows (see also illustration below):
- Work BLOCK 1.
- Work BLOCK 2 building from the bottom of the previous block.
- Repeat BLOCK 2, always building on the bottom of the previous block, until you've reached your desired length. Sample shown has 8, for 9 total blocks.
- Return to the start and work BLOCK 3, building off the side of BLOCK 1. This sets up the smaller blocks.
- Work BLOCK 4, building on the bottom of the previous block. Note that you need to work 2 of BLOCK 4 for each BLOCK 2.
- Repeat BLOCK 4 until you have worked all the way down each BLOCK 2.
If using the Scheepjes Stone Washed/River Washed kit, pair up the skeins for each two-tone block. Choose one color that reads darker [C1] and one in a similar shade that reads lighter [C2] The colors I paired are listed below:
Color order: Large block pairs [C1 | C2]: 943 Mekong | 836 Tourmaline 807 Red Jasper | 835 Rhodocrosite 946 Mississippi | 807 Carnelian 956 Avon | 816 Coral 944 Nile | 961 Mersey 809 Yellow Jasper | 833 Beryl 812 Lemon Quartz | 962 Narmada 806 Jade | 955 Po 826 Fosterite | 954 Congo |
Small solid blocks [C3 | C4]: 827 Peridot 959 Ural 819 New Jade 825 Malachite 953 Tiber 962 Narmada 952 Rhine 824 Turquoise 948 Danube 805 Apatite 949 Yarra 941 Colorado 942 Steenbras 830 Lepidolite 957 Eisack 947 Seine 829 Obsidian 803 Onyx |
This isn't the final color pairing, but it's very close. It was fun, playing with the little skeins!
For a more contrasty look, choose two colors that go together but are different shades.
Alternative yarn options:
This project lends itself well to using up leftover yarns of the same weight, like assorted sock yarn remnants.
You need approximately 27 yd/25 m each of two colors for each large block, and approximately 27 yd/25 m for each small block.
It would also work with one yarn that has long, slow color changes (like the beauties that Freia Fine Handpaints creates) for the C1. For BLOCKS 1 and 2 (large blocks) pair it with a solid color like black for the C2, and watch the variegated color play out over many blocks. In that case, you'd leave the variegated yarn uncut at the end of a block and use it to pick up the first set of sts, and then add in the contrast (ie black) for the second set. For the BLOCKS 3 and 4 (small blocks), you could continue with the same variegated yarn, or choose a compatible or contrasting variegated yarn of the same weight and work the blocks in sequence without breaking the yarn. The instructions to cut yarn at the end of each block only apply if you're changing colors after every block.
Whatever yarn you use, adjust the needle size specified here to create a solid-but-flowy fabric in garter stitch and measure gauge over 4 inches/10 cm.
To calculate the stitch count:
- Decide on the desired finished width for your scarf.
Take your desired scarf width and multiply it by .67. That gives you the width of the large block.
2. Take that width, multiply it by 2 and then by your number of stitches per inch (or cm, if you're working in metric), and round it to the nearest whole number. If it's an odd number, you're good; if it's an even number, add 1 to make it odd. This is the total number of stitches for BLOCK 1.Example: For a scarf 10 inches wide, your large block should be 10 x .67 = 6.7 inches wide.
3. To cast on, divide that number in half. Round up for the first set of stitches, and round down for the second.Example: If you're working at 5 stitches per inch, 6.7 x 2. 5 = 67 sts for BLOCK 1/2
Example: 67 ÷ 2 = 33.5
So you'll cast on 34 in your first color, and 33 in your second.
Techniques:
- Crochet cast on: video tutorial here
- P2tog bind off: Purl 1 st, *put resulting st back on left needle and p2tog*. Repeat from * to * until last st; pull yarn through and cut, leaving a long tail to weave in.
- CDD: Slip 2 sts together knitwise, k1, pass 2 slipped sts over. 2 stitches decreased.
- The first stitch of each row is slipped, to make the edging sts easier to pick up. Slip the stitch purlwise with the yarn in front.
- Adding new yarn: When changing yarns, unless you're using an animal fiber that you can spit-splice, change at the beginning or end of a row, and tie new yarn loosely to closest yarn tail but leave it loose enough to untie and retie snugly later when weaving in ends along the edge of a block.
- Interlock yarns at color change (BLOCKS 1 and 2):
When you reach the last stitch of the color you're knitting, move that yarn (think of it as old) to the front, laying old over the new yarn. Move the new to back, continue knitting. In this way the yarns are properly linked so that there will be no gap between the sections of color. Remember: old over new. Thanks to Marly Bird for this trick. - Picking up sts: A crochet hook can make picking up stitches easier.
- Edging options: The edge technique shown is a simple reverse stockinette rolled edge that mimics i-cord, finished by stitching it to the back of the scarf at the cast-on point. Alternately, you may wish to use an attached i-cord edging, a single-crochet or crab stitch edge or leave the scarf as is.
- Keeping track: When working BLOCKS 3 and 4, you may need to use a removable stitch marker to keep track of the CDD position. You can't place a marker on the needle for this decrease; you need to clip it into the stitch that results from the decrease. Instructions refer to "marked stitch" – this is the one with the marker in it. Move the marker up as you go, each time you work the decrease.. Once the fabric is established, the CDD stands out from the rest of the knitting, and you can use that as a guide, without needing the marker. The stitch resulting from the CDD in the previous row should be the second of the two you slip, so start the decrease 1 stitch before the previous CDD.
DIRECTIONS
Scarf
Note: Slip the every first stitch purlwise with yarn in front.
BLOCK 1 (large set-up block)
In C1 (dark color), using the crochet cast on method (or your preferred method), cast on 37 sts, change to C2 (light color) and cast on 36 sts.
Set-up row [WS]: Keeping color sections distinct, sl1, k 35 sts in C2, interlock yarns as noted in Pattern Notes, k37 in C1.
Row 1 [RS]: Using C1, sl 1, k to last 2 sts of C1 section; CDD; switch to C2, knit to end. (2 sts decreased)
Row 2: Sl 1, using C2, k to end of C2 section, interlock yarns, switch to C1, knit to end.
Repeat Rows 1–2 until 3 sts rem (2 of C1, 1 of C2).
Last row [RS]: CDD. Pull yarn through last stitch and cut, leaving a tail long enough to weave in.
BLOCK 2
Note: choose a new set of C1 and C2 for this and each subsequent block
With RS facing and NEW C1, pick up 37 sts (1 st in each edge st); tie NEW C2 to C1, snugly e-wrap cast on 36 sts in C2.
Set-up row [WS]: Sl 1, using C2, k to end of C2 section, interlock yarns, switch to C1, knit to end.
Complete as for BLOCK 1.
Continue:
Repeat BLOCK 2 until scarf is desired length.
BLOCK 3 (small set-up block):
In C3, cast on 18 sts, clipping your removable stitch marker in the last stitch cast on, and with RS facing, pick up 17 sts down the first half of the left edge of BLOCK 1.
Set-up row [WS]: Sl 1, k to end.
Row 1: Sl 1, k to 1 before marked stitch; CDD; knit to end. (2 sts decreased)
Row 2: Sl 1, k to end.
Repeat Rows 1–2 until 3 sts rem.
Last row [RS]: CDD. Pull yarn through last stitch and cut, leaving a tail long enough to weave in.
BLOCK 4 and all remaining small 1-color blocks:
Note: choose a new C3 for this and each subsequent block (see illoB.png)
Note: Each time, you'll be picking up only halfway down the adjacent large Block. BLOCK 3 sits alongside the top half of BLOCK 1; the first BLOCK 4 is worked on the bottom half of BLOCK 1. The second BLOCK 4 is worked on the top half of the next large Block, and so forth.
With RS facing, use C3 to pick up 18 sts along the bottom of the previously-worked Block, clipping your removable stitch marker in the last stitch, and then pick up another 17 sts along the left side of the adjacent large Block.
Set-up row [WS]: Sl 1, k to end.
Row 1: Sl 1, k to 1 before marked stitch; CDD; knit to end. (2 sts decreased)
Row 2: Sl 1, k to end.
Complete as per BLOCK 3.
FINISHING
Using a very long (at least 40 inch/100 cm) circular needle and MC, wirth RS facing you, start at one corner and pick up one knit st in each elongated st along outside edge of scarf, and one additional stitch at each corner.
Purl 4 rounds, stopping every few inches to check your tension, ensuring the edging tension matches the scarf body tension to avoid rippling.
Bind off using P2tog bind off, adjusting tension as you go so that it matches the tension of the scarf body. Edging will naturally roll toward the back of scarf.
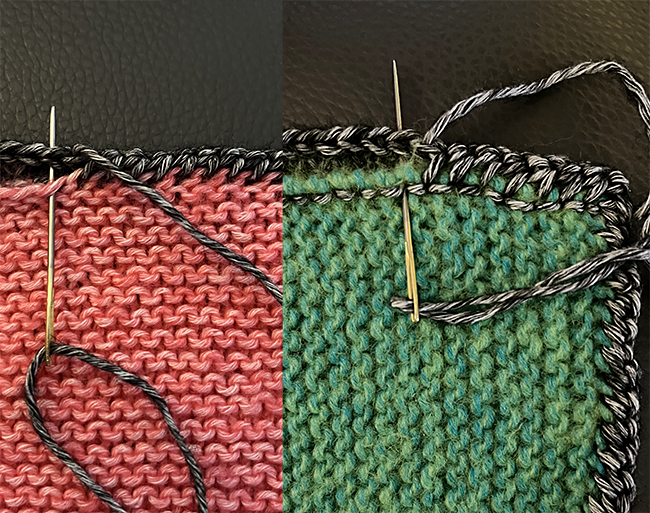
To make a more finely finished edge, stitch the bound-off edge of the edging to the edge of the small blocks on the back side, as shown in technique photos below. Note that the pink image (below left) shows where to seam your edging closed on the side of a block and the green square (below right) shows doing the same thing, but on the bottom of a block. Only the side stitches of the blocks are elongated because of the slipped stitch at the beginning of every row.
Weave in ends.
Blocking: The yarn used in the sample can be easily machine washed and dried, but you can expect more shrinkage than noted here. I wanted to preserve the look of the fabric as knitted, and so I machine washed in cold and hung over a rack to dry, straightening and shaping the scarf to get straighter edges.`
ABOUT THE DESIGNER
 Amy is the editor and founder of Knitty.com. Before there was Knitty, she was an obsessed quilter. She loves playing with color and will get back to quilting the last top she made in the early 2000s one of these days.
Most of the patterns she's designed are on Knitty, but she has a few you can view here.
Pattern & images © 2022 Amy Singer