


Wiseknit™: A column that teaches you how to do things you'll find in knitting instructions
INTRODUCTION
Wiseknit™: Practical Knitting Wisdom
by Kate Atherley
One of the wonderful things about knitting is that there are so many different solutions to every problem, so many possible answers to every question. This column aims to expand your knitting knowledge and toolkit with practical solutions and answers to your technical knitting questions and conundrums.
Picking a garment size to work in a pattern
We’ve made a change to the pattern style sheet at Knitty, and we thought it was worth talking about!
It’s all about the garment sizing information.
When making a garment, it's important to choose the right size for the body it's meant to fit. Different garments are designed to be worn very different ways, and we need to be guided by the designer in that choice. That is, should a garment be worn close-fitted, or is it designed to be oversized and relaxed?
Knitty patterns include the following elements to help you make that choice.
Labels
We have labels for the sizes we publish: XS[S, M, L, XL, 1X, 2X, 3X, 4X, 5X]These are a rough guide, and a pattern writing convenience – so that in the instructions, we can say things like “For Sizes XS and S, work the sleeves until they are... ”
But don’t draw too many conclusions about actual fit from a size label alone. Just as when buying clothes in a store, a M in one style might be very different than a M in another, and an M at another store different from those. Our size labels give you a quick answer to the question about how many sizes are available, and the rough range you can expect that those sizes cover.
But to choose a size to knit, you need more information.
Finished Measurements
The next piece of information we provide is the finished measurements. These are the measurements of the garment, as knitted (and “blocked"). We usually list only the key measurements so you can get a sense of the garment at a glance. For most elements, you’ll see a circumference and a length.The Garment Circumference
Unless otherwise indicated, the circumference of a garment is always taken under the arms.- For a top-down seamless garment, that’s the section immediately after the sleeves have been separated off.
- For a bottom-up seamless garment, that’s the section immediately before the sleeves are joined.
- For a garment worked in pieces and seamed, that’s the section below any armhole shaping.
Patterns use a remarkable and annoying variety of names for this circumference. You have possibly seen it referred to as “chest circumference” or “torso circumference”, or worst of all, “bust circumference”. In the past, we've used some of those terms too. Chest and torso are ok, although those terms do not make it entirely clear where the measurement is taken.
And then “bust”, although traditional, is just plain silly. You can’t talk about the bust circumference of a sweater because sweaters don’t have boobs! These finished measurements – and indeed the schematic measurements – are of the garment.
And at this point you likely have a very reasonable question. Most garment patterns do seem to say “bust” for this measurement. Why is it done that way? It’s a garment-industry standard established in the early 20th century to indicate that the garment is designed to be worn by a woman. I guess they used to think that if it said “chest”, we would think garment was designed for men?
Really, the most accurate way of describing that measurement is circumference at underarm. That’s what it’s conveying, after all.
The length
Unless otherwise indicated, the length of a garment taken from the outside edge of the shoulder down to the hem.Sometimes you’ll see additional measurements, but overall length and circumference are the key measurements you need to start to assess sizing. But this is still only part of the picture.
Schematic
The next piece of sizing information is the schematic.The schematic is what we need to truly assess the shape and measurements of the garment. It will show you the details of how it’s constructed – is it a seamless raglan or a set-in sleeve style worked in pieces, for example.
And it will show very detailed measurements: things like neck depth and armhole depth and how long the body and sleeve are from the underarms.
We can use the schematic as a way to virtually try the garment on. Compare it against garments you own and like the shape and fit of. And once you have determined the size you think you should make – see below! – you can also use it to assess what tweaks you might want to make, like sleeve and lower body length.
A side note to this, by the way, is that you should never knit a garment pattern if it doesn’t offer a schematic. Without one, you just don’t have the full picture.
Pictures
The garment pictures are a crucial piece of the decision process. Good garment photos – that is, photos taken on a model, rather than laying flat or on a judy – give you a sense of how the garment is designed to worn: it is being shown close-fitted, or oversized, or something in between?
Fit Recommendation
The last piece of information we need is a fit recommendation. It can be phrased as a direction, e.g. “choose a size with x inches/y cm positive/negative ease relative to your body”. Or “model is wearing it with x inches/y cm positive/negative ease relative to their underarm circumference”. (Or similar.)This is telling you more precisely what you’re seeing in the photos, and how the designer is expecting you to wear it.
Note that it is only ever a recommendation. You can always stray from the recommended fit But you absolutely do need to have a starting place.
For example, the (lack of) shaping in the upper body of a drop shoulder sweater means that you can’t wear it close-fitted. The lines of the garment don’t match the lines of the body. It’s like trying to fit a tennis racket into square shipping box. You need a bigger box to accommodate the shape of the racket.
The designer will have calculated things like sleeve circumference and length based on an expectation about where the sleeve sits on the body. If you wear a garment much looser than it was designed to be worn, the sleeve will absolutely be too long. Equally, if you wear a garment much tighter than it was intended to be worn, the sleeves will be too short and too tight, the shoulders too narrow, the neckline too shallow.
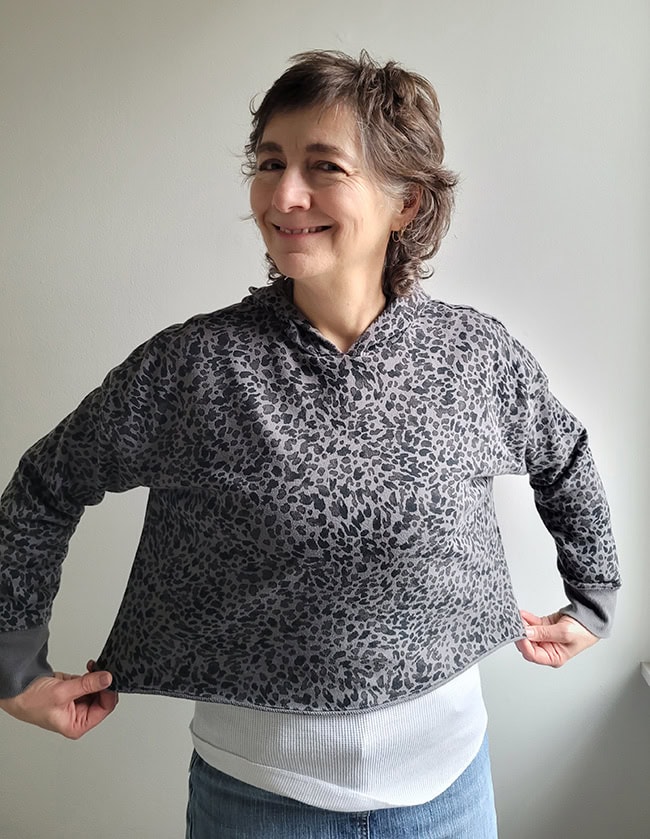
This top has a drop shoulder, and is specifically designed to be worn loose. It looks great worn with about 8 inches/20 cm of positive ease relative to my underarm circumference. The sleeve is exactly the right fit around my upper arm, and exactly the right length.
You can see how far away from my body the sleeve starts, and that's intentional.

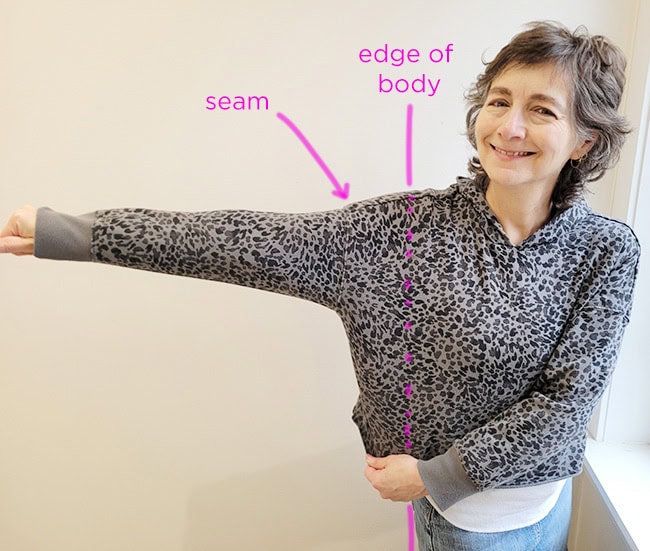
Pulling that seam in closer to my body (to illustrate a too-tight drop shoulder fit) creates two issues. The first is that the sleeve is too short. Although this could be rectified with a bit of arithmetic and pattern adjustment, it won't solve the second, larger issue. The armhole size and structure are off. The armhole is straight up and down, as is the top of the sleeve – the classic drop-shoulder construction. If you pull that in closer to your body – wearing the top with less positive ease – you end up with a sleeve that bunches under the arm, which creates folds in the upper sleeve and body. Neither of these are a disaster, but they are indications that the garment was not designed to be worn close-fitted.
Ease can be confusing, though. A lot of it has to do with that pesky “bust” word again. We see the word bust and, not unreasonably, assume that we're to add or subtract ease from the full bust circumference. That's not correct.
First of all, even if we are talking about garments designed for women, to be worn by a woman, we shouldn’t assume that the woman has breasts or what size those breasts might be.
Choosing a garment size based only on your full bust/largest chest circumference causes issues, because your full bust circumference doesn’t reflect the size of your frame. If you tell me you have a 48-inch full bust circumference, can I tell how big your shoulders are? No. If you have a 48-inch bust circumference, can I make a guess at your waist or hip circumference? No. If you have a 48-inch full bust circumference, can I draw any conclusions about your armscye depth? No.
To have a garment fit you well, it needs to be the right size based on your full upper body: it needs to take your shoulders into account, it needs to be an appropriate length in the armhole, the sleeves should be a comfortable circumference at the bicep. The good news is that there is a pretty good guide to this, however, and that’s your body measurement taken under your arms. That measurement, on an adult body, is a very good indicator of your frame and your core body measurements.
So that’s where we begin.
How to Actually Choose the Size
Look at the ease/fit recommendation in the pattern. If you’re being told that it’s to be worn with, for example, 2-3 inches of positive ease, take your measurement under the arms (this is sometimes described as “upper bust” or “high bust”), and add 2-3 inches to that measurement. If there’s a size that corresponds to that number (that is, one that offers a finished measurement that matches this upper bust + 2 or 3), that’s the size you should be making. Easy.
Even if the pattern says “bust”, you do not start with the full bust measurement. The designer isn't actually referring to your full bust measurement because they cannot know what cup size you wear. The word is there for historical reasons, that's all!
Now, what if you have a large bustline? Or a belly? Or other curves?
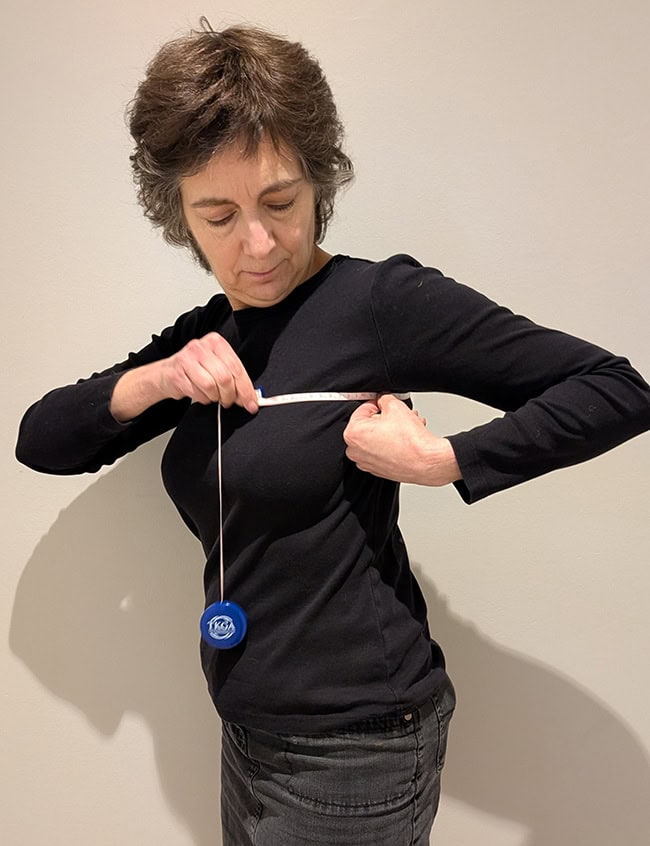
This is where the tape measure check comes into play.
Let’s use specific numbers. If Lee’s body measures 44 inches around under the arms, and the pattern tells you to choose a size with 4 inches of positive ease, then Lee is checking the pattern to see if one of the instruction sets in the pattern results in a sweater with a finished measurement of 48. If it does, perfect!
Size recommendations have some flexibility because we're talking about knitted or crocheted fabric, which has some give. If you find that there isn’t one that works exactly, you may well find one that’s pretty close.
(What if there’s simply isn’t a size that works for you? Perhaps because the pattern doesn’t have an inclusive size range, or the gaps between the sizes are too big? Honestly, the easiest answer is to find a different pattern.)
Because Lee has curvy, busty figure, they are going to do a fit check by holding the tape measure at that 48-inch circumference, making a big loop, and sliding it down over their chest and body to make sure it fits.
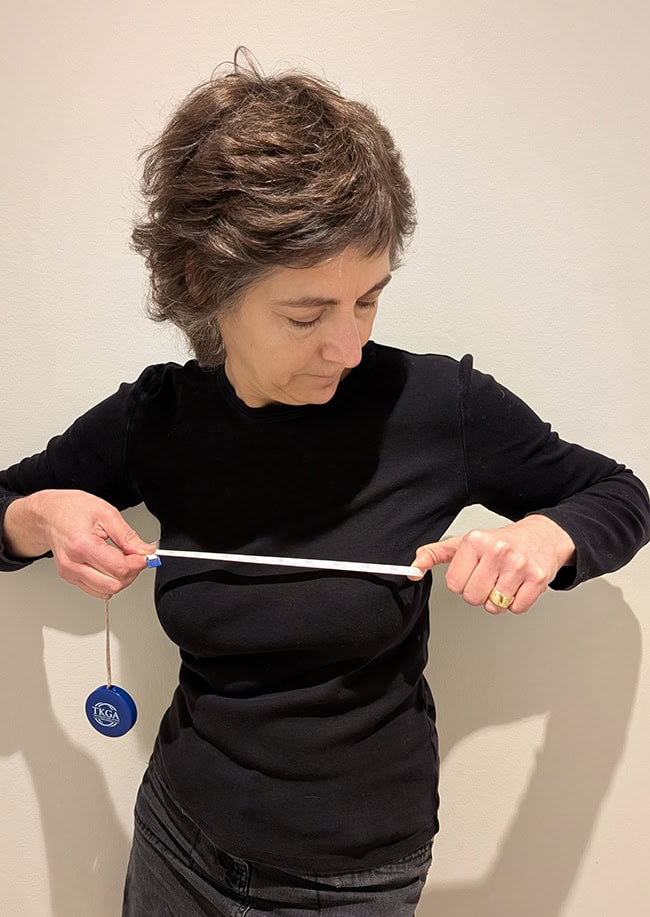
If it does? Lee is good to go!
Note: you don’t need or want a lot of positive ease over the fullest part of your bust, as it will make the garment look sloppy.
If it doesn’t fit over the fullest part of your bust, there are four possible solutions:
- Choose a larger size of the same garment. Again, don’t go too big, as it will be oversized in the shoulders, armholes and sleeves.
- Choose a garment pattern that naturally accommodates a larger bust: As a woman with relatively narrow shoulders but a relatively large bustline, I’m a big fan of an open-front cardigan, or a cardigan that I just don’t do up all the way.
- Choose a garment pattern with a-line shaping, one that becomes wider between armhole and hem. Or adjust the garment to make it that shape.
- Add bust darts. There’s a few ways to do this – short rows, or increasing and decreasing.
Want to learn more? I've written a book that covers this in more depth. Learn about it here: Math for Knitters
ABOUT THE AUTHOR
 Kate Atherley is Knitty's Managing Technical Editor and a knitting author and teacher. The combination of her university degree in mathematics, professional experience in software development and usability, and training in garment and fashion design give her a unique perspective. Her new book, Math for Knitters, has just been released.
You can see more of her work at kateatherley.com and on Ravelry.
Text & images © 2025 Kate Atherley.