


Kaleidoscope, a free knitting pattern from Knitty.com.
INTRODUCTION
Kaleidoscope
by Kate Harvie

Those who know me will be aware that my favorite color is all of them, often all at once. Also that I have a bit of a squirrel tendency, and have never been known to turn down a bag of random yarn scraps – well it would be a shame if a vague acquaintance's late great auntie Mabel's bag of bits went to waste, wouldn't it? As a consequence, I have always got a large quantity of leftovers and have made at least a dozen well-loved sweaters out of scraps for family members from the babies to their Great Granny.
This is a very versatile pattern intended to make use of assorted bits of pretty much any DK yarn. You can also add in bits of fingering used double. No scrap is too small. Every leftover is valuable. All yarn is loved.
The pattern is for a tank top or vest which I think would be great over a plain shirt or blouse when it isn't quite cold enough to go without, or as an extra layer under a sweater when it's extra cold. It is sized for adult women, but would be suitable for men as well.
You can of course be a bit more subtle and choose yarns from just one portion of the spectrum, if you prefer.
The fabric is constructed using a mix of slip stitch patterns. This can be in a repeated order, or in a random mix as you prefer. If you swap colors every couple of rows, you will achieve something rather beautiful.
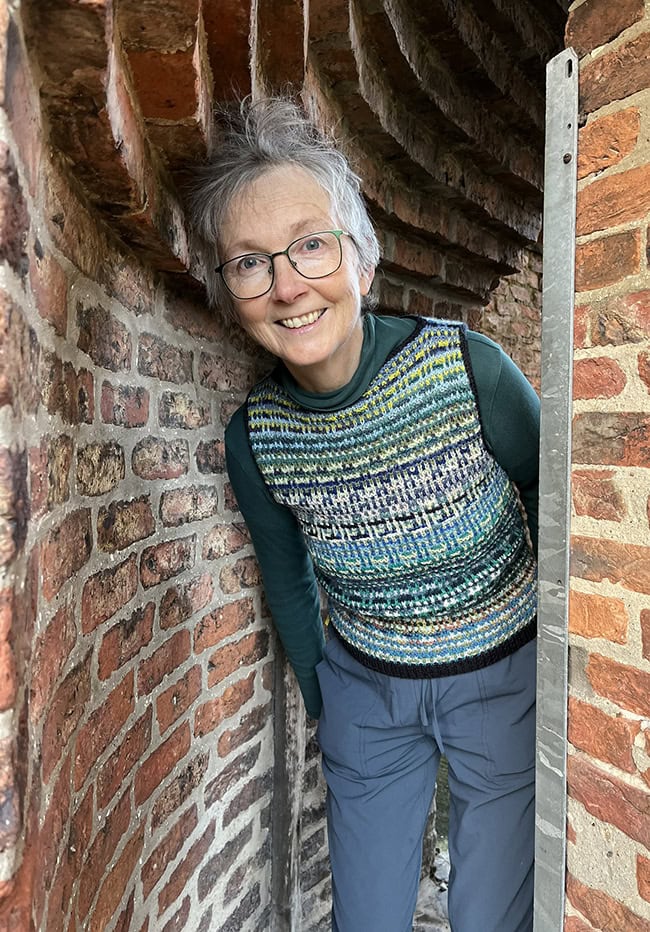
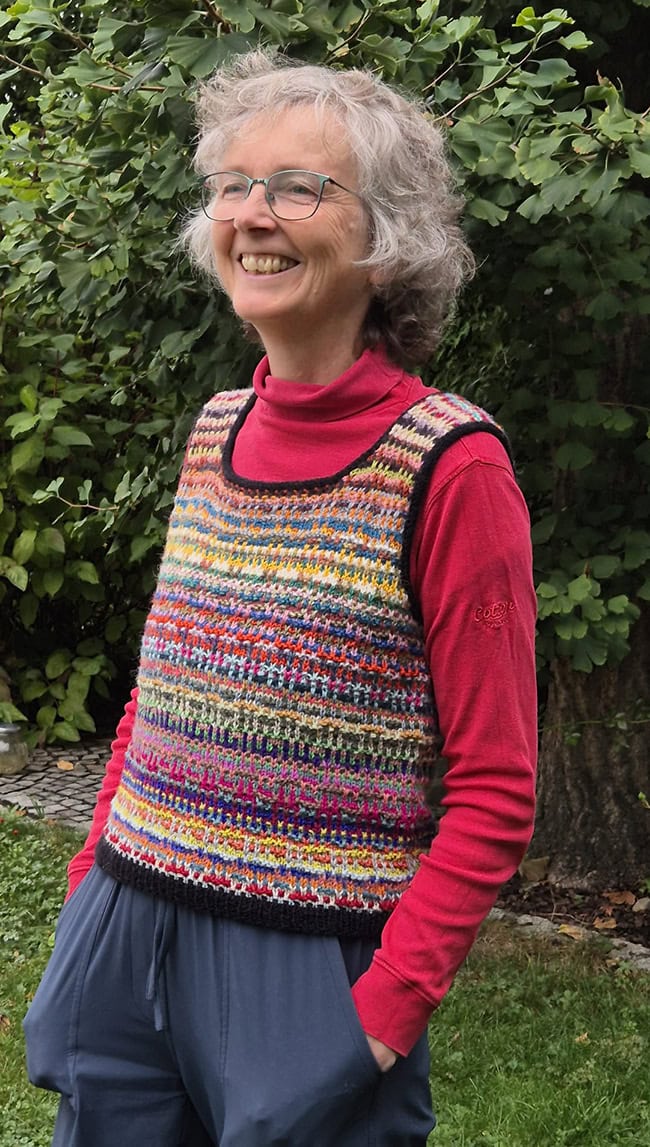
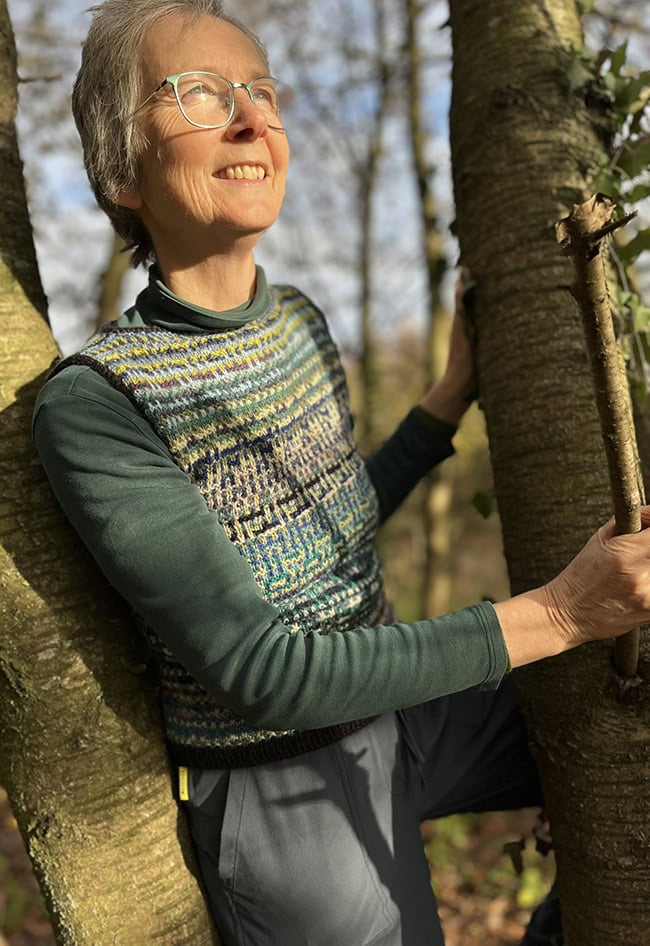
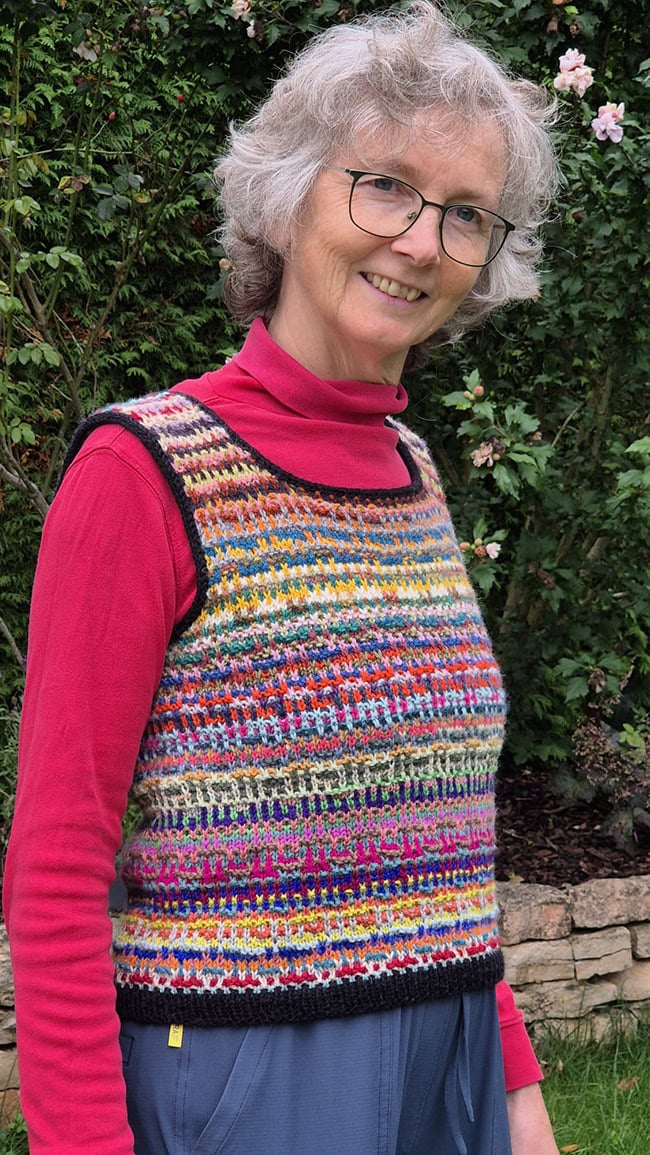
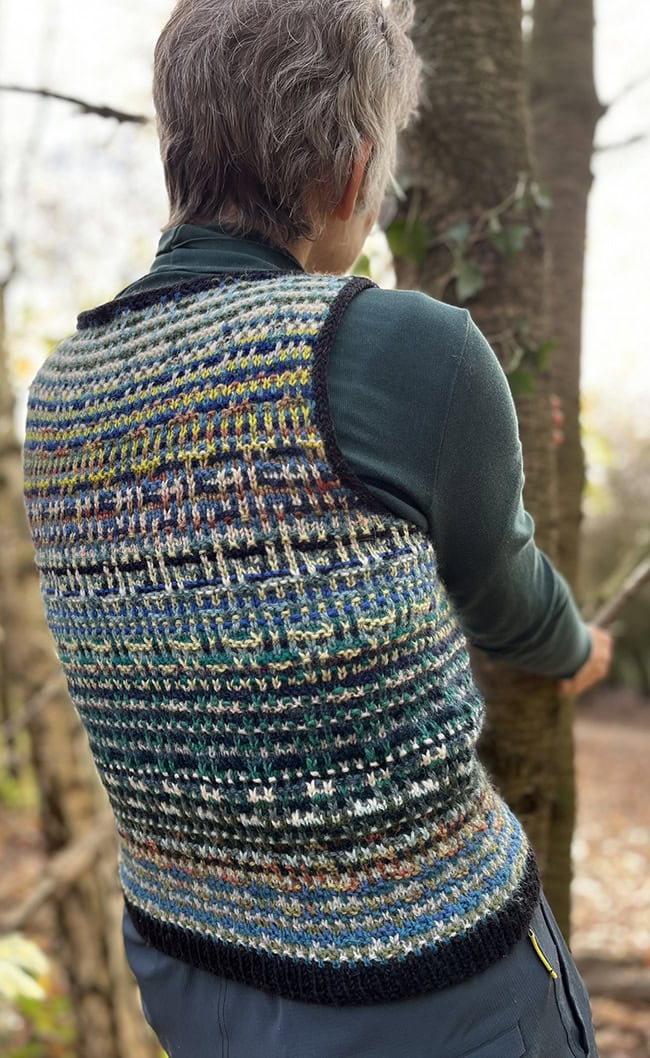
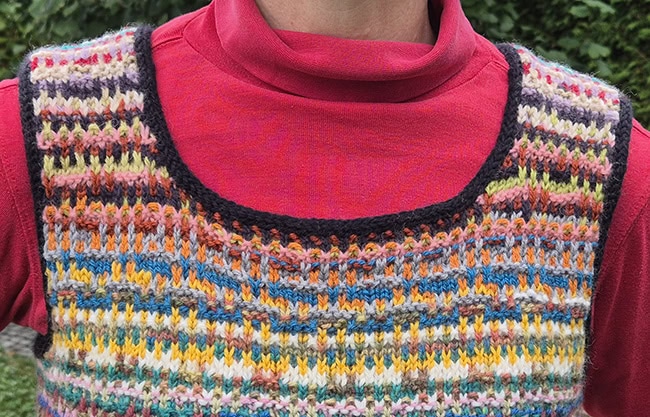
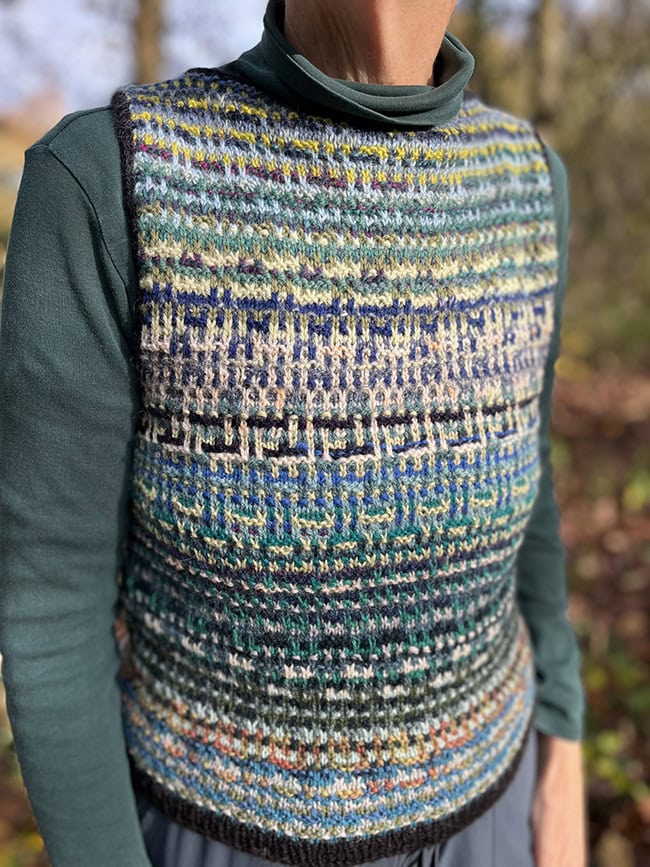
The pattern is styled for a square(-ish) neck or a boat neck. The square neck sample is knitted in every available color, and the boat neck version is knitted using scraps of mostly greens, blues and greys.
 model: Kate Harvie
photos: Elisabeth Zippelius, Jess Harvie


SIZE
XS[S, M, L, 1X, 2X, 3X, 4X, 5X]
Both versions shown in size S with 2 inches/5 cm of ease at largest part of chest and 3 inches/7.5 cm of ease at underarm.
FINISHED MEASUREMENTS
Chest/Bust: 32[36.5, 41.25, 44.25, 48.75, 53.25, 56.5, 61, 65.5] inches / 81.5[92.5, 105, 112.5, 124, 135.5, 143.5, 155, 166.5] cm
Length: 19.75[20.25, 20.75, 21, 21, 21.5, 22, 22.5, 23] inches / 50[51.5, 52.5, 53.5, 53.5, 54.5, 56, 57.5, 58.5] cm.
MATERIALS
Yarn
![]() This pattern is designed so that you can use up assorted leftovers of DK yarns. It is made with oddments of many different yarns from various manufacturers and colorways. It is difficult to be prescriptive about quantities. Essentially, you need a big bag of leftover yarn, in as many colors as you have available. The more yarn you have, the more choice you have. You can be subtle and use one part of the color spectrum (say greens or pinks only) or you can go wild and use everything. Choose yarns with a suggested gauge of 20-22 sts to 4 inches or 10cm, or thereabouts.
This pattern is designed so that you can use up assorted leftovers of DK yarns. It is made with oddments of many different yarns from various manufacturers and colorways. It is difficult to be prescriptive about quantities. Essentially, you need a big bag of leftover yarn, in as many colors as you have available. The more yarn you have, the more choice you have. You can be subtle and use one part of the color spectrum (say greens or pinks only) or you can go wild and use everything. Choose yarns with a suggested gauge of 20-22 sts to 4 inches or 10cm, or thereabouts.
You can use fingering/sock weight yarn held double. You can also throw in the odd bit of sport weight or light worsted in there if you want, as long as it is not too much.
If you want to use one color for hem, armhole and neck edgings, allow at least 72[79, 86, 92, 101, 109, 114, 122, 130] yards/ 66[72, 79, 84, 92, 100, 104, 112, 119] meters for this for the square neck, or 65[71, 80, 85, 93, 102, 107, 115, 122] yards/ 59[65, 73, 78, 85, 93, 98, 105, 112] meters for the boat neck.
For reference, if you use a similar mix of yarns to what I used, which was wool and wool-blends, your finished garment will weigh approximately 7.1[8.3, 9.5, 10.4, 11.5, 12.9, 13.9, 15.5, 16.9] oz/ 200[235, 270, 295, 325, 365, 395, 440, 480] grams for the square neck, 7.8[9, 10.6, 11.5, 12.7, 14.3, 15.3, 17.1, 18.7] oz/ 220[255, 300, 325, 360, 405, 435, 485, 530] grams for the boat neck. I recommend you start with at least twice this weight of yarn scraps to allow yourself artistic license.
Yarn Characteristics
![]() This pattern works best with fairly smooth DK weight yarns, but exact yarn characteristics are not critical, and variation is part of the charm. However, for best results I would suggest using yarns made with similar fibers, for example all wool or wool blends. Avoid chenille yarn as it will look terrible, but apart from that, nothing is off limits. Picking one color for the hem and the edgings at the neck and armholes ties everything in nicely.
This pattern works best with fairly smooth DK weight yarns, but exact yarn characteristics are not critical, and variation is part of the charm. However, for best results I would suggest using yarns made with similar fibers, for example all wool or wool blends. Avoid chenille yarn as it will look terrible, but apart from that, nothing is off limits. Picking one color for the hem and the edgings at the neck and armholes ties everything in nicely.
Recommended needle size
[always use a needle size that gives you the gauge listed below - every knitter's gauge is unique]
![]() 1 US #6/4mm circular needle, 28 inches/70 cm long or longer
1 US #6/4mm circular needle, 28 inches/70 cm long or longer
![]() 1 US #4/3.5mm circular needle, 28 inches/70 cm (for working ribbed hem)
1 US #4/3.5mm circular needle, 28 inches/70 cm (for working ribbed hem)
![]() Extra US #6/4mm needle (for working three-needle bind-off)
Extra US #6/4mm needle (for working three-needle bind-off)
Notions
![]() stitch marker
stitch marker
![]() yarn needle
yarn needle
![]() stitch holders or waste yarn
stitch holders or waste yarn
![]() 2 locking stitch markers (optional; for boat neck version only)
2 locking stitch markers (optional; for boat neck version only)
GAUGE
21 sts/28 rows/rounds = 4 inches/10 cm in stockinette stitch.
21 sts/48 rows/rounds = 4 inches/10 cm in pattern stitch.
Note: gauge is always taken after blocking.
Note: as the shaping on this top is minimal, row/round gauge is not critical, and depends on the patterns you choose for your garment.
PATTERN NOTES
[Knitty's list of standard abbreviations and techniques can be found here.]
Construction method:
This vest or tank top is worked seamlessly in the round from the bottom up. After dividing for the armholes, the front and back are worked separately back and forth. The shoulders are joined using three-needle bind-off, and then an i-cord edging finishes off the neck and armhole edges.
Changing colors: Using leftover yarns, the yarn color is changed every couple of rounds. Swap colors in and out as seems best to you. One possible way to do this is to put all your yarn in a big bag or basket, stick your hand in and pull out a random ball of yarn. If it looks good to you, use it; if not, then try again. Or alternatively you can arrange all your colors in advance, go for a gradient, a rainbow or a completely random mix. The possibilities are endless.
There is a choice of six stitch patterns to use, which can be used in a fixed order, or in an order that you choose as you go along. Or to mix it up a bit, throw a die every two rows to decide which stitch pattern to use next. This is what I did when working the sample, although sometimes I decided the die was wrong and overruled it! Feel free also to add your own stitch patterns or mix and match the ones provided. The only proviso is that you do not slip the same stitch more than twice consecutively.
Although you are changing color at the end of every two-round pattern, there are two things you can do to reduce the number of ends you have to weave in. Firstly, you can carry your colors up the back of your work and reuse them. Do not carry yarns for more than six rounds. When working in the round, make sure you bring the new color up from the right, around any other color you are carrying, to prevent holes and make a neat finish. When working flat, you can carry yarn for up to six rows on the right-hand side of your work when RS is facing. Bring the new color around and in front of any other yarns. Secondly, when you stop using a particular color, don't finish it at the end of a round or row. Replace the yarn with another that isn't too different, and work both colors of yarn together for several stitches, then snip off the ends on the WS leaving about a quarter inch/1 centimeter, after blocking the piece. Because the fabric is so busy, this will not show.
Techniques:
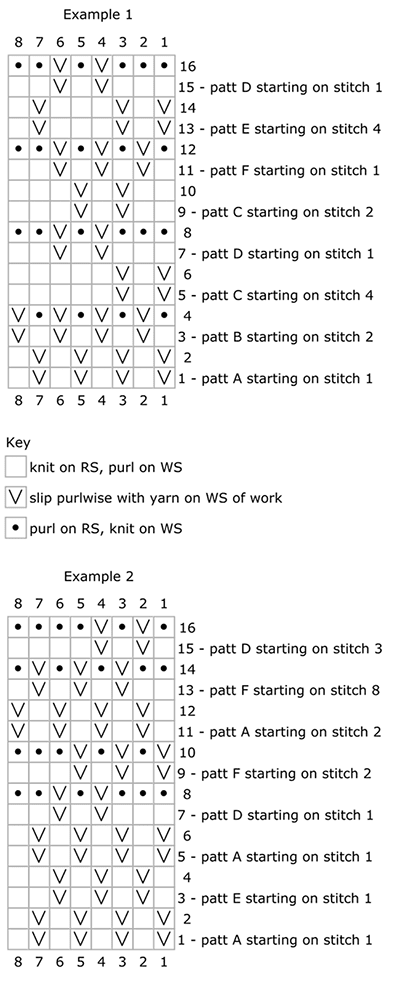
- This garment is worked in a series of simple slip stitch patterns. Each pattern is worked over two rounds. In each of these two rounds, the same stitches are slipped. When working the next pattern sequence, it is important to slip different stitches, so that no stitch is slipped for more than 2 rows consecutively.
- You can follow any stitch pattern with any other stitch pattern, but to make sure that you are slipping different stitches, you may need to start the new pattern on a stitch other than stitch 1 of the chart. You can start on any stitch of the chart as long as the slipped stitches are placed above stitches which were NOT slipped in the previous 2 rows. You can move the stitch patterns around so that you get a result that you like. See the Example Charts below for an example of a possible pattern sequence.
- I-cord edging: With RS facing, cast on 3 sts to left needle using knitted cast-on method. *K2, k2tog tbl, slip 3 sts back to left needle; rep from * until only 3 sts remain. Break yarn and draw through these 3 sts to fasten off. Sew ends of i-cord together as neatly as you can.
CHARTS
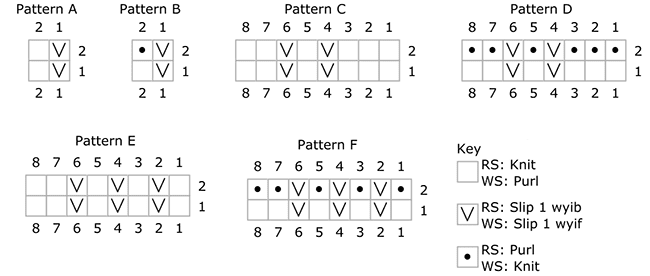
Pattern A (worked in the round)
Rounds 1-2: *Sl 1, k1; rep from * to end of rnd.
Pattern A (worked flat)
Row 1 [RS]: *Sl 1, k1; rep from * to end.
Row 2 [WS]: *P1, sl 1 wyif; rep from * to end.
Pattern B (worked in the round)
Round 1: *Sl 1, k1; rep from * to end of rnd.
Round 2: *Sl 1, p1; rep from * to end of rnd.
Pattern B (worked flat)
Row 1 [RS]: *Sl 1, k1; rep from * to end.
Row 2 [WS]: *K1, sl 1 wyif; rep from * to end.
Pattern C (worked in the round)
Rounds 1-2: *K3, sl 1, k1, sl 1, k2; rep from * to end of rnd.
Pattern C (worked flat)
Row 1 [RS]: *K3, sl 1, k1, sl 1, k2; rep from * to end.
Row 2 [WS]: *P2, sl 1 wyif, p1, sl 1 wyif, p3; rep from * to end.
Pattern D (worked in the round)
Round 1: *K3, sl 1, k1, sl 1, k2; rep from * to end of rnd.
Round 2: *P3, sl 1, p1, sl 1, p2; rep from * to end of rnd.
Pattern D (worked flat)
Row 1 [RS]: *K3, sl 1, k1, sl 1, k2; rep from * to end.
Row 2 [WS]: *K2, sl 1 wyif, k1, sl 1 wyif, k3; rep from * to end.
Pattern E (worked in the round)
Rounds 1-2: *(K1, sl 1) 3 times, k2; rep from * to end of rnd.
Pattern E (worked flat)
Row 1 [RS]: *(K1, sl 1) 3 times, k2; rep from * to end.
Row 2 [WS]: *P2, (sl 1 wyif, p1) 3 times; rep from * to end.
Pattern F (worked in the round)
Round 1: *(K1, sl 1) 3 times, k2; rep from * to end of rnd.
Round 2: *(P1, sl 1) 3 times, p2; rep from * to end of rnd.
Pattern F (worked flat)
Row 1 [RS]: *(K1, sl 1) 3 times, k2; rep from * to end of rnd.
Row 2 [WS]: *K2, (sl 1 wyif, k1) 3 times; rep from * to end of rnd.
DIRECTIONS
Body
Using smaller circular needle and the yarn you have chosen for your edgings, cast on 168[192, 216, 232, 256, 280, 296, 320, 344] sts, pm and join to work in the round, being careful not to twist sts.
Round 1: *K1, p1; rep from * to end of rnd.
Rep Round 1 until work measures 1 inch/2.5 cm from cast-on edge.
Change to larger circular needle. Choose a different color.
Work Rnds 1-2 of Pattern A.
Continue to work Stitch Patterns according to notes in Techniques until work measures 12.5[12.5, 12.5, 12.25, 11.75, 11.75, 11.75, 11.75, 11.75] inches / 32[32, 32, 31, 30, 30, 30, 30, 30] cm from cast-on edge, ending after second rnd of chart pattern.
Divide for armholes:
Cont in chosen stitch pattern, patt 5[6, 8, 9, 12, 15, 15, 18, 20] sts, place last 9[11, 15, 17, 23, 29, 29, 35, 39] sts worked on holder for left underarm (removing m), patt 84[96, 108, 116, 128, 140, 148, 160, 172] sts for Front and right underarm, place last 9[11, 15, 17, 23, 29, 29, 35, 39] sts worked on holder for right underarm, patt 75[85, 93, 99, 105, 111, 119, 125, 133] across Back to end of round. 75[85, 93, 99, 105, 111, 119, 125, 133] sts rem each for Front and Back.
Upper Back
Note: You will now work flat, beginning with Row 2 of current slip stitch pattern.
Make sure that, when slipping stitches, the yarn is always carried on the WS of the work. If you would like to make Front and Back the same, make a note of your chosen order of chart patterns.
Work 1 WS row even in patt.
Shape armholes:
Row 1 [RS]: K2tog, patt to last 2 sts, ssk. 2 sts decreased.
Row 2 [WS]: K1, patt to last st, k1.
Rep last 2 rows 3[5, 7, 9, 11, 13, 15, 17, 19] times more. 67[73, 77, 79, 81, 83, 87, 89, 93] sts.
Proceed to work neck shaping of choice: Boat neck version (shown above in greens) or Square neck version (shown below in rainbow colors).
Shape back and back neck (Boat neck version):
Row 1: K1, patt to last st, k1.
Row 2: Sl 1 purlwise, patt to last st, sl 1 purlwise.
Rep last 2 rows until work measures 7.25[7.75, 8.25, 8.75, 9.25, 9.75, 10.25, 10.75, 11.25] inches / 18.5[19.5, 21, 22, 23.5, 25, 26, 27.5, 28.5] cm from start of armhole shaping, ending after a WS row of Pattern B, D or F.
Break yarn and leave sts on needle, leaving a long tail for joining shoulder.
Upper Front (Boat neck version)
Join yarn to 75[85, 93, 99, 105, 111, 119, 125, 133] sts held for Front with WS facing and work as for Upper Back to end.
Turn work inside out, and with right sides together, work 3-needle bind-off, binding off 9[11, 12, 12, 12, 13, 14, 14, 15] sts together at left edge of Front and Back for left shoulder. Place resulting stitch from right needle on locking stitch marker and break yarn. Repeat for right shoulder.
Skip to Neck edging (Boat neck).
Shape back and back neck (Square neck version):
Row 1: K1, patt to last st, k1.
Row 2: Sl 1 purlwise, patt to last st, sl 1 purlwise.
Rep last 2 rows until work measures 6.25[6.75, 7.25, 7.75, 8.25, 8.75, 9.25, 9.75, 10.25] inches / 16[17, 18.5, 19.5, 21, 22, 23.5, 25, 26] cm from start of armhole shaping, ending after a WS row of Pattern B, D or F.
Note: If you want the left and right backs to match, make sure you have enough of your chosen yarns to work both sides, and set each yarn aside as you finish working it on the right back so that it is easily available for working the left back.
Shape right back shoulder:
Row 1 [RS]: K1, patt 17[20, 21, 22, 22, 22, 23, 24, 25] , turn and cont on these 18[21, 22, 23, 23, 23, 24, 25, 26] sts only.
Row 2 [WS]: K1, patt to last st, sl 1 purlwise.
Row 3 [RS]: K1, patt to last 2 sts, ssk. 1 st decreased.
Row 4 [WS]: K1, patt to last st, sl 1 purlwise.
Rep last 2 rows 3 times more. 14[17, 18, 19, 19, 19, 20, 21, 22] sts.
Row 5 [RS]: K1, patt to last st, k1.
Row 6 [WS]: Sl 1 purlwise, patt to last st, sl 1 purlwise.
Rep last 2 rows until right back measures 7.25[7.75, 8.25, 8.75, 9.25, 9.75, 10.25, 10.75, 11.25] inches / 18.5[19.5, 21, 22, 23.5, 25, 26, 27.5, 28.5] cm from start of armhole shaping, ending after a WS row.
Break yarn, leaving a long tail for joining right shoulder later. Leave sts on needle or place on holder.
Shape left back shoulder:
With RS facing, slip 31[31, 33, 33, 35, 37, 39, 39, 41] sts from center back to holder for back neck. Join yarn to rem 18[21, 22, 23, 23, 23, 24, 25, 26] sts.
Row 1 [RS]: Patt to last st, k1.
Row 2 [WS]: Sl 1 purlwise, patt to last st, k1.
Row 3 [RS]: K2tog, patt to last st, k1. 1 st decreased.
Row 4 [WS]: Sl 1 purlwise, patt to last st, k1.
Rep last 2 rows 3 times more. 14[17, 18, 19, 19, 19, 20, 21, 22] sts.
Row 5 [RS]: K1, patt to last st, k1.
Row 6 [WS]: Sl 1 purlwise, patt to last st, sl 1 purlwise.
Rep last 2 rows until left back measures 7.25[7.75, 8.25, 8.75, 9.25, 9.75, 10.25, 10.75, 11.25] inches / 18.5[19.5, 21, 22, 23.5, 25, 26, 27.5, 28.5] cm from start of armhole shaping, ending after a WS row.
Break yarn.
Upper Front (Square neck version)
Join yarn to 75[85, 93, 99, 105, 111, 119, 125, 133] sts held for Front with WS facing.
Work 1 WS row even in patt.
Shape armholes:
Row 1 [RS]: K2tog, patt to last 2 sts, ssk. 2 sts decreased.
Row 2 [WS]: K1, patt to last st, k1.
Rep last 2 rows 3[5, 7, 9, 11, 13, 15, 17, 19] times more. 67[73, 77, 79, 81, 83, 87, 89, 93] sts.
Row 1 [RS]: K1, patt to last st, k1.
Row 2 [WS]: Sl 1 purlwise, patt to last st, sl 1 purlwise.
Rep last 2 rows until work measures 3.25[3.75, 4.25, 5, 5.25, 6, 6.25, 7, 7.25] inches / 8.5[9.5, 11, 12.5, 13.5, 15, 16, 18, 18.5] cm from start of armhole shaping, ending after a WS row of pattern B, D or F.
Shape left front neck and shoulder:
Note: If you want the left and right fronts to match, make sure you have enough of your chosen yarns to work both sides, and set each yarn aside as you finish working it on the left front so that it is easily available for working the right front.
Row 1 [RS]: K1, patt 17[20, 21, 22, 22, 22, 23, 24, 25] , turn and cont on these sts only.
Row 2 [WS]: K1, patt to last st, sl 1 purlwise.
Row 3: K1, patt to last 2 sts, ssk. 1 st decreased.
Row 4: K1, patt to last st, sl 1 purlwise.
Rep last 2 rows 3 times more. 14[17, 18, 19, 19, 19, 20, 21, 22] sts.
Row 5 [RS]: K1, patt to last st, k1.
Row 6 [WS]: Sl 1 purlwise, patt to last st, sl 1 purlwise.
Rep last 2 rows until left front measures 7.25[7.75, 8.25, 8.75, 9.25, 9.75, 10.25, 10.75, 11.25] inches / 18.5[19.5, 21, 22, 23.5, 25, 26, 27.5, 28.5] cm from start of armhole shaping, ending after a WS row. Break yarn and place sts on holder.
Shape right front shoulder:
With RS facing, slip 31[31, 33, 33, 35, 37, 39, 39, 41] sts from center front to holder for front neck. Join yarn to rem 18[21, 22, 23, 23, 23, 24, 25, 26] sts with RS facing.
Row 1 [RS]: Patt to last st, k1.
Row 2 [WS]: Sl 1 purlwise, patt to last st, k1.
Row 3 [RS]: K2tog, patt to last st, k1. 1 st decreased.
Row 4 [WS]: Sl 1 purlwise, patt to last st, k1.
Rep last 2 rows 3 times more. 14[17, 18, 19, 19, 19, 20, 21, 22] sts.
Row 5 [RS]: K1, patt to last st, k1.
Row 6 [WS]: Sl 1 purlwise, patt to last st, sl 1 purlwise.
Rep last 2 rows until right front measures 7.25[7.75, 8.25, 8.75, 9.25, 9.75, 10.25, 10.75, 11.25] inches / 18.5[19.5, 21, 22, 23.5, 25, 26, 27.5, 28.5] cm from start of armhole shaping, ending after a WS row.
Turn to WS and join shoulders using three-needle bind-off.
Skip to Neck edging (Square neck).
Neck edging (Boat neck)
With RS facing, starting at right side of back, and using the yarn you have chosen for working edgings, k 47[49, 51, 53, 55, 55, 57, 59, 61] from back neck holder, pick up and knit 1 st before 1 st on holder, knit stitch from holder, pick up and knit 1 st before front neck sts, k 47[49, 51, 53, 55, 55, 57, 59, 61] from front neck holder, pick up and knit 1 st before 1 st on holder, knit st from holder, pick up and knit 1 st before back neck sts. Do not turn. 100[104, 108, 112, 116, 116, 120, 124, 128] sts.
Work i-cord edging.
Skip to Armhole edging.
Neck edging (Square neck)
Note: The exact number of sts you pick up on each side of neck is not critical, but it should be the same number on each side.
With RS facing, starting at right side of back, and using the yarn you have chosen for working edgings, k 31[31, 33, 33, 35, 37, 39, 39, 41] from back neck holder, pick up and knit 35 sts down left front neck, k 31[31, 33, 33, 35, 37, 39, 39, 41] from front neck holder, pick up and knit 35 sts up right front neck. Do not turn. 132[132, 136, 136, 140, 144, 148, 148, 152] sts.
Work i-cord edging.
Armhole edging
With RS facing and using needles for working short circumference in the round, k 9[11, 15, 17, 23, 29, 29, 35, 39] from underarm holder, pick up and knit 44[46, 50, 55, 58, 63, 66, 70, 73] sts up armhole to shoulder, pick up and knit 44[46, 50, 55, 58, 63, 66, 70, 73] sts down other side of armhole. 97[103, 115, 127, 139, 155, 161, 175, 185] sts.
Work i-cord edging.
Repeat for other side.
FINISHING
Weave in ends. Soak garment in lukewarm water with a drop of washing up liquid or woolly wash for 20-30 minutes, roll in towels or short spin to remove excess water, pull gently into shape and dry flat. Do not pin or stretch. Once dry, snip off any remaining loose yarn ends on the inside, leaving about 0.25 inch/1 cm.

A–Chest/Bust: 32[36.5, 41.25, 44.25, 48.75, 53.25, 56.5, 61, 65.5] inches / 81.5[92.5, 105, 112.5, 124, 135.5, 143.5, 155, 166.5] cm
B–Length underarm to hem: 12.5[12.5, 12.5, 12.25, 11.75, 11.75, 11.75, 11.75, 11.75] inches / 32[32, 32, 31, 30, 30, 30, 30, 30] cm.
C–Armhole depth: 7.25[7.75, 8.25, 8.75, 9.25, 9.75, 10.25, 10.75, 11.25] inches / 18.5[19.5, 21, 22, 23.5, 25, 26, 27.5, 28.5] cm.
D–Back neck width (Square neck): 7.5[7.5, 7.75, 7.75, 8.25, 8.5, 9, 9, 9.25] inches / 19[19, 19.5, 19.5, 21, 21.5, 23, 23, 23.5] cm.
E–Neck width (Boat neck): 9.25[9.75, 10, 10.5, 10.75, 10.75, 11.25, 11.5, 12] inches / 23.5[25, 25.5, 26.5, 27.5, 27.5, 28.5, 29, 30.5] cm.
ABOUT THE DESIGNER
 Kate has been a knitter and lover of anything woolly since childhood. She survived more than 40 years working in healthcare by playing viola, walking outdoors and knitting, hopefully not all at the same time. Since retirement in 2022, Kate has had a lot of fun trying vainly to reduce her stash, designing knitwear and playing with natural dyes in her garden shed. As well as a roomful of fiber and yarn, she has three grown-up children, a husband and a cat, and a growing number of grandchildren and granddogs. She lives in North Yorkshire close to the moors and the sea.
Find her on Ravelry and Instagram.
Pattern & images © 2025 Kate Harvie