


Changing Clothes, a column about customizing a Knitty pattern to suit you, by Brenda Dayne
INTRODUCTION
Changing Clothes
Naked.
The day I realised I was naked began like any other. Tea. Yoga. Shower. Stand in front of an open wardrobe and look for something to wear. Realise the options therein are both infinite and non-existent. We’ve all been there. In Schrödinger's wardrobe there are aways plenty of clothes, and yet nothing to wear.
On that day, specifically, I discovered that had a trouser issue. It was late spring, I had a gained a bit of weight over lockdown, and last year’s summer wardrobe didn’t quite fit anymore. I tried a lot of clothes on that morning, and rejected everything that felt too tight. Because life is too short to walk the world in clothing that feels tight. I realised that a lack of trousers that fit, meant that I was effectively naked from the waist down. I chose a dress to wear that morning, mentally filed the pressing need to make or buy summer trousers that fit, and went on with my day.
My ideas about clothing began to change that morning. I had been wearing clothes my whole life, but never really considered clothes before – really considered them – from both a practical perspective, and an historical one. Clothing as concept. Clothing as a way to cover nakedness and protect one from the elements. Clothing as a means of personal and creative expression. Clothing as part of a vast global industry with production methods that, quite literally, cost us the earth. After many months of reading and thinking and talking about clothing, considering why we wear what we wear, it became clear to me that I needed to change my clothes. Did I really need as many clothes as I owned? The answer was, of course, no.
I decided to stop buying ready-made clothes, to pare back the number of clothes I owned, and make sure that everything in my wardrobe fit me perfectly, expressed my image of how I wanted to present in the world, and worked with my lifestyle. I developed a few clothing guidelines to help direct my new relationship to clothes; a framework for changing clothes that I felt I could live with for the rest of my life. Now, every new garment project begins with three simple questions:
What do I need?
This question keeps me from over-consuming. It stops me from acquiring items of clothing that I do not need, and allows me to let go of clothing that I no longer wear.What do I want to wear?
This question keeps me in touch with the physical reality of wearing clothes: how I want clothes to fit; how I want them to feel on my body; how I want to look in my clothes; how I choose to present myself to the world.What do I want to make?
As a maker of clothing, this question helps me allocate resources, and choose my materials responsibly.
In this new regular column for Knitty, I’ll be choosing a pattern from Knitty’s back catalogue based on my personal clothing guidelines, changing the pattern to meet my own needs, and sharing the why and the how of my pattern modifications with Knitty’s gentle readers. Let’s begin.
What do I need?
Vest. Slipover. Tank top. Waistcoat. By any name, this simple sleeveless garment walks a beautiful line between clothing and accessory. While I’ve knit a few vests as gifts through the years, my own sweater collection is entirely devoid of this most versatile of garments. I thought a vest would be a great addition to my autumn/winter wardrobe, but I did need to test that theory. There is absolutely no point in committing precious time and materials to a garment that doesn’t integrate well into my existing wardrobe.
|
Save 15% off My Body Model Editor's note: My Body Model is folding as of December 15, 2022. Support the creator of this creative and clever solution and let her close her business with a bang. |
I began by sketching a few items clothing I already own and wear, to see if the proposed project played nicely with what I have on hand, as well as a few items I plan to make this season. For this task, I use a My Body Model croqui that’s based on my own measurements to create a 3x3 capsule collection.
Three tops. Three bottoms. Three layers. That’s the 3x3 capsule collection, in a nutshell. I’ve been using My Body Model, and 3x3 capsule collections for wardrobe planning for about a year now, and I absolutely love it. “Paper dolls for grownups” is actually a lot of fun, as well as a low tech, zero-impact way to test garment ideas on paper before committing time and materials to a project.
So my vest begins as a theoretical garment, sketched in a colour I know I have on hand, that is likely to tone with clothing currently in my wardrobe, and that I plan to make this season. I’ve envisioned it as a transitional garment, so have sketched my 3x3 collection to include some lighter-weight fabrics and colours from my late-summer wardrobe, as well as my autumn wardrobe’s heavier and darker-coloured clothing.
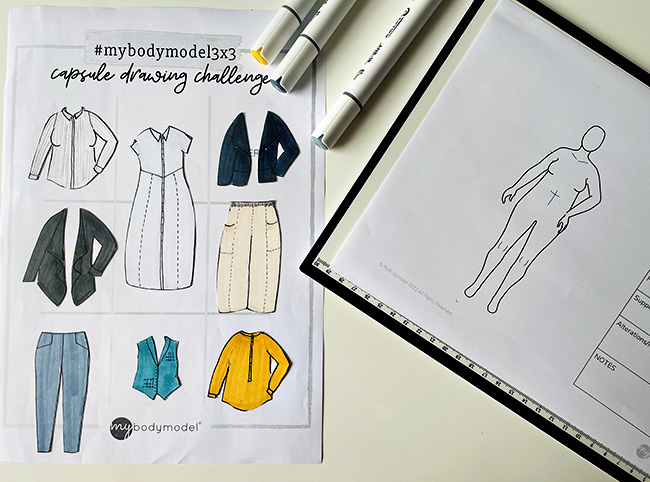
Paper dolls for grownups
The pale grey dress, cream trousers, and striped shirt are summer garments I currently own. The two jackets, likewise, are garments I typically wear in the autumn. My planned makes for the season include the Cornell shirt in mustard linen, and the Chandler trousers without pleats, in grey medium-weight linen.
Sketching just these seven items of clothing in a capsule collection, I can see that the eighth garment, a vest in medium teal colour, will not only work with what I own, and with the garments I plan to make, but it will also help me stylishly transition from summer to autumn.
What do I want to wear?
My choice for the vest pattern is Buttonbox, designed by Elizabeth McCarten. I’ve drawn my version of the proposed vest with points at the lower hem, and with the relaxed fit that I like wearing. My garment falls to my natural waistline as I am short through the torso and prefer this length for layering pieces. As most examples of knitted vests are worked straight across the bottom, I turned to woven examples to help determine the point size and positioning for my knitted vest. Fortunately, the success of Peaky Blinders has brought the flat cap and waistcoat look back into vogue.
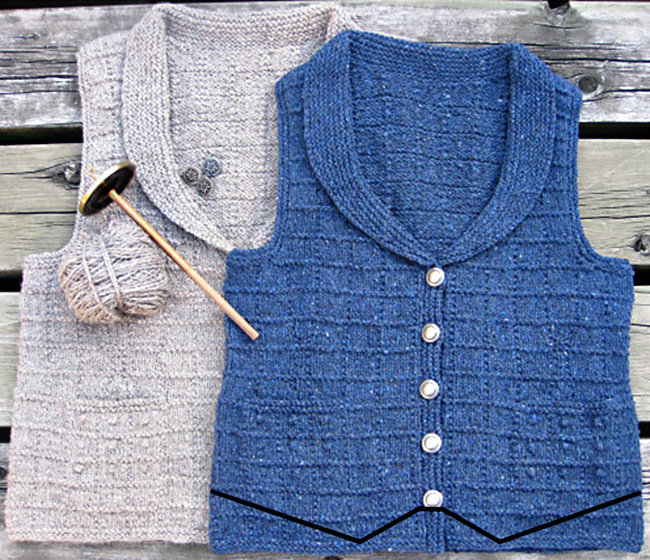
My point mods sketched atop the original flat-lay images of Buttonbox
Choosing a yarn
The original pattern was written for handspun yarn (2 ply, 11 wpi), with worsted-weight Shelter, by Brooklyn Tweed, given as a commercial alternative. Worsted weight’s closest UK cousin is DK weight, although serious yarn geeks will advise that these yarns are not precisely interchangeable. In practice, DK is a bit finer than true worsted weight. While I could order yarn for this garment, I have a lot of DK in my stash, and decide to knit using what I have on hand.
I chose Briar Rose Fibers “Glory Days”, 100% Bluefaced Leicester (discontinued) for its slightly relaxed hand after blocking, and 4-ply construction that provided outstanding stitch definition. I was happy with the fabric of my swatch, worked on 4.5mm needles, but the lighter-weight yarn and resulting change in gauge will require a bit of math.
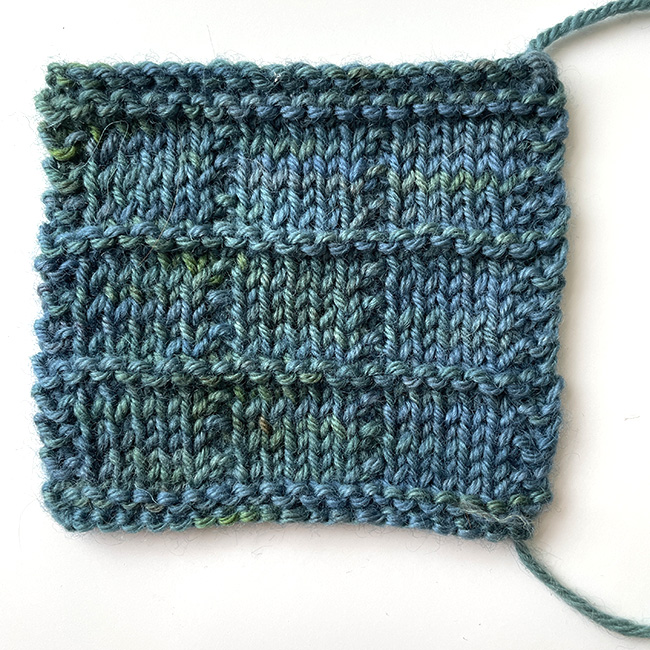
The swatch in Briar Rose Fibers Glory Days yarn
Accommodating the new gauge
Fortunately, original Buttonbox is a simple garment. The stitch pattern repeats regularly, and the lack of sleeves means there is nothing complicated about the math needed to adapt the pattern for a different gauge. My gauge swatch, along with the original dimensions of the garment provided everything I needed for my calculations. I first concentrated on the stitch gauge of my swatch, at 4.75 stitches per inch. That may not seem like much of a difference from the original garment’s 5 stitches per inch, but it will add up over the width of a garment. 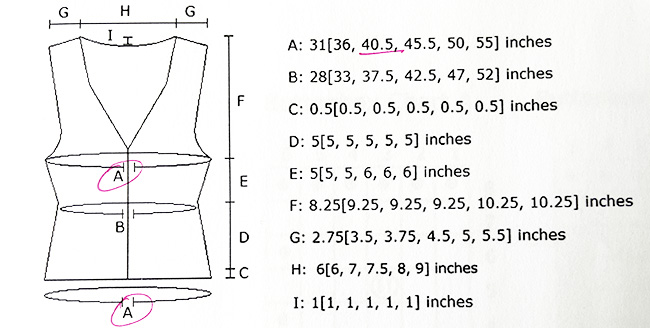
The original schematic for Buttonbox
Between sizes?
What if I wasn’t happy with the more relaxed fit, but the next size down is a bit too tight?
The difference between sizes in the original pattern is 12 stitches, or 2 full pattern repeats. If my desired fit fell somewhere between sizes, I’d need to remove full pattern repeats (6 stitches each) from the cast on number, then divide the number by 2 to get the front and back stitch counts, and divide the front stitch counts by 2, to get the count for the left and right fronts. This will mean moving the side-seam stitch markers by a few stitches, and then compensating for the missing stitches by changing the number of decreases at the underarm.The original schematic indicates the measurement at the cast on and the bust are the same, which meant I could use the number of stitches at the cast on for my calculation. I chose the size in the original pattern closest to my bust measurement, 40 inches, or size Large in the original pattern. The cast on number at this size is 203 stitches. To calculate the size of the garment at my gauge, I only needed to divide the number of stitches at the cast on (203) by my gauge (4.75 stitches per inch).
203 stitches / 4.75 stitches per inch = 42.75 inches at the cast on, and the bust.
This calculation means that, at my gauge, the vest will measure 2.25 inches larger than the original, giving it a bit more ease. This exactly the fit I was aiming for in my croquis sketches, and it also made the knitting very easy as I was able to use the stitch counts for size Large in the original pattern.
Happily, my row gauge is the same as the original pattern, so I don’t need to make any other changes, other than the length adjustments I’ve decided upon.
Designing the waistcoat points
To keep things as simple as possible, I decided to work the points as short rows, rather than increases, and designed the short rows to work within the given stitch pattern. My waistcoat points are two pattern repeats high. The angle is steeper closer to the midline of the body, while the lower hem gently transitions from the bottom of each point to within a few pattern repeats of the side seam markers on the vest. These changes to the front of the garment make the back of the vest two pattern repeats shorter than the original version.
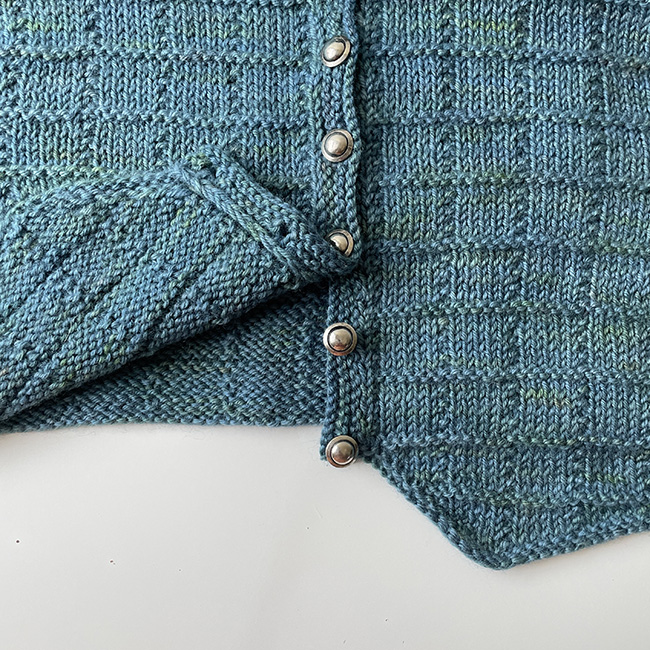
The back is two pattern repeats shorter than the front with the new points added at the bottom
At the smallest size, the points will continue past the side-seam marker for two pattern repeats, while at the largest size, the points will stop short of the side seam by three pattern repeats. All other sizes fall near the side seam to a greater or lesser degree. While it’s technically perfectly possible to calculate the short row lengths for every size to ensure the long edge of the point ends exactly at the side seam for each size, this one-chart-fits-all method is the simplest solution. And it really does work. The final row of the short row point sequence is worked across all stitches, which creates a gentle curve around body at the lower edge of the garment, across all sizes.
The rest of the garment
Following the points, I worked the rest of the garment very nearly as written. I omitted the pocket linings and openings due to changes in the length of the garment, and skipped knot stitch motifs on the back of the neck, as there were none on the front of the garment. After knitting the garment, I realised I would have had room for pockets after all, even with the shorter length. But I’m glad I left them off, as I don’t really want that extra bulk of pockets near my natural waist.
Something I didn’t notice until after the garment was complete was the location of the little hourglass-shaped decrease that forms the waist shaping. In the original pattern the decreases are centred on the pocket, which makes complete sense from a design perspective. Without the pockets, however, I might have shifted those decreases one pattern repeat closer to the centreline of the garment on both the back and fronts. This would have placed the decreases more inline with the shoulders of the garment. My instructions below include this subtle modification on the pocketless version of the waistcoat.

The hourglass decrease detail, and the collar before it was removed and replaced with a simpler neck treatment
Changes I made to the upper body of the garment were, likewise, minimal. I worked the underarm decreases every 2nd row, instead of every row as the pattern dictated. I also worked the decreases at the V-neck every 4th row, instead of every other row, for a more gradual slope to the neck.
I made minor changes to the button band and collar. I worked 7 buttonholes instead of five, as my buttons are a bit smaller than those used in the original. I worked the short row shawl collar without binding off the button band first, according to the new directions on designer, Elizabeth McCarthen’s blog. These instructions include a method for making the shawl collar a bit deeper, but I liked the vintage feel of the narrow collar, so chose to follow directions in the original pattern.
The verdict
The lack of sleeves made this a fast knit, and allowed me to easily do the gauge conversion. I loved nearly everything about the finished garment.
Something I didn’t anticipate, and that my fashion sketches didn’t alert me to, was the limitations inherent with the adorable shawl collar. While I love the look of the collar on the garment, it didn’t look quite right to me when styled with collared shirts and dresses. In fact, the original pattern images show the vest styled with a collar-less shirt, and a turtleneck.
Had I thought this through, I’d have realised that I have more shirts with collars than not, and that a vest with a shawl collar will not be as useful to me as a vest without. The choice is clear: Keep the collar and admire its loveliness in the sweater drawer, or remove the collar and actually wear the garment. For me, the entire point of making clothes is wearing them. The collar has to go.
Fortunately, ripping out the bind off and removing the collar only took about an hour, and since the garment had already been blocked, the band along the V-neck needed only a light steam and a bit of a poke to coax into place. I am sad to lose the vintage feel that the shawl collar brought to this piece, but removing it was the right decision.
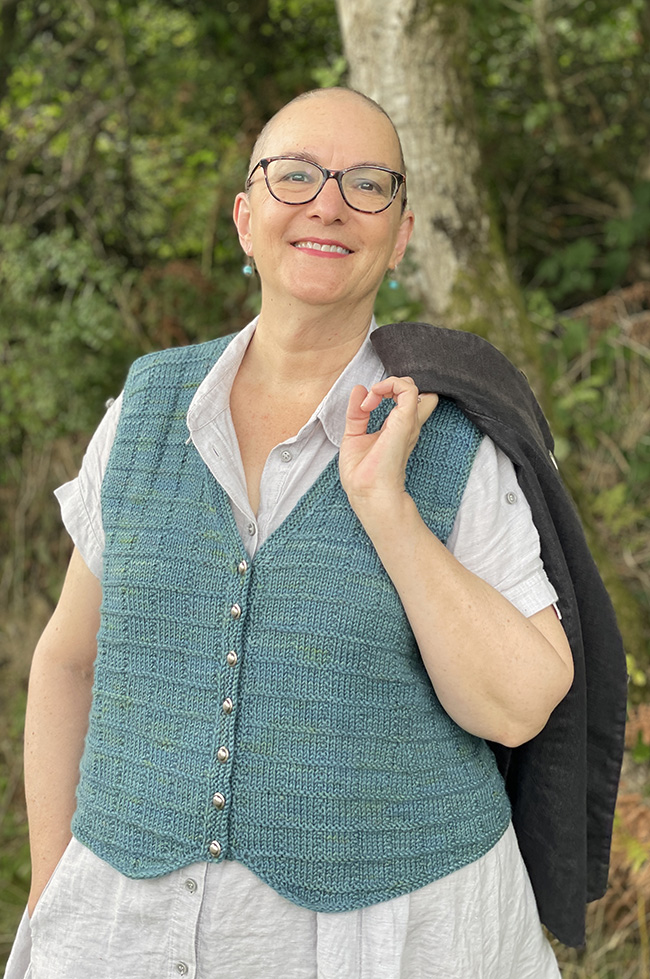
With the collar removed, the vest now works with many more items in my current wardrobe and, as you can see in the photoshoot, it now styles beautifully with most of the outfits exactly as I envisioned them in my 3x3 sketches. It really is the perfect blend of both garment and accessory. I know Buttonbox will become a much-worn layering piece in my wardrobe this winter.
![]()
Buttonbox with Waistcoat Points
See Buttonbox, Spring 2013, by Elizabeth McCarthen
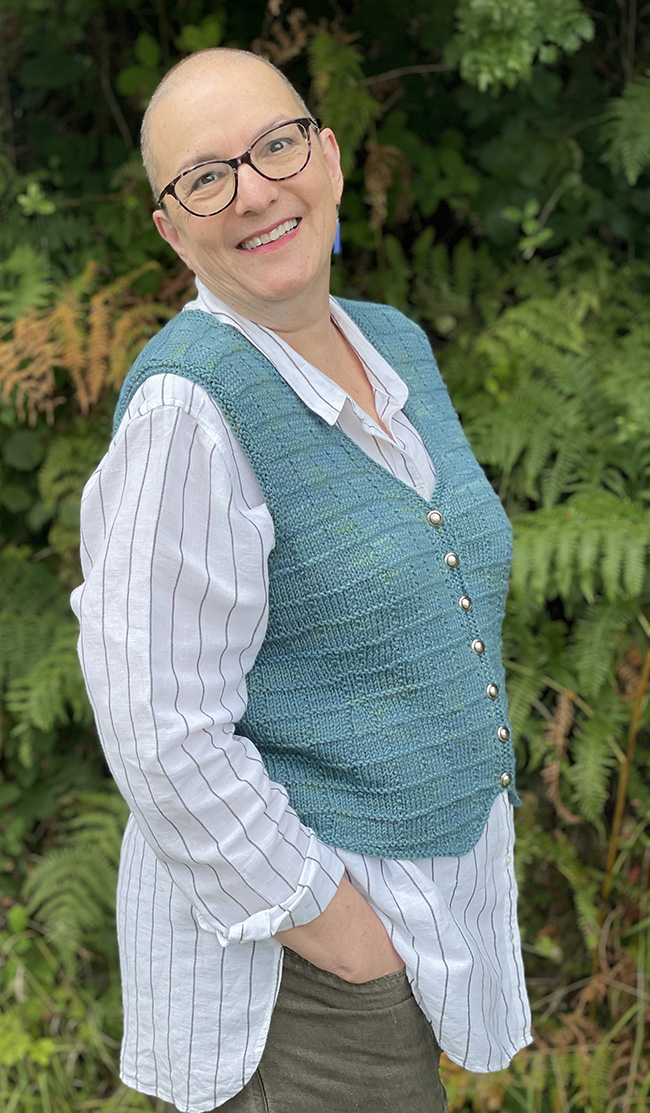
 model: Brenda Dayne
photos: Tonia Clarke
Pattern Notes
based on the changes in this articleCHARTS
Buttonbox Right Point
Row 1 (RS): K11, w&t.
Row 2: P1, w&t.
Row 3: K5, w&t.
Row 4: P1, k1, p4, w&t.
Row 5: K12, w&t.
Row 6: P1, [k1, p5] twice, w&t.
Row 7: K19, w&t.
Row 8: K20, w&t.
Row 9: K26, w&t.
Row 10: P1, k1, [p5, k1] 4 times, p1, w&t.
Row 11: K33, w&t.
Row 12: P1, k1, [p5, k1] 5 times, p2, w&t.
Row 13: K40, w&t.
Row 14: P1, k1, [p5, k1] 6 times, p3, w&t.
Buttonbox Left Point
Row 1 (WS): P1, w&t.
Row 2: K2, w&t.
Row 3: P4, k1, p3, w&t.
Row 4: K9, w&t.
Row 5: [P5, k1] twice, p3, w&t.
Row 6: K16, w&t.
Row 7: K22, w&t.
Row 8: K23, w&t.
Row 9: P1, k1, [p5, k1] 4 times, p3, w&t.
Row 10: K30, w&t.
Row 11: P2, [k1, p5] 5 times, k1, p3, w&t.
Row 12: K37, w&t.
Row 13: P3, [k1, p5] 6 times, k1, p3, w&t.
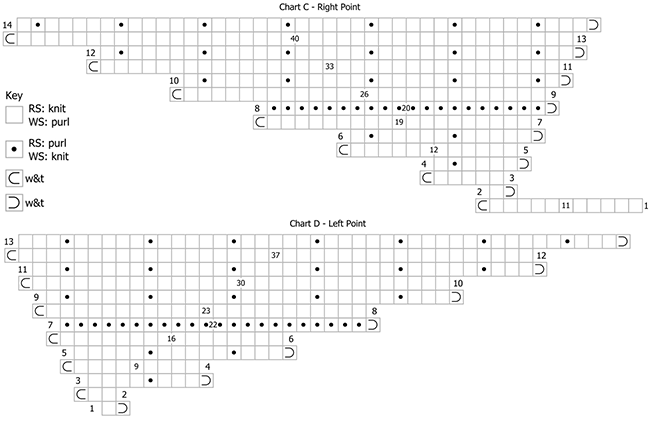
Note: The garter edging of the original Buttonbox pattern is worked first, followed by the waistcoat points, which are shaped with short rows and worked one by one.
If you wish to make the pockets, work the Pocket Linings as given.
Then, beginning with directions for the Lower Body, follow the original pattern for the CO. Work rows 1–3 as given.
Work Buttonbox Right Point from chart or written instructions above, working wrapped sts together with their wraps when you come to them, starting on the RS.
Next Row [RS]: K all stitches, working remaining wrapped sts together with their wraps when you come to them, to last 10 sts, w&t.
Then work Buttonbox Left Point from chart or written instructions, working wrapped sts together with their wraps when you come to them starting and ending on the WS.
Next row (Final row of points) [WS]: P2, k to last 2 sts, working remaining wrapped sts together with their wraps when you come to them, p2.
If Working Pockets
Begin working from the original Buttonbox pattern at “Begin pockets” section. Follow the remaining directions as written.
If Omitting Pockets
Begin working from the original Buttonbox pattern at “Begin pockets” section. Follow directions for stitch marker placement in Row 20 as written, as the markers are used to determine the location of Chart B decrease sections.
Replace “Insert pocket linings and beg waist shaping” row with this:
Beg waist shaping:
Work in patt to pocket marker, rm, work 1[1, 1, 1, 7, 7] sts in patt, work Row 1 of Chart B over next 5 sts, work in patt to pocket marker, rm, work in patt to side marker, sl side marker; work 18[24, 24, 30, 36, 36] sts in patt, work Row 1 of Chart B over next 5 sts; work in patt to 18[24, 24, 30, 36, 36] sts before side seam marker, work Row 1 of Chart B over next 5 sts; work to side marker, sl side marker;
Left Front: Work to pocket marker, rm, work 13[13, 13, 13, 16, 16] sts in patt, work Row 1 of Chart B over next 5 sts, work in patt to pocket marker, rm, work in patt to end. 147[171, 195, 219, 243, 267] sts; 8 sts decreased.
Follow all other directions as written.
ABOUT THE AUTHOR
 Brenda Dayne has never met a knitting pattern she hasn’t altered to suit her own particular tastes.
You can listen to her talk about knitting and making clothes in exhaustive detail in her podcast, Cast On. Brenda tells more stories and shares extra content at her Patreon.
Pattern & images © 2022 Brenda Dayne. Contact Brenda