


Palindrome, a free knitting pattern from Knitty.com.
INTRODUCTION
Palindrome
 by Michelle Porter

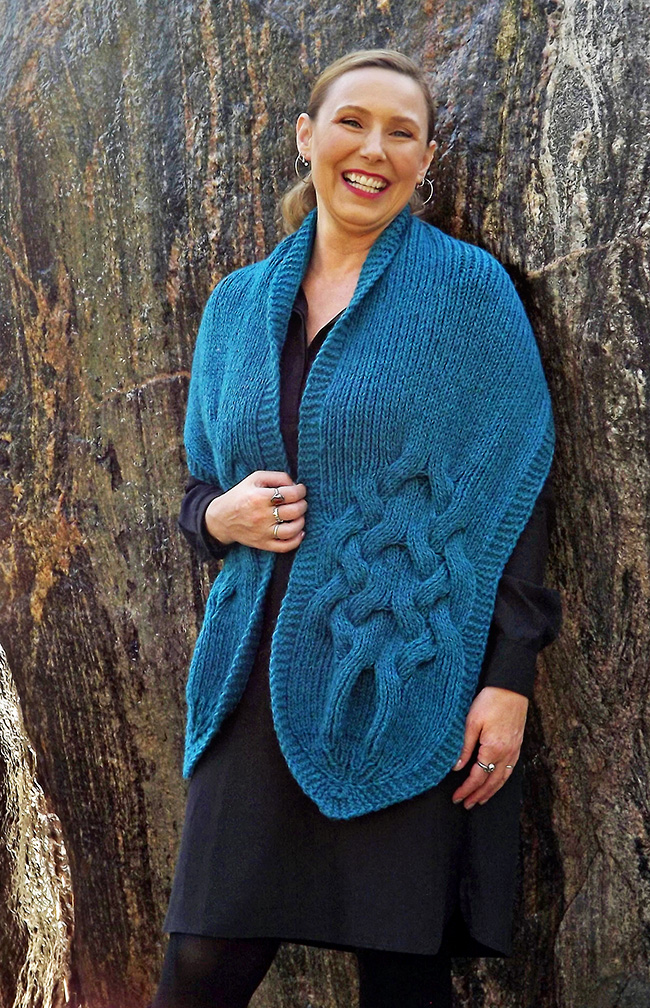
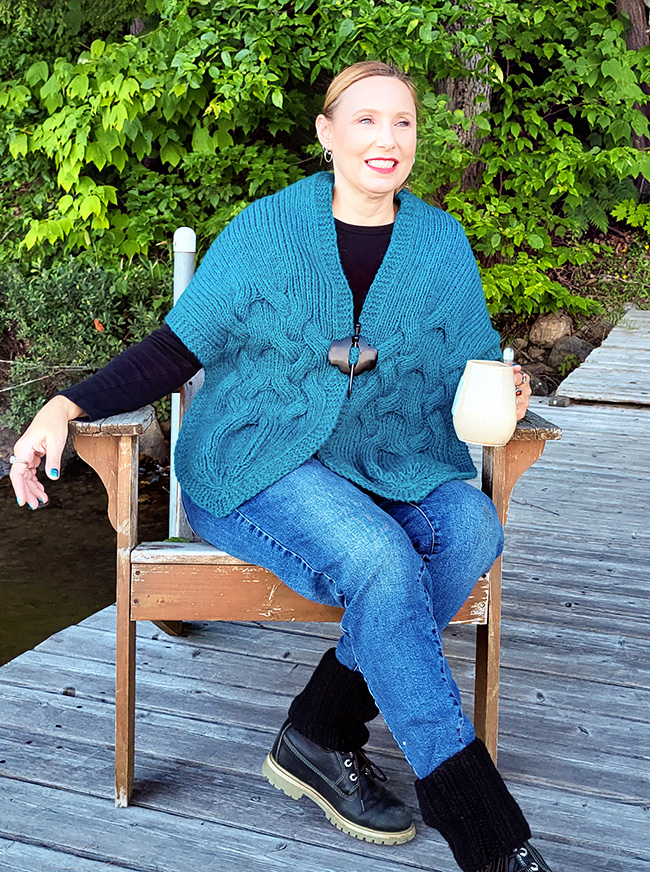
Whether you prefer the Wrap or the Collar, it's easy to add extra flair to your autumn wardrobe once the temperature drops.
Both pieces use the same design; you only have to choose how long to make the middle section.
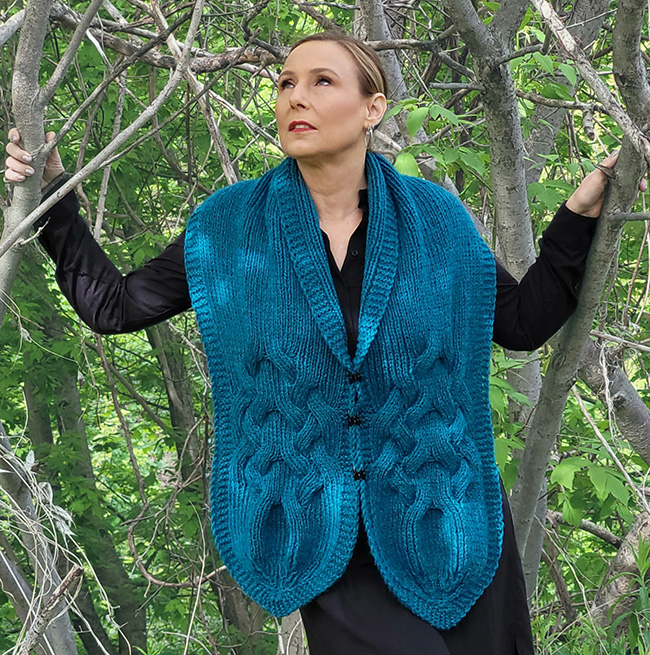
What makes this design unique is that it is completely reversible, not just right side/wrong side, but also left/right and top/bottom, thus "palindrome". Deeply textured cable motifs appear at the beginning and the end, cinching in the fullness of the fabric. Even though you are working in one direction and one piece, the techniques at each end will virtually mirror each other.
For a little fun, try my suggestions for alternate closures: a few hair clips can replace the look of buttons; or you can take advantage of the built-in buttonholes with a DIY "cufflink" double ended button.
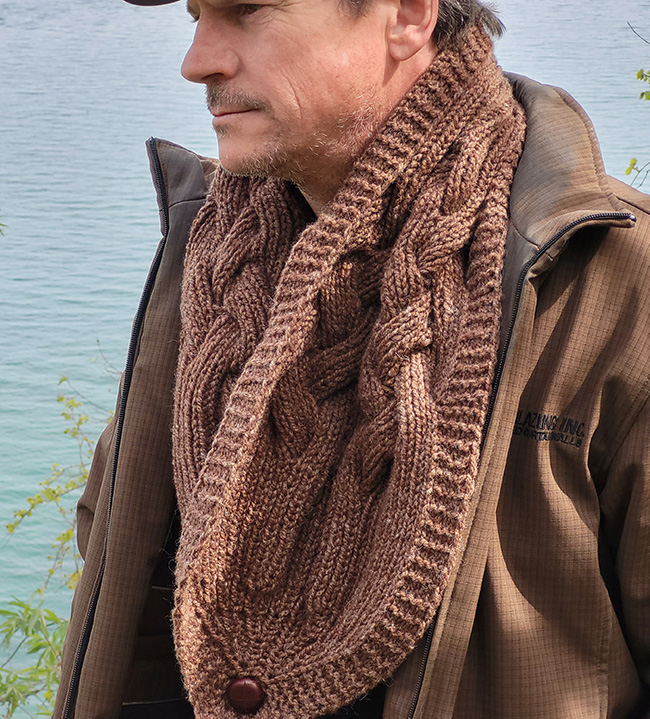
The bulkier yarn styles will work best for faster knitting and bold garments. Neutral colors are great, but why not choose your favorite bold color for a more uplifting statement piece?
 model + photos: Michelle Porter, Mark Jackson


SIZE
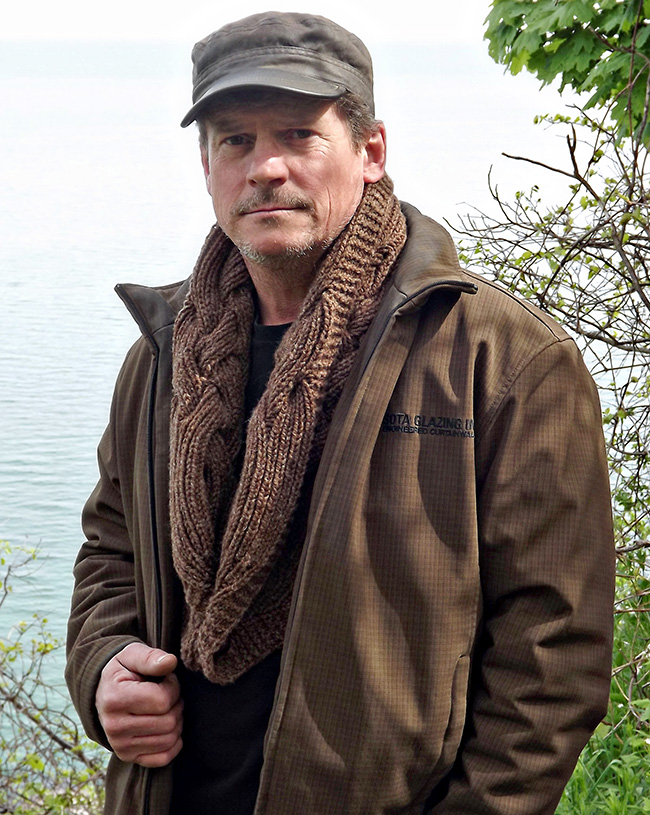
Wrap (shown above) or Collar (shown below)
FINISHED MEASUREMENTS
Width at center back/back neck: 17.5 inches/44.5 cm
Length - Wrap: 62 inches/157.5 cm
Length - Collar: 42 inches/106.5 cm
MATERIALS
Yarn
Wrap
![]() Cascade Yarns Eco+ [100% Peruvian Highland Wool; 478 yd/437 m per 8.75 oz/250 g skein]; color: Pacific 2433; 2 skeins; approx: 660 yd/600 m required
Cascade Yarns Eco+ [100% Peruvian Highland Wool; 478 yd/437 m per 8.75 oz/250 g skein]; color: Pacific 2433; 2 skeins; approx: 660 yd/600 m required
Yarn Characteristics
![]() Both yarns used are toothy, rustic, non-superwash wool or wool blend. These yarns have a 2-ply construction and knit up to a thick aran/chunky (light bulky) gauge. Solid, heather or tonal colors will best show off the highly textured cables. Look for yarns with elasticity to hold their shape in rib pattern.
Both yarns used are toothy, rustic, non-superwash wool or wool blend. These yarns have a 2-ply construction and knit up to a thick aran/chunky (light bulky) gauge. Solid, heather or tonal colors will best show off the highly textured cables. Look for yarns with elasticity to hold their shape in rib pattern.
Recommended needle size
[always use a needle size that gives you the gauge listed below - every knitter's gauge is unique]
![]() US #10/6mm needles for working flat
US #10/6mm needles for working flat
Notions
![]() 2 locking stitch markers, 2 other markers
2 locking stitch markers, 2 other markers
![]() 1 small stitch holder
1 small stitch holder
![]() waste yarn, approx: 1 yd/1 m, smooth and easy to remove in a similar thickness
waste yarn, approx: 1 yd/1 m, smooth and easy to remove in a similar thickness
![]() optional: 2 buttons with shank, 1 inch/2.5 cm diameter
optional: 2 buttons with shank, 1 inch/2.5 cm diameter
![]() cable needle
cable needle
![]() yarn needle
yarn needle
GAUGE
17 sts/20 rows = 4 inches/10 cm in 1 x 1 Rib stitch
74 sts/50 rows in Cable pattern motif A or B, measures 10.5 inches/26.5 cm wide and 9 inches/23 cm long
PATTERN NOTES
[Knitty's list of standard abbreviations and techniques can be found here.]
Even though the garment is completely reversible, a right side and wrong side are identified in instructions for the convenience of following the pattern.
For ease in working the borders, it is recommended to place a stitch marker after the first 5 sts and before the last 5 sts, on Row 1 of "Point increases". Slip stitch markers along throughout pattern until end of Row 16 of "Point decreases", then remove markers.
Join new yarn inside the 5 sts border, before or after the rib.
To ensure you have enough yarn to finish, be mindful of the halfway point of the length. Once you have used slightly less than half your yarn, place a removable marker to indicate the center of the garment. Take note of how many rows you have worked since finishing Cable Motif A. Regardless of the measurements given in instructions, you should not work more rows than the same amount to reach center, before beginning Cable Motif B.
This project uses a provisional cast on. Use your preferred provisional cast on technique; directions for various techniques may be found here (photo tutorial) and here (video tutorial).
Instructions for grafting can be found here (photo tutorial) and here (video tutorial).
Sl1p-wyif: Slip 1 st purlwise with yarn held in front.
SK2P: Slip 1 st knitwise to right needle; knit the next 2 sts together; on the right needle, pass the slipped stitch over (the stitch from knit 2 together). 2 sts decreased.
8/8 LrC (Left rib Cross): Slip next 8 sts to cable needle and hold at front of work, (k1, p1) 4 times from left needle; (k1, p1) 4 times from cable needle.
8/8 RrC (Right rib Cross): Slip next 8 sts to cable needle and hold at back of work, (k1, p1) 4 times from left needle; (k1, p1) 4 times from cable needle.
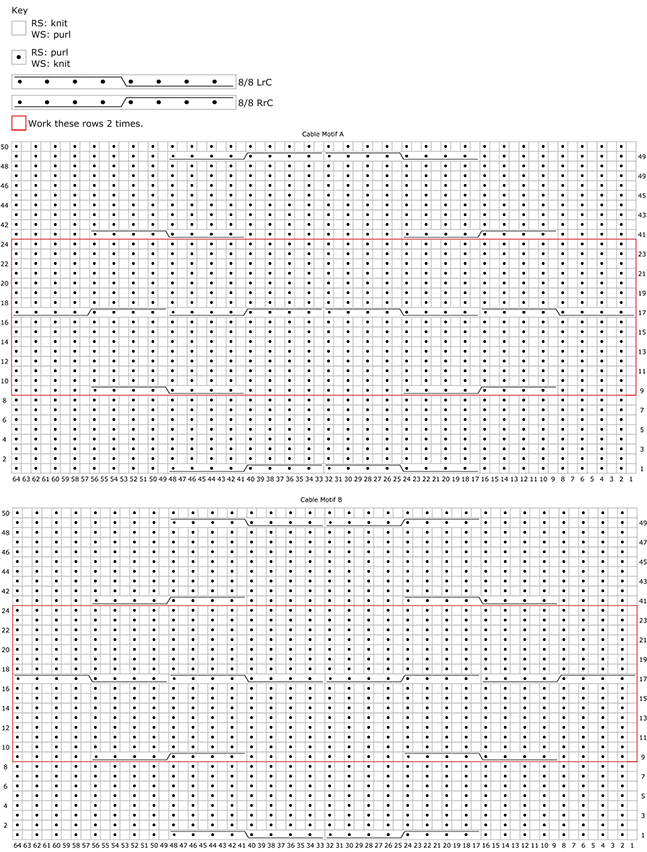
CHARTS
CABLE MOTIF A
Work from written or charted instructions as you prefer.
Row 1 [RS]: (K1, p1) 8 times, 8/8 LrC, 8/8 RrC, (k1, p1) 8 times.
Rows 2 [WS]: [K1, p1] across.
Rows 3-8: Rep Row 2.
Row 9: (K1, p1) 4 times, 8/8 RrC, (k1, p1) 8 times, 8/8 LrC, (k1, p1) 4 times.
Rows 10-16: Rep Row 2.
Row 17: 8/8 LrC, 8/8 LrC, 8/8 RrC, 8/8 RrC.
Rows 18-24: Rep Row 2.
Rows 25-40: Work Rows 9-24 once more.
Rows 41-48: Work Rows 9-16 again.
Row 49: (K1, p1) 8 times, 8/8 LrC, 8/8 RrC, (k1, p1) 8 times.
Row 50: Rep Row 2.
CABLE MOTIF B
Work from written or charted instructions as you prefer.
Row 1 [RS]: (K1, p1) 8 times, 8/8 RrC, 8/8 LrC, (k1, p1) 8 times.
Row 2 [WS]: [K1, p1] across.
Rows 3-8: Rep Row 2.
Row 9: (K1, p1) 4 times, 8/8 LrC, (k1, p1) 8 times, 8/8 RrC, (k1, p1) 4 times.
Rows 10-16: Rep Row 2.
Row 17: 8/8 RrC, 8/8 RrC, 8/8 LrC, 8/8 LrC.
Rows 18-24: Rep Row 2.
Rows 25-40: Work Rows 9-24 once more.
Rows 41-48: Work Rows 9-16 again.
Row 49: (K1, p1) 8 times, 8/8 RrC, 8/8 LrC, (k1, p1) 8 times.
Row 50: Rep Row 2.
DIRECTIONS
BOTH VERSIONS
Looped tab:
With waste yarn use a provisional method to cast on 7 sts.
Join working yarn.
Row 1 [RS]: Knit.
Row 2 [WS]: K2tog, k to end. 6 sts.
Rows 3-10: Knit 8 rows.
Row 11, join loop [RS]: Sl1p-wyif, k5, remove waste yarn from provisional cast on end and place the resulting 6 live sts onto left needle, then continue to knit to end. 12 sts.
Row 12: Sl1p-wyif, k to end.
Point increases:
Row 1 [RS]: Sl1p-wyif, k4, kfb twice, k5. 14 sts.
Row 2 [WS]: Sl1p-wyif, k to end.
Row 3: Sl1p-wyif, k4, ([k1, yo, k1] in next st, p1) twice, k5. 18 sts.
Rows 4-6: Sl1p-wyif, k4, (k1, p1) 4 times, k5.
Row 7: Sl1p-wyif, k4, ([k1, yo, k1] in next st, p1) 4 times, k5. 26 sts.
Rows 8-10: Sl1p-wyif, k4, (k1, p1) 8 times, k5.
Row 11: Sl1p-wyif, k4, ([k1, yo, k1] in next st, p1) 8 times, k5. 42 sts.
Rows 12-14: Sl1p-wyif, k4, (k1, p1) 16 times, k5.
Row 15: Sl1p-wyif, k4, ([k1, yo, k1] in next st, p1) 16 times, k5. 74 sts.
Rows 16-32: Sl1p-wyif, k4, *k1, p1; rep from * to last 5 sts, k5.
Cable Motif:
Next row: Sl1p-wyif, k4, work Cable Motif A to last 5 sts, k5.
Following row: Sl1p-wyif, k4, work Cable Motif A to last 5 sts, k5.
Work as set until all 50 rows of Cable Motif are complete.
Place a locking stitch marker at end of last row.
Wrap Version ONLY:
Next row: Sl1p-wyif, k4, *k1, p1; rep from * to last 5 sts, k5.
Repeat last row until piece measures approximately 29 inches/73.5 cm from locking stitch marker, ending with a WS row.
Collar Version ONLY:
Next row: Sl1p-wyif, k4, *k1, p1; rep from * to last 5 sts, k5.
Repeat last row until piece measures approximately 9 inches/23 cm from locking stitch marker, ending with a WS row.
Both Versions, Continue:
Cable Motif
Next row: Sl1p-wyif, k4, work Cable Motif B to last 5 sts, k5.
Following row: Sl1p-wyif, k4, work Cable Motif B to last 5 sts, k5.
Work as set until all 50 rows of Cable Motif are complete.
Next 16 rows: Sl1p-wyif, k4, *k1, p1; rep from * to last 5 sts, k5.
Point decreases:
Row 1 [RS]: Sl1p-wyif, k4, (SK2P, p1) 16 times, k5. 42 sts.
Rows 2-4 [WS]: Sl1p-wyif, k4, (k1, p1) 16 times, k5.
Row 5: Sl1p-wyif, k4, (SK2P, p1) 8 times, k5. 26 sts.
Rows 6-8: Sl1p-wyif, k4, (k1, p1) 8 times, k5.
Row 9: Sl1p-wyif, k4, (SK2P, p1) 4 times, k5. 18 sts.
Rows 10-12: Sl1p-wyif, k4, (k1, p1) 4 times, k5.
Row 13: Sl1p-wyif, k4, (Sk2P, p1) twice, k5. 14 sts.
Row 14: Sl1p-wyif, k4, (k1, p1) twice, k5.
Row 15: Sl1p-wyif, k4, k2tog twice, k5. 12 sts.
Row 16: Sl1p-wyif, k to end.
Looped tab
First row [RS]: Sl1p-wyif, k to end.
Next row, separate loop [WS]: K6 sts, turn; place remaining 6 sts on stitch holder.
Knit 6 rows.
Working yarn is at inner edge of tab. Cut yarn leaving a 12 inch/30.5 cm long strand.
With RS facing, fold the 6 sts of tab around to make a loop.
Return the 6 held sts to a needle.
To close, you have a choice. The sample was closed by grafting the two sets of the stitches together.
OR, if you prefer, turn both needles so that WS is facing, and work a three-needle bind off. This will look slightly different than the sample, but on a small stitch count it's less noticeable.
FINISHING
Weave in yarn ends. Soak piece in lukewarm water and then roll in a towel to squeeze most of the moisture out. Lay flat to dry, spreading the cables and ribbed stitches so that all stitches are visible.
Closures
To make "cufflink" double ended button: With yarn, sew the two buttons to each other through the shank. Use this to join the two points through the holes at the center of the looped tabs.
Both the Wrap and the Collar present a perfect opportunity to show off your best knitwear jewelry of shawl pins and sticks, however, other ideas include: hair clips or barrettes, brooches or large lapel pins, large stud earrings with safety backs or tie tacks. Place these instead of buttons, joining the inside edges together.
ABOUT THE DESIGNER
 Having grown up knitting alongside her grandmother on Canada's east coast, it was a natural progression that Michelle Porter would make a career in the yarn industry. After moving to Toronto over 28 years ago, she has had the opportunity to own a yarn store, work in yarn warehouses and design hundreds of patterns for both yarn companies and her personal line of patterns: Fondle Patterns.
Michelle's clutter free and straightforward design aesthetic has been followed throughout her design collections.
See more of Michelle's work on her Ravelry designer page or check her out on Instagram.
Pattern & images © 2022 Michelle Porter