





How to Get Hooked: Information and instructions for knitters who want to learn how to crochet
INTRODUCTION
How to Get Hooked
by Julia Madill
As the new crochet columnist for Knitty, I want you to know I get it. This is KNIT-ty, not CROCHET-y! In this column, I aim to share some fun crochet tips and techniques, knowing I am primarily speaking to the unconverted: knitters. Fear not, my stick-wielding friends! I am one of you! As someone who learned to knit first, crochet second, I hope to guide you down the same path and, hopefully, remove some stumbling blocks along the way.
Crochet Borders for Knitting
Adding a border can give your knitting that little je ne sais quoi. Unfortunately, adding a finishing touch to the edge of your knitting can sometimes be finicky. After-the-fact borders usually require picking up stitches, which a lot of knitters have, um, strong feelings about. Here’s where choosing a hook over a needle may be your salvation. When you crochet a border, you will “pick up” (not a term used in crochet, but the concept is similar) along your work AND create a finished stitch all at the same time.
Before you begin
It may be obvious, but knit stitches and crochet stitches are not created equal. Crochet stitches are generally larger than knit stitches, even when using the same yarn and equivalent hook and needle sizes. This means you cannot work one crochet stitch into every knit stitch along an edge and expect good results.
How do we solve this? Two options:
- Work fewer crochet stitches than knit stitches. If we compare single crochet fabric to stockinette, the stitch ratio is approximately 3:4 to 3:5. This means you will need to work 3 single crochet stitches into every 4 to 5 knit stitches. When working along the side of stockinette rows, the ratio is approximately 2:3, or 2 single crochet stitches to 3 stockinette rows. For garter stitch, the ratio is more like 1:2, or 1 crochet stitch to 2 garter rows.
Hate counting? If the single crochet border will be your final edge, you can take some liberties and wing it, knowing you will need to work fewer crochet stitches overall. As you are making one finished stitch at a time, it is easy to make adjustments as you work.
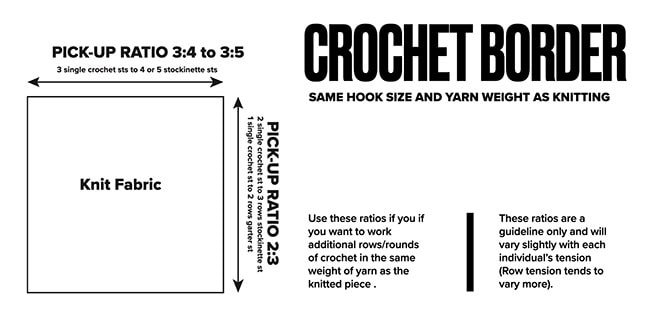
Use this approximate ratio for working crochet stitches evenly into knit fabric.
- Use a finer-weight yarn and smaller crochet hook. You CAN work one crochet stitch to each knit stitch if you adjust your yarn and hook size to be finer/smaller than what you used for the knitting. This may take a little trial and error, but I’ve put together an equivalency guide based on average gauges for different yarn weights. Use a hook size appropriate to the crochet yarn weight you choose.
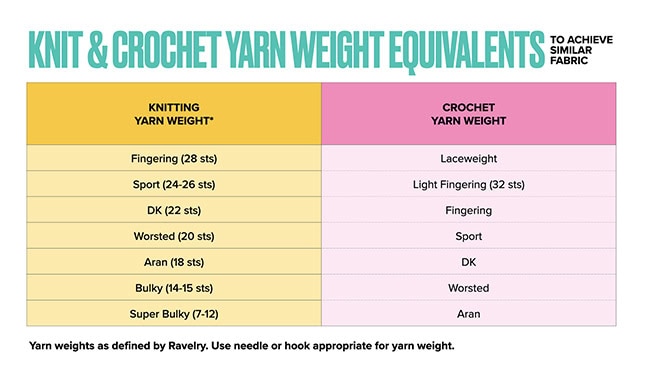
To work crochet stitches into knit stitches at a 1:1 ratio, you will need to use a finer weight yarn. This rough guide will get you started.
Need a refresher on how to work the single crochet stitch? Here’s a quick demo (see above).
SINGLE CROCHET BORDER ON A KNIT EDGE
If you are to learn ONE crochet border technique, this is it. A single crochet edge works as a simple decorative border on its own, or serves as a base for more complex decorative edges.
Photos below demonstrate working a complete round of single crochet into a stockinette fabric. Where exactly you insert your hook to make each stitch is not strictly important, but consistency is key for a nice, even border.
WORKED ACROSS A BIND-OFF EDGE
With Right side (RS) of knitting facing:
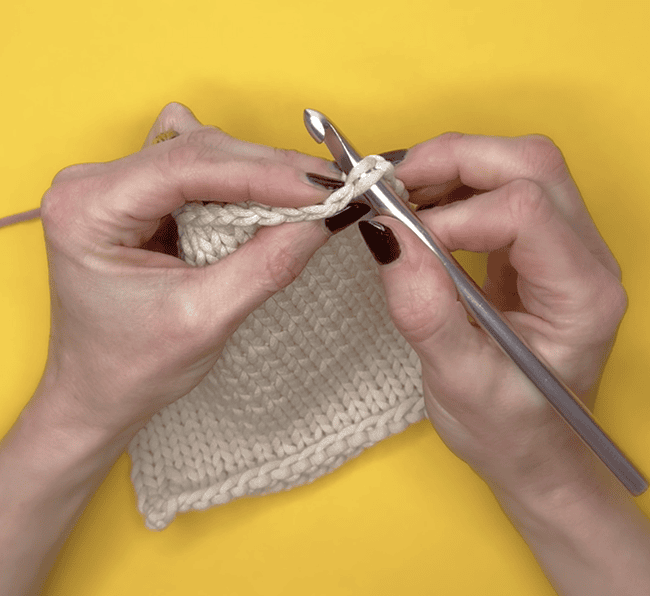
1. Insert hook from right side to wrong side (front to back) through the first two loops of the first bound-off stitch.
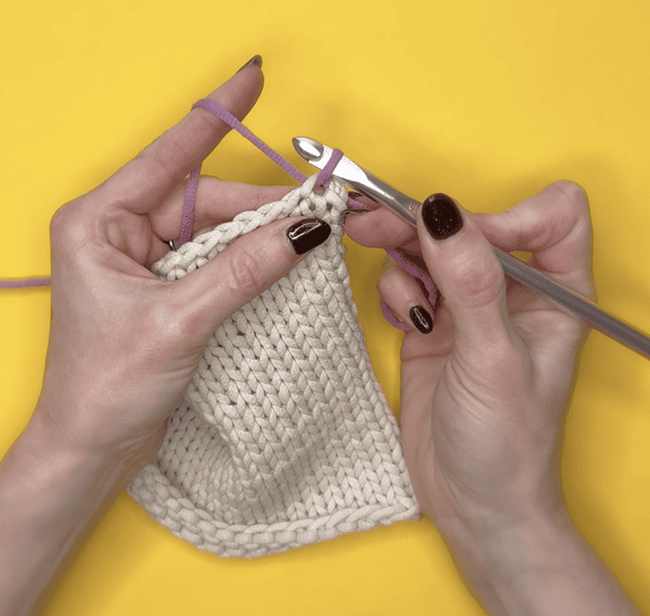
2. Pull through a loop of yarn
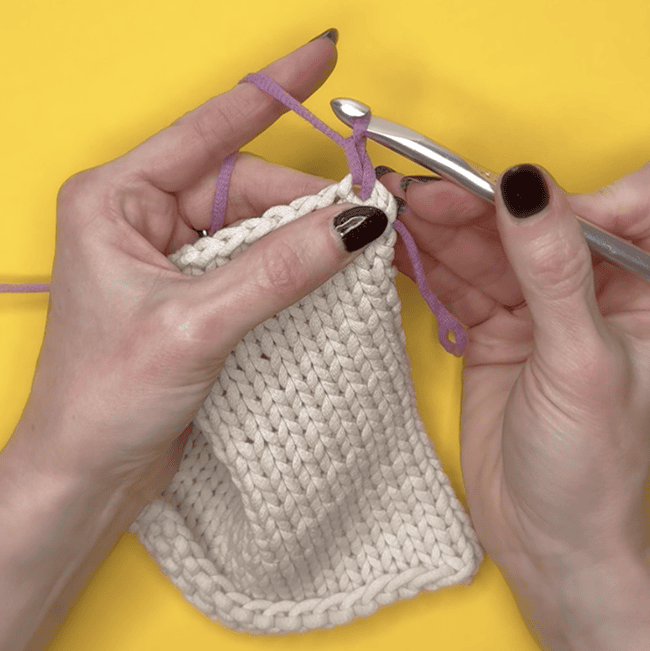
3. Yarn over hook (yoh or yo) and draw a loop through the loop on hook. This does not count as a stitch.
Note: Steps 2 and 3 shown above are commonly referenced as “join yarn with slip stitch” in crochet patterns.
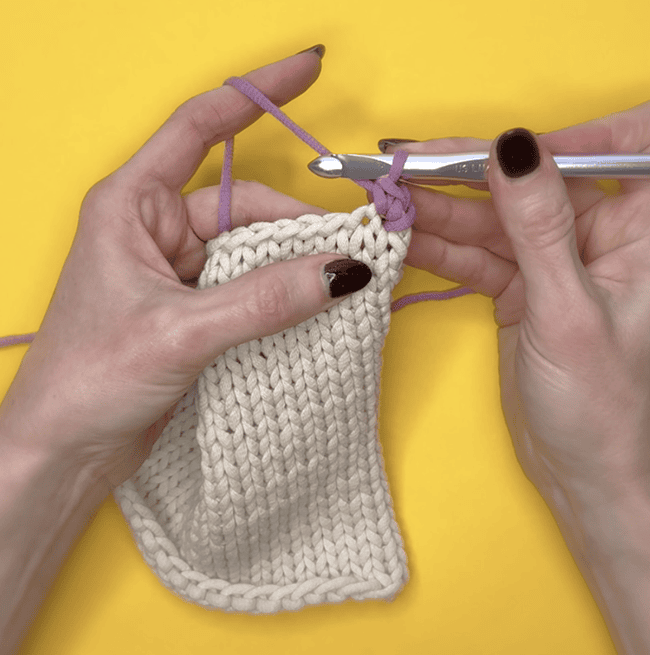
4. Single crochet (sc) in same space you just joined your yarn.
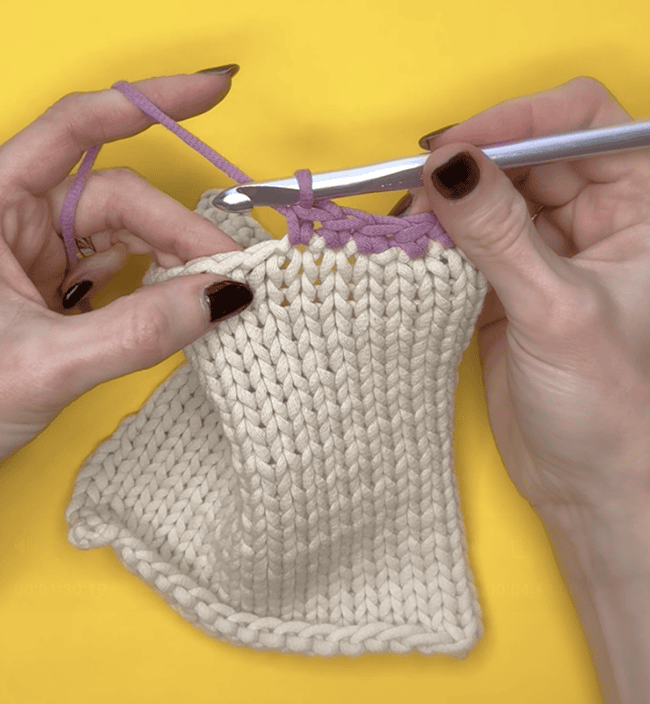
5. Single crochet across your edge, skipping every 4th or 5th bound off stitch.
Alternate method: If you do not like the appearance of a skipped stitch, work a single crochet two together (sc2tog) over every 3rd and 4th (or 4th and 5th) bound off stitch.
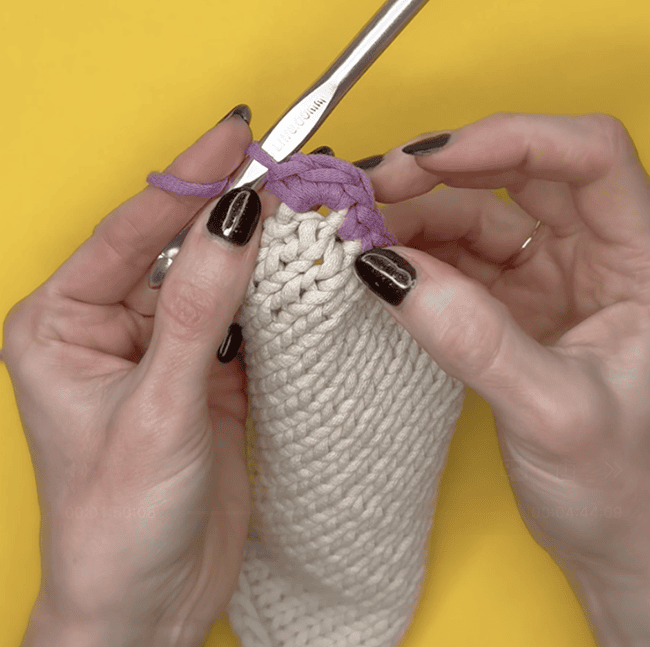
6. If working around a corner, 3 sc in the last stitch before rotating to work along the next edge.
WORKED ACROSS A SIDE EDGE
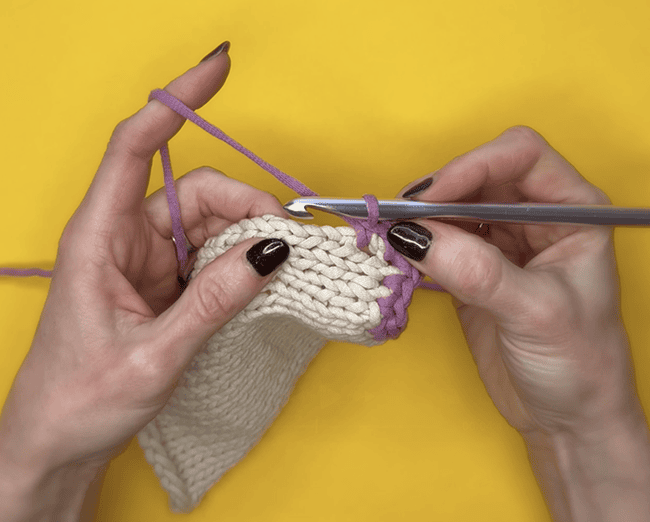
7. Work sc along side edge, inserting hook between last 2 columns of stitches and skipping every 3rd row. Use the “bars” between stitches as a guide for counting rows.
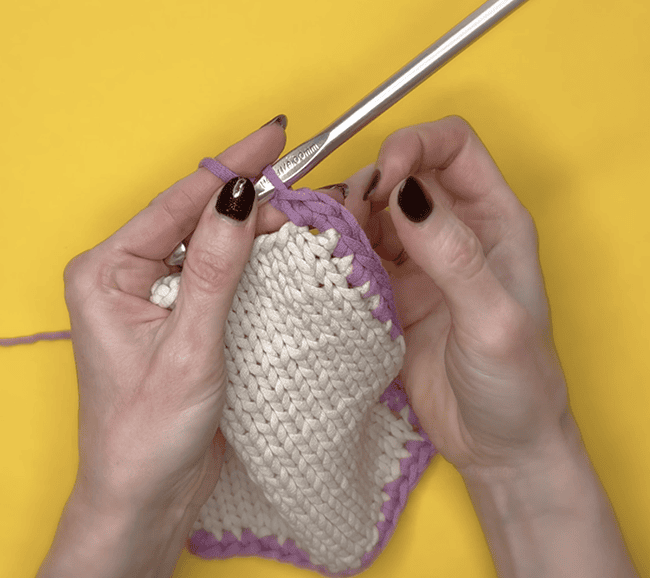
8. If working around a corner, 3 sc in the last space before rotating to work along the next edge.
WORKED ACROSS A CAST-ON EDGE
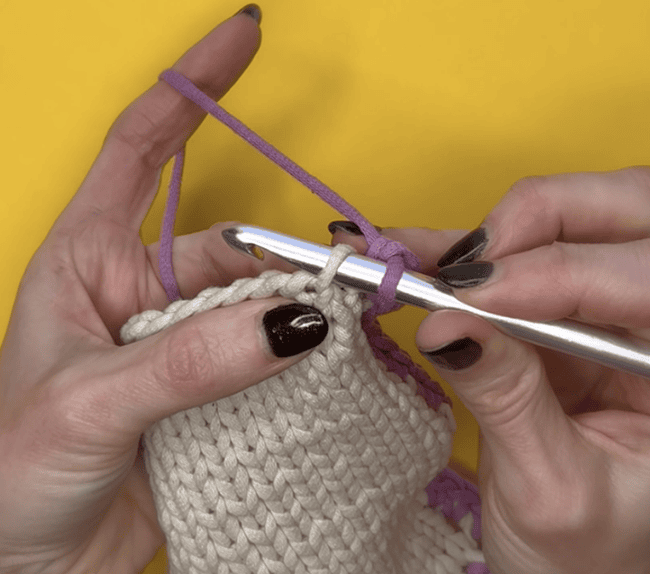
9. Single crochet across, skipping every 4th or 5th cast-on stitch. Where you insert your hook will vary depending on the cast-on method used. The long tail cast-on is shown in photos.
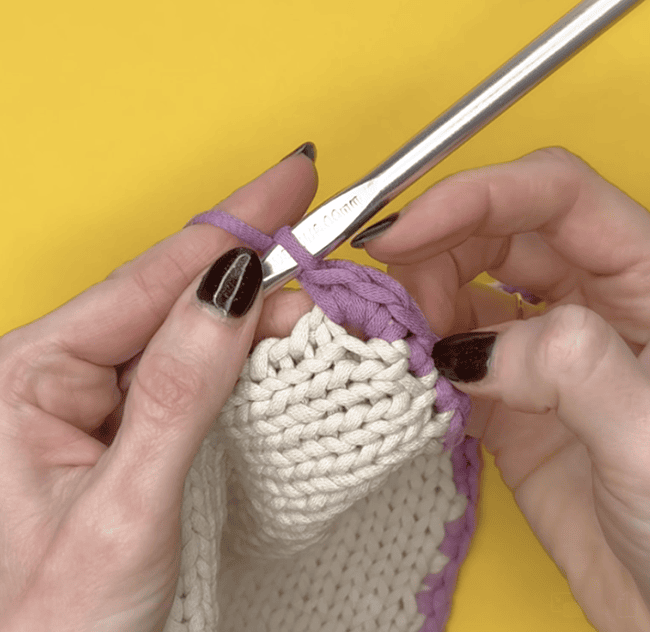
10. Work 3 sc in the last st if working around a corner.
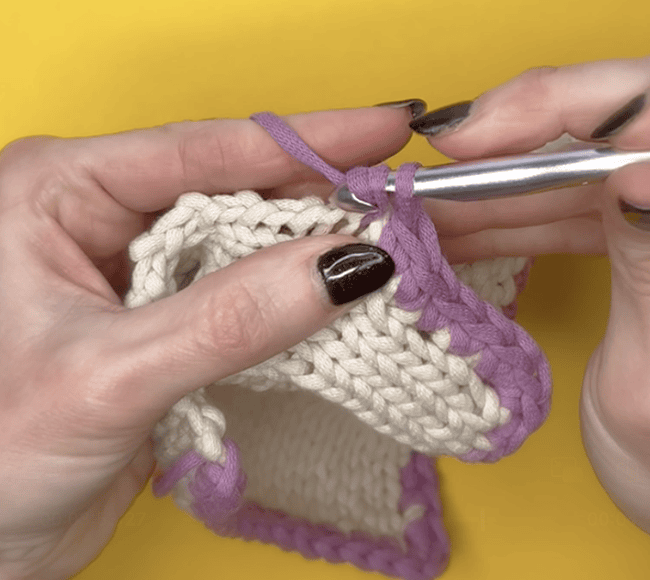
11. Work sc along side edge, inserting hook between last 2 columns of stitches and skipping every 3rd row.
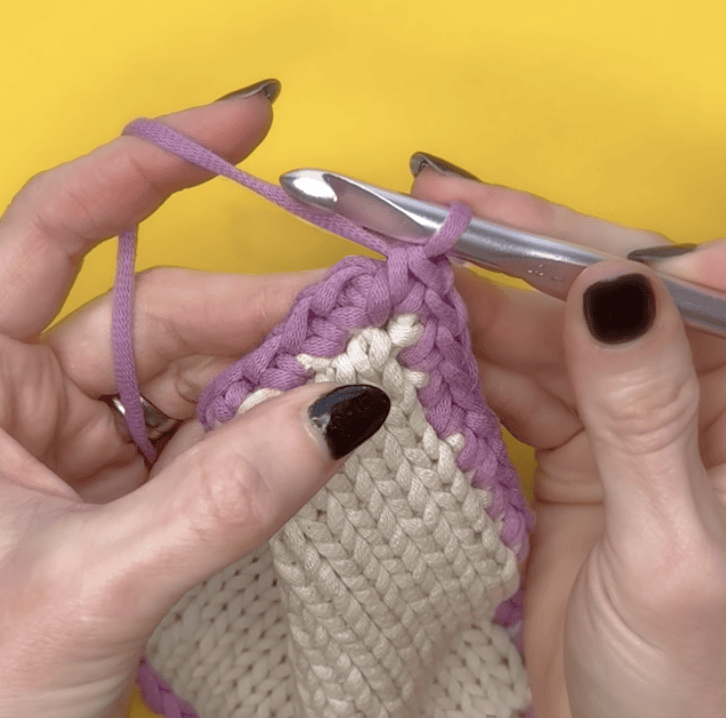
12. Work 2 sc in same space as first sc (together with first stitch of round they create the 3-stitch corner.
JOINING THE ROUND
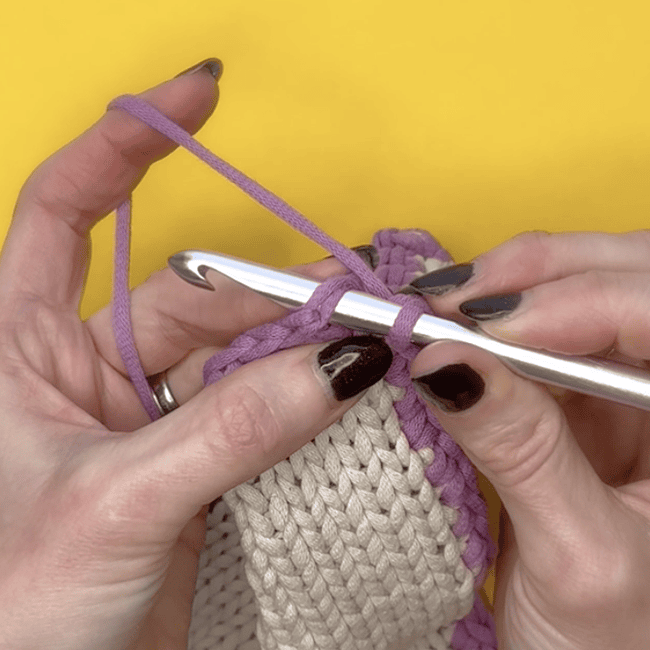
13. Join with a sl st to the first sc.
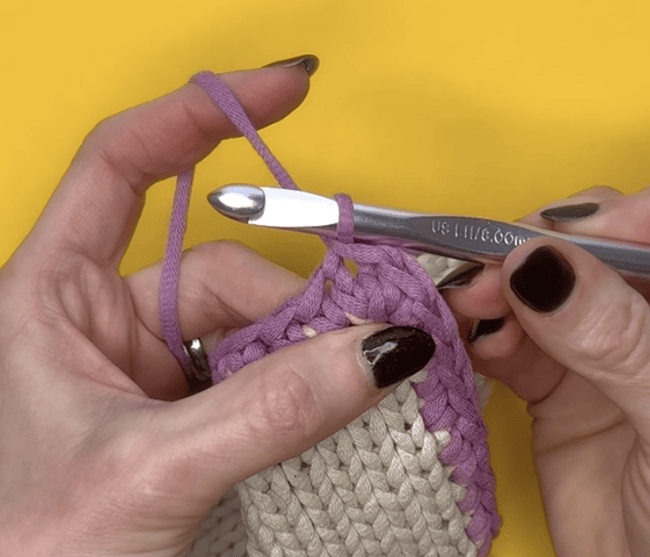
14. Fasten off by cutting the yarn, yarning over the hook and drawing the tail through the loop on hook.
REVERSE SINGLE CROCHET BORDER
Want to take your crochet border to the next level with minimal effort? Reverse single crochet (aka “crab stitch”) is simply single crochet worked left-to-right instead of right-to-left (switch those directions if you crochet left-handed!). This simple difference results in a beautiful twisted cord-like edge. It also results in a final edge, as you cannot work another row into the twisted stitches. This border looks best when worked into a foundation row of single crochet rather than directly into knit fabric.
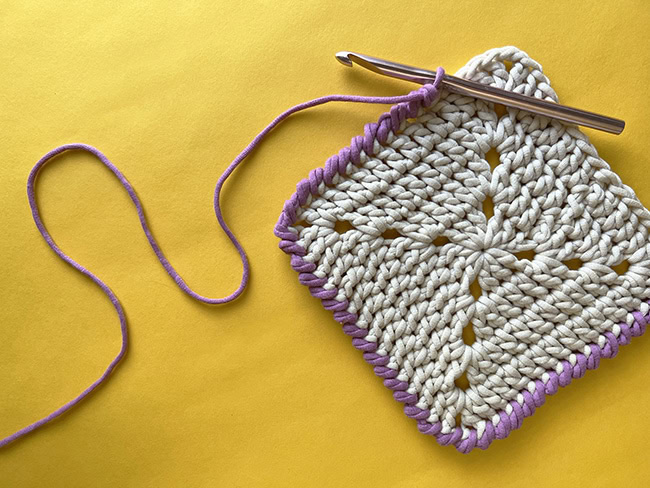
Here we see a contrast reverse single crochet border worked on a double crochet square.
- Join yarn with a slip stitch to the left edge of your piece (see steps 2 & 3 of single crochet border above). If working in the round, yarn can be joined anywhere though I typically choose a corner.
- Working left-to-right instead of right-to-left as usual (reverse if crocheting left-handed), single crochet in each stitch to end of the row or round. If working around a corner, working 1 stitch in each stitch will produce a softly rounded corner. For a sharper corner, work 2 or 3 stitches in the same corner stitch. If worked in the round, finish by joining with a slip stitch to the first reverse sc of the round.
This video shows reverse single crochet worked into a double crochet square, but the technique is the same when working into a foundation row of single crochet on knitting.
FAUX I-CORD BORDER
Love the look of an applied i-cord but hate the application? This look-a-like border might be your answer. This technique works best in the round, but similar results can be achieved in rows if each row is worked right-to-left (or left-to-right for lefties), with the right side always facing, fastening off at the end of each row.
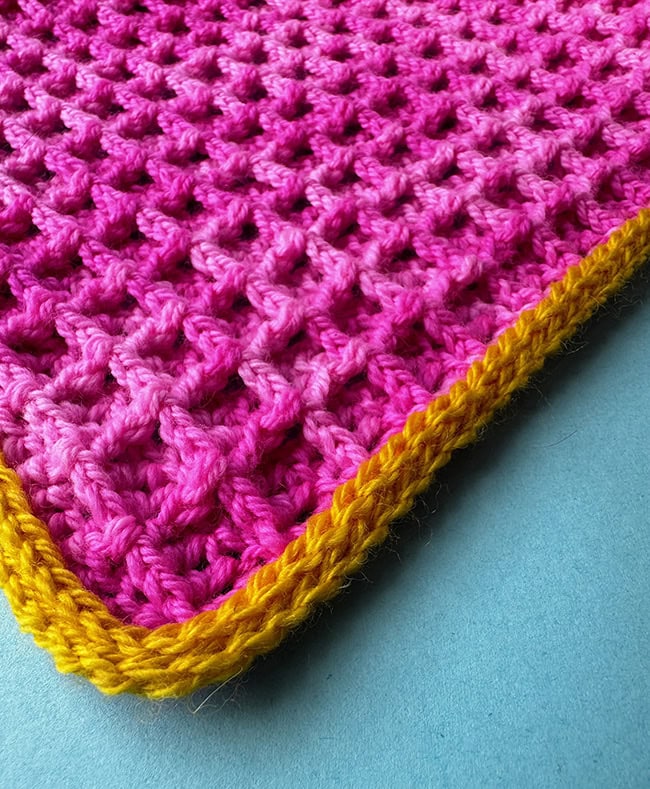
I used the faux i-cord border for my Awfully Waffly Cowl in Knitty Issue 93 with great results!
Before you begin, you may want to familiarize yourself with the stitches used in this border, which are somewhat uncommon:
Yoslst (Yarn over slip stitch): Yo and insert hook into indicated stitch, yo and draw through all loops on hook
Sl st-tlo: (Slip Stitch in Third loop only): Work a slip stitch into the third loop only. In this pattern the third loop is located under the top two loops at the back (WS) of the work.
Now, the instructions:
Round 1: Work a round of single crochet as outlined above.
Round 2: Yoslst loosely in each sc around. Do not join.
Round 3: Sl st-tlo loosely in each yoslst around. Sl st in first sl st to join.
TO INFINITY AND BEYOND
Want more? Once you have mastered working a foundation row or round of crochet, you can start adding all manner of decorative crochet borders to your knitting. From simple taller stitches like double crochet to complex lacy patterns, there are oodles of options. Keep in mind you may need to work your base row to a specific stitch-multiple for some patterns. There are many books dedicated solely to crochet borders, so check out your local LYS, library or bookstore.
And a reminder to beware of the AI slop online. This article by Toni Lipsey on ModernDailyKnitting.com – one of our favorite resources! – will help you spot the bad stuff.
Happy crocheting, knitters!
ABOUT THE AUTHOR
 Julia Madill is a knit and crochet pattern designer, tech editor, and graphic artist, and Knitty's new Crochet Editor. She loves sharing what she has learned in her 10+ years of experience in the yarn industry, providing others with the tools to create in their own style, voice and aesthetic. Her book, Every Way with Granny Crochet is available from David and Charles publishers.
She lives in Toronto with her partner, two daughters, a cat named Pickles and a whole lot of yarn.
Text & images © 2026 Julia Madill