





Wiseknit™: A column that teaches you how to do things you'll find in knitting instructions
INTRODUCTION
Wiseknit™: Practical Knitting Wisdom
by Kate Atherley
One of the wonderful things about knitting is that there are so many different solutions to every problem, so many possible answers to every question. This column aims to expand your knitting knowledge and toolkit with practical solutions and answers to your technical knitting questions and conundrums.
Going Both Ways?
Knitters love a seamless garment, no question! They’re fun and easy to knit that way. From a design and mathematics perspective, raglans and circular yokes constructions are straightforward to set up for working in one piece. For both of these shapes, there are tidy formulas to make the garments, and the way the sleeves are connected to the body lend themselves to working in tandem with the body.
There are two other structures that are – to different degrees – less frequently worked seamlessly: drop-shoulders traditional or modified) and set-in sleeves. In the case of a set-in sleeve garment, the mathematics of the structure is not so simple and doesn’t lend itself to a formula in the same way; and for both of them, the sleeves are placed, essentially, perpendicularly to the body of the garment.
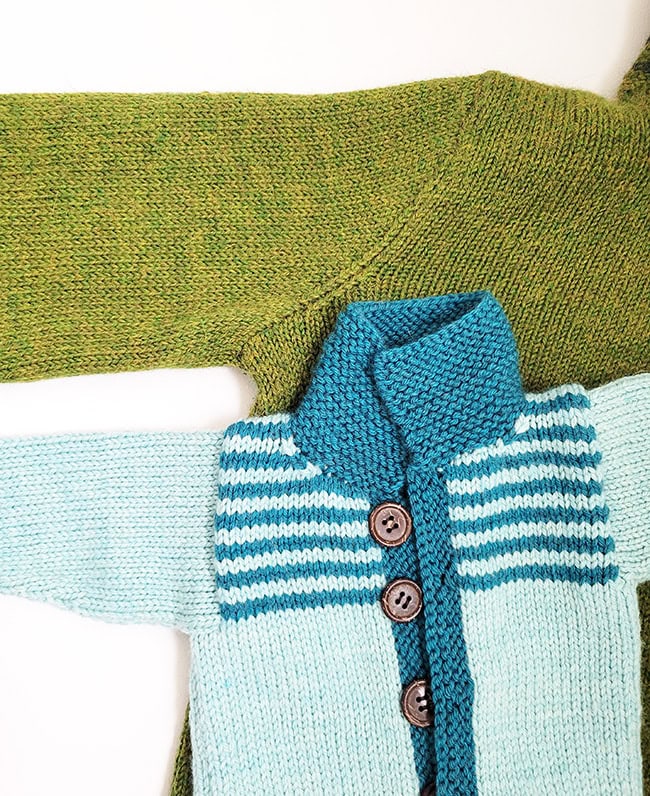
top: set-in sleeve; bottom: modified drop shoulder
This means that you really can’t knit them at the same time as the body.
That having been said, there are ways to reduce the amount of seaming for a structure like this.
It’s important to note that this isn’t always advisable, however. Generally, you can assume that the designer has chosen to do things in a particular way for good reason: actual sewn seams can be important in a knit garment, as they provide structure and scaffolding to help the fabric – which is stretchy and often weighty – hold its shape over time. A seamless garment, particularly one worked in an adult size, knitted in a yarn that’s heavy or prone to stretching (e.g. superwash wool, alpaca, silk, cotton), and worn with an oversized or relaxed fit, will be inclined to sag and fall out of shape over time.
Garments that are good candidates for reducing seams are ones that are not too big or heavy – that is, ones in kids’ sizes, ones worn a little closer fitted, or worked in a yarn that’s lighter, and more inclined to hold its shape over time. Garments worked in 100% non-superwash wools or blends with pure wool as the majority of the fiber, especially fluffy and woolen-spun ones, are great for this. Mohair too, as that’s very light and not at all inclined to stretch. For a kid’s sweater, even worked in a superwash wool, I’m always going to go as seamless as possible. But for adult sweaters, a bit of prudence is sometimes required.
The Body
A fairly straightforward change is to work the lower body in one piece. For a pullover, you’ll cast on for both the front and back at the same time and work them in the round. For a cardigan, you’ll cast on for both front pieces and the back, and work them back and forth still, but joined together.
Beyond determining whether this is a good idea for your particular garment, you might need to make a few small stitch count adjustments for to accommodate stitch patterns.
If there’s a pattern stitch, make sure you’re working with the correct stitch count multiple. Often, for a garment worked in pieces, there will be edge stitches set up to make seaming easier. For example, if the hem is worked in (k2, p2) ribbing, a front and a back might be worked not on an even multiple of four stitches, but rather a multiple of four stitches plus two, so that the pattern flows neatly when you’ve sewn the seams (see image below). The mattress stitch seam is worked between the first and second stitches of the fabric, so that you lose a stitch each side to the seam allowance, resulting in a completely uninterrupted 2x2 rib.
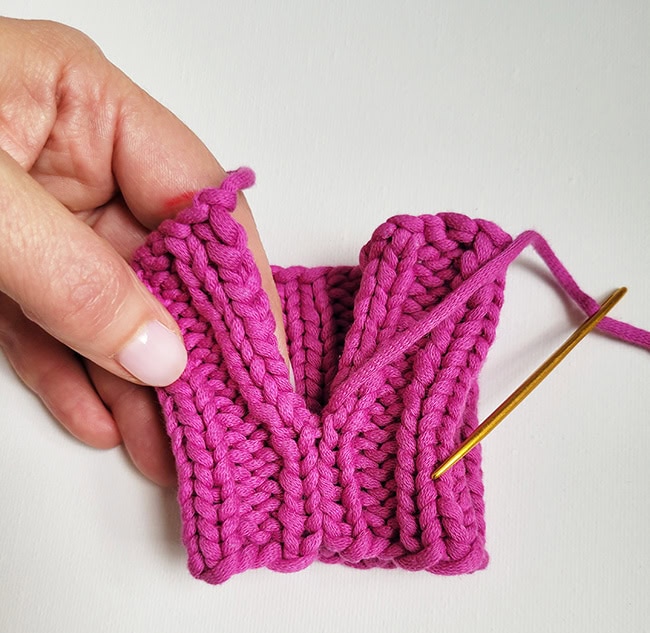
(k2, p2) + k2 joins neatly to be (k2, p2) all the way around
If you’re casting on for both the front and back of a pullover at the same time, you don’t want those edge stitches – all you need is an even multiple for the pattern stitch. Add together the stitch count for the front(s) and the back, and round down to the nearest multiple for the pattern stitch. For (k2, p2) ribbing, for example, the number of stitches should divide evenly by four.
If you’re making a cardigan, you’ll need to retain the edge stitches at the very start and end of these full-body rows, to set up whatever is required for the front edges. Get rid of them at the side seams.
The tricky bit here is that when it’s time to do any armhole shaping and divide the stitches up to work the Front(s) and Back separately, you need to make sure that you have the same number of stitches as you would when working the Front(s) and Back separately, as per the original pattern. To make the rest of the finishing easier, do not make any adjustments (no matter how small) in the armhole shaping, but rather adjust the stitch counts for the body. You will absolutely need the seam allowance/selvedge stitch restored in the armhole section for joining the sleeve, whether you’re going to do that with conventional seams or without.
If the body is worked in stockinette stitch, or if there’s a pattern with stockinette stitch at the edges, once your hem is complete, increase back to the full number of stitches for Front(s) and Back added together. If the body is worked in a pattern stitch, work a sneaky increase or two as required either end of the rows immediately before any armhole shaping is worked, and the Front and Back divided.
Sleeves
There are two things you can do to reduce the seaming necessary for the sleeve.
The obvious one is to keep the sleeve as a separate piece, but work it in the round. Although this seems like a good idea, it can introduce more problems than it solves. In sewing, you can do it this way, joining the body and sleeve seams, and then fitting the tube of the sleeve into the round hole of the body. However, this isn’t advisable for knit garments, and it’s just more challenging to sew the required seams. It’s significantly easier to work a seam on handknit fabrics if the fabrics are lying flat (see below).
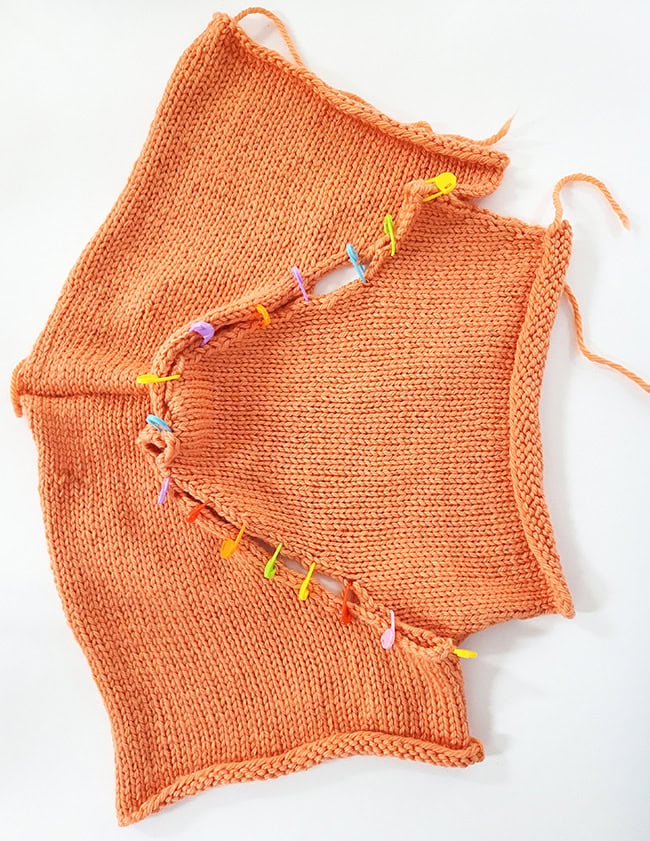
sleeve cap pinned into armhole
The better solution is to pick up stitches around the armhole, and work the sleeve in the round, downwards. No seams at all, of course! I did this for my Kiernan sweater, and three patterns in this issue use this method: Spell Check, Structured Seams, and Echo. We hope you give at least one of them a go!
Look for more about how to convert a flat set-in/sewn-in sleeve to a pick up and knit downwards version as well as tips on sewing in a flat set-in sleeve in future issues of Knitty.
ABOUT THE AUTHOR
 Kate Atherley is Knitty's Managing Technical Editor and a knitting author and teacher. The combination of her university degree in mathematics, professional experience in software development and usability, and training in garment and fashion design give her a unique perspective.
Find her new book, Math for Knitters and more of her work at kateatherley.com and on Ravelry.
Text & images © 2026 Kate Atherley.