


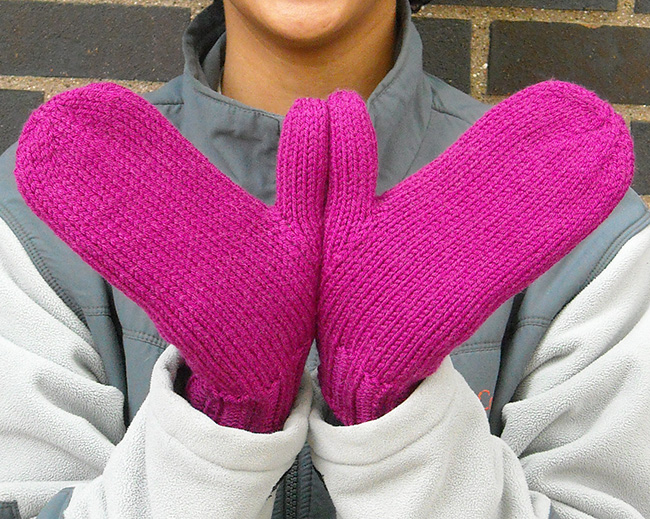
PRN Mittens, a free knitting pattern from Knitty.com. Free knitting pattern for a DETAILS HERE.
INTRODUCTION
PRN Mittens
by Alison Jarvis

PRN is an abbreviation of the Latin pro re nata, which means "as needed" or "as the circumstances require," and is often used in medical treatment directives.
This is a mitten pattern prescription using whatever yarn you have at hand. It is especially created for anyone who feels like a swatch is just a delaying tactic to discourage you from getting started. You will not need to check your gauge, because this is a knit-to-fit mitten.
Also calling out to all toe-up sock knitters: this mitten is for you. Start at the fingertips and work your way to the wrist. This pattern is for stash-busters and those who play yarn chicken, too. Those different-yarn cuffs can look like a design element if you find yourself short.
Of course, once you understand the prescription don't limit yourself to working-class plain stockinette – add color designs, cables, twists, textures, etc.
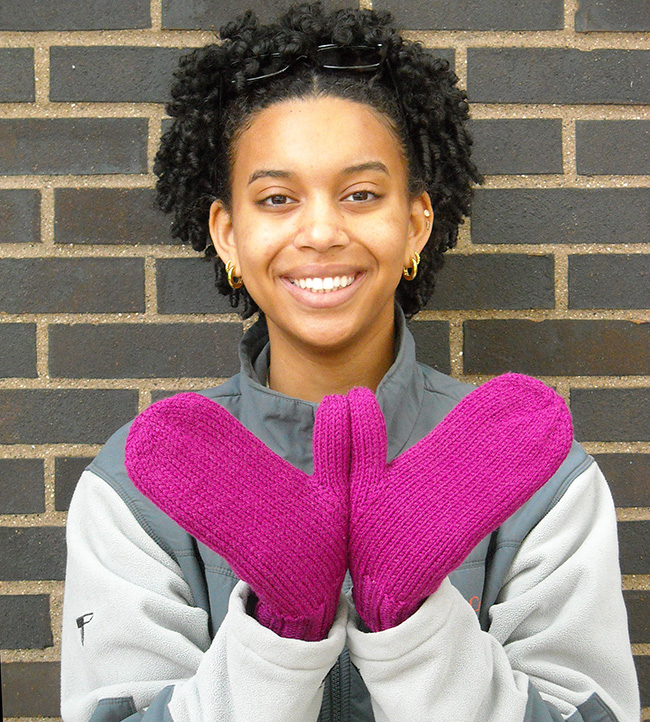
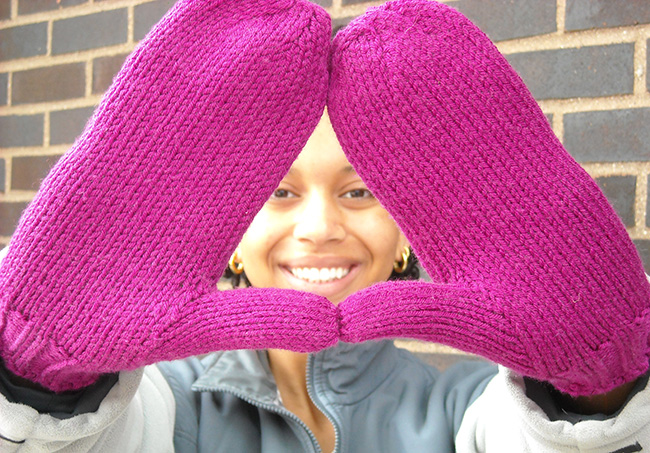
 model: Morgan Batiste-Simms
photos: Alison Jarvis


SIZE
Knit to fit – any size
shown in women's size medium
FINISHED MEASUREMENTS (as shown)
hand circumference: 7 in/18 cm
fingertip to start of cuff: 7.25 in/18.5 cm
cuff length: 2.25 in/5.5 cm
MATERIALS
Yarn
![]() Cascade Greenland, [100% wool; 137 yd /125 m per 3.5 oz /100 g skein]; color: 3516 Magenta, 1 skein
Cascade Greenland, [100% wool; 137 yd /125 m per 3.5 oz /100 g skein]; color: 3516 Magenta, 1 skein
Note: For a women's medium-size mitten in worsted-weight yarn, allow about 200 yards. Thicker yarn requires less yardage, but more total weight.
Yarn Characteristics:
The yarn shown is a tightly plied bulky 100% superwash merino wool. Choosing wool or other animal fibers will give the most warmth. Avoid fibers that lack elasticity, so the mittens hold their shape. (ie Alpaca is very warm but not very elastic.)
Recommended needle size
![]() Needles for small circumferences in the round (see GAUGE below)
Needles for small circumferences in the round (see GAUGE below)
Note: sock-length circulars can be used for the body of the mitten and the cuff, but a secondary method will be required for the top of the mitten, and the thumb
![]() a second set of needles one size smaller for making a ribbed cuff
a second set of needles one size smaller for making a ribbed cuff
Notions
GAUGE
I highly recommend knitting to a tighter gauge than usual so that the mittens wear longer and are warmer. Start with needles one or two sizes smaller than what's recommended on the ball band. The knitted fabric should be firm but retain elasticity.
PATTERN NOTES
[Knitty's list of standard abbreviations and techniques can be found here.]
Beginning at the fingertips, the hand and thumb are worked separately, then joined and worked to the wrist with symmetric thumb gusset decreases. Switch to smaller needles at the wrist for a basic ribbed cuff. And finally a grafted closure at the thumb-hand join makes a smooth join and avoids holes.
Techniques:
DIRECTIONS
Hand
Using Judy's Magic Cast On, CO 6 st – 3 sts per side. As you work the following rounds, use a removable stitch marker to mark the start of the round.
Rnd 1: Knit.
Rnd 2: RLI in each stitch. 12 st. If using dpn, divide on 3 needles.
Rnd 3: Knit.
Rnd 4: (RLI, k1) around. 18 st.
Rnd 5: Knit.
Rnd 6: (RLI, k2) around. 24 st.
Rnd 7: Knit.
At this point, divide the stitches up into 6 groups. You can use markers, and/or divide them across your needles so that you can keep track. The following instruction refers to the groups.
Next rnd, increase: (RLI, k to end of group) 6 times.
Following rnd: Knit.
Repeat the last 2 rnds until you have the desired circumference. Aim for the mitten to be the same size or be slightly bigger around than the widest part of the hand above the thumb. If the recipient of the mittens is not available, you can look here for guidance.
The final inc rnd can be worked with fewer than 6 inc as needed.
Stop to measure
Work another approx 0.5 inches/1 cm, then measure the circumference of the mitten to confirm the fit. Measuring on the needles will not be accurate, so put the sts on waste yarn, then handwash and let air dry before measuring.
Mark the first K rnd after you reach the desired diameter. Continue working until the mitten is long enough to cover the hand, from the tip of the wearer’s thumb to where it joins the hand at the "V". If you’re able to try it on, you’ll get the most accurate measurement. You can also estimate like this: the full length of the hand is a little longer than the circumference of the hand above the thumb. Subtract about 2–2.5 inches/5–6.5cm from the hand length, and that’s the length to aim for.
Count the number of rnds worked from the marked rnd and write it down here: ____________
You'll need this number in order to make the second mitten the same size.
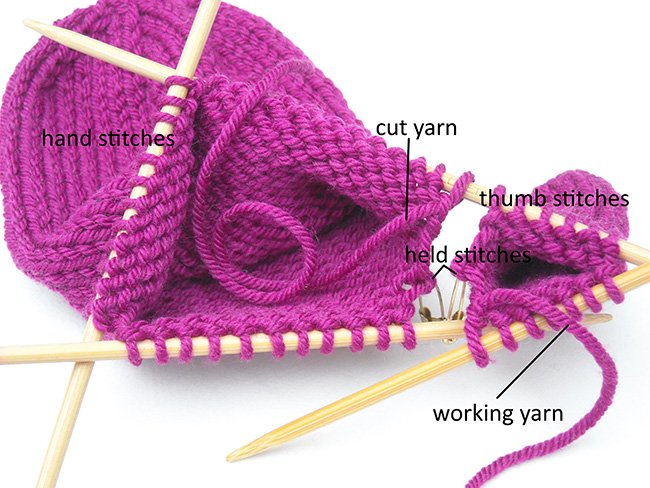
Cut the yarn, leaving a tail of about 8 inches/20 cm for grafting later. Place the next st on a locking pin or waste yarn and drop it from the needles, and slip the remaining sts onto waste yarn.
Thumb
Begin as above for the hand, CO 6 st and inc every other rnd to the desired circumference. Aim for the mitten thumb to be the same circumference as the thumb you’re aiming to fit, or slightly bigger around than the widest part of the thumb, which is usually at the first joint.
Generally, the number of stitches for the thumb is about one-third the number of stitches for the hand plus two to three stitches for a worsted-weight yarn. You may need to add more stitches for lighter-weight yarns or to fit stouter fingers.
Work the thumb until the length from the fingertip to the needles matches the length of the thumb from the tip to where it joins the hand at the "V." Remember to mark the first K rnd after the last inc rnd, and record the number of total rnds here: ____________
Do not cut the yarn. Place the next st on a locking pin or waste yarn and drop from the needles.
If using dpns, divide the remaining thumb sts on 2 needles before the next step.
Join Hand and Thumb
Place the hand sts back on needles. Align the hand and thumb so that the 2 held sts are opposite each other, with fingertips pointing the same direction and RS facing. Arrange the needles so the working yarn from the thumb is available (as below).
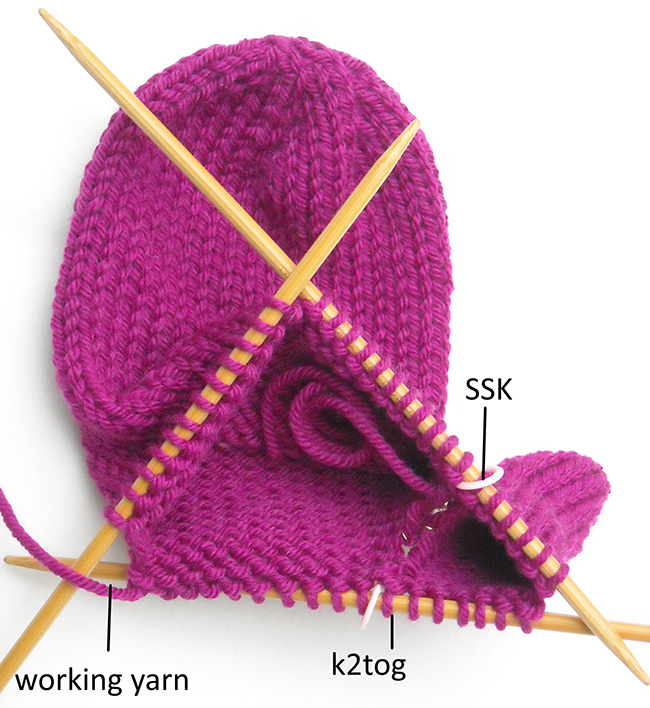
Round 1: Starting with hand sts to join the round, knit around, stopping 1 st before the end of the hand. Place a marker,
Work an SSK with the last st of the hand and the first st of the thumb. Continue, knitting until 1 st remains. Work k2tog on the last st of the thumb and the first st of the hand. This is the end of the round. Rearrange sts and/or place markers as desired. 2 sts decreased, as below.
At this point, you can take one of two approaches to decreasing for the gusset: You can calculate the gusset decrease placement precisely, or you can wing it. If you're making the mittens for yourself, or someone who is available to try the mitts on as you go, you can wing it and adjust on the fly. If you can't test fit as you go, your results will probably be better if you calculate it.
Winging It:
Knit 2 rnds.Dec rnd: K to first m, sl m, SSK, k to 2 st before end of round, k2tog. 2 stitches dec.
Work 2 rnds.Continue working Dec rnd followed by 2 work-even rnds until 2 or 3 st remain between the m, removing the markers on the final round. Try the mitten on as you go. It should be long enough to reach the point where you hand and your wrist meet, and your last decreases should be close to the bottom. If need be, change the number of rounds between the decreases – if you need more length, add extra rounds between decreases; if you need it to be shorter, skip some of the even rounds between the Dec rnds.
OR
Calculating It:
Measure the length from the "V" to the wrist. Then count the number of rows in this length from your knitted hand section and calculate the rate of decreasing. Here's an example:
Length: 2.5 inches/5.5 cm
Rnds in this length: 20
Total decreases: 16 st between markers – 2 remaining st = 14 st decreased
Dec rnds: 14 st/2 st dec per rnd = 7Dec rnds
Total rnds minus Dec rounds = 20 total rounds – 7Dec rnds = 13 knit-even rounds
Plan: 2 knit-even rounds followed by a Dec rnd, 6 times total (=18 total rounds, including 12 knit-even rounds), then 1 knit-even round followed by a Dec rnd (20 rounds), working Dec rnds as follows:Dec rnd: K to first m, sl m, SSK, k to 2 st before end of round, k2tog. 2 stitches dec.
Cuff
Switch to the smaller needles.
Important Note: Before you proceed, decide which ribbing you want to work: (K1, p1) or (K2, p2). You'll need to work a Dec rnd, and the target number will depend on which ribbing pattern you want to work. You need an even number of stitches for (K1, p1) ribbing, a multiple of 4 for (K2, p2).
Next round: Knit around, working k2tog evenly around to decr approx 10% of the sts.
Ribbing round, option 1: (K1, p1) around.
Ribbing round, option 2: (K2, p2) around.
Work to the desired length, about 2 to 3 in/4 to 6 cm. BO with a stretchy technique, such as Jeny's Surprisingly Stretchy bind off or Elizabeth Zimmermann's sewn bind off.
FINISHING
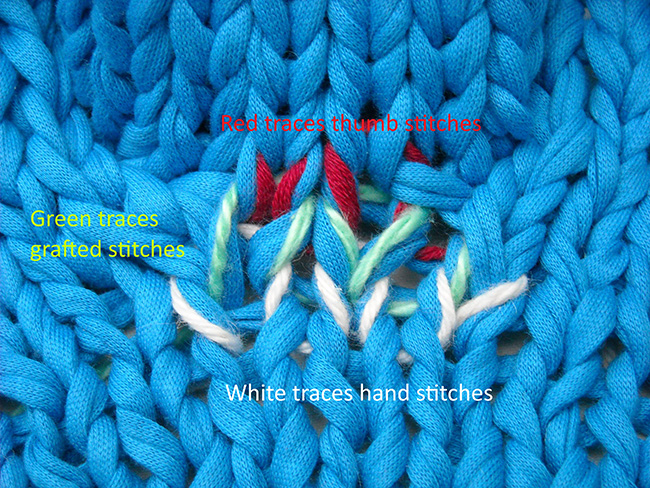
Join together the 2 held stitches at the thumb and hand using a a hybrid grafting/seaming method, as follows:
Bring the cut tail of yarn to the RS and place it on a yarn needle.
Adjust the stitches around the opening to snug or open up any uneven stitches.
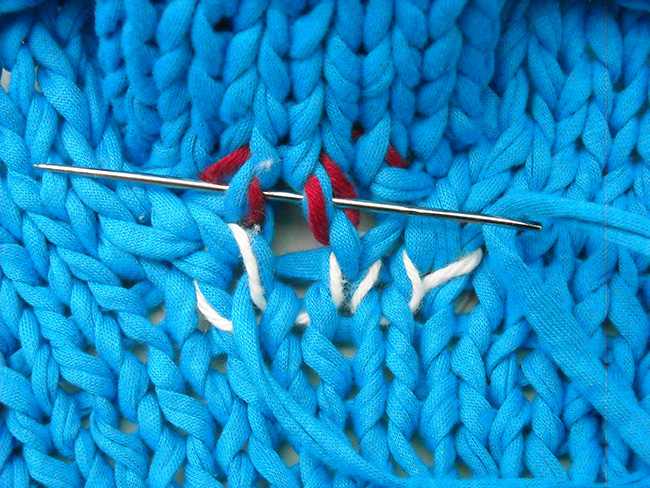
Find the st on either side of the held sts that are on the same side (hand or thumb) (Pic 3) - called "adjacent st" and labelled in the image below.
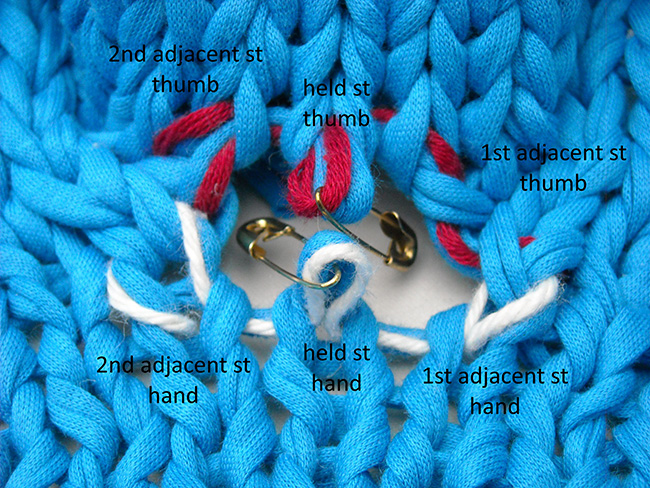
Start by pulling the threaded needle through the first adjacent thumb st (the one on the right-hand side) from WS to RS.
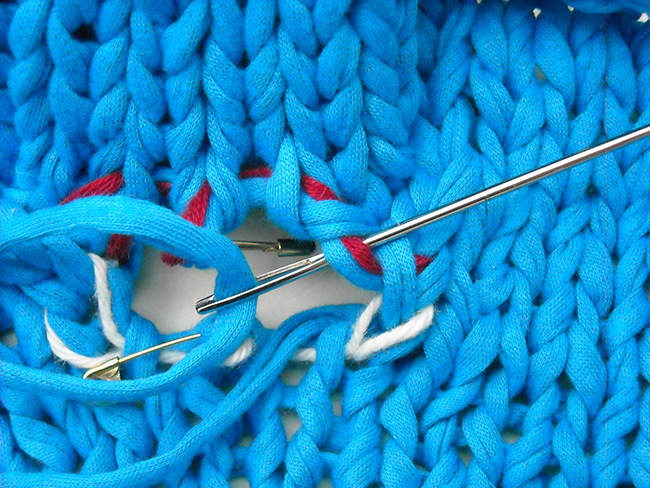
Next, pull the yarn through the first adjacent hand st (the one on the right-hand side) from RS to WS.
Then pull the yarn through the hand-side held st from WS to RS as shown below:
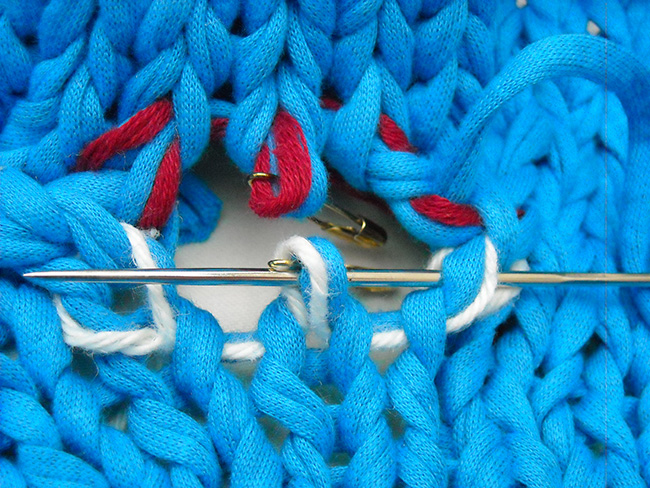
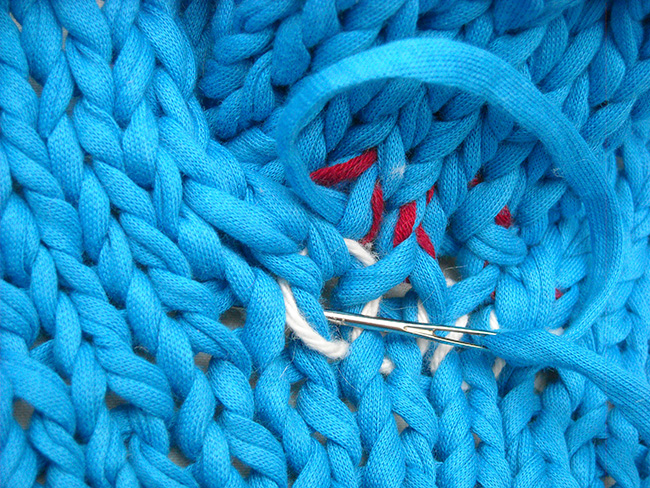
Continue pulling the yarn through the stitches in the following sequence:
Pull the yarn through the first adjacent thumb st (the one on the right-hand side) from RS to WS.
Pull the yarn through the thumb-side held st, from WS to RS, as below:
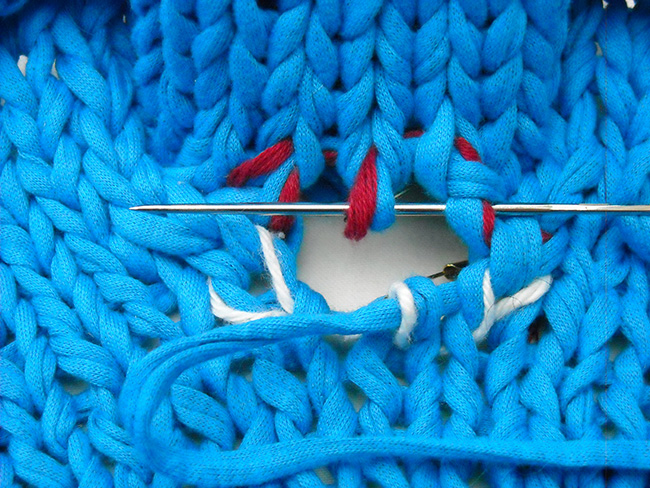
Pull the yarn through the hand-side held st, from RS to WS.
Pull the yarn through the second adjacent hand st (the one on the left-hand side) from WS to RS, as below:
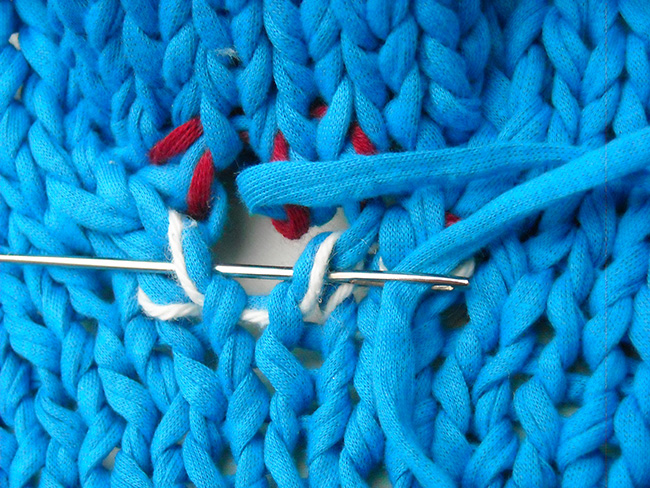
Pull the yarn through the thumb-side held st, from RS to WS.
Pull the yarn through the second adjacent thumb st (the one on the left-hand side) from WS to RS as below:
Pull the yarn through the second adjacent hand st (the one on the left-hand side) from RS to WS (optional, as below:
This is the finished result.
Weave in all ends. Wash and dry according to the yarn's ball band directions.
ABOUT THE DESIGNER
 Alison Jarvis lives in Minneapolis where warm mittens are a necessity many months of the year. She works in biomedical research and consorts with her stash during mitten weather. During non-mitten weather she tends her native-plant garden and volunteers at the local natural area.
Email CarryYarnMN on Ravelry with questions.
Pattern & images © 2021 Alison Jarvis