


Hoolet, a free knitting pattern from Knitty.com.
INTRODUCTION
Hoolet
 by Amelia Archer

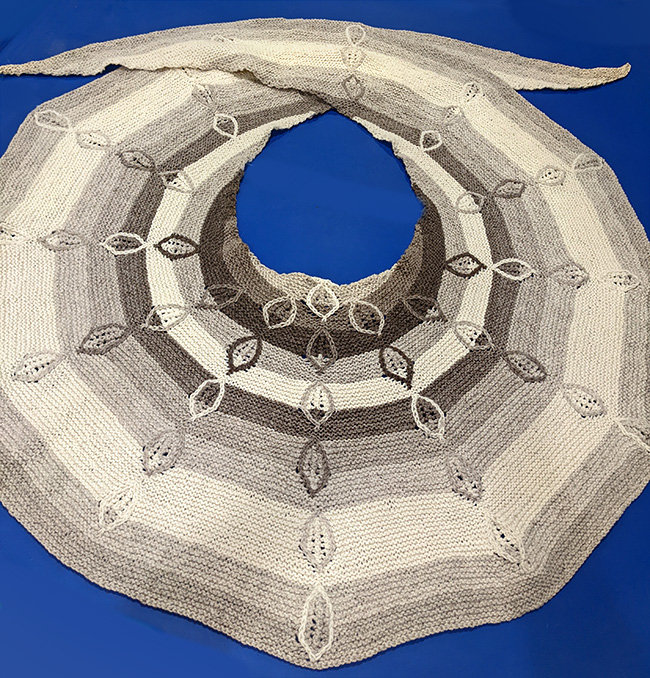
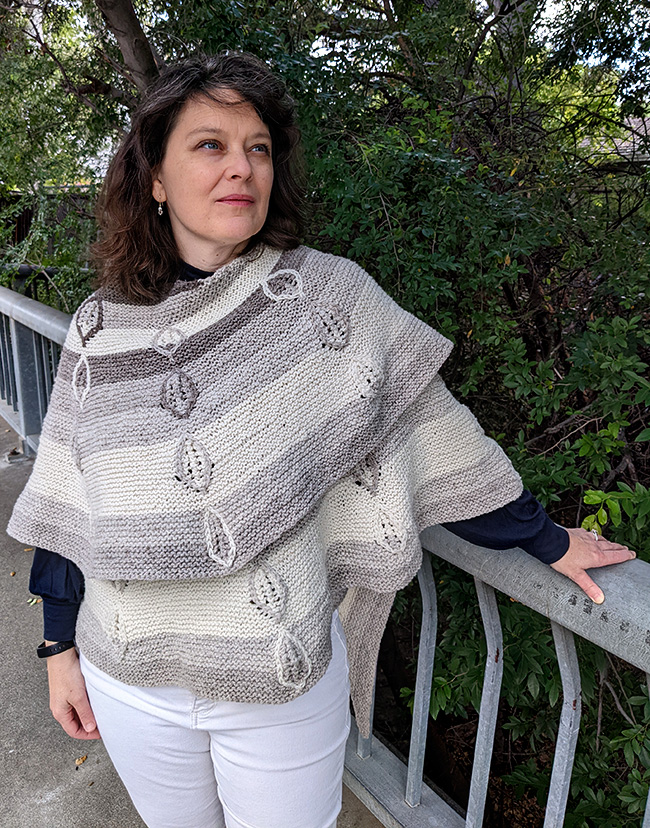
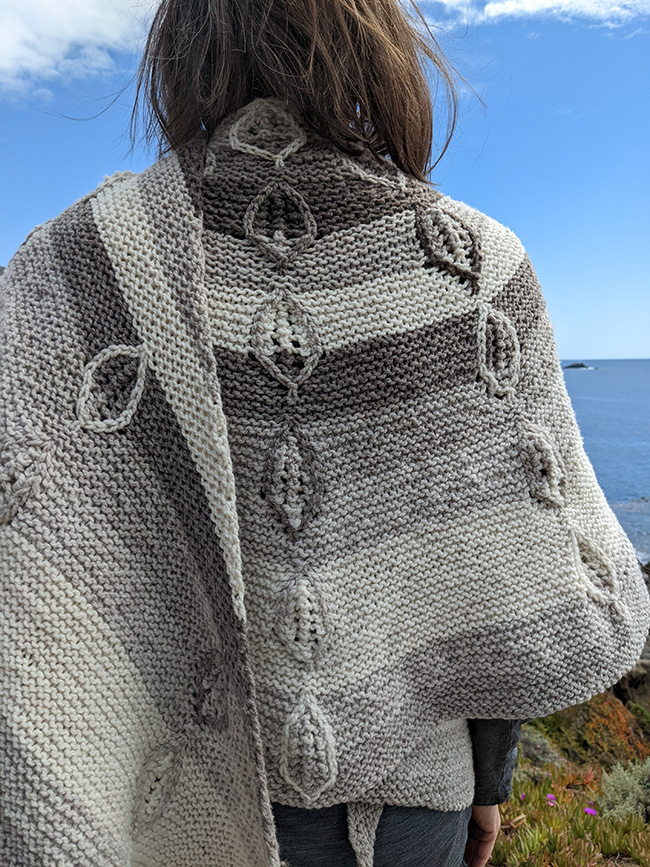
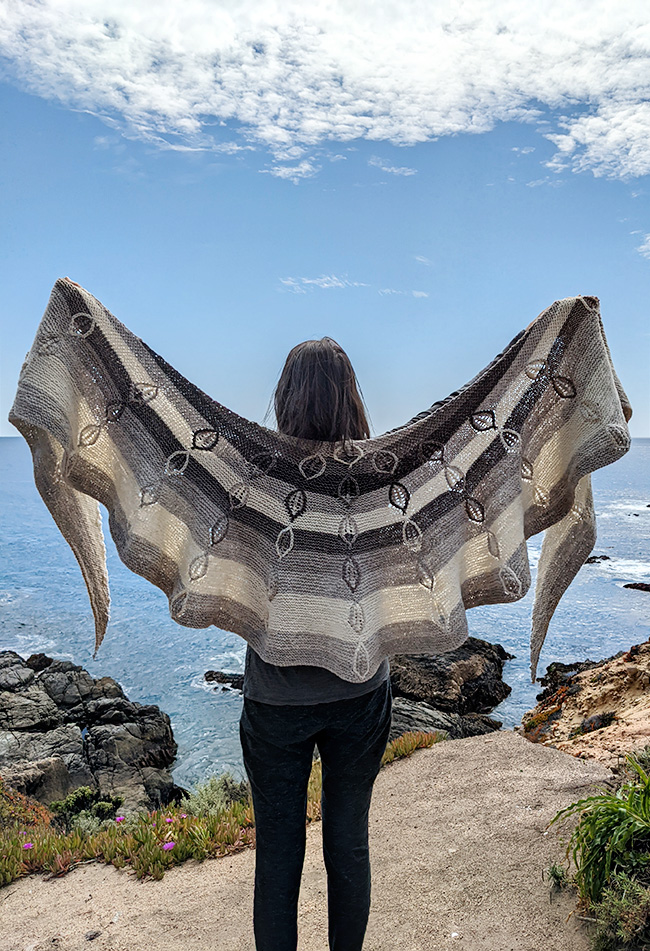
Hoolet is Scottish for owlet—a baby owl. Shawls make me think of birds, and since we have owls that swoop down as our headlights hit the dark driveway in the woods near where we live and also perch in the high treetops on late summer nights, I was inspired by their hooting (and also admittedly by the garter knits of Outlander) to create my first shawl. Using my technique of Color Loops (vertical stranded loops), I envisioned (optional) stripes interrupted with a feather motif that bring light, air, and color contrast to a wide, but wrappable, flight-inspiring cozy knit.
In the sample shown, I used an all-natural color scheme, with stripes of varying degrees of contrast. The shape of the shawl is a parabola at first, which then grows into an ellipse which will naturally hug your shoulders. There are increases at each side, broadening the shawl quite quickly. You may stop after completing any generation of the feather motif, though, so it’s a stop-when-you-want knit!
 model + photos: E. Archer, A. Archer


SIZE
One – work to desired size based on yardage
FINISHED MEASUREMENTS
Width: 10 feet/3 meters on the inside edge
Depth: 21 inches/53 cm depth at center neck
MATERIALS
Yarn
Elsawool [Woolen-spun cormo wool; 267yd/244m per 4 oz/113.4 g skein]; natural shades of white, gray, and brown:
![]() [MC1, MC6, MC10, MC11] white; 2 skeins
[MC1, MC6, MC10, MC11] white; 2 skeins
![]() [MC9, MC12] 5% silver; 2 skeins
[MC9, MC12] 5% silver; 2 skeins
![]() [MC2, MC5, MC8, MC12] 10% light gray; 2 skeins
[MC2, MC5, MC8, MC12] 10% light gray; 2 skeins
![]() [MC7] 30% medium gray; 1 skein
[MC7] 30% medium gray; 1 skein
![]() [MC3] 40% medium gray; 1 skein (small amount--30 yards)
[MC3] 40% medium gray; 1 skein (small amount--30 yards)
![]() [MC6] 60% dark gray; 1 skein (small amount--45 yards)
[MC6] 60% dark gray; 1 skein (small amount--45 yards)
Total yardage used: 1600 yards
Yardage used for each stripe:
MC1: 2-3 yards
MC2: 12-13 yards
MC3: 27-28 yards
MC4: 45 yards
MC5: 68 yards
MC6: 120 yards
MC7: 150 yards
MC8: 180 yards
MC9: 210 yards
MC10: 250 yards
MC11: 275 yards
MC12: 275 yards
Yarn Characteristics
![]() The sample shawl shown uses a woolen-spun worsted weight 2-ply yarn. It is very soft, round, and bouncy. For more subtle striping, I recommend close colors or a gradient for a fade. More contrast will highlight the striping effect, but will also make the feather motif pop. This shawl might also be a good way to mix your handspun yarns!
The sample shawl shown uses a woolen-spun worsted weight 2-ply yarn. It is very soft, round, and bouncy. For more subtle striping, I recommend close colors or a gradient for a fade. More contrast will highlight the striping effect, but will also make the feather motif pop. This shawl might also be a good way to mix your handspun yarns!
Recommended needle size
[always use a needle size that gives you the gauge listed below - every knitter's gauge is unique]
![]() US #7/4.5mm circular needle, 32 inch/80cm or longer, for working flat.
US #7/4.5mm circular needle, 32 inch/80cm or longer, for working flat.
![]() A single needle one size larger, for working the bind off
A single needle one size larger, for working the bind off
Notions
![]() 12 inch/30 cm ruler
12 inch/30 cm ruler
![]() yarn needle
yarn needle
GAUGE
15 sts/32 rows = 4 inches/10 cm in garter stitch
15.5 sts/23 rows = 4 inches/10 cm in stockinette stitch
PATTERN NOTES
[Knitty's list of standard abbreviations and techniques can be found here.]
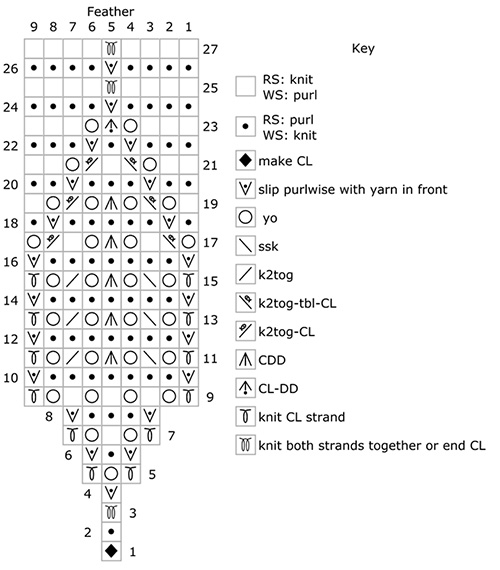
This shawl starts at the top, and is worked in garter stitch. It’s shaped through increases at the start of each row, and some hidden within the feather motifs. The feather motifs use Color Loops and all follow the same 27-row chart. Each new generation of feathers is added mid-way through the chart, offset so that the first generation is in line with the third, fifth, etc. and similarly the even generations form a column.
A short demo to start the shawl is here.
Please see the Ravelry page for modification options: a cozy shawlette, a simple cape version, or to make the shawl less wide and more deep.
Purl on: When casting on, to start the shawl, begin with a slip knot and place it on the left needle. *Insert right needle into the stitch as if for a purl stitch, wrap yarn around needle and pull through as usual; leave the original loop on the left needle and place the new loop on the left needle, beside it. Repeat from * until you have one less than the required number of stitches. Insert right needle into the stitch as if for a purl stitch, wrap yarn around needle and pull through as usual; leave the original loop on the left needle, and the new loop on the right needle, then take yarn to the back and work first row of the pattern.
When working the start of row cast on, insert right needle into the first stitch on the left needle, as if for a purl stitch, wrap yarn around needle and pull through as usual; leave the original loop on the left needle, and place the new loop on the left needle. Insert the right needle into this new stitch, as if for a purl stitch, wrap yarn around needle and pull through as usual; leave the original loop on the left needle, but leave the new loop on the right needle. Take yarn to the back and continue with the rest of the instructions for the row.
Color Loops: Measured lengths of yarn are formed into a long hanging loop on one row, and slipped or knit on following rows. There are no ends to weave in because the last little loop at the end is knit or forms a short float. Consistent tension is best, and it helps to wrap around something rather than stretching along a table surface, for example.
Make a Color Loop (CL): Insert right needle into the next stitch, place top of short edge of 12-inch/30cm ruler to that stitch and stretch working yarn around the long edge of the ruler 1 and one-half times around for a 3-feet/90cm moderately tight loop. Pinch that measured location and use that pinched yarn to complete the stitch. Continue knitting with working yarn letting the loop fall to the back of the work. All Color Loops are made on the right side. The first WS after making a CL, knit into each stitch with a loop hanging from it with the working yarn and let the CL hang. It will be worked only on the RS rows.
Color changes always occur at the end of a wrong-side row (row 2 or 16) by breaking the yarn after the last stitch, and using a new MC to start the next row with the 2-stitch Purl On.
Troubleshooting: For a loop that still has length, the new feather generation CL may be made into the last generation's end of loop. This may be occurring if you use a yarn closer to a DK weight. Consider an extra row 12 and 13 to modify the pattern without changing the 3-feet/90cm measurement of the Color Loops, or tighten your tension as you measure the loops.
CHARTS
The chart shows the feather motif that is repeated throughout this shawl. Feathers are described as generations. Each generation of feathers begins on row 15 of the generation of feathers that precedes it. Note that the first WS row of the chart (row 2) is worked in the MC and the stitches with loop strands hanging will be loose. On the next row those strands will be knit together and tightened up again.
CL: see Pattern Notes. A Color Loop (CL) is a loop, so the two strands of the loop may be knit or slipped individually or together as specified in the chart. They are slipped on all wrong side rows with yarn in front.
K2tog-tbl-CL: knit CL through the back loop together with the MC stitch on the left.
K2tog-CL: knit CL together with the MC stitch on the right.
CL-DD: A Color Loop central decrease in three steps. Work K2tog-tbl-CL (see above), knit the next stitch with CL or MC depending on how much is left of the CL, then past the first stitch over. This keeps the CL on top.
DIRECTIONS
First Stripe:
Cast On: Using the Purl On method (see notes above), loosely cast on 5 stitches with MC1.
Row 1 [RS]: K2, work Feather chart, k1. 5 sts
Row 2 [WS]: Purl on 2 (see Pattern Notes). K2, work Feather chart, knit to end, break yarn. 7 sts.
Second Stripe:
Row 3 [RS]: Purl on 2 with MC2. K4, work Feather chart, k3. 9 sts.
Row 4: Purl on 2. Knit to feather, work Feather chart, knit to end. 2 sts increased.
Repeat last row, until row 14 of the Feather chart is complete. 45 sts.
In the next two rows you will start two new feathers and continue working the first generation of feathers.
Next row [RS]: Purl on 2, k to 2 sts before Feather, work Feather Chart row 1 to establish new feather, k1, work Feather as set, k1, work Feather Chart row 1 to establish new feather, k to end of row.
Following row [WS]: Purl on 2. [K to feather, work Feather chart] 3 times, k to end.
Break yarn.
Third Stripe:
Change to MC3 and continue as set until you have worked Row 14 of the Feather chart for the second-generation feathers. 89 sts.
In the next two rows you will start three new feathers. The middle new feather lines up vertically with the first-generation feather. Continue working the second generation of feathers.
Next row [RS]: Purl on 2, k to 6 sts before Feather (second generation), [work Feather Chart row 1 to establish new feather, k5, work Feather as set, k5] 2 times, work Feather Chart row 1, k to end of row.
Following row [WS]: Purl on 2.[K to feather, work Feather chart] 5 times, k to end, break yarn.
Fourth Stripe:
Change to MC4 and continue as set until you have worked Row 14 of the Feather chart for the third generation feathers. 143 sts.
Continuing:
Continue this process, building new feather generations 4[5, 6, 7] as follows:
Next row [RS]: Purl on 2, k to 10[14, 18, 22] sts before Feather, [work Feather chart row 1 to establish new feather, k9[13, 17, 21], work feather as set] 3[4, 5, 6] times, work Feather chart row 1, k to end of row.
Following row [WS]: Purl on 2. Knit to end working feathers as set, break yarn.
New Stripe:
Change MC and continue as set until you have worked Row 14 of the Feather chart for the newest generation of feathers. 297[ 371, 455, 549] sts.
Continue this process, building feather generations 8[9], without edge feathers, as follows:
Next row [RS]: Purl on 2, k to feather [work feather as set], k25[29], [work Feather chart row 1 to establish new feather, k25[29], work feather as set] 6[7] times, k to end of row.
Following row [WS]: Purl on 2. Knit to end working Feathers as set, break yarn.
New Stripe:
Change MC and continue as set until you have worked Row 14 of the Feather chart for the newest generation of feathers. 643[737] sts.
Continue this process, building feather generation 10:
Next row [RS]: Purl on 2. Knit to 34 before Feather, [work Feather Chart row 1 to establish new feather, k33), work Feather Chart as set] 7 times, work Feather Chart row 1, k to end of row.
Following row [WS]: Purl on 2. Knit to end, working Feathers as set, break yarn.
New Stripe:
Change MC and continue as set until you have worked Row 14 of the Feather chart for the newest generation of feathers. 831 sts.
Continue this process, building feather generation 11:
Next row [RS]: Purl on 2, k to feather [work feather as set], k37, [work Feather chart row 1 to establish new feather, k37], work feather as set] 7 times, k to end of row.
Following row [WS]: Purl on 2. Knit to end working feathers as set, break yarn.
Last Stripe:
Change MC and continue as set until you have worked Row 14 of the Feather chart for the newest generation of feathers. 935 sts.
Continue as set until you have finished Feather generation 11, without adding new Feathers, ending on a RS row. 963 sts.
Using the larger needle in your right hand, bind off as follows: slip the first st, knit the next and pass the slipped st over; continue to bind off knitwise to the end. Cut yarn and pull through final st to secure.
FINISHING
Soak in lukewarm water with a wool-wash if desired. Roll in a towel to squeeze most of the moisture out, and lay flat to dry, stretching and pinning to emphasize the shape. Once dry, weave in ends.
ABOUT THE DESIGNER
 Amelia Archer is a knitter, designer, musician, busy family manager, and nature lover!
Amelia looks forward to growing the Knitting with Color Loops platforms (YouTube, Instagram, Ravelry and her Ravelry Group) and exploring new stitch possibilities including functional and structural Color Loops!
Pattern & images © 2022 Amelia Archer