


Puzzle Pieces, a free knitting pattern from Knitty.com.
INTRODUCTION
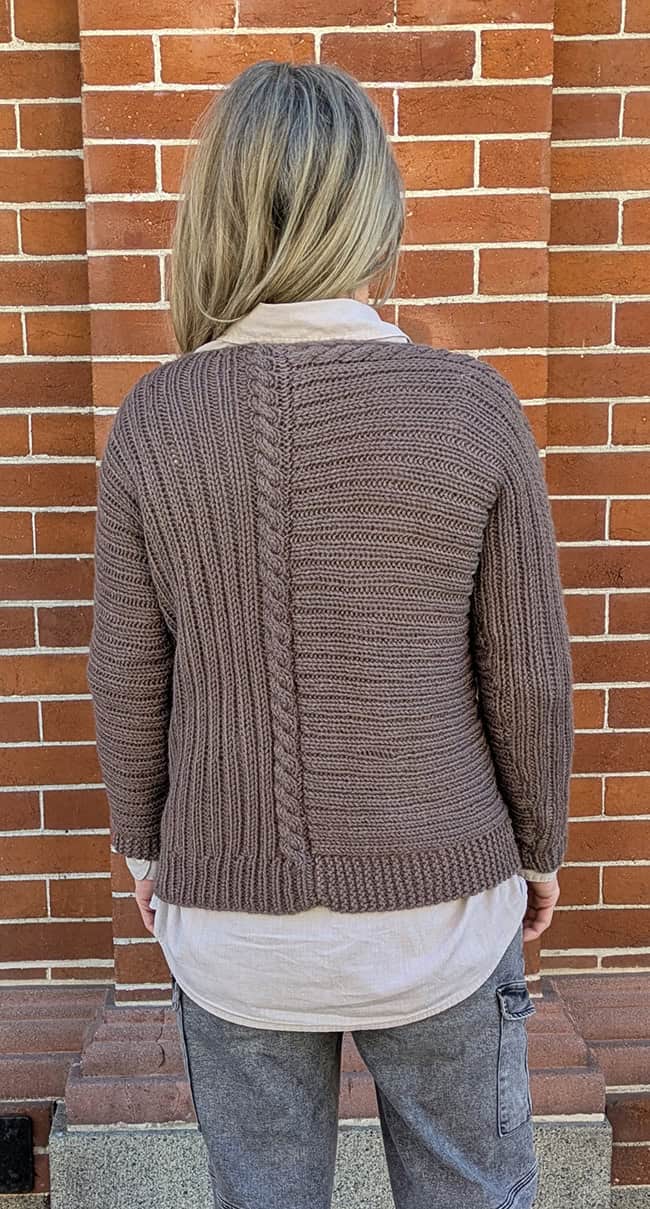
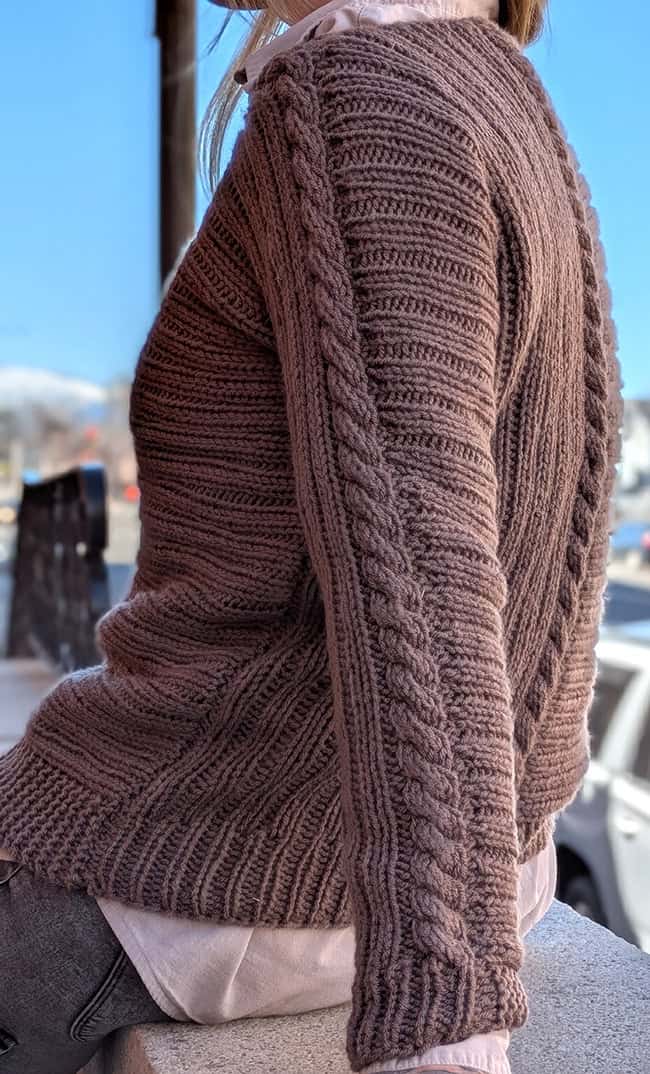
Puzzle Pieces

by Amy Gunderson

There are many reasons I fell in love with knitting when I first picked it up as a hobby 15 years ago. Perhaps the biggest reason is the engineering aspect of it. I discovered I could knit socks from the cuff down or the toe up or even sideways or beginning with the heel. Likewise, sweaters can be knit from the bottom up, top down, seamed, seamless, various yoke constructions, and the list goes on.
Many of my favorite designs have started by asking myself: is it possible? Puzzle Pieces began this way as I wondered if a sweater could be constructed in a sort of pinwheel fashion in sections. Knitting this sweater is both straightforward and a bit of an adventure. The stitches are kept relatively simple so the focus stays on the construction and the instructions can be as streamlined as possible.
 model: Amy Gunderson
photos: Justin Reed


SIZE
XS[S, M, L, 1X, 2X, 3X, 4X, 5X]
shown in size S with 4 inches/10 cm of positive ease (brown version); size M with 8 inches/20 cm of positive ease (red version)
FINISHED MEASUREMENTS
Chest/Bust: 34[38, 42, 46, 50, 54, 58, 62, 66] inches / 86.5[96.5, 106.5, 117, 127, 137, 147.5, 157.5, 167.5] cm
Length: 22[22.75, 23.75, 24.5, 24.5, 24.5, 25.25, 25.25, 26] inches / 56[58, 60, 62, 62, 62, 64, 64, 66] cm
MATERIALS
Yarn
Brown Version (shown above):
![]() Premier Yarns Basix Worsted [100% acrylic; 359 yds/328 m per 7 oz/200 g skein]; color: 1115-35 Pecan: 2[3, 3, 3, 3, 4, 4, 4, 5] skeins
Premier Yarns Basix Worsted [100% acrylic; 359 yds/328 m per 7 oz/200 g skein]; color: 1115-35 Pecan: 2[3, 3, 3, 3, 4, 4, 4, 5] skeins
Red Version (shown below):
![]() Premier Yarns Puzzle [100% acrylic; 328 yds/300 m per 7 oz/200 g skein]; color: 1050-19 Checkers: 2[3, 3, 3, 3, 4, 4, 4, 5] skeins
Premier Yarns Puzzle [100% acrylic; 328 yds/300 m per 7 oz/200 g skein]; color: 1050-19 Checkers: 2[3, 3, 3, 3, 4, 4, 4, 5] skeins
Yarn Characteristics
![]() The samples shown use heavy worsted/bulky-weight yarn that are 100% acrylic. Most acrylic or acrylic blends should work well, and wool will work especially well due to its blockable nature.
The samples shown use heavy worsted/bulky-weight yarn that are 100% acrylic. Most acrylic or acrylic blends should work well, and wool will work especially well due to its blockable nature.
Recommended needle size
[always use a needle size that gives you the gauge listed below - every knitter's gauge is unique]
![]() US #9/5.5mm straight or circular needle, 32 inches/80 cm long
US #9/5.5mm straight or circular needle, 32 inches/80 cm long
Notions
![]() stitch markers, including 1 removable
stitch markers, including 1 removable
![]() US #I-9/5.5mm crochet hook
US #I-9/5.5mm crochet hook
![]() cable needle
cable needle
![]() yarn needle
yarn needle

GAUGE
15 sts/21 rows = 4 inches/10 cm in K2, P1 Ribbing
Note: gauge is always taken after blocking. As this pattern is worked in multiple directions, correct stitch and row gauge is crucial.
PATTERN NOTES
[Knitty's list of standard abbreviations and techniques can be found here.]
Construction Method
This sweater is made in a modular fashion. Stitches are picked up from previous sections and worked outward. Work begins with the Right Back/Right Back Sleeve.
Due to the stretchy nature of ribbing, the measurements for each piece will not exactly match the measurements of the previous piece when working. Refer to the schematic measurements when blocking.
Techniques
- Mattress stitch (near the end of the video)
- Basic crochet slipped stitch
- Sloped Bind-off: On the row before the bind-off, sl the last st purlwise wyif. On the bind-off row, sl the first two sts wyif, pass the first slipped st over the second, bind off rem sts as usual.
-
3/3 LC: Sl next 3 sts to cn and hold in front, k3 from left needle; k3 from cn.
K1, P1 Ribbing (even number of sts)
Row 1 [RS]: *K1, p1; rep from * to end
Rep Row 1 for patt.K1, P1 Ribbing (odd number of sts)
Row 1 [RS]: *K1, p1; rep from * to last st, k1.
Row 2 [WS]: *P1, k1; rep from * to last st, p1.
Rep Rows 1-2 for patt.Cable (worked over 8 sts)
Row 1 [RS]: P1, 3/3 LC, p1.
Row 2 [WS]: K1, p6, k1.
Row 3: P1, k6, p1.
Row 4: K1, p6, k1.
Rep Rows 1-4 for patt.
DIRECTIONS
Section 1, Right Back and Right Back Sleeve
Note: This section is worked sideways, with the cast-on starting at the center back. The beginning of the RS is the 9-stitch garter stitch hem.
Center Back
Cast on 85[88, 91, 94, 94, 94, 97, 97, 100] sts.
Set-up row 1 [RS]: K9, (p1, k2) to last 7 sts, pm, p1, k4, p1, k1.
Set-up row 2 [WS]: Sl 1 purlwise wyif, k1, p4, k1, sm, (p2, k1) to last 9 sts, k9.
Set-up row 3: K9, work in est rib to m, sm, p1, (k2, m1) 2 times, p1, k1. 87[90, 93, 96, 96, 96, 99, 99, 102] sts.
Set-up row 4: Sl 1 purlwise wyif, k1, p6, k1, sm, work in est rib to last 9 sts, k9.
Establish Repeat
Row 1 [RS]: K9, work in est rib to m, sm, work Row 1 of Cable over next 8 sts, k1.
Row 2 [WS]: Sl 1 purlwise wyif, work Row 2 of Cable over next 8 sts, sm, work in est rib to last 9 sts, k9.
Cont in patt until piece measures 4.25 inches/11 cm, ending after a WS row. Place removable marker in fabric at beg of last WS row (cable edge).
Next row [RS]: K9, work in est rib to m, sm, work Cable over next 8 sts, k1.
Next row [WS]: P1, work Cable over next 8 sts, sm, work in est rib to last 9 sts, k9.
Cont in patt, working 1 st at neck edge in St st (instead of slipping on WS rows) until piece measures 9[10, 11, 12, 13, 14, 15, 16, 17] inches / 23[25.5, 28, 30.5, 33, 35.5, 38, 40.5, 43] from cast-on edge, ending after a WS row.
Shape sleeve:
Next row [RS]: BO 59[60, 61, 62, 60, 59, 60, 58, 59] sts, patt to end. 28[30, 32, 34, 36, 37, 39, 41, 43] sts.
Work 5 rows even in est patt.
Note: Work decreases into rib pattern, working ssk or ssp as needed.
Sleeve dec row [RS]: K1, ssk (or ssp), patt to end. 1 st decreased, 27[29, 31, 33, 35, 36, 38, 40, 42] sts rem.
Work 7[5, 5, 5, 5, 5, 3, 3, 3] rows even in patt.
Rep last 8[6, 6, 6, 6, 6, 4, 4, 4] rows 4[8, 4, 0, 2, 0, 12, 10, 8] more time(s). 23[21, 27, 33, 33, 36, 26, 30, 34] sts.
Rep Sleeve dec row.
Work 5[3, 3, 3, 3, 3, 1, 1, 1] row(s) even in patt.
Rep last 6[4, 4, 4, 4, 4, 2, 2, 2] rows 2[0, 6, 12, 9, 12, 2, 6, 10] more times. 20[20, 20, 20, 23, 23, 23, 23, 23] sts rem.
Work even in patt until Sleeve measures 15 inches/38 cm from BO row, ending after a WS row.
Cuff
Row 1 [RS]: K 0[0, 0, 0, 1, 1, 1, 1, 1] , (p1, k1) to 1 st before m, p1, remove m, k1, (p1, k2tog) 2 times, p1, k1. 18[18, 18, 18, 21, 21, 21, 21, 21] sts.
Work even in P1, K1 rib as est for 9 rows.
BO in patt until 1 loop remains. Keep on needle for Section 2.
Section 2, Right Front and Right Front Sleeve
Note: Section 2 is picked up from the straight edge of Section 2 and worked from the top (shoulder edge) down. The last loop on the needle from the cuff of Section 1 counts as the first picked-up st.
Set-up Section 2
Set-up row 1 [RS]: With RS facing, pick up and knit 6 more sts along the ribbed cuff portion of Section 1, pick up and knit 70[73, 76, 79, 82, 88, 91, 94, 97] sts along remainder of Section 2 to removable marker (about 2 sts for every 3 rows), remove m and turn. 77[80, 83, 86, 89, 95, 98, 101, 104] sts.
Set-up row 2 [WS]: Sl 1 purlwise wyif, k1, p4, k1, pm, (p2, k1) to last 7 sts, k7.
Note: Work sts increased before m on RS rows (neck increase sts) into est P1, K2 rib patt.
Set-up row 3 [RS]: K7, (p1, k2) to 1 st before m, m1r, k1, sm, p1, (k2, m1) 2 times, p1, k1. 1 st increased at Neck edge, 2 sts increased in Cable section; 80[83, 86, 89, 92, 98, 101, 104, 107] sts.
Set-up row 4: Sl 1 purlwise wyif, k1, p6, k1, sm, work in est rib to last 7 sts, k7.
Establish Repeat
Note: Read through the following section before beginning. Sleeve shaping will begin while Neck shaping is still being worked.
Row 1 [RS]: K7, work in est rib to 1 st before m, m1r, k1, sm, work Row 1 of Cable over next 8 sts, k1. 1 st increased at Neck edge.
Row 2 [WS]: Sl 1 purlwise wyif, work Row 2 of Cable, sm, work in est rib to last 7 sts, k7.
Rep last 2 rows 13 more times. 14 total sts increased at neck. Place removable marker in fabric at neck edge of last row worked.
Work with no further neck increases, following Sleeve Shaping as instructed below; after Neck increases are complete, maintain the last st of RS rows/first st of WS rows in St st (rather than slipping the first st of each WS row).
AT THE SAME TIME, when piece measures 4.25[4.25, 4.25, 4.25, 5, 5, 5, 5, 5] inches / 11[11, 11, 11, 12.5, 12.5, 12.5, 12.5, 12.5] cm from pick-up edge, ending after a WS row, begin sleeve shaping as follows.
Shape sleeve:
Using the sloped method (see Pattern Notes) and cont in est patt, BO 10[8, 6, 6, 6, 6, 4, 4, 4] sts at beg of next 6[5, 2, 6, 10, 10, 3, 9, 12] RS rows, then BO 0[10, 8, 8, 0, 0, 6, 6, 6] sts at beg of next 0[2, 6, 3, 0, 0, 8, 4, 2] RS rows. 60 total sts BO for sleeve.
After Neck Shaping and Sleeve Shaping are complete, there will be 34[37, 40, 43, 46, 52, 55, 58, 61] total sts.
Keeping the first st of every RS row and last st of every WS row in St st, work even in patt until piece measures 14.5[14.75, 15, 15.25, 14.75, 14.5, 14.75, 14.25, 14.5] inches / 37[37.5, 38, 38.5, 37.5, 37, 37.5, 36, 37] cm from last sleeve BO row, ending after a WS row.
Hem
Row 1 [RS]: P 1[0, 1, 0, 1, 1, 0, 1, 0] , (k1, p1) to m, remove m, k1, p2tog, k1, p2tog, k1, p1, k1. 32[35, 38, 41, 44, 50, 53, 56, 59] sts.
Work in est K1, P1 Ribbing until ribbed hem measures 2.5 inches/6.5 cm, ending after a WS row.
BO in patt until 1 loop remains. Keep on needle for Section 3.
Section 3, Left Front and Left Front Sleeve
Note: Section 3 is picked up from the center front edge of Section 2 and worked sideways. The last loop on the needle from the hem of Section 2 counts as the first picked-up st.
Set-up row 1 [RS]: With RS facing, pick up and knit 66[69, 72, 75, 75, 75, 78, 78, 81] more sts along the side of the Right Front to removable marker (about 2 sts for every 3 rows). 67[70, 73, 76, 76, 76, 79, 79, 82] sts.
Set-up row 2 [WS]: Sl 1 purlwise wyif, k1, p4, k1, pm, (p2, k1) to last 9 sts, k9.
Note: Work sts increased before m on RS rows and after m on WS rows (neck increase sts) into est P1, K2 rib patt.
Set-up row 3: K9, (p1, k2) to 1 st before m, m1r, k1, sm, p1, (k2, m1) 2 times, p1, k1. 1 st increased at Neck edge, 2 sts increased in Cable section; 70[73, 76, 79, 79, 79, 82, 82, 85] sts.
Set-up row 4: Sl 1 purlwise wyif, k1, p6, k1, sm, p1, m1p, work in est rib to last 9 sts, k9. 71[74, 77, 80, 80, 80, 83, 83, 86] sts.
Establish Repeat
Row 1 [RS]: K9, work in est rib to 1 st before m, m1R, k1, sm, work Cable over next 8 sts, k1. 1 st increased; 72[75, 78, 81, 81, 81, 84, 84, 87] sts.
Row 2 [WS]: Sl 1 purlwise wyif, work Cable over next 8 sts, sm, p1, m1p, work in est rib to last 9 sts, k9. 1 st increased; 73[76, 79, 82, 82, 82, 85, 85, 88] sts.
Rep last 2 rows 1 more time. 75[78, 81, 84, 84, 84, 87, 87, 90] sts.
Row 5 [RS]: Work as Row 1. 1 st increased.
Row 6 [WS]: Sl 1 purlwise wyif, work Cable over 8 sts, sm, work in est rib to last 9 sts, k9.
Rep last 2 rows 11 more times. 87[90, 93, 96, 96, 96, 99, 99, 102] sts.
Place removable marker in fabric at beg of last WS row worked.
Note: Neck Shaping is now complete. Maintain the last st of RS rows/first st of WS rows in St st (rather than slipping the first st of each WS row).
Work even in patt with no further increases until piece measures 9[10, 11, 12, 13, 14, 15, 16, 17] inches/ 23[25.5, 28, 30.5, 33, 35.5, 38, 40.5, 43] cm from pick-up edge, ending after a WS row.

Shape sleeve:
Next row [RS]: BO 59[60, 61, 62, 60, 59, 60, 58, 59] sts, patt to end. 28[30, 32, 34, 36, 37, 39, 41, 43] sts.
Work 5 rows even in est patt.
Note: Work decreases into rib pattern, working ssk or ssp as needed.
Sleeve dec row [RS]: K1, ssk (or ssp), patt to end. 1 st decreased, 27[29, 31, 33, 35, 36, 38, 40, 42] sts rem.
Work 7[5, 5, 5, 5, 5, 3, 3, 3] rows even in patt.
Rep last 8[6, 6, 6, 6, 6, 4, 4, 4] rows 4[8, 4, 0, 2, 0, 12, 10, 8] more time(s). 23[21, 27, 33, 33, 36, 26, 30, 34] sts.
Rep Sleeve dec row.
Work 5[3, 3, 3, 3, 3, 1, 1, 1] row(s) even in patt.
Rep last 6[4, 4, 4, 4, 4, 2, 2, 2] rows 2[0, 6, 12, 9, 12, 2, 6, 10] more times. 20[20, 20, 20, 23, 23, 23, 23, 23] sts rem.
Work even in patt until Sleeve measures 15 inches/38 cm from BO row, ending after a WS row.
Cuff
Row 1 [RS]: K 0[0, 0, 0, 1, 1, 1, 1, 1] , (p1, k1) to 1 st before m, p1, remove m, k1, (p1, k2tog) 2 times, p1, k1. 18[18, 18, 18, 21, 21, 21, 21, 21] sts.
Work even in P1, K1 rib as est for 9 rows.
BO in patt until 1 loop remains. Keep on needle for Section 4.
Section 4, Left Back and Sleeve
Note: Section 4 is picked up from the shoulder edge of Section 3 and worked from the top down. The last loop on the needle from the cuff of Section 3 counts as the first picked-up st.
Set up Section 4
Set-up row 1 [RS]: With RS facing, pick up and knit 6 more sts along the ribbed cuff portion of Section 3, pick up and knit 70[73, 76, 79, 82, 88, 91, 94, 97] sts along remainder of Section 3 to removable marker (about 2 sts for every 3 rows), remove m, cast on 17 sts. 94[97, 100, 103, 106, 112, 115, 118, 121] sts.
Set-up row 2 [WS]: P1, k1, p4, k1, pm, (p2, k1) to last 9 sts, p2, k7.
Set-up row 3: K9, (p1, k2) to m, sm, p1, (m1, k2) 2 times, p1, k1. 2 sts increased; 96[99, 102, 105, 108, 114, 117, 120, 123] sts.
Set-up row 4: P1, work Row 1 of Cable over next 8 sts, sm, (p2, k1) to last 9 sts, p2, k7.
Establish Pattern
Row 1 [RS]: K9, (p1, k2) to m, sm, work Cable over next 8 sts, k1.
Row 2 [WS]: P1, work Cable over next 8 sts, sm, (p2, k1) to last 9 sts, p2, k7.
Cont in est patt until piece measures 4.25[4.25, 4.25, 4.25, 5, 5, 5, 5, 5] inches / 11[11, 11, 11, 12.5, 12.5, 12.5, 12.5, 12.5] cm, ending after a WS row.
Shape sleeve:
Using the sloped method (see Pattern Notes) and cont in est patt, BO 10[8, 6, 6, 6, 6, 4, 4, 4] sts at beg of next 6[5, 2, 6, 10, 10, 3, 9, 12] RS rows, then BO 0[10, 8, 8, 0, 0, 6, 6, 6] sts at beg of next 0[2, 6, 3, 0, 0, 8, 4, 2] RS rows. 36[39, 42, 45, 48, 54, 57, 60, 63] sts rem.
Work even in patt until piece measures 14.5[14.75, 15, 15.25, 14.75, 14.5, 14.75, 14.25, 14.5] inches / 37[37.5, 38, 38.5, 37.5, 37, 37.5, 36, 37] cm, ending after a WS row.
Hem
Row 1 [RS]: K 1[0, 1, 0, 1, 1, 0, 1, 0] , (p1, k1) to 1 st before m, p1, remove m, k1, (p2tog, k1) 2 times, p1, k1. 2 sts dec'd; 34[37, 40, 43, 46, 52, 55, 58, 61] sts.
Work in est K1, P1 Ribbing until Hem measures 2.5 inches/6.5 cm, ending after a WS row.
BO all sts in patt.

FINISHING
With mattress st, sew side edge of Section 4 to cast-on edge of Section 1. Weave in ends.
Block sweater to finished measurements. Sew sleeve and side seams using mattress st.
Neck edging
Join yarn to right Back Neck. With crochet hook, work 12 sl st along right Back Neck, 12 sl st along left Back Neck, 16 sl st along left Front Neck, and 16 sl st along right Front Neck. Fasten off, weave in rem ends.
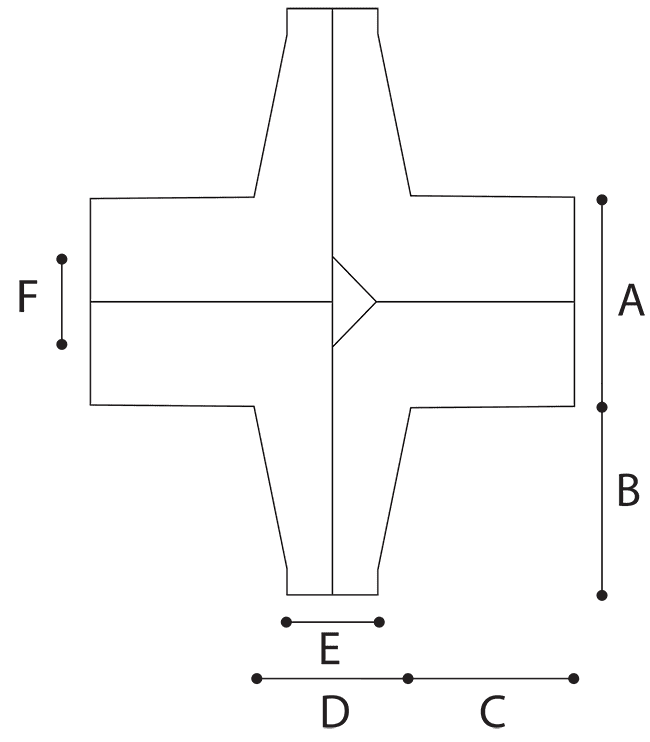
A – Body Width: 18[19.75, 21.75, 23.5, 25.25, 27.75, 29.75, 31.5, 33.25] inches / 45.5[50, 55, 59.5, 64, 70.5, 75.5, 80, 84.5] cm
B – Sleeve Length: 17 inches/43 cm
C – Body Length to Underarm: 16[16.25, 16.5, 16.75, 16.25, 16, 16.25, 15.75, 16] inches/ 40.5[41.5, 42, 42.5, 41.5, 40.5, 41.5, 40, 40.5] cm
D – Upper Arm: 12.25[13.25, 14, 15, 16.75, 17, 18, 19.25, 20.25] inches/ 31[33.5, 35.5, 38, 42.5, 43, 45.5, 49, 51.5] cm
E – Wrist: 8.25[8.25, 8.25, 8.25, 9.75, 9.75, 9.75, 9.75, 9.75] inches/ 21[21, 21, 21, 25, 25, 25, 25, 25] cm
F – Neck Width (see Pattern Notes): 8.5 inches/21.5 cm
ABOUT THE DESIGNER
 Amy has been crazy for yarn ever since she had some down time in between pizza making back in Iowa. She's been the creative director for Universal Yarn, yarn director for Jimmy Beans Wool, and has done knit and crochet designs for most major magazines. She is currently the senior creative manager for Premier Yarns. She also does freelance design work, technical editing, crochet chart making, and many other assorted yarny things.
When she's not busy with fiber, she's probably playing tennis, at the dog park, or sitting in the corner being antisocial. Find more of her work on Ravelry.
Pattern & images © 2026 Amy Gunderson