


Chain, Chain, Chain, a free knitting pattern from Knitty.com. Free knitting pattern for a striped garter stitch triangular shawl.
INTRODUCTION
Chain, Chain, Chain
 by Laura Barker

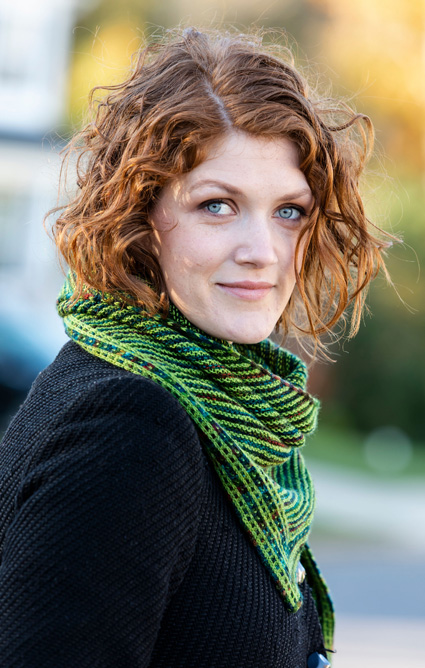
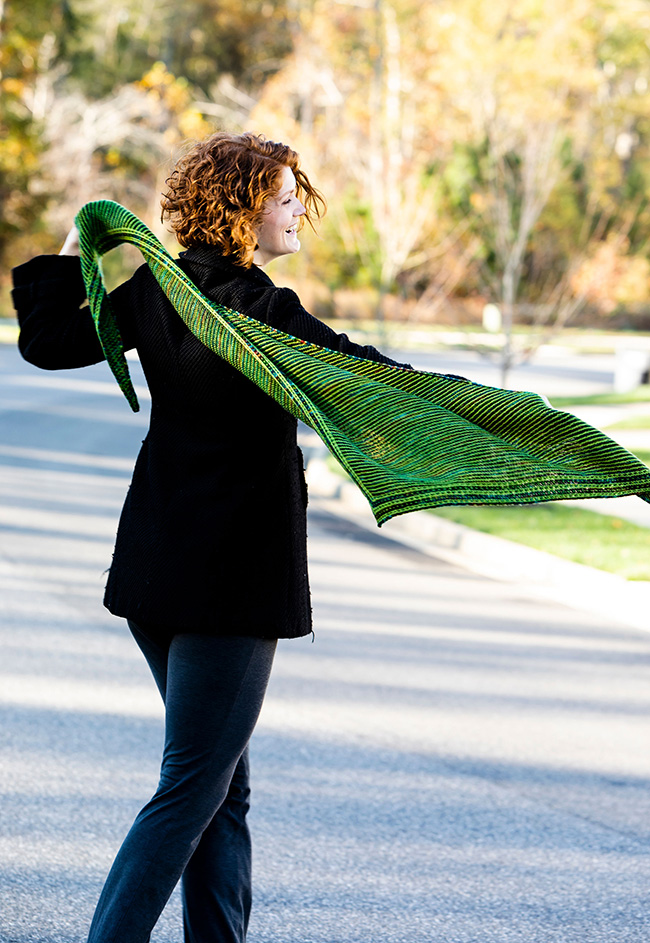
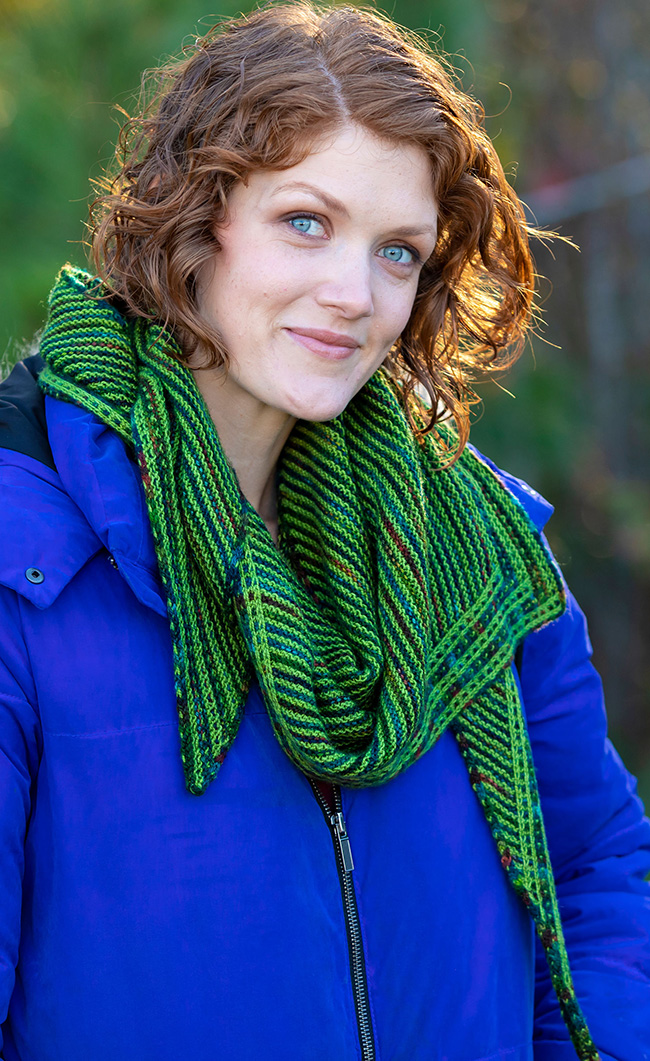
Chain, Chain, Chain is an asymmetric garter stitch shawl with two asymmetric, but similar, slip stitch borders from Barbara Walker which are worked simultaneously with the shawl body. The vertical border, worked along the right edge, is stockinette. The horizontal border, worked along the top edge, is garter stitch. The two borders merge together at a dramatic point.
To me, these borders resemble chains, perhaps because I've been thinking more about Aretha Franklin since her passing. Her music was an important part of the soundtrack of my daughters' childhoods, so I named my shawl "Chain, Chain, Chain," in her honor. The shawl features a continuous i-cord selvedge that begins with the cast-on, travels up each side, and finally, is worked as the bind-off. The i-cord features a single stitch in the contrast color worked every few rows, adding to the chain appearance.
While the yarns I used were my treasures from Maryland Sheep and Wool, "Chain, Chain, Chain" is designed for any two skeins of contrasting sock yarn weighing about 100g each. With additional skeins, the shawl could easily be expanded.
 model: Rachael Howell
photos: Kellie Nuss


SIZE
One
FINISHED MEASUREMENTS
Width: 83 inches/211 cm
Depth at deepest point: 22 inches/56 cm
MATERIALS
Yarn
![]() [MC] Persimmon Tree Farm Piggy Toes SW [100% superwash merino; 560 yd per 113g skein]; color: PT814; 1 skein
[MC] Persimmon Tree Farm Piggy Toes SW [100% superwash merino; 560 yd per 113g skein]; color: PT814; 1 skein
![]() [CC] Miss Babs Yummy 2-ply [100% superwash merino; 400 yd/365 m per 115 g skein]; color: Hops; 1 skein
[CC] Miss Babs Yummy 2-ply [100% superwash merino; 400 yd/365 m per 115 g skein]; color: Hops; 1 skein
Recommended needle size
[always use a needle size that gives you the gauge listed below - every knitter's gauge is unique]
![]() US #4/3.5mm circular needle, 32 inch/80 cm or longer
US #4/3.5mm circular needle, 32 inch/80 cm or longer
Notions
![]() one DPN in a similar size, or cable needle (for a setup step)
one DPN in a similar size, or cable needle (for a setup step)
![]() stitch markers (optional but can be helpful)
stitch markers (optional but can be helpful)
![]() yarn needle
yarn needle
GAUGE
22 sts/34 rows = 4 inches/10 cm in stockinette stitch
22 sts/54 rows = 4 inches/10 cm in garter stitch
40sts/54 rows = 4 inches/10 cm in slip stitch border
PATTERN NOTES
[Knitty's list of standard abbreviations and techniques can be found here.]
This triangular wrap begins with a small i-cord cast-on based on Judy Becker's magic cast-on. The i-cord selvedges and vertical slip stitch border grow from the cast-on. Once the border grows to full width, the garter stitch body begins and grows slowly, with decreases at the right edge of the garter stitch every 4 rows, and increases at the left edge every other row. The result is a long, skinny, asymmetric triangle which may be styled in many ways. While the start of this shawl is tangy, once the garter stitch is well established, the bulk of the shawl may require less concentration. The top border continues the asymmetry as it nearly mirrors the stockinette slipped vertical border with a horizontal, garter stitch version. The i-cord border features a single stitch in the contrast color worked every few rows. This continues the pattern, adds interest to the project, and anchors the contrast color securely without having to twist yarns on the wrong side.
On Which Color to Use
You change color every two rows, on the RS row. In the instructions below, the color used is noted at the start of the RS row; on the following WS row, use the same color.
- Abbreviations:
LLI*[Special Left Lifted Increase]: With left needle, on RS, lift the left leg of stitch three rows below the stitch just worked (closest stitch below of same color), and knit tbl. 1 st increased. - LSR: Left Selvedge Row
- M1p Make 1 purl stitch: Insert left needle, from front to back, under strand of yarn which runs between last stitch on left needle and first stitch on right needle; purl this stitch through back loop.1 st increased.
- RSR: Right Selvedge Row
- slp 3 wyif: Slip 3 sts purlwise with yarn held in front.
I-cord Selvedge
The I-cord selvedges are the three stitches at each edge, worked as you work the body of the shawl. When working the MC at the right edge [RS rows], the three selvedge stitches are worked twice before working the body of the shawl. When working the MC, on the RS, the three selvedge stitches at the left edge appear as purl stitches. On the WS, these stitches are worked three times before working the body of the shawl to accommodate the longer edge. When working the CC, only the center selvedge stitch is worked; the other two stitches are slipped. These CC stitches not only mirror the slipped-stitch border, they also anchor the CC color at each edge, and no twisting of yarns is needed when changing colors.
I-cord selvedge:
Note: that the selvedge sts are slipped at the end of every row.
RSR1 [Worked at start of RS row]: With CC, Sl1p wyib, k1, sl1p wyib.
LSR2 [Worked at start of WS row]: With CC, Sl1p wyib, k1, sl1p wyib.
RSR3a-b [Worked at start of RS row]: With MC, K3; slip 3 stitches just worked purlwise from right needle to left. Do not turn. K3.
LSR4a-c [Worked at start of WS row, with MC]: [K3 (be careful; third stitch will be very close to adjacent body stitch), slip 3 stitches just worked purlwise from right needle to left. Do not turn.] twice, k3.
Techniques:
- Judy's Magic Cast On
- Kitchener Stitch/Grafting: here and here
- Slipping stitches: All stitches are slipped purlwise.
For the I-cord selvedges, stitches are slipped with yarn in front.
For the body of the shawl, stitches are slipped with yarn in back.
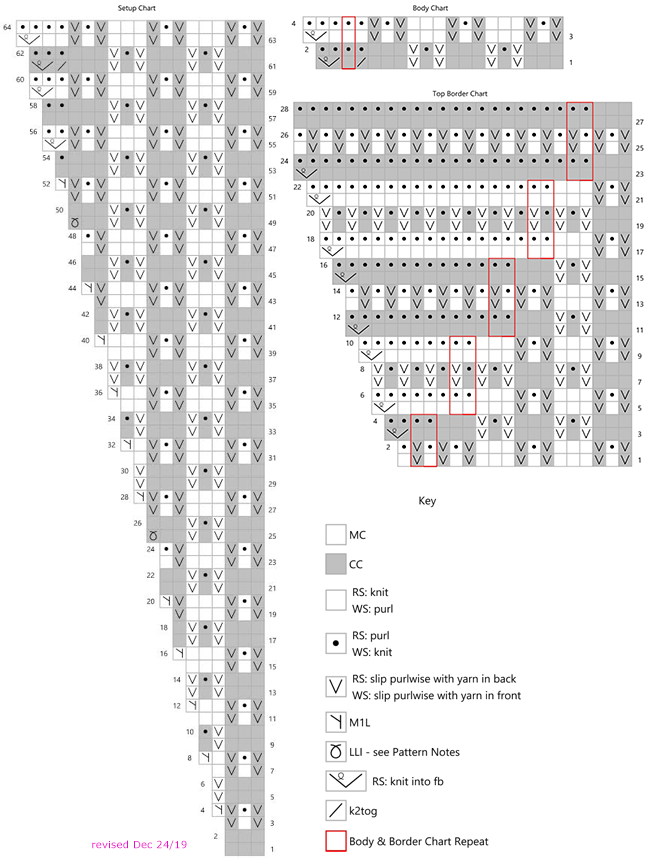
CHARTS
Setup Pattern
Work from Chart or written instructions as you prefer.
Row 1[RS]: With CC, K3.
Row 2[WS]: P3.
Row 3: With MC, Sl1p wyib, k1, sl1p wyib.
Row 4: M1p, sl1p wyif, k1, sl1p wyif. 1 st inc.
Row 5: With CC, K3, sl1p wyib.
Row 6: Sl1p wyif, p3.
Row 7: With MC, [Sl1p wyib, k1] 2 times.
Row 8: M1p, p1, sl1p wyif, k1, sl1p wyif.
Row 9: With CC, K3, sl1p wyib, k1.
Row 10: K1, sl1p wyif, p3.
Row 11: With MC, Sl1p wyib, k1, sl1p wyib, k2.
Row 12: M1p, p2, sl1p wyif, k1, sl1p wyif. 1 st inc.
Note: At this point, slip-stitch border is two chain-motifs wide.
Row 13: With CC, K3, sl1p wyib, k1, sl1p wyib.
Row 14: Sl1p wyif, k1, sl1p wyif, p3.
Row 15: With MC, Sl1p wyib, k1, sl1p wyib, k3.
Row 16: M1p, p3, sl1p wyif, k1, sl1p wyif. 1 st inc.
Row 17: With CC, K3, [sl1p wyib, k1] 2 times.
Row 18: P1, sl1p wyif, k1, sl1p wyif, p3.
Row 19: With MC, Sl1p wyib, k1, sl1p wyib, k3, sl1p wyib.
Row 20: M1p, sl1p wyif, p3, sl1p wyif, k1, sl1p wyif. 1 st inc.
Row 21: With CC, K3, sl1p wyib, k1, sl1p wyib, k2.
Row 22: P2, sl1p wyif, k1, sl1p wyif, p3.
Row 23: With MC, Sl1p wyib, k1, sl1p wyib, k3, sl1p wyib, k1.
Row 24: K1, sl1p wyif, p3, sl1p wyif, k1, sl1p wyif.
Row 25: With CC, K3, sl1p wyib, k1, sl1p wyib, k2, LLI*. 1 st inc.
Note: At this point, slip-stitch border is three chain-motifs wide.
Row 26: P3, sl1p wyif, k1, sl1p wyif, p3.
Row 27: With MC, Sl1p wyib, k1, sl1p wyib, k3, sl1p wyib, k1, sl1p wyib.
Row 28: M1p, sl1p wyif, k1, sl1p wyif, p3, sl1p wyif, k1, sl1p wyif. 1 st inc.
Row 29: With CC, K3, sl1p wyib, k1, sl1p wyib, k3, sl1p wyib.
Row 30: Sl1p wyif, p3, sl1p wyif, k1, sl1p wyif, p3.
Row 31: With MC, Sl1p wyib, k1, sl1p wyib, k3, [sl1p wyib, k1] 2 times.
Row 32: M1p, p1, sl1p wyif, k1, sl1p wyif, p3, sl1p wyif, k1, sl1p wyif. 1 st inc.
Row 33: With CC, K3, sl1p wyib, k1, sl1p wyib, k3, sl1p wyib, k1.
Row 34: K1, sl1p wyif, p3, sl1p wyif, k1, sl1p wyif, p3.
Row 35: With MC, Sl1p wyib, k1, sl1p wyib, k3, sl1p wyib, k1, sl1p wyib, k2.
Row 36: M1p, p2, sl1p wyif, k1, sl1p wyif, p3, sl1p wyif, k1, sl1p wyif. 1 st inc.
Note: At this point, slip-stitch border is four chain-motifs wide.
Row 37: With CC, [K3, sl1p wyib, k1, sl1p wyib] 2 times.
Row 38: [Sl1p wyif, k1, sl1p wyif, p3] 2 times.
Row 39: With MC, [Sl1p wyib, k1, sl1p wyib, k3] 2 times.
Row 40: M1p, [p3, sl1p wyif, k1, sl1p wyif] 2 times. 1 st inc.
Row 41: With CC, [K3, sl1p wyib, k1, sl1p wyib] 2 times, k1.
Row 42: P1, [sl1p wyif, k1, sl1p wyif, p3] 2 times.
Row 43: With MC, [Sl1p wyib, k1, sl1p wyib, k3] 2 times, sl1p wyib.
Row 44: M1p, sl1p wyif, [p3, sl1p wyif, k1, sl1p wyif] 2 times. 1 st inc.
Row 45: With CC, [K3, sl1p wyib, k1, sl1p wyib] 2 times, k2.
Row 46: P2, [sl1p wyif, k1, sl1p wyif, p3] 2 times.
Row 47: With MC, [Sl1p wyib, k1, sl1p wyib, k3] 2 times, sl1p wyib, k1.
Row 48: K1, sl1p wyif, [p3, sl1p wyif, k1, sl1p wyif] 2 times.
Row 49: With CC, [K3, sl1p wyib, k1, sl1p wyib] 2 times, k2, LLI*. 1 st inc.
Note: At this point, slip-stitch border is full width, five chain-motifs wide.
Row 50: P3, [sl1p wyif, k1, sl1p wyif, p3] 2 times.
Row 51: With MC, [Sl1p wyib, k1, sl1p wyib, k3] 2 times, sl1p wyib, k1, sl1p wyib.
Note: Next row will begin garter stitch body.
Row 52: M1p, sl1p wyif, k1, sl1p wyif, [p3, sl1p wyif, k1, sl1p wyif] 2 times. 1 st inc.
Row 53: With CC, [K3, sl1p wyib, k1, sl1p wyib] 2 times, k4.
Row 54: K1, p3, [sl1p wyif, k1, sl1p wyif, p3] 2 times.
Row 55: With MC, [Sl1p wyib, k1, sl1p wyib, k3] 2 times, sl1p wyib, k1, sl1p wyib, kf&b. 1 st inc.
Row 56: K2, sl1p wyif, k1, sl1p wyif, [p3, sl1p wyif, k1, sl1p wyif] 2 times.
Row 57: With CC, [K3, sl1p wyib, k1, sl1p wyib] 2 times, k5.
Row 58: K2, p3, [sl1p wyif, k1, sl1p wyif, p3] 2 times.
Row 59: With MC, [Sl1p wyib, k1, sl1p wyib, k3] 2 times, [sl1p wyib, k1] 2 times, kf&b. 1 st inc.
Row 60: K3, sl1p wyif, k1, sl1p wyif, [p3, sl1p wyif, k1, sl1p wyif] 2 times.
Row 61: With CC, [K3, sl1p wyib, k1, sl1p wyib] 2 times, k3, k2tog, kf&b.
Row 62: K3, p3, [sl1p wyif, k1, sl1p wyif, p3] 2 times.
Row 63: With MC, [Sl1p wyib, k1, sl1p wyib, k3] 2 times, sl1p wyib, k1, sl1p wyib, k2, kf&b. 1 st inc.
Row 64: K4, sl1p wyif, k1, sl1p wyif, [p3, sl1p wyif, k1, sl1p wyif] 2 times.
Body Pattern
Work from Chart or written instructions as you prefer. Note that stitch counts here do NOT include selvedge stitches.
Row 1 [RS]: With CC, [K3, sl1p wyib, k1, sl1p wyib] 2 times, k3, k2tog, k to last st, kf&b.
Row 2: K to last 15 sts, p3, [sl1p wyif, k1, sl1p wyif, p3] 2 times.
Row 3: With MC, [Sl1p wyib, k1, sl1p wyib, k3] 2 times, sl1p wyib, k1, sl1p wyib, k to last st, kf&b. 1 st inc.
Row 4: K to last 15 sts, sl1p wyif, k1, sl1p wyif, [p3, sl1p wyif, k1, sl1p wyif] 2 times.
Horizontal Border Pattern
Work from Chart or written instructions as you prefer. Note that stitch counts here do NOT include border stitches.
Row 1: With MC, [Sl1p wyib, k1, sl1p wyib, k3] 2 times, sl1p wyib, k1, sl1p wyib, [k1, sl1p wyib] to last st, k1.
Row 2: K1, [sl1p wyif, k1] to last 15 sts (slip-stitch border), sl1p wyif, k1, sl1p wyif, [p3, sl1p wyif, k1, sl1p wyif] 2 times.
Row 3: With CC, [K3, sl1p wyib, k1, sl1p wyib] 2 times, k to last st, kf&b. 1 st inc.
Row 4: K to last 15 sts (slip-stitch border), p3, [sl1p wyif, k1, sl1p wyif, p3] 2 times.
Note: At this point, slip-stitch border is reduced to four chain-motifs wide.
Row 5: With MC, [Sl1p wyib, k1, sl1p wyib, k3] 2 times, k to last st, kf&b. 1 st inc.
Row 6: K to last 12 sts (reduced slip-stitch border), [p3, sl1p wyif, k1, sl1p wyif] 2 times.
Row 7: With CC, [K3, sl1p wyib, k1, sl1p wyib] 2 times, [k1, sl1p wyib] to end of row.
Row 8: [Sl1p wyif, k1] to last 12 sts (reduced slip-stitch border), [sl1p wyif, k1, sl1p wyif, p3] 2 times.
Row 9: With MC, [Sl1p wyib, k1, sl1p wyib, k3] 2 times, k to last st, kf&b. 1 st inc.
Row 10: K to last 12 sts (reduced slip-stitch border), [p3, sl1p wyif, k1, sl1p wyif] 2 times.
Note: At this point, slip-stitch border is reduced to three chain-motifs wide.
Row 11: With CC, K3, sl1p wyib, k1, sl1p wyib, k to last st, kf&b. 1 st inc.
Row 12: K to last 9 sts (reduced slip-stitch border), p3, sl1p wyif, k1, sl1p wyif, p3.
Row 13: With MC, Sl1p wyib, k1, sl1p wyib, k3, sl1p wyib, k1, sl1p wyib, [k1, sl1p wyib] to last st, k1.
Row 14: K1, [sl1p wyif, k1] to last 9 sts (reduced slip-stitch border), sl1p wyif, k1, sl1p wyif, p3, sl1p wyif, k1, sl1p wyif.
Row 15: With CC, K3, sl1p wyib, k1, sl1p wyib, k to last st, kf&b. 1 st inc.
Row 16: K to last 9 sts (reduced slip-stitch border), p3, sl1p wyif, k1, sl1p wyif, p3.
Note: At this point, slip-stitch border is reduced to two chain-motifs wide.
Row 17: With MC, Sl1p wyib, k1, sl1p wyib, k to last st, kf&b. 1 st inc.
Row 18: K to last 6 sts, p3, sl1p wyif, k1, sl1p wyif.
Row 19: With CC, K3, sl1p wyib, k1, sl1p wyib, [k1, sl1p wyib] to end.
Row 20: [Sl1p wyif, k1] to last 4 sts sl1p wyif, p3.
Row 21: With MC, Sl1p wyib, k1, sl1p wyib, k to last st, kf&b. 1 st inc.
Row 22: K to last 6 sts, p3, sl1p wyif, k1, sl1p wyif.
Note: At this point, slip-stitch border is reduced to one chain-motif wide.
Row 23: With CC, K to last st, kf&b. 1 st inc.
Row 24: K to last 3 sts (reduced slip-stitch border), p3.
Row 25: With MC, [Sl1p wyib, k1] across.
Row 26: [K1, sl1p wyif] across.
Row 27: With CC, K across.
Row 28: K to last 3 sts (reduced slip-stitch border), p3.
DIRECTIONS

I-cord Cast-on and Set-up
With MC, Using Judy Becker's Magic Cast-On, cast-on 3 sts onto each side, beginning with lower needle.
Note: It is not necessary to begin with the lower needle, but it does a better job of securing the yarn tail.
Position work so that RS is up, and needle tips are facing to the left.
Pull lower needle out, towards the left, sliding lower 3 sts onto cable, and re-position lower needle as left needle. Slide 3 sts on right needle purlwise to left needle.
Row 1 [RS]: With MC, K3, wyib, slide 3 sts just worked purlwise from right needle to left.
Row 2 [RS]: RLI with MC, k1 with MC, k1 with CC, k1 with MC. 4 sts. Wyib, slide 3 sts from right needle to left. Fourth st remains on right needle. CC working yarn and tail just dangle.
Row 3 [RS]: With MC, RLI, k3. 5 sts. Wyib, slide 3 sts from right needle to left.
Row 4 [RS]: With MC, RLI, k3. 6 sts. You now have 6 sts on needle and 3 sts on cable.
Pull needle through 6 stitches so that all 9 stitches are together on cable. Slide all stitches onto right needle with RS showing; working yarn is a left edge. Slide first 3 stitches onto dpn (or cable needle). Rotate left end of dpn to the back half a rotation so that WS of these 3 stitches is showing (purl bumps). Slide 3 stitches from dpn back to right needle. Turn work.
Row 5 [WS]: With MC, Slp 3 wyif, p3, slp 3 wyif. 9 sts.
Pattern is now set up: There are three stitches each for the I-cord selvedges and body. Slip-stitch border is one chain-motif wide.
Row 1 [RS]: With CC, work RSR1; work Row 1 of Setup Pattern; slp 3 wyif.
Row 2: Work LSR2, work Row 2 of Setup Pattern; slp 3 wyif.
Row 3: With MC, work RSR3a-b; work Row 3 of Setup Pattern; slp 3 wyif.
Row 4: Work LSR4a-c, work Row 4 of Setup Pattern; slp 3 wyif.
Continue in pattern as set until you have completed Row 64 of the Setup Pattern.
Body Pattern
Row 1 [RS]: With CC, work RSR1; work Row 1 of Body Pattern; slp 3 wyif.
Row 2: Work LSR2, work row 2 of Body Pattern; slp 3 wyif.
Row 3: With MC, work RSR3a-b; work Row 3 of Body Pattern; slp 3 wyif.
Row 4: Work LSR4a-c, work Row 4 of Body Pattern; slp 3 wyif.
Repeat Rows 1-4 until shawl measures 58 inches/150 cm, or until no less than 10% of MC and CC remain, and there are an even number of garter stitch stitches in shawl body, ending with Row 2. If working a larger shawl with more yarn, reserve 10% of MC and CC for horizontal garter border and bind-off.
Horizontal Border Pattern
Row 1 [RS]: With CC, work RSR1; work Row 1 of Horizontal Border Pattern; slp 3 wyif.
Row 2: Work LSR2, work Row 2 of Horizontal Border Pattern; slp 3 wyif.
Row 3: With MC, work RSR3a-b; work Row 3 of Horizontal Border Pattern; slp 3 wyif.
Row 4: Work LSR4a-c, work row 4 of Horizontal Border Pattern; slp 3 wyif.
Continue in pattern as set until you have completed Row 28 of the Horizontal Border Pattern.
I-cord Bind-off
Bind-off Row 1[RS]: With MC, K3; slip 3 stitches just worked purlwise from right needle to left. Bring CC over MC to carry CC inside I-cord.
Bind-off Row 2 [RS]: With MC, K2, ssk; 1 body stitch bound off; slip 3 stitches just worked purlwise from right needle to left. Bring CC over MC to carry CC inside I-cord.
Bind-off Row 3 [RS]: K1 with MC, k1 with CC, carry MC over CC, ssk with MC; 1 body stitch bound off; slip 3 stitches just worked purlwise from right needle to left. Bring CC over MC to carry CC inside I-cord.
Bind-off Row 4 [RS]: With MC, K1, k1 tbl, ssk; 1 body stitch bound off; slip 3 stitches just worked purlwise from right needle to left. Bring CC over MC to carry CC inside I-cord.
Repeat Bind-off Rows 2-4 until all shawl body stitches are bound off. 3 left selvedge I-cord sts remain.
Work Bind-off Row 1 one more time.
FINISHING
Using Kitchener stitch to graft 3 Bind-off I-cord stitches and 3 Left Selvedge I-cord stitches together.
Weave in ends. To block shawl, first add a few drops of a non-residue soap for hand-knits to cold water. Completely submerge and soak for at least 20 minutes. Drain water, and gently squeeze out as much water as possible. Whenever you are moving wet shawl, be careful to fully support it and not allow any part to dangle and stretch. Roll shawl in towel and press to extract additional moisture. Place damp shawl on blocking surface and pin to desired dimensions; allow to dry fully. If the vertical border is curling, lightly steam block as follows: Set iron to the lowest temperature that allows steam. Fold vertical border in half with WS showing. Bring iron close to shawl, but DO NOT TOUCH your work with the iron. Infuse border with steam. Allow to dry before moving.
ABOUT THE DESIGNER
 Laura is a life-long knitter and former engineer and math teacher. She enjoys combining all the best of her experience in her favorite career, knitting design and education. Her designs feature innovative construction with clear instruction. She is the author of Mitered Entrelac, Knitting Entrelac Around the Corner, and has published patterns in Knitty, Knitter's Magazine, Knit Edge Magazine and on Ravelry. She was an instructor at a DC LYS, and has taught for Stitches Events and various retreats. She was founding VP of the Capitol Hill Knitting Guild.
Her work may also be found on Ravelry, Instagram, and FB as well as her website.
Pattern & images © 2019 Laura Barker.