Merida, a free crochet pattern from Knitty.com.
INTRODUCTION
Merida
 by Alison Green
![]()
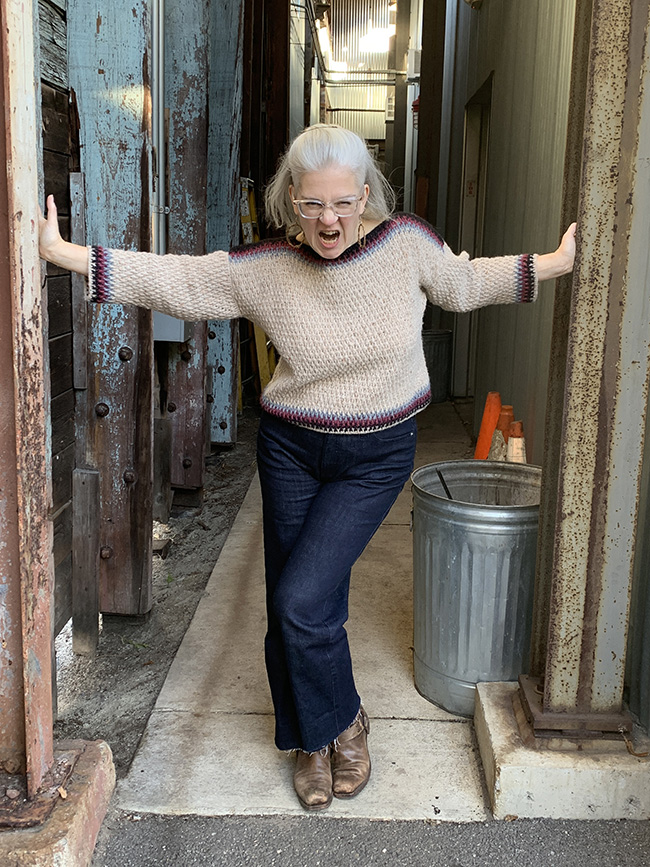
The "What the Fluff" theme for this issue got me excited to design one more piece in Berroco's latest brushed alcapa-blend yarn, Mistico. (I've already designed a whole pattern collection in this yarn and can't get enough of it!)
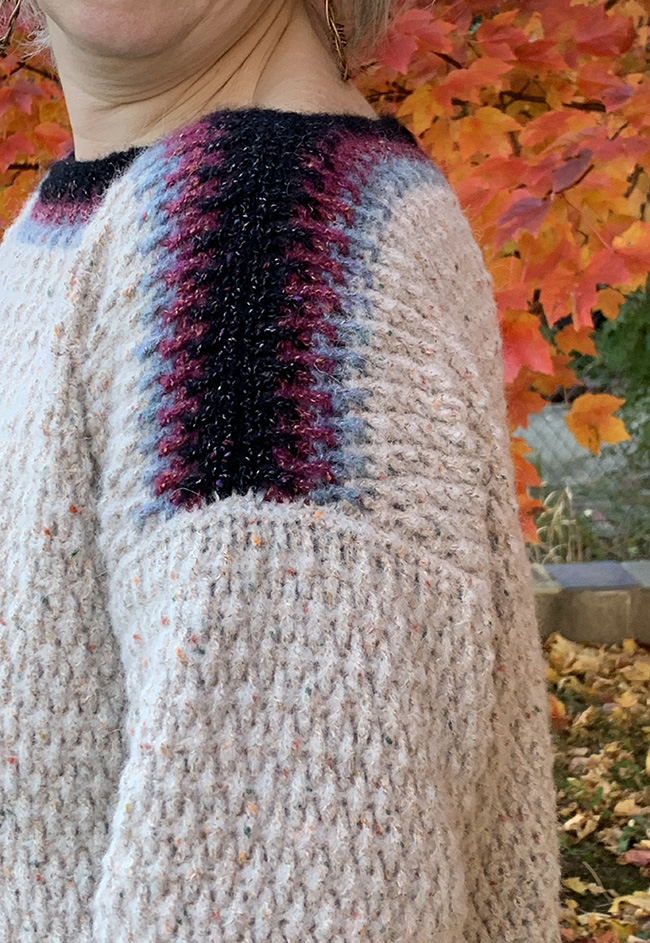
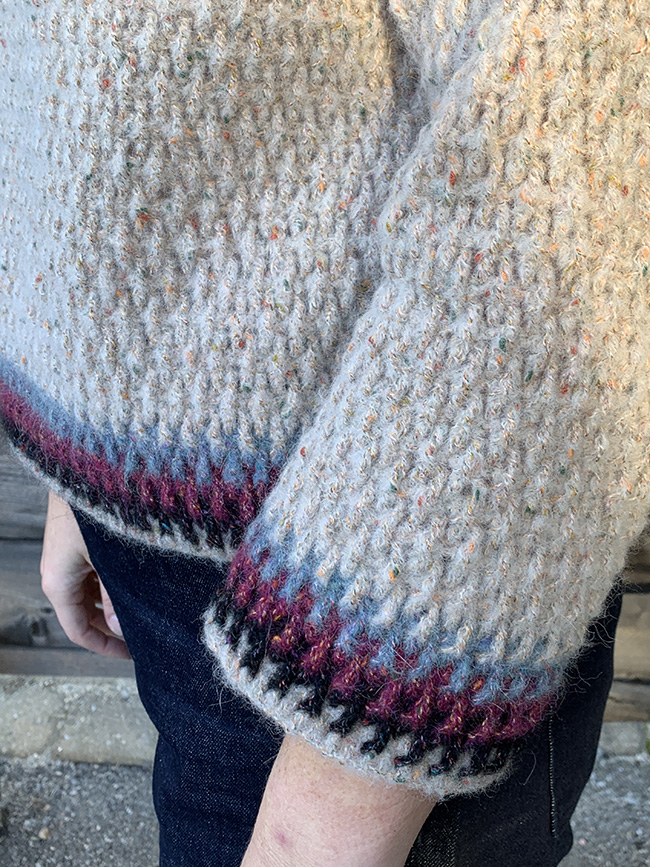
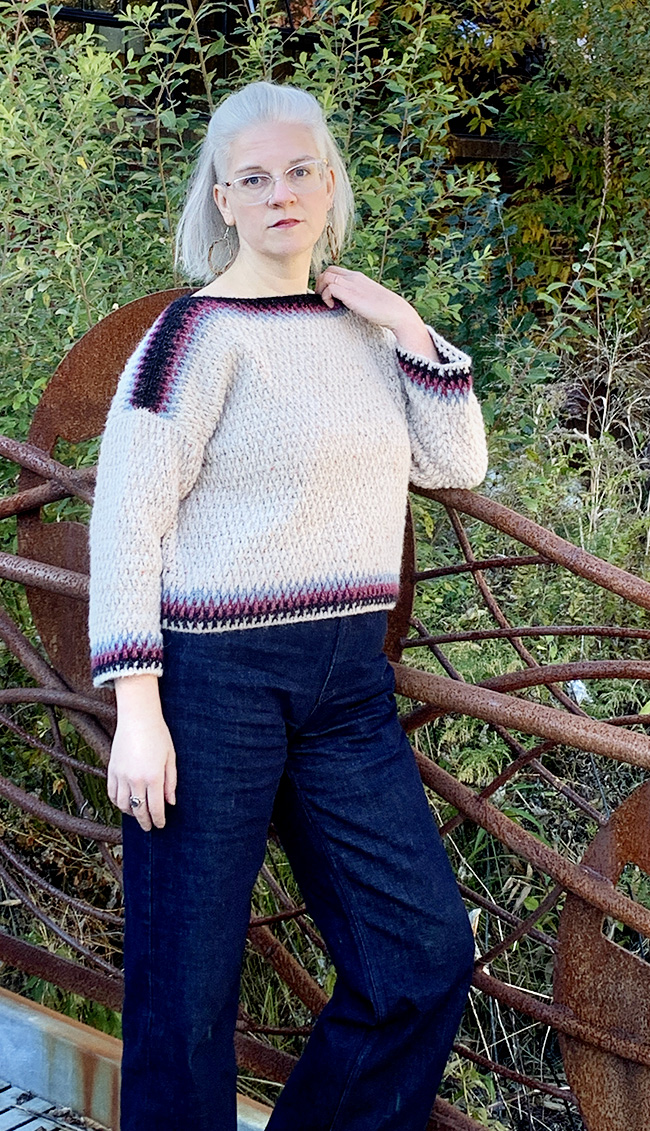
The crochet stitch pattern I've used, called Alpine Stitch, has a dimensional quality that shows off the little tweedy flecks in the yarn. Meanwhile, I love how the stripes are broken up by the front post treble crochet stitches worked into a row below.
The body of the sweater is worked in the round to the underarm, then split for back and front after some gusset shaping worked below the underarm. An easy boat neck highlights the stripe detail that is repeated at the shoulder and neck edge.
 model: Alison Green
 photos: John Bent
SIZE
Women's XS[S, M, L, 1X, 2X, 3X, 4X, 5X]
shown in size L with approximately 3 inches/7.5 cm of ease at chest/bust
FINISHED MEASUREMENTS
Circumference at chest/under arms: 35.75[40.5, 44.25, 48, 51.75, 56.5, 60.25, 64, 67.75] inches 91[103, 112.5, 122, 131.5, 143.5, 153, 162.5, 172] cm
Note: This measurement does not include gusset increases which are worked just before the underarm.
Length: 19.75[19.75, 20.25, 20.25, 20.75, 20.75, 21.5, 22, 22.75] inches/ 50[50, 51.5, 51.5, 52.5, 52.5, 54.5, 56, 58] cm
MATERIALS
Yarn
Berroco Mistico [48% Cotton, 30% Alpaca, 12% Wool, 10% Nylon; 191/175 per 50g skein];
![]() [MC] #2503 Dreamy; 6[7, 8, 8, 9, 9, 10, 11, 11] skeins
[MC] #2503 Dreamy; 6[7, 8, 8, 9, 9, 10, 11, 11] skeins
![]() [CC1] #2547 Astral; 1 skein
[CC1] #2547 Astral; 1 skein
![]() [CC2] #2525 Whimsical; 1 skein
[CC2] #2525 Whimsical; 1 skein
![]() [CC3] #2522 Pensive; 1 skein
[CC3] #2522 Pensive; 1 skein
Yarn Characteristics
![]() The sample shown uses a light worsted weight yarn that has a soft halo of solid color brushed alpaca with a slightly variegated cotton, wool, and nylon core that shows up as tweedy flecks throughout.
The sample shown uses a light worsted weight yarn that has a soft halo of solid color brushed alpaca with a slightly variegated cotton, wool, and nylon core that shows up as tweedy flecks throughout.
Recommended needle size
[always use a needle size that gives you the gauge listed below - every knitter's gauge is unique]
![]() Size G US / 4mm hook
Size G US / 4mm hook
Notions
![]() open-ring crochet markers
open-ring crochet markers
![]() yarn needle
yarn needle
GAUGE
17 sts/15 rows = approximately 4 inches/10 cm in pattern stitch
30 sts/26 rows = 7 inches/10 cm in pattern stitch
PATTERN NOTES
[Knitty's list of standard abbreviations and techniques can be found here.]
Construction method:
Body is worked in the round to the underarm, then divided for back and front. Shoulders are sewn. Sleeves are worked in the round from the bottom up, and joined to armholes using a slip stitch seam.
Note: When working in the round, you will still turn the work at the end of each round, to ensure that the pattern stays consistent when transitioning to working flat. This also makes the stitch pattern align better.
Techniques:
SDC (Standing double crochet): Video tutorial
fptr (Front Post Treble Crochet): Yo 2 times, insert hook from front to back to front around the post of the stitch indicated, yo, pull up a loop, (yo, pull through 2 loops on hook) 3 times.
Pattern Stitch 1 [Worked over an even number of sts, working in the round but turning at the end of each round]
Note: When changing colors, at the end of the round before the color change, work the sl st in the new color and break off the previous color, leaving an end to weave in later.
Rnd 1 [RS]: Sdc, *fptr around dc below next sc, skip this sc, dc in next sc; rep from * to last sc, fptr around dc below last sc, sl st in first st to join. Turn.
Rnd 2 [WS]: Ch 1, sc in same st and in each st to end. Sl st in first st to join. Turn.
Rnd 3 [RS]: Ch 1, sl st around dc below first sc, sdc, *dc in next sc, fptr around dc below next sc, skip this sc; rep from * to last sc, dc in last sc. Turn.
Rnd 4 [RS]: Ch 1, sc in same st and in each st to end. Sl st in first st to join. Turn.
Pattern Stitch 2 [Worked flat over an odd number of sts]
Note: When changing colors, at the end of the row before the color change, work the last step of the sc in the new color and break off the previous color, leaving an end to weave in later.
Row 1 [RS]: Sdc, *fptr around dc below next sc, skip this sc, dc in next sc; rep from * to end. Turn.
Row 2 [WS]: Ch 1, sc in first st and in each st to end. Turn.
Row 3: Sdc, *dc in next sc, fptr around dc below next sc, skip this sc; rep from * to last 2 sc, dc in each of last 2 sc. Turn.
Row 4: Ch 1, sc in first st and in each st to end. Turn.
DIRECTIONS

Body
Using MC, ch 154[174, 190, 206, 222, 242, 258, 274, 290] .
Set-Up Rnd 1 [RS]: Dc in 4th ch from hook (counts as 2 dc), dc in next ch in each ch across, sl st in top of tch to join. Turn. 152[172, 188, 204, 220, 240, 256, 272, 288] dc.
Set-Up Rnd 2 [WS]: Ch 1, sc in next dc and in each dc to end. With CC1, sl st in first st to join. Turn. Break off MC.
Begin working in Pattern Stitch 1. Work Rnds 1-2 with CC1, work Rnds 3-4 with CC2, work Rnds 1-2 with CC3.
Work Rnds 3-4 with MC, then continuing in MC, work Rnds 1-4 six more times, then work Rnds 1-2 once more. 36 total rounds worked including Set Up; work should measure 9.75 inches / 25 cm.
Place a locking st marker on the 77th[87th, 95th, 103rd, 111th, 121st, 129th, 137th, 145th] st; the first half of the sts will be the back, and marker indicates the first st of the front.
Shape gusset:
Rnd 1 (Inc Rnd) [RS]: Ch 1, sl st around dc below first sc, sdc, 2 dc in next sc, *fptr around dc below next sc, skip this sc, dc in next sc; rep from * to st before marked st, work a second dc in same st as last dc, fptr around dc below next (marked) sc and move marker up, skip this sc, 2 dc in next sc, **fptr around dc below next sc, skip this sc, dc in next sc; rep from * to last 2 sc, fptr around dc below next sc, skip this sc, 2 dc in last sc. Turn. 4 sts increased.
Rnd 2 [WS]: Ch 1, sc in same st and in each st to end, moving marker up. Sl st in first st to join. Turn.
Rnd 3 (Inc Rnd) [RS]: Ch 1, sdc, fptr around dc below next sc, dc in this sc (instead of skipping it), *fptr around dc below next sc, skip this sc, dc in next sc; rep from * to 2 sts before marked sc, fptr around dc below next sc, skip this sc, dc in next sc, fptr around dc below last st worked, dc in next (marked) sc and move marker up, fptr around dc below next sc, dc in this sc (instead of skipping it), **fptr around dc below next sc, skip this sc, dc in next sc; rep from ** to last 2 sts, fptr around dc below next sc, skip this sc, dc in next sc, fptr around dc below last st worked. Turn. 4 sts increased.
Rnd 4 [WS]: Ch 1, sc in same st and in each st to end, moving marker up. Sl st in first st to join. Turn.
Repeat last 4 rnds 3 times more. 168[188, 204, 220, 236, 256, 272, 288, 304] sts.
Divide back and front:
Next Row [RS]: Sl st in first 2 sc. Work Row 1 of Pattern St 2, ending in the st before the marked st. Turn. 83[93, 101, 109, 117, 127, 135, 143, 151] sts.
Remaining unworked sts will be the front. Continue only on the sts just worked for the back.

Back
Continue working in Pattern St 2 until armholes measure 6[6, 6.5, 6.5, 7, 7, 7.75, 8.25, 9] inches / 15[15, 16.5, 16.5, 18, 18, 19.5, 21, 23] cm, ending with a WS row. Break off MC and work next 2 rows in CC3, then 2 rows in CC2, then 2 rows in CC1. Fasten off.
Front
With RS facing, rejoin MC in the st after the marked st, and work Row 1 of Pattern St 2, ending in the st that was formerly the last st of the round. (Do not work into the sl st from the dividing row.)
Complete as for Back.
Sleeves
Using MC, ch 54[54, 54, 54, 58, 58, 60, 60, 64] .
Set-Up Rnd 1 [RS]: Dc in 4th ch from hook (counts as 2 dc), dc in next ch in each ch across, sl st in top of tch to join. Turn. 52[52, 52, 52, 56, 56, 58, 58, 62] dc.
Set-Up Rnd 2 [WS]: Ch 1, sc in next dc and in each dc to end. With CC1, sl st in first st to join. Turn. Break off MC.
Begin working in Pattern Stitch 1. Work Rnds 1-2 with CC1, work Rows 3-4 with CC2, work Rows 1-2 with CC3.
Continuing in Pattern St 1 with MC only, work 16[16, 8, 8, 8, 8, 4, 0, 0] more rnds, ending on Rnd 2 of pattern st.
Shape sleeve:
Rnd 1 (Inc Rnd) [RS]: Ch 1, sl st around dc below first sc, sdc, 2 dc in next sc, *fptr around dc below next sc, skip this sc, dc in next sc; rep from * to last 2 sc, fptr around dc below next sc, skip this sc, 2 dc in last sc. Turn. 2 sts increased.
Row 2 [WS]: Ch 1, sc in same st and in each st to end, moving marker up. Sl st in first st to join. Turn.
Rnd 3 (Inc Rnd) [RS]: Ch 1, sdc, fptr around dc below next sc, dc in this sc (instead of skipping it), *fptr around dc below next sc, skip this sc, dc in next sc; rep from * to last 2 sts, fptr around dc below next sc, skip this sc, dc in next sc, fptr around dc below last st worked. Turn. 2 sts increased.
Rnd 4 [WS]: Ch 1, sc in same st and in each st to end, moving marker up. Sl st in first st to join. Turn.
Repeat last 4 rounds 2[2, 3, 3, 3, 3, 4, 5, 6] times more. 64[64, 68, 68, 72, 72, 78, 82, 90] sts.
Work even in Pattern St 1 until sleeve measures 14.5[14.5, 14, 14, 14, 13, 13, 13, 13] inches / 37[37, 35.5, 35.5, 35.5, 33, 33, 33, 33] cm, ending on a WS row. Bind off, or leave yarn attached if joining to body using a sl st seam.
FINISHING
Count 19[24, 29, 33, 36, 41, 46, 50, 53] sts from armhole edge on each side of back and front to and place a marker for end of shoulder. Using either mattress st with RS facing, or sl st with WS facing, join shoulder seams.
Sew sleeves to armholes, or turn work to the WS and join with sl st.
Weave in all ends and block as desired. To block, soak in lukewarm water with a wool wash, squeeze most of the moisture out, and then lay flat to dry, shaping gently.

Body Circumference: 35.75[40.5, 44.25, 48, 51.75, 56.5, 60.25, 64, 67.75] inches / 91[103, 112.5, 122, 131.5, 143.5, 153, 162.5, 172] cm
Neck Width: 10.5 inches / 26.5 cm
Shoulder Width: 4.5[5.75, 6.75, 7.75, 8.5, 9.75, 10.75, 11.75, 12.5] inches / 11.5[14.5, 17, 19.5, 21.5, 25, 27.5, 30, 32] cm
Body Length to Underarm: 12.25 inches / 31 cm
Armhole Length: 7.5[7.5, 8, 8, 8.5, 8.5, 9.25, 9.75, 10.5] inches/ 19[19, 20.5, 20.5, 21.5, 21.5, 23.5, 25, 26.5] cm
Sleeve Cuff Circumference: 12.25[12.25, 12.25, 12.25, 13.25, 13.25, 13.75, 13.75, 14.5] inches / 31[31, 31, 31, 33.5, 33.5, 35, 35, 37] cm
Upper Sleeve Circumference: 15[15, 16, 16, 17, 17, 18.25, 19.25, 21.25] inches / 38[38, 40.5, 40.5, 43, 43, 46.5, 49, 54] cm
Sleeve Length: 14.5[14.5, 14, 14, 14, 13, 13, 13, 13] inches / 37[37, 35.5, 35.5, 35.5, 33, 33, 33, 33] cm
ABOUT THE DESIGNER
 Alison is the design director for Berroco yarns, and lives in Providence, RI. She has been working in the yarn industry as a designer, teacher and technical editor since 2002.
Pattern & images © 2023 Alison Green


