


Hextangled, a free knitting pattern from Knitty.com.
INTRODUCTION
Hextangled
by Kate Schimmer

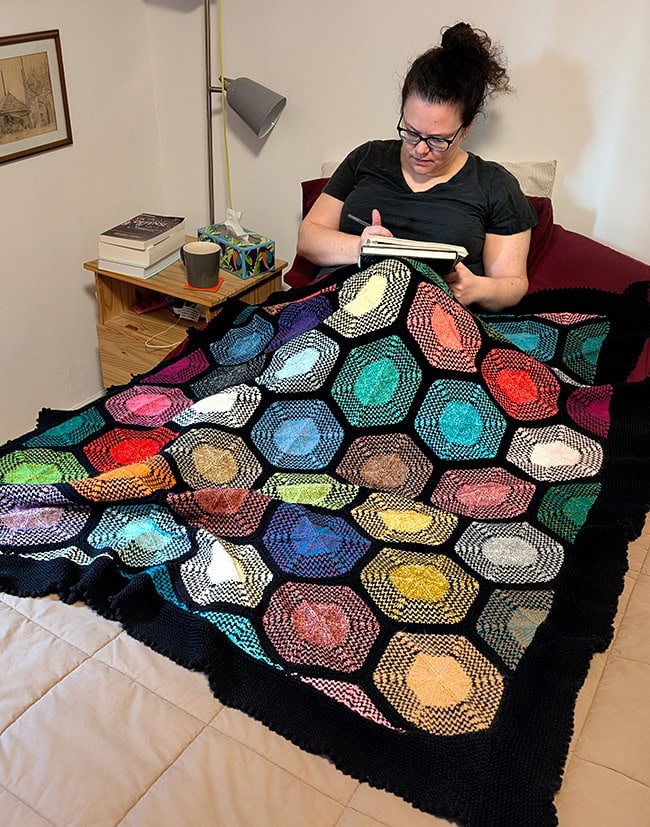
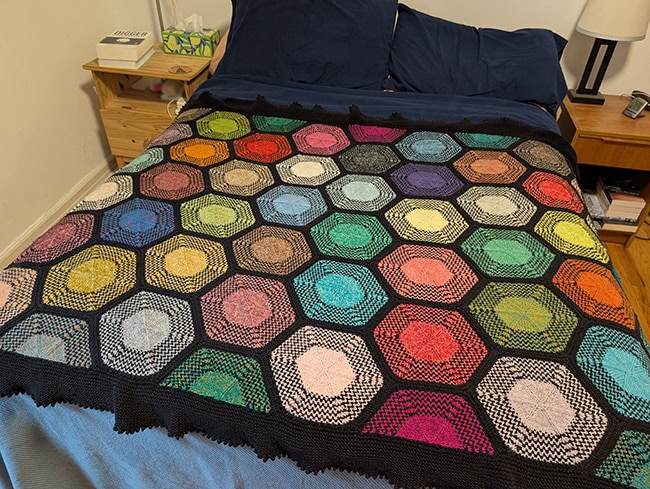
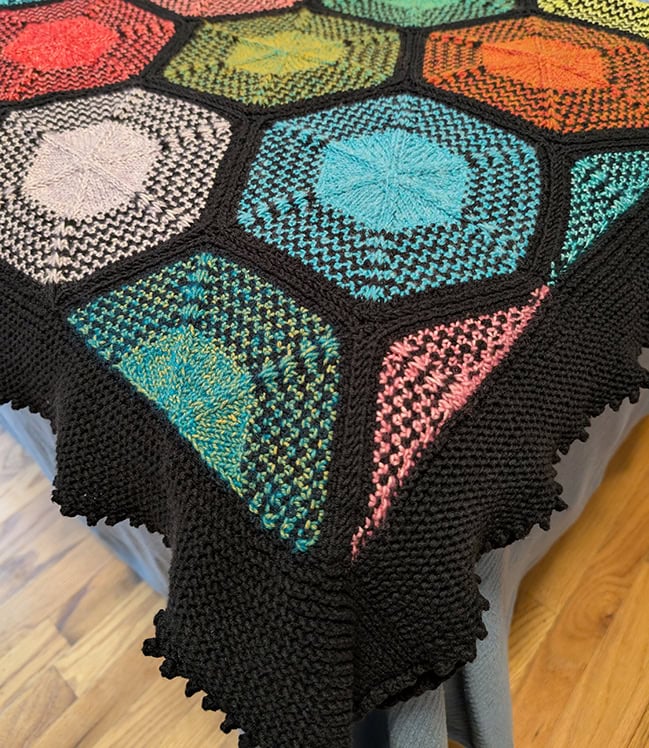
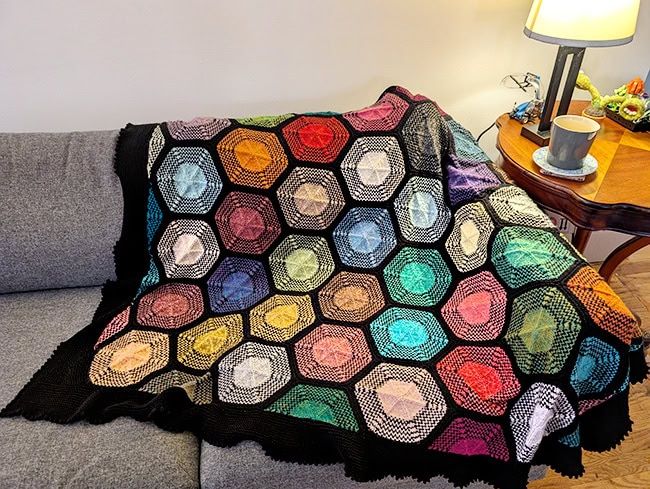
Did you know that hexagons can be infinitely tiled to fill a space, with no gaps? Hextangled – a portmanteau of "hexagon" and "rectangle" – is a blanket made of three types of modular components: hexagons, half-hexagons and hexagon-edges, that combine to form an almost-perfect rectangle. The components have solid stockinette centers, and a linen-stitch outer ring; using two colors, the linen stitch makes bold zig-zags that are the perfect canvas to play with color. A garter stitch-border, with two short-row triangles in opposite corners to fully square the components, is picked up and knit along each edge, and then is finished with a picot bind-off.
The blanket uses the main color for the linen-stitch increase rows and black contrast color for the bind-off of each component and the border. It was designed to use almost every gram of 49 colors in the Scheepjes Stone Washed/River Washed Color Pack; with each hexagon taking almost a full 10-gram mini-skein. The yarn order was random; the mini-skeins went into a project bag, and it was shaken up and the next color picked was the next color used. I kept the stack of components in order as I finished, soaked and blocked them, letting those original selections guide the look of the final blanket.
 model: Kate Schimmer
photos: Jonathan Altschuler, Kate Schimmer


SIZE
This is a modular blanket, adaptable to be any size by making a different number of pieces, working with a different yarn or working at a different gauge (or all three!)
FINISHED MEASUREMENTS
64 by 50 in / 163 by 127 cm
The sample shown is made of 40 Hexagons, 8 Half-Hexagons on the long sides, and 10 Hexagon-Edges on the short sides. The knit-on garter-stitch border adds 3.5 in / 9 cm to each side.
Each Hexagon measures 4.5 in / 11.5 cm long on each side.
Each Half-Hexagon measures 4.5 in / 11.5 cm on short side and 9 in / 23 cm on the long side.
Each Hexagon-Edge measures 4.5 in / 11.5 cm on short side and 7.75 in / 19.5 cm on the long side.
MATERIALS
Yarn
![]() [MC] Scheepjes Stone Washed/River Washed Color Pack (78% Cotton, 22% Acrylic; 28 yd / 26 m per 10g skein); 49 skeins
[MC] Scheepjes Stone Washed/River Washed Color Pack (78% Cotton, 22% Acrylic; 28 yd / 26 m per 10g skein); 49 skeins
![]() [CC] Scheepjes Softfun (60% Cotton, 40% Acrylic; 153 yd/ 140 m per 50g skein); black, color #2408; 15 skeins
[CC] Scheepjes Softfun (60% Cotton, 40% Acrylic; 153 yd/ 140 m per 50g skein); black, color #2408; 15 skeins
See notes below about yardage and colors.
Yarn Characteristics
![]() The blanket uses a sport-weight cotton-acrylic blend, which is soft and smooth with a slight halo. It comes in a sampler package of 58 different semi-solid colors, of which 49 were used as the main color (center) color for the Hexagons, Half-Hexagons and Hexagon-Edges. The contrast color is a dk-weight cotton acrylic blend in solid black for contrast. Although there is a slight difference in gauge in the two yarns, it's not noticeable in the linen-stitch pattern, and smaller needles are used for the garter-stitch border in the contrast color.
The blanket uses a sport-weight cotton-acrylic blend, which is soft and smooth with a slight halo. It comes in a sampler package of 58 different semi-solid colors, of which 49 were used as the main color (center) color for the Hexagons, Half-Hexagons and Hexagon-Edges. The contrast color is a dk-weight cotton acrylic blend in solid black for contrast. Although there is a slight difference in gauge in the two yarns, it's not noticeable in the linen-stitch pattern, and smaller needles are used for the garter-stitch border in the contrast color.
This pattern will work best when the main and contrast colors have a strong contrast within each individual hexagon, and smooth yarns will show off the linen-stitch texture best. If using two different weight yarns for the MC and CC, swatching will be important to estimate the total yarn required and the estimated sizes of the final blanket!
If you are substituting a different yarn for the MC, you can choose to work with a single color, or as many as one different color for each piece. If you are substituting a different yarn for the CC, you can choose to work with a single color, or as many as one different color for each piece.
Each Hexagon uses approximately 28.5 yds/26 m of the main color and 31.5 yds/29 m of the contrast color; each Half-Hexagon uses 14 yds/13 m of the main color and 16 yds/15 m of the contrast color; each Hexagon-Edge uses 4.5 yds/4 m of the MC and 5 yds/5 m of the contrast color.
The Top and Bottom Borders use approximately 159 yds/145 m of the contrast color each; the Right and Left Borders use approximately 252 yds/230 m of the contrast color each; the Two-Stitch Picot Border uses 25 yds/23 m along each short side and 34 yds/31 m along each long side.
Recommended needle size
[always use a needle size that gives you the gauge listed below - every knitter's gauge is unique]
![]() US #4/3.5mm needles, for small-circumference in the round
US #4/3.5mm needles, for small-circumference in the round
![]() US #4/3.5mm needles, for working flat
US #4/3.5mm needles, for working flat
![]() US #8/5mm needles, for small-circumference in the round
US #8/5mm needles, for small-circumference in the round
![]() US #8/5mm 16 inch/40 cm circular needle
US #8/5mm 16 inch/40 cm circular needle
![]() US #8/5mm needles, for working flat
US #8/5mm needles, for working flat
![]() US #4/3.5mm circular needles, 32-40 inch/80-100 cm long, for working garter-stitch border on perimeter flat
US #4/3.5mm circular needles, 32-40 inch/80-100 cm long, for working garter-stitch border on perimeter flat
Notions
![]() US F/3.75mm crochet hook, for cast-on
US F/3.75mm crochet hook, for cast-on
![]() cable needle
cable needle
![]() yarn needle
yarn needle
![]() stitch markers
stitch markers
![]() stitch holders or waste yarn
stitch holders or waste yarn
Optional but recommended:
![]() blocking mats
blocking mats
![]() painter's tape or masking tape
painter's tape or masking tape
![]() ruler
ruler
![]() protractor
protractor
![]() pins
pins
![]() removable stitch markers
removable stitch markers
![]() steamer
steamer
GAUGE
22 sts/30 rounds = 4 inches/10 cm in stockinette stitch on smaller needles, in Stone Washed/River Washed
26 sts/22 rounds = 4 inches/10 cm in linen stitch worked in the round, on larger needles, in Softfun and Stone Washed/River Washed
Note: The blanket was designed to use as much of each 10g mini-skein from the Stone Washed/River Washed Colour Pack as possible in each full hexagon - leaving a tail of less than 36 in / 91 cm. Gauge is critical to achieving this!
PATTERN NOTES
[Knitty's list of standard abbreviations and techniques can be found here.]
Construction method: This blanket is made of hexagons, knit in the round from the center out, with a stockinette center and a linen-stitch outside; half-hexagons knit flat from the center out with a stockinette center and linen-stitch outside; and hexagon-edges knit flat from the long side, using linen-stitch short rows to build the triangle shape. The components are seamed together and then stitches are picked up along each side for a garter-stitch border, and finished with a picot bind-off.
Techniques:
- LLIP (Purled lifted increase to left): Insert left needle from front to back under the left leg of the stitch two rows below the first stitch on the right needle, lifting this loop onto the left needle, then purl into this loop.
- RLIP (Purled lifted increase to right): Purl into the top of the stitch below the first stitch on the left needle, leaving the first stitch on the left needle.
- Pinhole Cast-on / Emily Ocker's Cast-on: photo tutorial and video tutorial
Note: This cast-on method ensures that the centers of the Hexagon and Half-Hexagon components match. If you prefer, you can use any alternative cast-on for the Hexagon, joining to work in the round, and any alternate cast-on for the Half-Hexagon, turning to work the first wrong-side row flat. - Crochet Cast-on: photo tutorial
- Linen Stitch (worked over an odd number of stitches, in the round):
Round 1: *K1, slp wyif; rep from * to last st, k1.
Round 2: *Slp wyif, k1; rep from * to last st, slp wyif. - Linen Stitch (worked over an odd number of stitches, worked flat):
Row 1: *K1, slp wyif; rep from * to last st, k1.
Row 2: *Slp wyib, p1; rep from * to last st, slp wyib. - Picking up stitches along a garter-stitch vertical edge: video tutorial
- C2B: Slip 1 st onto cable needle, and hold in back, remove marker, k1, replace marker, k1 from cable needle
- 2-stitch picot bind-off: photo tutorial
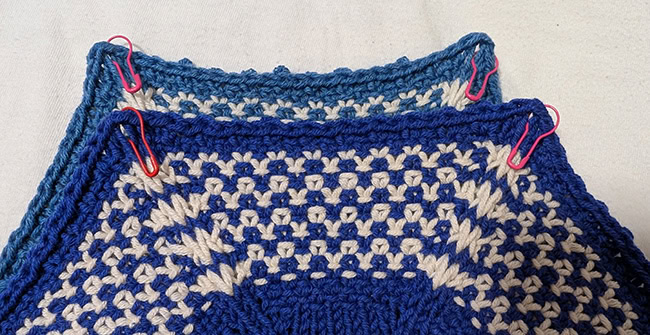
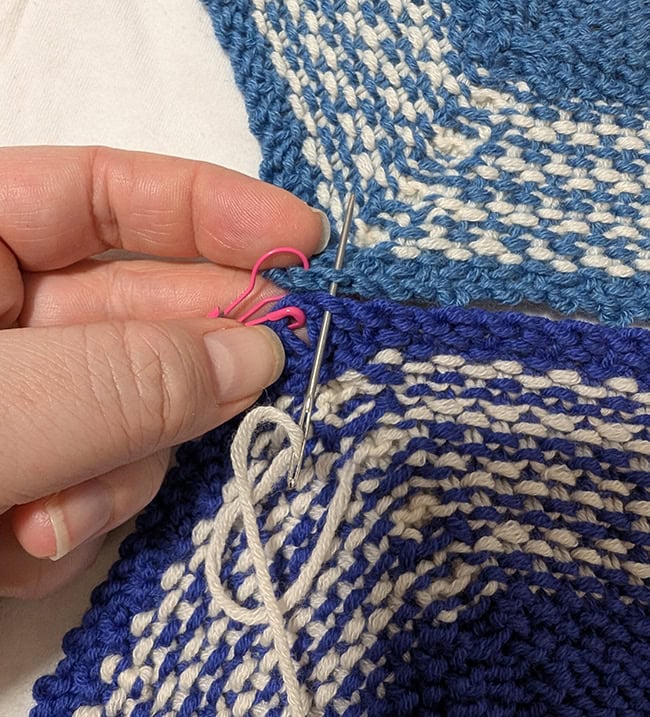
- Whip-Stitch Seams:
Single Edge
This is used to seam two hexagons together along a single edge
Step 1: Place removable stitch markers in the final ktbl on the corners of each edge. These are easier to place looking at the right-side of each component.
Step 2: Then, flip each component over so the wrong side is facing, and align the stitch markers at the beginning and end of each edge to be seamed.
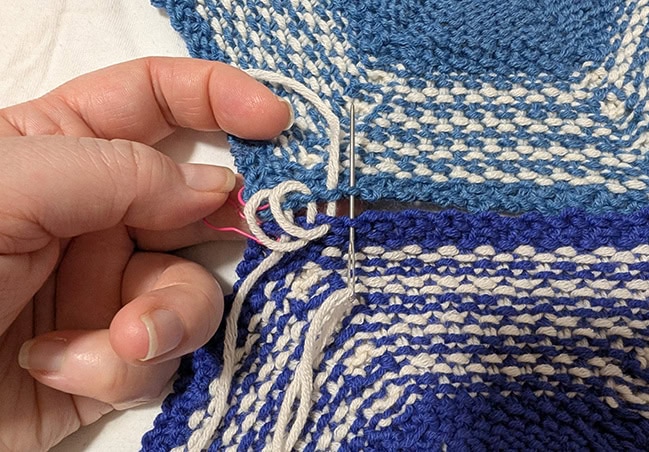
Step 3: Using a darning needle and a 20 in/50cm length of yarn, pull needle through the first purl bumps next to the marked stitches on the left side, from bottom to top. Leave a 6 in/ 15 cm tail to secure later
Step 4: Then, pass the needle through the next set of purl bumps, from bottom to top
Step 5: Repeat until all 23 sets of purl bumps have been sewn together, working left to right across the seam. Secure ends of yarn.
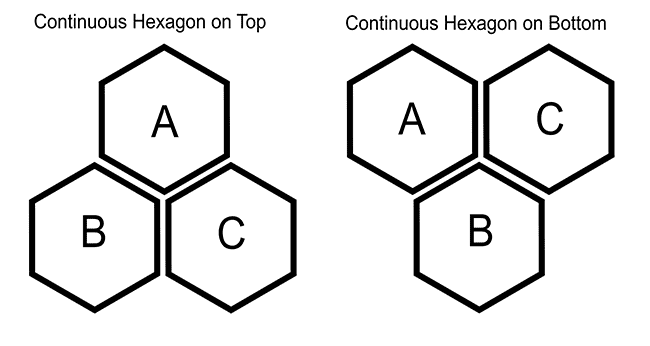
Multiple Edges
This is used to seam two strips of hexagons together, along a line that looks like a zigzag.
Step 1: Place removable stitch markers in the final ktbl at the ends of each strip. These are easier to place looking at the right-side of each component.
Steps 2-5 are worked as for the Single Edge above, before working the yarn through purl bumps on all three hexagons to transition from the seam between A and B to either A and C (if the continuous hexagon is on top) or A and B (if the continuous hexagon is on the bottom)
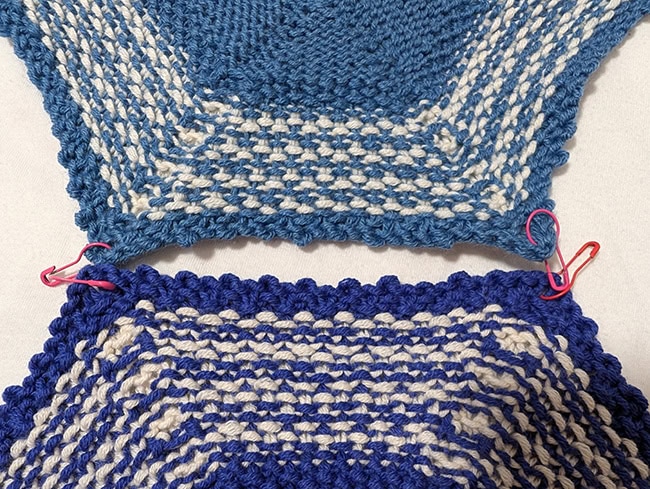
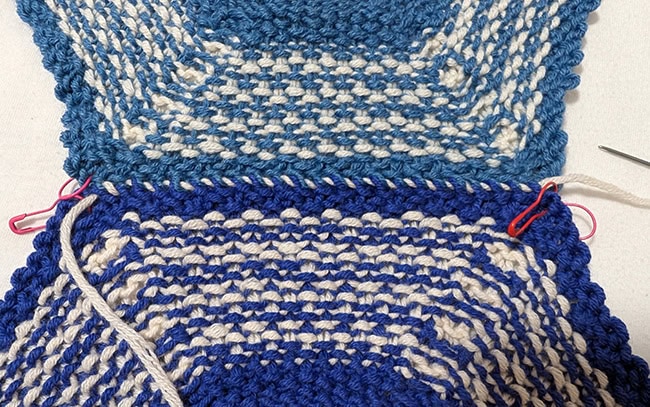
Optional: if desired, you can secure the yarn at the beginning and edge of each section of the seam by passing the yarn through the final set of purl bumps three additional times, making each additional loop to the left of the previous, then passing the needle from left to right through all three loops.
Step 6: The next purl bumps on the hexagons should be the ktbls at each corner. If the continuous hexagon is on top, work as follows: pass the yarn through the bumps on B and A, working from bottom to top; pass the yarn through the bumps on B and C, working from right to left; pass the yarn through A and B, working from top to bottom; and finally pass the yarn through C and A, working from bottom to top. If the continuous hexagon is on the bottom, work as follows: pass the yarn through the bumps on B and A, working from bottom to top; pass the yarn through the bumps on B and C, working from right to left; then pass the yarn through the bumps on C and A, working from right to left; and finally pass the yarn through the bumps on B and A, working from bottom to top. The yarn should now be ready to work the next seam segment in the strip.
Then repeat Steps 3-6, beginning from the purl bumps to the right of the final loop made in Step 6; alternating between "on top" and "on bottom" instructions, until the final seam in the strip has been worked.
- Short-row Wedge: After picking up stitches, Rows 1-18 are garter-stitch short rows that are used to created a wedge to square the top-left corner of the blanket, before working the remaining rows of the top border.
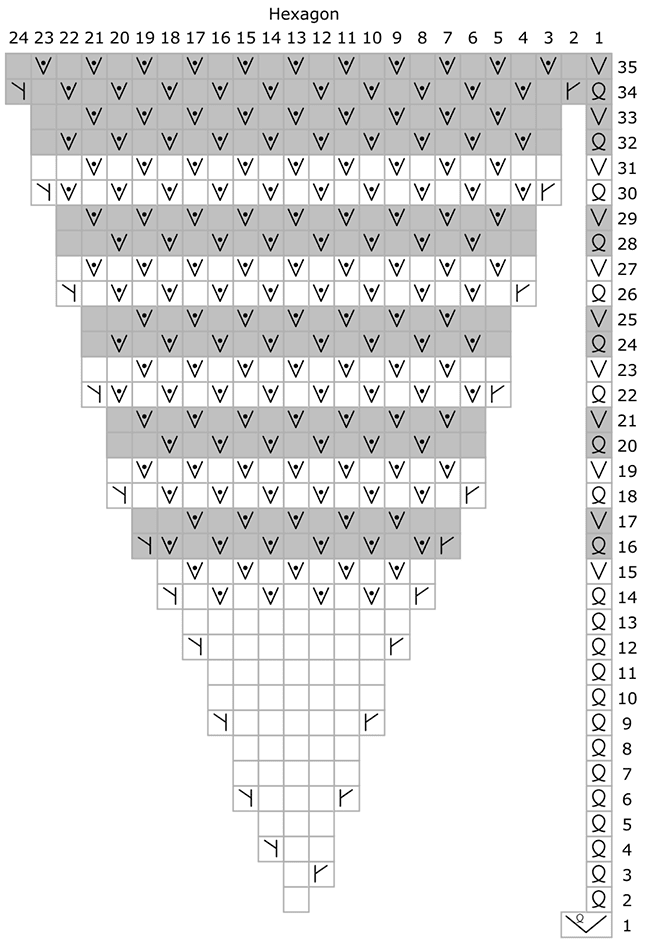
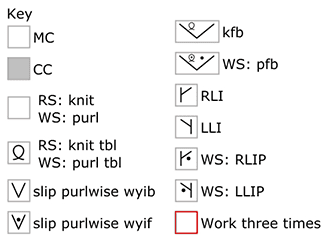
CHARTS
DIRECTIONS
Hexagon (Make 40, for a blanket matching the size of the pattern sample, using one 10g mini-skein for each hexagon
)
With MC and US #4/3.5mm needles, for small-circumference in the round, cast on 6 stitches using Emily Ocker's Cast On and join to work in round.
Work from chart or written instructions as you prefer.
Round 1: [Kfb] 6 times. 12 sts.
Note: If using stitch markers to divide up the 6 wedges, place them after the k1 in Round 2.
Round 2: [K1 tbl, k1] 6 times.
Round 3: [K1 tbl, RLI, k1] 6 times. 18 sts.
Round 4: [K1 tbl, k2, LLI] 6 times. 24 sts.
Round 5: [K1 tbl, k3] 6 times.
Round 6: [K1 tbl, RLI, k3, LLI] 6 times. 36 sts.
Rounds 7-8: [K1 tbl, k5] 6 times.
Round 9: [K1 tbl, RLI, k5, LLI] 6 times. 48 sts.
Rounds 10-11: [K1 tbl, k7] 6 times.
Round 12: [K1 tbl, RLI, k7, LLI] 6 times. 60 sts.
Round 13: [K1 tbl, k9] 6 times.
Switch to #8/5mm needles, for small-circumference in the round. As you work the following rounds, change to a 16-inch circular if your work gets too large for your small circumference method.
Round 14: [K1 tbl, RLI, (k1, slp wyif) 4 times, k1, LLI] 6 times. 72 sts.
Round 15: [Slp wyib, k1, [slp wyif, k1] 5 times] 6 times.
Join CC, alternating CC and MC every two rounds until Round 32.
Round 16 [CC]: [K1 tbl, RLI, (slp wyif, k1) 5 times, slp wyif, LLI] 6 times. 84 sts.
Round 17 [CC]: [Slp wyib, k1, (k1, slp wyif) 5 times, k2] 6 times.
Round 18 [MC]: [K1 tbl, RLI, k1, (slp wyif, k1) 6 times, LLI] 6 times. 96 sts.
Round 19 [MC]: [Slp wyib, (k1, slp wyif) 7 times, k1] 6 times.
Round 20 [CC]: [K1 tbl, k1, (k1, slp wyif) 6 times, k2] 6 times.
Round 21 [CC]: [Slp wyib, k1, (slp wyif, k1) 7 times] 6 times.
Round 22 [MC]: [K1 tbl, RLI, (slp wyif, k1) 7 times, slp wyif, LLI] 6 times. 108 sts.
Round 23 [MC]: [Slp wyib, k1, (k1, slp wyif) 7 times, k2] 6 times.
Round 24 [CC]: [K1 tbl, k1, (slp wyif, k1) 8 times] 6 times.
Round 25 [CC]: [Slp wyib, k1, (k1, slp wyif) 7 times, k2] 6 times.
Round 26 [MC]: [K1 tbl, RLI, (k1, slp wyif) 8 times, k1, LLI] 6 times. 120 sts.
Round 27 [MC]: [Slp wyib, k1, (slp wyif, k1) 9 times] 6 times.
Round 28 [CC]: [K1 tbl, k1, (k1, slp wyif) 8 times, k2] 6 times.
Round 29 [CC]: [Slp wyib, k1, (slp wyif, k1) 9 times] 6 times.
Round 30 [MC]: [K1 tbl, RLI, (slp wyif, k1) 9 times, slp wyif, LLI] 6 times. 132 sts.
Round 31 [MC]: [Slp wyib, k1, (k1, slp wyif) 9 times, k2] 6 times.
Break MC, all remaining rounds and bind-off are worked in CC
Round 32: [K1 tbl, k1, (slp wyif, k1) 10 times] 6 times.
Round 33: [Slp wyib, (slp wyif, k1) 10 times, k1] 6 times.
Round 34: [K1 tbl, RLI, (k1, slp wyif) 10 times, k1, LLI] 6 times. 144 sts.
Round 35: [Slp wyib, k1, (slp wyif, k1) 11 times] 6 times.
Bind off as follows: *K1 tbl, k1, lift first stitch worked over second to bind off, and continue binding off as normal to marker; repeat from * to end.
Half-Hexagon
The Half-Hexagons are knit flat, beginning with the same cast on as the hexagons. Make 8, for a blanket the same size as the pattern sample; making two Half-Hexagons from each 10 g mini-skein
With MC and US #4/3.5mm needles for working flat, cast on 4 stitches using Emily Ocker's Cast On (to match Hexagon), or alternative cast on if preferred, but do not join. Turn work, beginning with a WS row.
Work from chart or written instructions as you prefer.
Row 1 [WS, MC]: [Pfb] 3 times, p1 tbl. 7 sts.
Row 2 [RS]: Sl wyib, [k1, k1 tbl] 3 times.
Row 3: [Slp wyif, p1, LLIP] 3 times, p1 tbl. 10 sts.
Row 4: Sl wyib, [k2, LLI, k1 tbl] 3 times. 13 sts.
Row 5: [Slp wyif, p3] 3 times, p1 tbl.
Row 6: Sl wyib, [RLI, k3, LLI, k1 tbl] 3 times. 19 sts.
Row 7: [Slp wyif, p5 3 times, p1 tbl.
Row 8: Sl wyib, [k5, k1 tbl] 3 times.
Row 9: [Slp wyif, RLIP, p5, LLIP] 3 times, p1 tbl. 25 sts.
Row 10: Sl wyib, [k7, k1 tbl] 3 times.
Row 11: [Slp wyif, p7] 3 times, p1 tbl.
Row 12: Sl wyib, [RLI, k7, LLI, k1 tbl] 3 times. 31 sts.
Row 13: [Slp wyif, p9] 3 times, p1 tbl.
Switch to #8/5mm needles for working flat.
Row 14: Sl wyib, [RLI, (k1, slp wyif) 4 times, k1, LLI, k1 tbl] 3 times. 37 sts.
Row 15: S [Slp wyif, p1, (slp wyib, p1) 5 times] 3 times, p1 tbl.
Join CC, leaving MC attached and alternating CC and MC every two rows until Row 32.
Row 16 [CC]: Sl wyib, [RLI, (slp wyif, k1) 5 times, slp wyif, LLI, k1 tbl] 3 times. 43 sts.
Row 17 [CC]: [Slp wyif, p1, (p1, slp wyib) 5 times, p2] 3 times, p1 tbl.
Row 18 [MC]: Sl wyib, [RLI, k1, (slp wyif, k1) 6 times, LLI, k1 tbl] 3 times. 49 sts.
Row 19 [MC]: [Slp wyif, (p1, slp wyib) 7 times, p1] 3 times, p1 tbl.
Row 20 [CC]: Sl wyib, [k1, (k1, slp wyif) 6 times, k2, k1 tbl] 3 times.
Row 21 [CC]: [Slp wyif, p1, (slp wyib, p1) 7 times] 3 times, p1 tbl.
Row 22 [MC]: Sl wyib, [RLI, (slp wyif, k1) 7 times, slp wyif, LLI, k1 tbl] 3 times. 55 sts.
Row 23 [MC]: [Slp wyif, p1, (p1, slp wyib) 7 times, p2] 3 times, p1 tbl.
Row 24 [CC]: Sl wyib, [k1, (slp wyif, k1) 8 times, k1 tbl] 3 times.
Row 25 [CC]: [Slp wyif, p1, (p1, slp wyib) 7 times, p2] 3 times, p1 tbl.
Row 26 [MC]: Sl wyib, [RLI, (k1, slp wyif) 8 times, k1, LLI, k1 tbl] 3 times. 61 sts.
Row 27 [MC]: [Slp wyif, p1, (slp wyib, p1) 9 times] 3 times, p1 tbl.
Row 28 [CC]: Sl wyib, [k1, (k1, slp wyif) 8 times, k2, k1 tbl] 3 times.
Row 29 [CC]: [Slp wyif, p1, (slp wyib, p1) 9 times] 3 times, p1 tbl.
Row 30 [MC]: Sl wyib, [RLI, (slp wyif, k1) 9 times, slp wyif, LLI, k1 tbl] 3 times. 67 sts.
Row 31 [MC]: [Slp wyif, p1, (p1, slp wyib) 9 times, p2] 3 times, p1 tbl.
Break MC, all remaining rows and bind-off are worked in CC
Row 32: Sl wyib, [k1, (slp wyif, k1) 10 times, k1 tbl] 3 times.
Row 33: [Slp wyif, p1, (p1, slp wyib) 9 times] 3 times, p1 tbl.
Row 34: Sl wyib, [RLI, (k1, slp wyif) 10 times, k1, LLI, k1 tbl] 3 times. 73 sts.
Row 35: [Slp wyif, p1, (slp wyib, p1) 11 times] 3 times, p1 tbl.
Bind off as follows: *K1 tbl, k1, lift first stitch worked over second to bind off, and continue binding off as normal to marker; repeat from * to end.
Hexagon-Edge
The Hexagon-Edges are knit flat, beginning with a crochet cast on. Make 10, for a blanket the same size as the pattern sample; making two Hexagon-Edges from each 10g mini-skein.
Wrap and turn short rows are used, but the wraps do not need to be picked up or worked; leave them as is. There is no chart for this section, because of the short rows.
With MC, your crochet hook and US #4/3.5mm needles for working flat, cast on 37 stitches using the crochet method. Begin working with #8/5mm needles for working flat.
Row 1 [WS, MC]: Sl wyif, p17, pm p19.
Note: Place a stitch marker on row 1 after the 18th stitch, to mark the center twisted stitch; on the right side, the stitch before the marker will always be a ktbl. On the wrong side, the stitch after the marker will always be worked as a slp wyif.
Row 2 [RS, MC]: Sl wyib, k17, RLI, k1 tbl, LLI, k1, w&t. 39 sts.
Row 3 [MC]: Slp wyib, p1, slp wyif, p1, slp wyib, w&t.
Join CC, alternating CC and MC every two rows, up to Row 16.
Row 4 [CC]: K2, k1 tbl, k2, slp wyif, k1, w&t.
Row 5 [CC]: [Slp wyib, p1] twice, slp wyif, [p1, slp wyib] twice, w&t.
Row 6 [MC]: [K1, slp wyif] twice, RLI, k1 tbl, LLI, [slp wyif, k1] 3 times, w&t. 41 sts.
Row 7 [MC]: [Slp wyib, p1] 3 times, p1, slp wyif, p1, [p1, slp wyib] 3 times, w&t.
Row 8 [CC]: [K1, slp wyif] 3 times, k1, k1 tbl, k1, [slp wyif, k1] 4 times, w&t.
Row 9 [CC]: [Slp wyib, p1] 4 times, p1, slp wyif, p1, [p1, slp wyib] 4 times, w&t.
Row 10 [MC]: [K1, slp wyif] 4 times, k1, RLI, k1 tbl, LLI, k1, [slp wyif, k1] 5 times, w&t. 43 sts.
Row 11 [MC]: [Slp wyib, p1] 6 times, slp wyif, [p1, slp wyib] 6 times, w&t.
Row 12 [CC]: [K1, slp wyif] 5 times, k2, k1 tbl, k2, [slp wyif, k1] 6 times, w&t.
Row 13 [CC]: [Slp wyib, p1] 7 times, slp wyif, [p1, slp wyib] 7 times, w&t.
Row 14 [MC]: [K1, slp wyif] 7 times, RLI, k1 tbl, LLI, [slp wyif, k1] 8 times, w&t. 45 sts.
Row 15 [MC]: [Slp wyib, p1] 8 times, p1, slp wyif, p1, [p1, slp wyib] 8 times, w&t.
Break MC, all remaining rows and bind-off are worked in CC
Row 16: [K1, slp wyif] 8 times, k1, k1 tbl, k1, [slp wyif, k1] 9 times, w&t.
Row 17: [Slp wyib, p1] 9 times, p1, slp wyif, p1, [p1, slp wyib] 9 times, w&t.
Row 18: [K1, slp wyif] 9 times, k1, RLI, k1 tbl, LLI, k1, [slp wyif, k1] 10 times, RLI, k1 tbl. 48 sts.
Row 19: Sl wyif, p1, [slp wyib, p1] 11 times, slp wyif, [p1, slp wyib] 11 times, RLIp, p1 tbl. 49 sts.
Bind off as follows: *K1 tbl, k1, lift first stitch worked over second to bind off, and continue binding off as normal to one stitch before marker; repeat from * to one stitch before end, k1tbl and bind off final stitch.
FINISHING
Blocking:
Wash the individual components.
To make assembly easier, you may choose to pin out (and steam, if required) the individual components, to bring them to a consistent size and shape.
Note: Guidelines may help you pin hexagons to a consistent size and shape and can be set up as follows:
- Step 1: Place tape close to top edge of blocking mat, parallel with top edge of mat
- Step 2: Using ruler, place a second line of tape parallel to the first, with the middle of the tape 3.75 in/9.5 cm from the top edge of the top tape line
- Step 3: Using ruler, place a third line of tape parallel to the first two, with the bottom edge of the tape 7.75 in/19.5 cm from the top edge of the top tape line
If blocking mats are large enough, a second set of guidelines may be placed below the first.
Pin each Hexagon at each of its six corners, with the top and bottom edges aligned to the tape guidelines, if using them.
If the majority of your yarn is synthetic, steam the pieces once they are pinned out, so that they hold their shape once dry.

Assembly:
Cut lengths of CC as follows:
- 40 20-in/50-cm lengths
- 7 120-in/305-cm lengths
- 2 lengths of 108 in /274 cm lengths
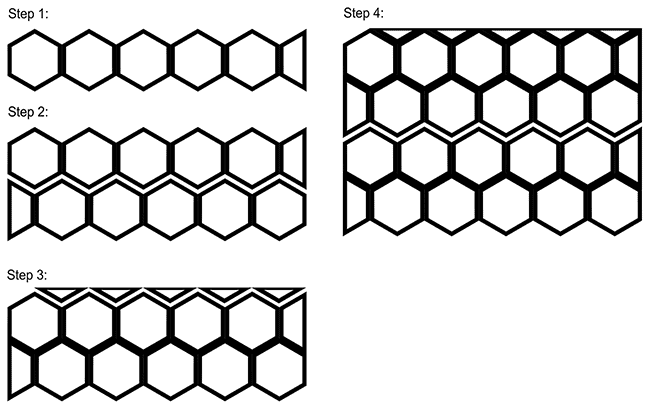
Use whip stitch to seam individual hexagons into strips, then strips into panels, as follows:
- Step 1:
Using the shortest lengths of yarn, make strips by seaming 5 Hexagons together along parallel sides, then adding one Half-Hexagon. You will have 8 total strips. - Step 2:
Using the 120 in/305 cm lengths of yarn, combine two strips by seaming together along long sides; with Half-Hexagons at opposite ends; you will have 4 total strips. - Step 3:
Using the 108 in/274 cm lengths of yarn, seam 5 Hexagon-Edges to the long edge of 2 strips made in Step 2, along the long side of each strip. You will have 2 strips with Hexagon-Edges, and 2 strips without. - Step 4:
Using the 120 in/305 cm length of yarn, seam 1 of the remaining strips from Step 2 together with a strip from Step 3, along the long side of the strip; you will have 2 panels. - Step 5:
Using the final 120 in/305 cm length of yarn, seam panels made in Step 4 together, along the long sides without the Hexagon-Edges.
Border
The border is knit in sections, beginning by picking up stitches from the top of the blanket and using short rows to square off the angled corner, knitting additional rows in garter stitch, then breaking the yarn and putting the live stitches on a stitch holder.
Stitches are then picked up along the bottom edge, working a second border identical to the top; then along the right side, then the left side, before working a two-stitch picot bind off. To minimize gaps between components, markers are placed during pick up between each component, and a 2-stitch cable is worked between the edge stitches on the first wrong-side row.
Top Border
With right-side facing and the angled corner on the left (corner A1 on schematic), using US #4/3.5mm needles for working flat and CC, pick up and knit 37 stitches along the long side of each Hexagon-Edge, placing a marker after the final stitch of each Hexagon-Edge; then 24 stitches along the angled corner of a Hexagon.
Pick up under both legs of the crochet cast on on the Hexagon-Edges, and under both legs of the bound—off stitches on the Hexagon.

The total stitch count will be a multiple of 37 plus 24; for a blanket with five Hexagon-Edges along each short edge, there will be 209 stitches total. Stitch counts are provided based on this size.
Short-row wedge [see Pattern Notes]
Row 1 [WS]: K1, k2tog, k18, ssk, k1, w&t. 207 sts
Row 2 [RS]: K22.
Row 3: K20, w&t.
Row 4: K20
Row 5: K1, k2tog, k15, w&t. 206 sts.
Row 6: K17
Row 7: K15, w&t.
Row 8: K15
Row 9: K1, k2tog, k10, w&t. 205 sts.
Row 10: K12
Row 11: K10, w&t.
Row 12: K10
Row 13: K1, k2tog, k5, w&t. 204 sts
Row 14: K7
Row 15: K5, w&t.
Row 16: K5
Row 17: K1, k2tog, w&t. 203 sts
Row 18: K2
Row 19 [WS]: K to 1 stitch before marker, C2B, *knit to 1 stitch before marker, remove marker and C2B; repeat from * until after last marker is removed, k to end. Wraps are should be picked up and worked with the wrapped stitch.
Knit 30 rows.
Break yarn, and put stitches on waste yarn or stitch holder
Bottom Border
Work as for Top Border.
Right-Side Border
With right-side facing, beginning at the bottom-right corner of the blanket, using US #4/3.5mm needles for working flat and CC, pick up and knit 25 stitches from the first short-side border, picking up one stitch from each garter ridge and placing a marker; pick up and knit 40 stitches along each Half-Hexagon, picking up under both stitches from the slip-stitch edge and placing a marker; then pick up and knit 25 stitches along each Hexagon, picking up from both legs of the bound-off stitches and placing a marker; then 2 stitches from the edge of the Hexagon-Edge, placing a marker; and then finally 16 stitches from the other short-side border, picking up one stitch from each garter ridge.
The total stitch count will be 25 from the first short-side border and short-row wedge plus a multiple of 40 stitches for each Half-Hexagon, plus a multiple of 25 stitches for each Hexagon; plus 2 stitches for the Hexagon-edge plus 16 stitches from the second short-side border. For a blanket with four Hexagons and four Half-Hexagons along each long side, the total stitch count will be 303 stitches.
Row 1 [WS]: K to 1 stitch before marker, removing marker, C2B, removing marker,*C2B, k1, [kfb, k4] 7 times, kfb, k1, C2B removing marker, k to 1 stitch before marker, removing marker; repeat from * until final marker is removed, C2B, knit to end.
Knit 30 rows, ending on a WS row.
Break yarn, and put stitches on waste yarn or stitch holder.
Left-Side Border
Work as for Right-Side Border 1, but do NOT break yarn after final WS row.
Bind-off
Begin 2-stitch picot bind-off as follows, with right side facing:
*Cast on 2 sts using cable-cast on, bind off 4 stitches then slip remaining stitch on right-handle needle back onto the left hand needle; and repeat from * until a single stitch remains on the right-hand needle.
Turn blanket 90 degrees clockwise so Bottom Border is at top of work. Using left-hand needle, pick up but do not work 16 stitches from edge of Right-Side Border, then return all held stitches from Bottom Border onto left needle – to the right of the Right-Side Border stitches – then pick up but do not knit 16 stitches from the edge of Left-Side Border. The picked-up stitches from the Right- and Left-Side borders should be the bread in a held-stitch sandwich. If you're looking at your work with RS facing, the Right-Side Border stitches are to the far left end of the left needle, and the Left-Side Border stitches are to the far right (near the tip) end of the left needle.
Resume 2-stitch picot bind-off until a single stitch remains on the right-hand needle.
Turn blanket 90 degrees clockwise so Right-Side Border is at top. Return all held stitches of the Right-Side Border to the left needle, and resume 2-stitch picot bind-off until a single stitch remains on the right-hand needle.
Turn blanket 90 degrees clockwise so Top Border is at the top. Using left-hand needle, pick up but do not work 16 stitches from edge of Left-Side Border, then return all held stitches from Top Border onto needle, then pick up but do not knit 16 stitches from the edge of Right-Side Border.
Resume 2-stitch picot bind-off until a single stitch remains on the right-hand needle. Break yarn and pull through last stitch.
Weave in all ends. Wash and dry according to care instructions for yarn used.
ABOUT THE DESIGNER
 When she's not knitting, or thinking about knitting, or tossing her stash to find that yarn she knows she has, Kate is a product manager for a company in the construction industry.
Pattern & images © 2025 Kate Schimmer