


Yellow Brick Cowl, a free knitting pattern from Knitty.com.
INTRODUCTION
Yellow Brick Cowl
 by Simone Bechtold

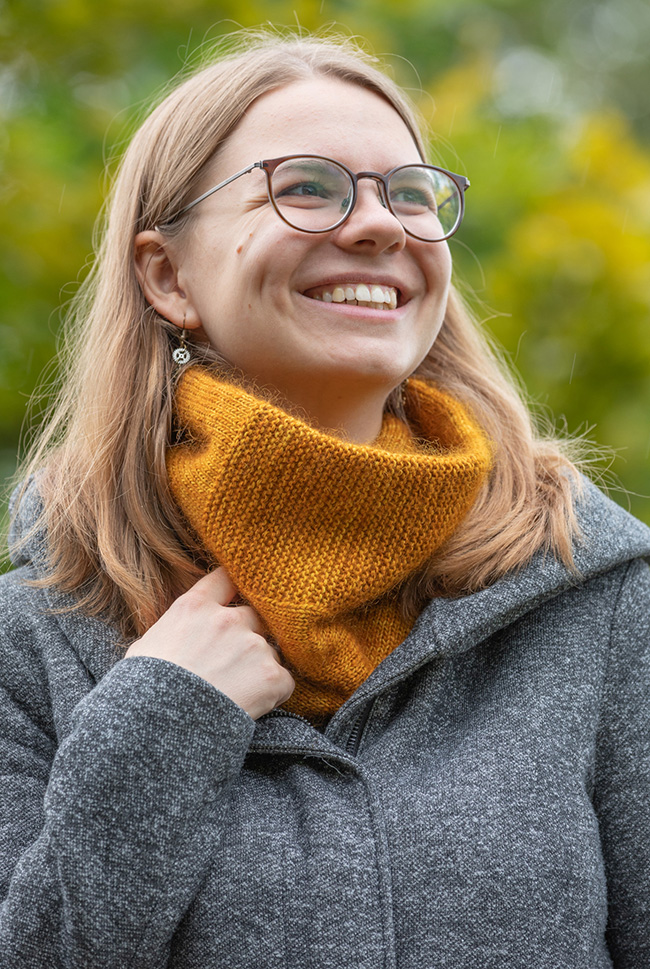
Garter stitch and stockinette have different row gauges. Some of us learned that the hard way (I certainly did) or try to block it out (with varying success), but who says it must be a bad thing? Used on purpose, different gauges can help to shape your knitting without any increases or decreases. The Yellow Brick Cowl utilizes this to make the top part of the cowl narrower than the bottom, resulting in a toasty neck without strangling you.
The cowl is worked holding two strands of yarn together: one strand of sock yarn and one strand of a fine silk/mohair blend. Use two similar colorways for a blended effect as shown in the sample or two different colors for a marled look.
Gradients or colorful sock yarn leftovers combined with a single color of silk/mohair yarn would look great, too.
 model: Patricia Schiewald
photos: Sebastian Worm


SIZE
One
FINISHED MEASUREMENTS
Circumference: 25.25 inches/64 cm at the bottom, 22.75 inches/58 cm at the top
Length: 8.25 inches/21 cm
MATERIALS
Yarn
![]() [MC1] Frida Fuchs Steppke Single [100 % wool; 400 yd/ 366 m per 100 g skein]; color: Kurkuma; 1 skein
[MC1] Frida Fuchs Steppke Single [100 % wool; 400 yd/ 366 m per 100 g skein]; color: Kurkuma; 1 skein
![]() [MC2] Frida Fuchs Fiffi Lace [72 % Mohair, 28 % silk; 459 yd/ 420 m per 50 g skein]; color: Curry; 1 skein
[MC2] Frida Fuchs Fiffi Lace [72 % Mohair, 28 % silk; 459 yd/ 420 m per 50 g skein]; color: Curry; 1 skein
Note: Both yarns are held together.
Yarn Characteristics
![]() The sample shown uses a single-ply merino sock yarn held together with a silk/mohair blend in lace weight. Any sock yarn with a high wool content that gives you the right gauge will work, but make sure it is soft enough for wear on your neck. Most silk/mohair lace yarns have around 60-75% mohair and 25-40% silk. Any of those will work as long as the yardage is similar, choose one with the right amount of fluff for you.
The sample shown uses a single-ply merino sock yarn held together with a silk/mohair blend in lace weight. Any sock yarn with a high wool content that gives you the right gauge will work, but make sure it is soft enough for wear on your neck. Most silk/mohair lace yarns have around 60-75% mohair and 25-40% silk. Any of those will work as long as the yardage is similar, choose one with the right amount of fluff for you.
Recommended needle size
[always use a needle size that gives you the gauge listed below - every knitter's gauge is unique]
![]() US #2.5/3 mm circular needle, up to 16 inches/40 cm long OR at least 32 inches/80 cm long to use with magic loop. Alternatively, a set of US #2.5/3 mm DPNs with a length of at least 8 inches/20 cm.
US #2.5/3 mm circular needle, up to 16 inches/40 cm long OR at least 32 inches/80 cm long to use with magic loop. Alternatively, a set of US #2.5/3 mm DPNs with a length of at least 8 inches/20 cm.
Notions
![]() spare US #2.5/3 mm (or similar, up to one size larger or smaller is fine) circular needle, at least 16 inches/40 cm long, OR a spare set of US #2.5/3 mm (or similar) DPNs with a length of at least 8 inches/20 cm (only used for Three-Needle bind off or grafting)
spare US #2.5/3 mm (or similar, up to one size larger or smaller is fine) circular needle, at least 16 inches/40 cm long, OR a spare set of US #2.5/3 mm (or similar) DPNs with a length of at least 8 inches/20 cm (only used for Three-Needle bind off or grafting)
![]() US #2.5/3 mm (or similar) crochet hook for provisional cast on, if using a crochet method
US #2.5/3 mm (or similar) crochet hook for provisional cast on, if using a crochet method
![]() smooth scrap yarn for provisional cast on
smooth scrap yarn for provisional cast on
![]() 3 stitch markers
3 stitch markers
![]() yarn needle
yarn needle
GAUGE
24 sts/32 rounds = 4 inches/10 cm in stockinette stitch with both yarns held together.
PATTERN NOTES
[Knitty's list of standard abbreviations and techniques can be found here.]
Construction method:
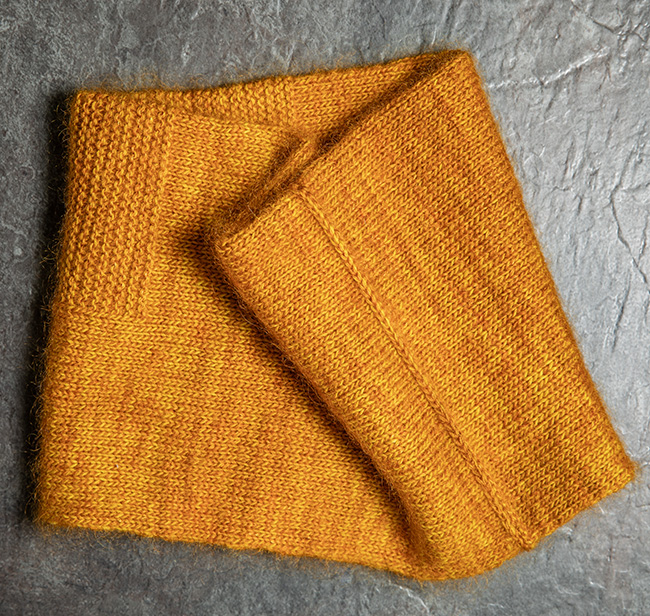
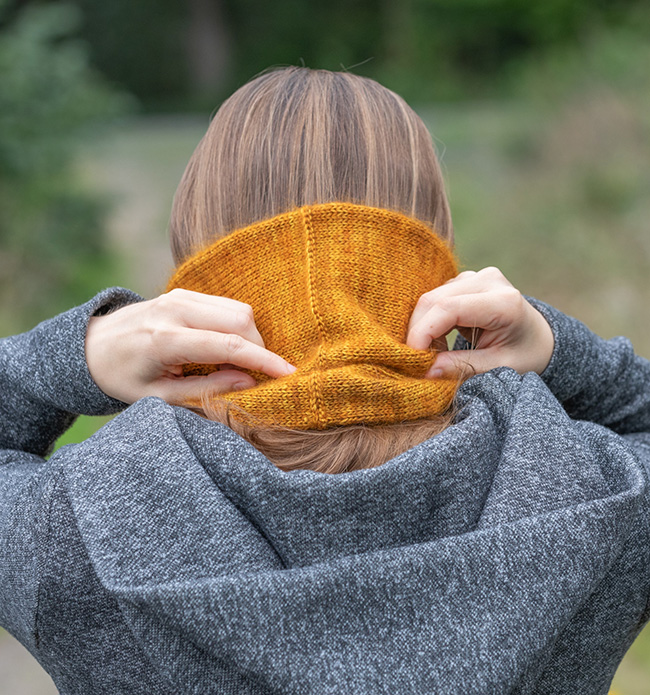
The cowl starts with a provisional cast on. Then you work a long tube in the round. Finally, the live stitches and the stitches from the cast on are bound off together using the Three-Needle Bind Off for a pronounced seam at the back of the cowl (as shown in the sample) or grafted (for a seamless look).
The cowl is joined with a three-needle bind off. This gives a pronounced seam. If you prefer a seamless look, graft the two ends of the cowl together. This is most easily done by only using the sock yarn for grafting, and then working a duplicate stitch in the silk/mohair yarn over the grafted seam.
Techniques:
DIRECTIONS

Using a provisional method and waste yarn, CO 100 sts.
Place marker, and holding MC1 and MC2 together, join for working in the round.
Note: Both yarns will be held together for the remainder of the project.
Work in stockinette stitch (k every st) for 70 rounds or about 8.25 inches/21 cm.
Next round, place markers: K25, place marker, p50, place marker, k to end of round.
Pattern round 1: Knit.
Pattern round 2: K to first marker, p to second marker, k to end of round.
Repeat the last two rounds another 33 times, until you have 35 garter ridges.
Work in stockinette stitch (k every st) for 70 rounds or the same length as the first stockinette part (i.e., 8.25 inches/21 cm).
Remove the two markers you placed to indicate the start and end of the garter section. Leave the working yarns attached.
Weave in any ends inside the tube, including the yarn ends from the provisional cast on.
Remove the waste yarn and return the sts from the provisional cast-on onto the spare circular needle or DPNs.
Join the two live edges using a three-needle bind off with right sides out/wrong sides facing each other.
FINISHING
Weave in any remaining ends. Soak the cowl in lukewarm water with a mild detergent or shampoo. Rinse with lukewarm water and blot it with a towel until most of the moisture is gone. Lay the cowl out on a dry towel, shaping it gently, and let dry. Do not overstretch the garter stitch section, as it should pucker a bit. Leave to dry (turn it after half a day so the other side dries nicely). The cowl is narrower on the side with the garter stitch; wear this at the top. If the mohair deflated a bit during the drying process, gently shake the cowl or use a soft bristled brush to fluff it up again.
ABOUT THE DESIGNER
 Simone holds an M.A. in Celtic Studies and works as a copy editor of IT books. She finds the similarities of computer code to handwritten manuscripts from the 9th century rather amusing. Cat content really transcends the ages (check out Pangur Bán!).
She is a true process knitter who thrives on learning new techniques. A day of figuring out a complicated thing is a day well spent. Her personal style is rather simple and straightforward, which has led to more than one super intricate lace shawl in her wardrobe that she'll probably never wear (but oh how fun it was to knit them!).
Find her on Ravelry or Instagram.
Pattern & images © 2023 Simone Bechtold